Wet felting wool toys for beginners. Felting from wool: instructions for beginners. Funny monkey made of felt
Dry felting captivates so much that you want to create again and again. Familiarize yourself with the intricacies of this needlework and step by step master class with step by step photos.
Felting needles and auxiliary tools
If you decide to do this interesting needlework, you will need special tools. You can buy them at craft stores. First of all, it's needles.

Unlike ordinary sewing, these do not have an eye, and the opposite end to the sharp end is blunt and bent up. The longest needle for felting does not exceed 13 cm. Each has its own number and is designed for a certain type of felting.
So, with the help of needles No. 32–No. 36, initial work. They help to shape the piece of wool, but after such a tool, large punctures remain on the product. Needle No. 38 will help to remove them and compact the workpiece. It is also used to finish the product. To polish the decoration, a toy made using the dry felting technique, a more elegant needle number 40 is used. It will also help to decorate the product finally.
Needles for felting can be of different sections:
- triangular;
- crowned;
- reverse;
- stellate.
Star-shaped needles are used to polish toys and jewelry. If you need to attach decorative elements to the main product without deforming them, then they work with a crown needle.
If it is necessary that the product has several shades, then needles for felting of the reverse section are used. This form helps to get a bundle of wool from an already formed blank - from the inner parts of the base.
When you start dry felting toys, you will need a thick foam sponge, a brush or a special mat for this type of needlework. These soft helpers are needed in order not to break the needle, since if you put the workpiece on a hard surface, stick a game into it, then the tip of that needle may break. And if you hold the product in your hand and act in this way, you can get hurt by pricking.
In addition to some of these soft materials, you can purchase a special needle holder, which is made of wood or plastic and has several holes for felting needles to be inserted into. Thanks to him, the needlework process is accelerated at times, and it is convenient to work with such a tool.

Dry felting from wool is carried out as follows:
- Take a ball of wool right size, placed on a brush, mat or sponge.
- The needle makes a lot of piercing movements so that it sticks deep into, captures the fibers and gets them out. Do this until the workpiece acquires the desired shape and density.
- Further, other felting needles are used to attach the details of the product.
- In the end, finishing work is carried out.
The subtleties of wool and how to achieve the desired shades when felting?

In order to make toys, felt boots, using the felting technique, sheep wool is used. It is relatively inexpensive. But New Zealand and Australian merino wool is more expensive.
If you come across felting wool that says "bleached", use it as a light tone of the product or base, which you will cover on top with fibers of a different or other shades. But if you want to paint the whitewash at home, you can do it. It will be enough to buy a dye for wool and follow the instructions.
If you need a filler for a toy, on top of which you will attach fibers of the desired color, then purchase a sliver. This is undyed wool, which is the cheapest.
To stuff toys, you can buy tow. If you come across such material, it consists of short hairs that are left after combing the wool.
If the source material of the desired shade is not on sale, make it yourself. To do this, you need to mix the wool of two or more colors. If you want to do this at the very beginning of work, then tear off a lump from the wool of the desired color, lightly attach it with a needle. Then wrap with several fibers of wool of a different shade and take a reverse needle. With it, you will get the villi of wool inside and fluff the top layer a little.
In the process of work, you can put wool fibers of other colors on top to get the desired shades.
If, for example, you want to make a tiger, then to create its stripes, attach black wool fibers to the yellow base, rolling them parallel to each other.
We make a doll with our own hands
Once you know what to use for felting needles, wool, auxiliary tools, it's time to put the theory into practice! Felting will help create soft toys.
If this is your first work, wool felting for beginners is best done by making a simple but effective doll, for example, like this.

Its basis is a wire frame. Thanks to him, it will be possible to bend her arms and legs and give the desired position. Prepare for work:
- chenille wire 22 cm long;
- wool;
- sponge or brush;
- needles for felting: triangular section No. 38 and No. 40, star-shaped No. 40.
We begin to give the toy volume. Wind strands of light wool on the frame and attach them with a needle. In place of the body, the hands of the wool should go a little more. Now tear off a lump of the same light wool, turn it with a needle into a rather tight ball, but lower part leave it as it was at the beginning. This strand will become the neck, roll it to the upper body. If this neck part is not large enough, add some more wool and compact it with a felting needle.
Now it's time to dress up this ballerina doll. Lay pink wool fibers on her upper part torso, attaching them with a needle No. 40. For a skirt, we place strands of wool from top to bottom, attaching them in the waist area. Then trim the hem with scissors. It remains to do a hairstyle, shoes, and rejoice, looking at what beautiful doll helped create the felting technique and your skillful hands.
Felting a monster from wool master class
Next, it will be presented detailed description with step by step photos. They will help you make a toy with your own hands. Then you will be able to invent and develop sketches of fairy-tale, cartoon characters, animals, animals, people and make them using the needle felting technique.

Such interesting toy you will succeed, of course, it may differ in color and size. Here is what is proposed to use for needlework:
- unspun wool of the main and auxiliary colors;
- felting needles numbered: 36, 38, 40;
- sponge or foam rubber;
- for tinting - pastel crayons and a brush;
- paper;
- two beads for the eyes;
- colour pencils.

Here is what felting from the wool of a monster toy consists of:
Draw a sketch of the future product on paper to determine what it consists of, since usually the parts are rolled separately and then connected. Here - the torso and head are a single whole, and the arms, legs and decor elements are made and attached separately.

Tear off a lump from the main wool, separate it with your hands in different directions, so that a fluffy homogeneous mass is formed from the fibers.

The ball of wool should be much larger than the final blank, since in the process of felting it will become several times smaller.
Take a thick needle No. 36, start felting the wool with it, in order to first form it into a round lump, at the same time making the workpiece quite dense, without voids. Then use your fingers to shape it into a pear shape so that the thickening is at the bottom.
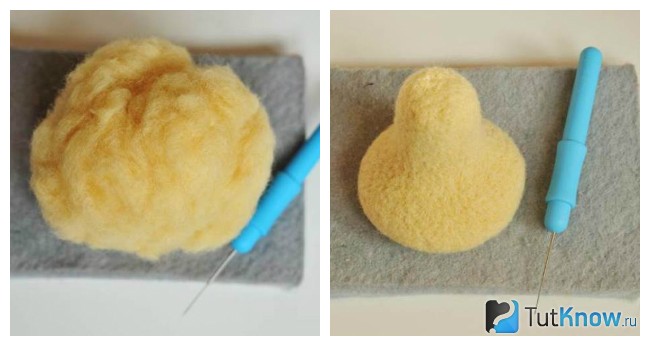
If you need to add a little wool, roll it with a thick needle.

Take a needle number 38, with punctures, give the surface of the monster's body an even shape, grinding it with this tool.

We continue to study with an example how step-by-step felting is done. Now we have to make the paws of the toy. For the first, also tear off a piece of wool. Give it a “sausage” shape with your hands, and make it wider at the bottom, as there will be palms or feet. Now form the workpiece first with a thick one, and then with a thinner needle.

It's time to mark the fingers of the toy with a thin needle. Work them out with a thin needle with a cross section. In the same way, decorate the fingers on the remaining second paired foot.
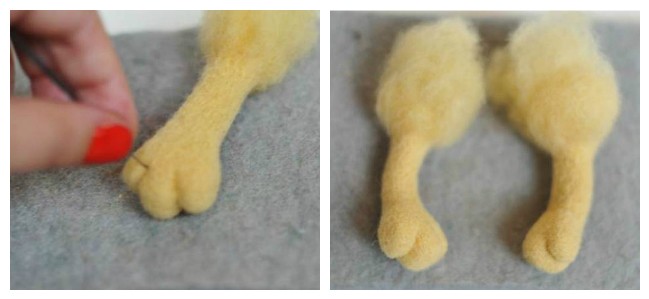
Then craft the 2 remaining paws

As you can see, from the side opposite to the fingers, we do not roll the wool yet. Such fluffy is needed in order to connect them to the body.
Attach each foot in its place, attach to the body with a thick needle, straightening the fibers well, then sand the surface with a thin one. If the junction of the parts is too visible, it was not possible to do it carefully, this is fixable. Put some wool here, felt it with a size 36 needle, and then work this area with a size 38 needle.

Now we begin to create the facial features of the toy. Take 2 small white pieces of wool, knit a loose ball from each with a No. 36 needle, then attach these whites to your face using a No. 38 needle.

In the same way, attach green balls of wool to these proteins, glue each bead to them - these will be the pupils.

Make an original hairstyle from colored wool, attach it to your head with a needle or glue. In the latter case, you need to immediately do everything as planned. After all, then this area will no longer be possible to work out with a needle.

The mouth can be embroidered with black thread, and you can also draw shades of the face with crayons to make it even more interesting. You can crumble them and apply with a brush or use colored pencils. Felting toys is a creative process, decorate them as you wish and enjoy the results!

Such man-made souvenirs can be given to friends, or a pleasant hobby can be turned into a source of additional income. After all, few people still work in this technique. To make you love felting from wool even more, videos of creating toys will help you. Watch the stories and choose the product you want to create right now!
How to make a northern bear using the dry felting technique, see this video:
By felting wool.
Felting or felting - interesting technique needlework, gaining momentum. Using the technique of dry felting, you can create unusual figurines, souvenirs, jewelry, decor items and accessories. Felting is an original mixture of sculpture and needlework, which allows the master's creative imagination to be revealed to the maximum.
(Master Christina Mayorova)
Needle felting tools
Let's take a look at what we need for dry felting for beginners.
- Needles

For dry felting, you will need special serif needles. Since when such a needle is stuck into wool, pieces of wool fibers are caught on serifs and tangled with each other. For various kinds stalling and work stages there are several different needles:
According to the cross-sectional shape of the needle, there are triangular, three-beam and four-beam (asterisks)

If you notice, then on each edge of the felting needle blade there are special serifs, and thus, the more edges, the more serifs, and the faster the felting process. It is worth adding that the accuracy of the holes left by it depends on the cross section of the needle.
In the direction of serifs, there are straight and reverse felting needles

Needles for felting forward push the fiber into the product, and reverse needles pull the wool fiber out of the product, this serves to make the product from felting and correct it.
Also felting needles differ in numbers. For example, the higher the needle number, the thinner it is. So felting needles numbered 30,32,36 are coarse, these needles are used at the initial stage of felting. Thick felting needles have a thicker blade, due to which they cover a slightly larger area, and pull the wool fibers deeper into the product faster, thereby dumping a dense felting base faster, but they leave behind distinct, large puncture marks, which on finished product are not allowed. Therefore, in order to avoid traces of punctures during felting, thin needles numbered 38 - 42 are used. Also, for finishing grinding the product, you need to use asterisk needles, because the punctures after them look neater and less noticeable.
felting pad
Needles for dry felting are very sharp and rather long, during felting they can easily pierce a felt product through and through, respectively, the working surface, for example, a table, will be scratched. Therefore, in order not to injure yourself and not break the needle on the hard surface of the furniture, a special felting substrate or felting mat is used.
Most often, an ordinary thick foam rubber washcloth is used as a felting mat. The disadvantage of using a washcloth: in the process of felting, the notches at the end of the felting needle pull out pieces of foam rubber from the washcloth, which later get stuck between the felted wool fibers. This, as you understand, causes significant damage to the wool product.
Often in the work you can find felting substrates, or the so-called "felting rugs", which are made of polyethylene foam. Such felting mats are much more durable and of higher quality than the above-described washcloths. A big plus: each of the sides of such a felting rug has a surface designed for different types of felting wool.
For beginner needlewomen in the felting technique, we recommend using polyethylene foam film, which is used to pack ordinary household appliances. If your passion for needle felting grows into something more, change the felting mat for a more professional one.

Another option for a dry felting substrate is a brush mat. It is quite expensive, but the felting brush mat is the most convenient to use as a substrate for dry felting, because special bristles made of synthetic fiber do not interfere with the movements of the needle and at the same time prevent the felting needle from coming into contact with the hard surface of the desktop. thereby preventing damage to the needle.

An inexpensive alternative to a professional brush mat is a regular brush with bristles. This version of the brush is quite suitable for the experience of dry felting for beginners.
Rule: Before using the mat again, carefully remove the wool fibers that remain between the bristles, otherwise there will be a mixture of wool in the next product.
felting thimbles
Use leather or rubber thimbles to protect your fingers from being punctured while felting wool.
Wool for felting
For dry felting, natural wool for felting is used. Felting wool differs in thickness - the smaller the number of microns, the finer the wool. Wool is thin, semi-fine and coarse . Semi-thin dyed wool is best for dry felting, you should not take too thin merino wool, it will quickly collapse with a needle, leading to a warp of the product, which is almost impossible to correct.
For the basis of toys, in order to save money, they often use cheaper, low-quality undyed wool, such wool is called Sliver. Then it is rolled over with the main wool.

combed tape
The combed ribbon is straight elongated wool fibers neatly laid in a long ribbon in one direction for felting.

Before felting, the wool must be strongly entangled. How better fiber will be tangled, the more efficient and accurate the felting process will be, you can do this with a brush for combing animals or by repeatedly pulling and shifting the fibers “cross over”.

Carded wool (woolen wool)
Carded wool is a ready-made mass of wool for felting, consisting of tangled fibers, thanks to which the carding quickly falls off and saves the time of the master due to the lack of the need to pre-prepare the wool for felting. Great for beginner needlewomen.

Here are a few useful tips and rules from felting master Kristina Mayorova.
- Use quality needles.
- Insert the needle perpendicular to the felted surface
- Take your time at work
- Remember that the needle goes much deeper than you think.
- Quick and sharp needle strokes do not speed up the process. This will break the needle and damage the wool fibers.
- Insert the needle deep to the center, try to stretch the wool fibers inward, then at first it will create density inside the wool crafts, and the outer layers of the product will gradually become denser.
- When the needle enters the wool product, you should hear a sound similar to a crunch
- A product is considered sufficiently felt when it does not change shape at all when pressed. To do this, tap on the table with your fingers, and then with the product, if the sound of the knock is the same, then the knock was a success.
- When grinding the product, use a thin needle with an asterisk section, the punctures should be close to each other
- Remove any bumps in places where you cannot drop the strands, attach small pieces of tangled wool and sand the product.
- When processing with a reverse needle, you should also diligently make punctures close to each other
- The parts of the wool product are connected by sticking to each other, for this it is necessary to leave the junction fluffy, then we fill the loose fibers of one part into another part with a needle. After that, we strengthen the junction of the parts - lay a bunch of wool, fill up and grind
- When working, we take into account that the wool falls off by about a third
- For paired parts, we immediately prepare the same amount of wool for felting
Wool felting master class for beginners video
Text prepared by: Veronica
At first glance, wool felting for beginners may seem like a rather complicated process, but it is not so - it is enough to have patience, a little skill and choose the right technique.
Wool felting techniques
There are 2 main techniques for felting wool, the process for creating products for which is fundamentally different. That is why it is difficult to say which style of felting is easier for beginners to master - here everyone chooses what he likes.
Wet felting
It was wet felting from wool that gave the name to the technique of creating warm products.
A piece of woolen material must be wetted with a simple soapy solution and begin to roll the product in your hands, giving it the desired shape. Since the wool decreases in size during felling, it takes 2-3 times to work. more material than the size of the future product.
There are 2 ways of skating: in the first one, a wet ball is skating in the hands, which results in voluminous crafts. In the second, the wool is laid out evenly in a thin layer on a bamboo rug, moistened with a solution, covered with a film. The resulting workpiece must be rolled into a roll of medium density and rolled for a long time, gradually increasing the pressure of the hands.
The latter method is used more often - it allows you to make beautiful bright matter with the effect of a marble color transition, sometimes it also looks like a patchwork technique. However, wet felting for beginners is better if you work with bulky figures.
In this style, it is customary to create paintings, clothes, bags, scarves and capes, accessories, jewelry.
dry felting
Dry felting is done in a completely different way. Prepare a ball of wool and roll it a little between your palms, giving it the desired shape. Take a special needle with notches and start poking it into the ball often, often - this tangles the wool fibers inside the ball, fastening them and compacting them.
You can understand that the part is already ready by slightly pressing it - the workpiece of the desired density will return to the shape that you gave it before squeezing. Further, the fibers will no longer be confused, but torn.
Dry felting from wool is used to create volumetric figures of animals, fairy-tale characters, people - they can be used as ordinary figurines or toys.
Felting wool for beginners always seems to be a very long and laborious task. However, the result of each lesson pleases and makes needleworkers continue to create amazing woolen works.
Wool for felting
Even for beginners, it is no secret that the felting technique chose wool as the main material. It comes in different textures, densities and colors, and each variety is used for specific purposes.
Tops
Tops wool, or comb tape, is of the highest quality - it is actively used in both wet and dry techniques. The material is well combed, the fibers are soft and lie in one direction. It is also called spun wool.

In its raw form, the blank is similar to a woolen ribbon, from which you can tear off shreds.
wool wadding
Another type of wool is called carded wool due to the large brushes (cards) with which it is combed out. Unlike tops, the fibers in carded wool are multidirectional, and the material itself is more like cotton wool.

Such wool is cheaper than comb ribbon and therefore suitable for beginner needlework. Properly made products made of woolen wool look no different from tops.
Sliver
This is the name of combed, cleaned, but not dyed wool, which is used as a base - if you make the whole toy from tops or carded wool, too much expensive material will go away.

In addition, this variety is specially designed to serve as stuffing - it is denser and therefore holds its shape better.
Tools for the job
Special devices are needed mainly for dry felting. Wet felting from wool involves more work of the fingers and palms than special accessories.
Needles
Dry felting from wool, as a rule, is performed using special needles in the form of the letter L with notches on the tip - they tangle the hairs of wool, compacting the material and forming a certain thing out of it.

For beginners, it is very important to remember the classification of needles by number:
- No. 36 - the roughest, used at the initial stage of material processing;
- No. 38 - thinner, the main felting is performed precisely by this number;
- No. 40 is the thinnest needle, which is used to process small details, decorative elements.
In addition, there is a needle with notches directed in the opposite direction - it does not dump, but draws out the fibers, and is suitable for giving fluffiness to toy animals.
Felt machine
Automatic alternative to the needle - can hold up to 12 or more needles in the nozzle! It is understood that the device allows you to speed up the processing time of the product several times. Such a device is especially useful when working on flat things.
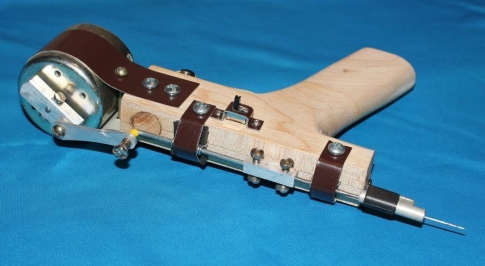
However, before buying it, you need to get used to working with needles and practice well - this is especially true for beginners.
Substrate
In other words, the rug you work on. Its presence is important for several reasons:
- due to the hard surface under the work, the needle can easily break or bend;
- it is also inconvenient to hold the product on weight - you can accidentally pierce your finger.

It is not necessary to buy a special substrate - instead, use foam rubber washcloths, thick hard brushes, felt mats or foam blocks.
Beginner Tip: Felt counts best material! It doesn't fluff the bristles like brushes, it doesn't leave pieces of foam rubber in the work, and it doesn't make nasty sounds when pierced like foam.
Master class: do-it-yourself hedgehog
Below is a master class on dry felting for beginners - you can make a cute brooch in the form of a hedgehog from the cult cartoon "Hedgehog in the Fog".
You will need: black, dark gray, light gray, white and red carded wool, needles of all thicknesses, brooch clasp, Moment glue, soap and hot water.

When creating some small details, wet felting from wool was used.
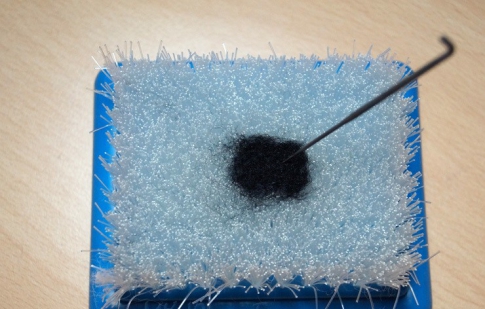
- Lay a small ball of black wool on the backing and sew along the entire length with a size 38 needle.
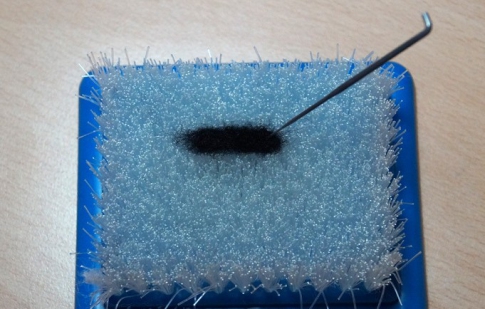
- Roll the part into a roll, put it back on the substrate and let it go.
- One side of the foot should remain fluffy, do not touch it.

- Wet the workpiece completely in warm water. Lather your fingers well and begin to gently rub the foot from all sides.

- Now put the “sausage” on the palm of your hand and roll it, covering it with the other palm on top.
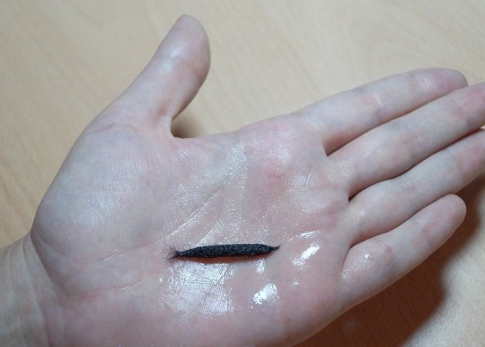
Rinse the workpiece in clean water and send to dry. Similarly, make all 4 paws: longer - legs, a little shorter - handles.
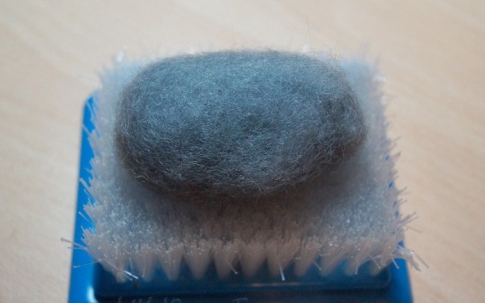
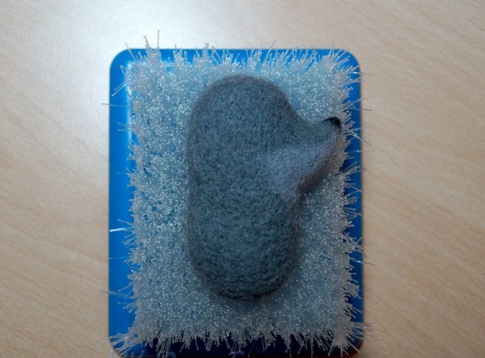
- Prepare a ball of black wool about 10 centimeters long, 3 centimeters high and thick. Lay it out in the form of a flat oval on the substrate. You can choose other options, but remember that the material will decrease by about a third in the work.

- Start felting the product with a needle number 36, moving over the entire area of \u200b\u200bthe oval. Stick the needle in the center at a right angle, decreasing it towards the edges.
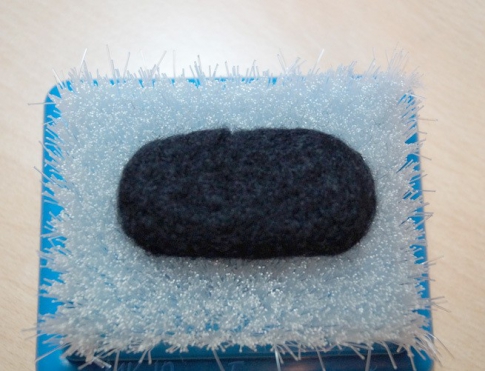
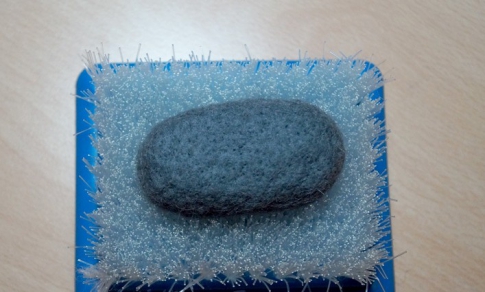
- When the ball turns into a dense, plump oval, wrap it with dark gray wool so that the black color does not show through it.
- At this stage of work, use a needle number 38. Stick it not so deep - the black layer is already quite dense, you need to fill the gray wool.
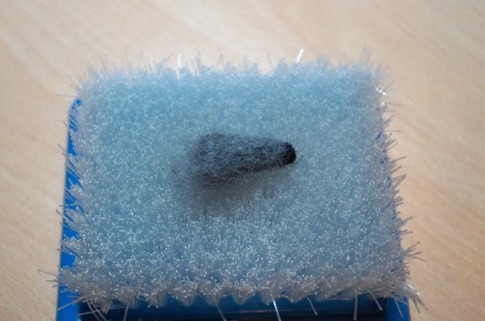
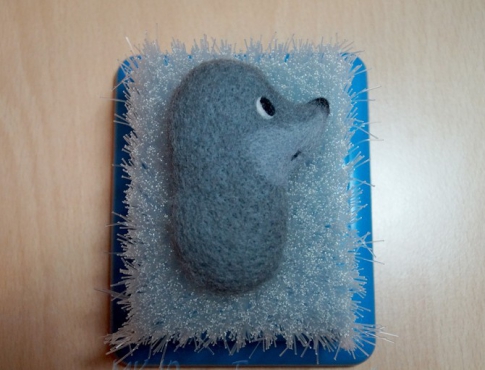
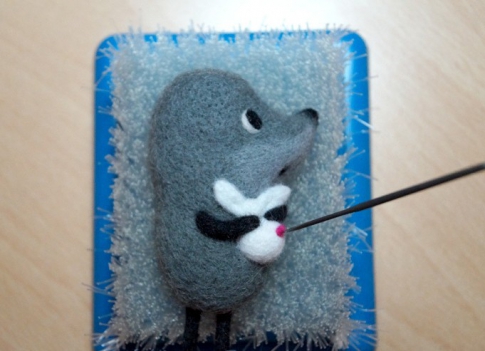
- When the torso is ready, take care of the nose. Lay a small triangle of dark gray wool on the backing and work it with a size 38 needle.

- Roll the workpiece into a roll and go through the needle again, leaving a wider edge fluffy.

- Now work out the base of the triangle - as a result, you will get a cone that is dense on all sides. Roll a small black piece to the tip of the cone - this is the spout.
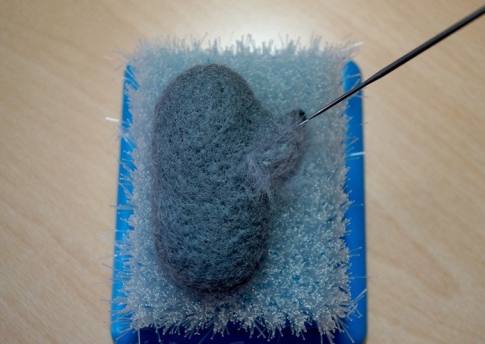
- Attach the nose blank to the body and roll it, working with a needle from all sides at the base.

- If the shape of the nose or torso does not suit you, you can always correct it by rolling a piece of a suitable color in the right place.

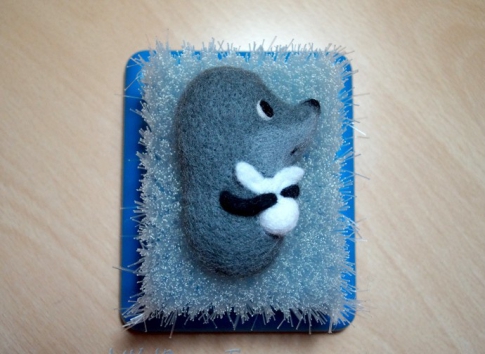
- Take a flat small piece of light gray, straighten and roll under the nose, marking the mouth area.
- Now grind the product - stick the needle shallowly and as often as possible. Each puncture should be as close as possible to the previous one.
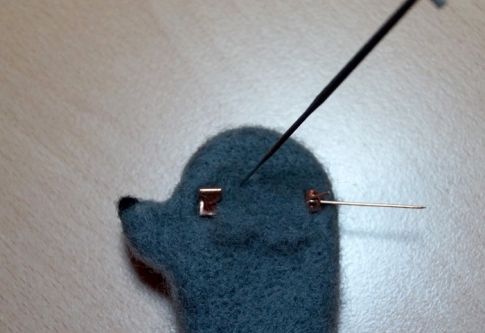
- From a tiny black piece, roll an oval and fasten the eyes in place.

- Lay the white color around the black oval and fix the protein around the pupil.

- Make a mouth in the same way.
- Roll up small ball white color, screw it with a No. 38 needle. Fasten it to the hedgehog with the same needle. Roll small white “petals” on top - you get a road knot.

- Fasten the handles on top of the knot.
- The legs need to be fastened by attaching the free side to the "back" of the brooch. FROM reverse side hedgehog, make a recess for the fastener - often go through the needle number 36 in the right place.
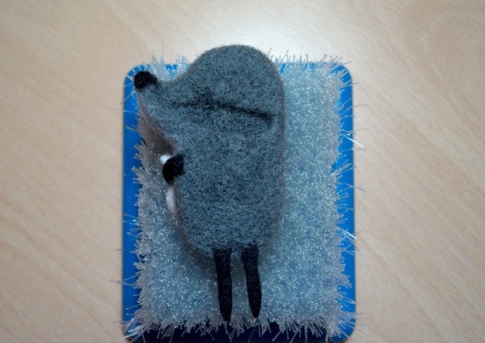
- Place the clasp in the recess, cover with a pre-felted rectangle of dark gray wool on top and fasten with a No. 38 needle.
- Use felting to decorate the knot with small red peas - this can also be done using beading.
- Go over the entire surface of the brooch with a needle with reverse fibers. Stick it not very deep, but often to get fluffiness - hedgehog spines. Leave the muzzle and knot smooth.

Remember that even for professionals, felting one product from wool takes from several hours to several days, despite the fact that the work progresses easily. In this case, the main thing is to be able to wait and watch how a wonderful little animal emerges from a simple piece of wool!
Another simple tutorial for beginners you can learn from the video - here you can see how to make felting a flower from wool.
Wet felting from wool: 4 workshops
It is not difficult to do wet felting from wool, which even beginner needlewomen can perfectly handle. By felting, you can get a lot of useful and interesting felt things, both souvenirs and unique products, as well as useful things that will be useful in everyday life. How to do this, read on.
Wet felting from wool for beginners: useful instructions
Any person who wants to learn how to felt wool can achieve this, because. making felt is quite simple, the main thing is to have a desire to get acquainted with this business.
Wet felting wool begins with the preparation of tools, for this you will need:
- Merino wool, available in several shades, they can be purchased at specialty craft stores.
- The rug is bamboo, you can use the rug, which is sold in stores selling accessories for rolls and sushi.
- You will also need material for the substrate, you can use pimply film, which is used for packaging. You will also need a mosquito net, or you can take old tulle curtains.
- You will need water in a bottle, with holes made in the lid, and a bar of baby soap.
 Before you start wet felting, it is better to read the detailed instructions in advance.
When everything is ready, you can start felting wool. From the prepared wool, it is necessary to tear off several bundles 20-30 cm long. They need to be stretched, and this must be done several times, first the bundles are laid out in a horizontal direction on pimply film(pimples up) so that a square of 30x30 cm is obtained. After that, new bundles of wool are laid out on top of the first layer, but already vertically, and another layer is laid out horizontally on top.
From above, the wool is covered with a net or tulle, sprayed with soapy water so that the wool is saturated.
After you need to rub your hands in a grid in a circle, after the wool is laid out on a bamboo mat, and it rolls into a tube. After that, the bamboo mat is rolled on a hard surface, and due to this, the wool falls off.
To learn how to felt wool on your own wet way, you need to take merino wool or Shetland (Shetland).
First, it is better to separate a beam from it, more precisely, you need to separate several beams.
Spread the wool in layers overlapping, horizontally and vertically. Spread it along the length and width of such dimensions as they want to get a piece of felt.
 The result of wet felting depends on the quality of the wool, which is intended for work.
When everything is ready, you can proceed to the following steps:
- On the laid out wool, you need to press in several places with your palms in order to make sure that the thickness of the wool is the same everywhere, if there are places where there is little wool, then you should fill them with tufts of wool.
- After that, the wool is closed from above with a net or tulle, after which it is abundantly watered from above with soapy water, it is necessary to moisten from the center to the edges. At the same time, moisturizing should not be too strong, if, when pressed with your hands, water comes through the fabric, you should put a terry towel on top, and make a few vigorous pressures so that the towel absorbs excess water.
- After that, you can start rubbing the fabric on top in a circular motion, while you don’t need to press too hard. After a sufficiently long time, the mesh is removed, the wool is covered with a film and turned over to the other side, after which the felting process continues.
- After that, the mesh is removed from the wool, and the future felt is checked for how it felt, for this you need to slightly pull the fibers from anywhere in the canvas. If after that the entire fiber begins to rise, then you can further pick up the canvas and start rubbing it between your palms for a stronger adhesion of the fibers.
The main thing is not to rush.
An example of the layout of wool during wet felting at home
In order for the product to turn out to be of high quality, it is necessary to be able to properly lay out the wool in order to be able to successfully knit it later. This is especially important for beginners - those people who first decided to do this type of needlework.
 It is imperative to learn how to properly lay out the wool so that the future product turns out beautiful and neat.
Master Class:
- Bunches are separated from the finished wool of the sheep, and carefully, row by row, they are laid out on a pimply film, the first layer is folded horizontally, and then perpendicular to the first layer. The thickness should be the same everywhere, such a layout will make a high-quality canvas.
- If you plan to make not just a canvas, but some things, for example, a decorative heart, then here you already need to roll the bundles of wool into a ball between the palms, from which you can later form figures, for example, from sheep wool a great snowman.
- If any drawing is supposed on the canvas, for example, the image of a tulip, then in this case there are 2 options for its calculation - reverse and direct.
In a straight lay, the colored wool is laid out on top of the already laid out wool. With this layout, the drawing turns out to be a little blurry and, after the final felting, will resemble a watercolor drawing.
In the reverse layout, colored wool is laid out first, and then regular wool is laid out on top, while the pattern is quite clear.
When the canvas is ready, it must be washed in warm water and, without wringing, carefully spread out on a bamboo rug.
If it is not enough, you can use a large terry towel.
Making Wool Beads: A Wet Felting Workshop for Beginners
In addition to the canvas or some funny little animals, you can make interesting things, such as beads. Such things can serve as training for beginners, as they do not require any special skills and knowledge.
 Wet felting is even used to create original and creative beads.
Bead manufacturing technology is as follows:
- Small pieces are plucked from the wool and rolled first between the fingers, and then between the palms. In order for the beads to turn out to be multi-colored, you can felt them from multi-colored wool.
- When the base is ready, the balls are immersed in warm soapy water, wetted and continue to roll between the palms. Bead sizes can vary from small to quite large.
- When the desired size is reached, the balls must be rinsed in cold water, dried, wrapped in a towel and squeezed lightly.
Finished beads are connected to each other with a needle and thread, the needle is threaded through the center of the beads.
For beauty, the beads should alternate with each other, both in size and color.
Such a master class will help a person who starts felting wool to learn how to work with wool, felt and, subsequently, to do any larger things, for example, you can make a felted clutch or stole.
A simple technique of wet felting from wool for beginners
For those who are just starting out with wool felting, it is best to start with simple products, for example, with a simple felt cloth. It will subsequently be possible to make any things from it, for example, some people are engaged in the manufacture of booties.
 Even beginners can cope with wet felting from wool, the main thing is to start with a simple felt cloth
The technique of wet felting wool is different, for example:
- First, as usual, a pimply film is laid out on the table, a piece of silk is laid out on top of it, and wool is laid out on top of it in long strands. In this case, the wool must be fluffed up a little, and gaps must be left between the bundles.
- If you plan to make a colored canvas, you can alternate wool different colors, after that, carefully place the net on top so as not to move the spread out wool.
- Through the mesh, the wool is sprayed with a warm soapy solution, the water is gently evenly distributed with the palms of the hands over the entire wool, and after that, you can start felting.
- After several strokes with the palms over the mesh, it is carefully removed from the wool, this is necessary so that the wool does not stick to the mesh.
- The wool, together with the silk, is gently turned over, and the palms need to be rubbed over the silk, gradually the fibers will penetrate through the silk. The silk is turned over again, folded on a towel, and the towel is wound on a rolling pin and the wool on the silk is rolled several times.
- After that, almost ready-made silk with wool fibers must be aired and washed in warm water.
You can slightly crumple the product, wash it several times after each wash, the silk needs to be straightened. After the final wash, the product is straightened and dried.
Wet felting from wool: master class (video)
Using simple tools for work, as well as the lessons given above, you can successfully felt wool yourself. Moreover, you can do not only a simple or decorated canvas, but also any things.
Examples of wet felting from wool (photo)


The unique structure of the wool fibers of some animals allows it to be used in needlework. Wool villi easily delaminate along the length. Each fiber has microscopic hooks capable of interlocking with the same scales located nearby. At the slightest friction, the scales-hooks of individual fibers are connected, forming woolen lumps that are soft to the touch.
If you continue to rub and tangle the fibers, the woolen ball becomes denser and decreases in size. As the final volume is formed, it can be given the desired shape.
What is felting?
Felting is the process of interlocking, entangling or interlacing wool fibers to create products. different shapes. Felting from wool involves the use of wool from different animals: sheep, camel, alpaca, llama, yak. You can buy wool for felting in specialized stores of yarn and needlework.
The most common wool felting techniques are dry felting and wet felting. These are fundamentally different techniques with which you can make felted toys from wool, clothing and footwear, interior elements and accessories. All things that are knitted from wool are very warm and pleasant to the touch. Many needlewomen note that the process of stalling itself has a calming effect on the nervous system.
Dry felting technique
Dry felting from wool allows you to make three-dimensional figures. For this you will need:
- wool;
- needles for felting wool;
- basis for felting.
Felting needles are very sharp, thin and have many pointed notches. It is because of them that children under 10 years old should not be engaged in dry felting. A large number of notches allows you to tangle the fibers not only on the surface of the woolen ball, but also inside it. The basis for dry felting can be an ordinary washcloth or a piece of dense foam rubber. Some craftswomen use a brush with stiff synthetic bristles instead.
The technique of dry felting is that a ball of wool is placed on the base and repeatedly pierced with a notched needle. To give the desired shape, the craftswoman changes the angle of entry of the needle into the wool, forming dents and protrusions. Most often, toys are made using this technique.
Wet felting technique
Wet felting from wool allows you to create a dense, thick material - felt. You will need:
- wool;
- basis for felting;
- alkaline solution;
- pimply film.
In this case, the basis for felting can be a bamboo napkin. An alkaline solution is prepared from soap, which improves the adhesion of the scales of different wool fibers. This method of making crafts is much safer than dry felting.
Wool fibers are laid out on the base in several layers. In this case, the villi of each next layer should be laid out perpendicular to the fibers of the previous one. Having moistened the woolen layout with soapy water, the needlewoman covers it with a pimply film and rubs it with her hands. In the process, you can twist the bamboo napkin. When the fibers stop separating from each other, the felt can be considered ready. It is rinsed with clean water and sent to dry in a warm place.
After drying, the canvas decreases in size by 25-30%. In this way, paintings, clothes, hats, scarves and accessories are created from felt. Using the method of wet felting, patterns and designs from multi-colored wool can be applied to felt. Warm clothes were made in this way many centuries ago.
All necessary materials and tools can be found in craft stores. A wide range of choices exist in online stores.
Felting from wool: a master class for beginners
If you want to learn how to make toys or crafts from felt, you will need master classes on felting from wool for beginners, which can be found in large numbers on the Internet. Usually this step by step photos with explanatory notes. Even the most novice craftswoman will be able to deal with them.
Video tutorials are even clearer. They show in detail all the actions, repeating which you can easily master the felting of toys, accessories or something more complex from wool. AT in social networks exists a large number of communities of interest, where experienced needlewomen give good advice on creating toys from felt and answer questions from beginners. By joining such a group, you will learn a lot of useful things about felting and will be able to gain experience.
Having ordered a set for felting from wool and armed with theoretical knowledge, proceed to the practical implementation of your ideas. Wool is a plastic material that provides unlimited possibilities for the realization of a wide variety of fantasies. Combining materials by color and quality, you will learn how to make cute souvenirs for friends, exclusive items of clothing and designer accessories.
Comment on the article "How to felt wool toys"
How to felt wool toys. What is felting and what is the difference between dry felting and wet felting.
How to felt wool toys. Felting wool is a fascinating pastime. The properties of this material make it possible to create paintings, clothes, hats, scarves and accessories from felt in this way.
How to felt wool toys. Let's invite the children to return their parents to childhood, that is, to believe that Santa Claus will New Year after all, to them as adults ... ... in a wet way, too, wallowed? my hare is quite soft (remember, the lap-eared one is so brown :), but in the photo ...
Section: Felting (roll wool dry like). About felting. Where to buy felt in Moscow? Wallow. Goat hair in skeins. Couldn't resist, bought it naturally. The most common types of wool processing are dry and wet felting.
Tell me, is the yarn for dry felting fundamentally different from the yarn for wet felting? Or more specifically, this yarn for The most common types of wool processing are dry and wet felting. All things that are knitted from wool are very warm...
Wet felting, making felted flowers. 7ya.ru - an information project on family issues: pregnancy and childbirth, parenting, education and career... How to make wool toys. To content. What is felting?
What is felting? Felting is the process of interlocking, entangling, or weaving wool fibers to create different shapes. Where to buy felt in Moscow? Wallow. The most common types of wool processing are dry and wet felting.
Go to LiveJournal on felt ru or find felting on aspen. And now on your needlework topic: it seems to me that wet felting, I can’t say about dry felting yet, because I don’t know, there is a very large field for creativity. You're right - any felting is a great springboard for creativity.
Toy "Hippo" from wool yarn. Dry felting allows you to make very gentle, soft, cute Christmas decorations! Felting is the process of entangling, entangling or interlacing wool fibers to create products. Where to buy felt in Moscow? Wallow.
Creative workshop of Anna Tepenitsyna Miracle felt Duration 1 hour 20 min Felted toys. Courageous, brutal such symbols next year. How to felt wool toys. This method of making crafts is much safer than dry felting.
Felted toys. Courageous, brutal such symbols of the next year. Knitted toys - cartoon characters Cat Leopold. How to felt wool toys. What is felting and what is the difference between dry felting and wet felting.
For those who wish, I continue the demonstration of felted toys and temari balls (embroidery): "Kitten" This is such a small kitten. Striped in three colors on a white background, but all in my favorite beige tones. Eyes sculpted from plastic and painted.
Felting wool. What is felting? Felting is the process of interlocking, entangling, or weaving wool fibers to create different shapes. What is felting? Dry felting technique. All things that are knitted from wool...
How to felt wool toys. What is felting and what is the difference between dry felting and wet felting. Christmas decorations do-it-yourself: burlap angels. Felted toys. Register. balls and felting.
What is felting and what is the difference between dry felting and wet felting. Print version. With their help, you can make toys, clothing and footwear, interior elements and accessories. All things that are knitted from wool are very warm and pleasant to the touch.
How to felt wool toys. This method of making crafts is much safer than dry felting. Wool fibers are laid out on the base in several layers. Wet felting, making felted flowers.
I sewed the bag before felting, with woolen threads, and the upper cut, where later From my little experience: at the full cycle - “cotton” turned out to be felt for slippers, very Felting is the process of coupling, tangling or interlacing wool fibers to create products ...
How to felt wool toys. Felting wool is a fascinating pastime. The properties of this material make it possible to create voluminous and flat figures. Let's invite children to return their parents to childhood, that is, to believe that Santa Claus is still coming to them this New Year ...
Dry or wet? Dry next in line, but mo >. they are still in the process :-) But everything is very simple - ready-made blanks (I take foam plastic, but you can also use plastic, or whatever is at hand) carefully wrap with wool in several layers in different directions, then, as usual, soap and ...
Toy "Hippo" made of wool yarn. My knitted toys. I love knitting very much. How to felt wool toys. What is felting and what is the difference between dry felting and wet felting. DIY Christmas decorations: burlap angels.