What can you make a tank craft from. How to make crafts of military equipment with your own hands? Do-it-yourself plasticine tank
Ships are included in the mandatory set of toys. Nowadays, children are used to receiving purchased cars as a gift, with which the child will play a little, and then throw it under the sofa or in a box with toys, and forget about it for a long time. Parents are very disappointed, because the toy is expensive, and the baby's interest in the new product disappears very quickly.
Yes, and this is normal, the baby is developing, he wants something new all the time. And that's good, actually. For parents, there is a way out: you need to make military equipment with your own hands from improvised materials.
The value of crafts
It is important for the development of children creative work. In the Netherlands, the manufacture of crafts from waste material is so developed that there are a number of shops where you can buy the necessary waste material: bottle caps, old buttons, styrofoam pieces, foam bands, etc.
In fact, such work develops thinking, imagination. The child along the way acquires knowledge about the qualities and properties various materials. And the completed model will be more appreciated by the kid, as he invested a piece of his soul and a lot of work in its manufacture.
Also important point is an Team work adult and child. Parents of the current generation are heavily loaded at work, devote little time to their children, but the joint production of military equipment with their own hands from improvised materials will unite the family at the same table. Common activities always bring together. Consider several options for crafts.
foam tank
The simplest version of crafts that children can do on their own, for example, in kindergarten or primary school, as gifts for dads on the holiday of May 9 or February 23. technique" as a gift will fit perfectly.

To work, you will need two household sponges, cocktail tubes, scissors, PVA glue, colored cardboard. Leave the lower sponge in its original form and put the grater down. If desired, the edges of the tank hull can be rounded with scissors.
Carefully remove the grater from the second sponge and cut out 6 identical circles from it, sticking them on the ends of the lower sponge, 3 on each side. It remains only to cut the stars out of cardboard and insert the tubes. Instead of a die on a tank cannon, you can cut out a flame from a red or orange sponge. For this, the edges need to be sharpened. It was very simple to get a model of military equipment with your own hands - a tank.
When the glue sets, the toy is quite strong, so you can play with it perfectly, even in water. It will be interesting for children to watch how the sponge fills with water and the tank sinks.
Airplane
Consider how to make military equipment with your own hands from improvised materials: plastic bottle green, thick cardboard, colored paper. You will also need a knife, scissors, PVA glue, a pencil, a black felt-tip pen for work.

In order to make an airplane, you need to cut two identical holes for the wings of the airplane in the middle part of the bottle. Then work continues with paper. On thick cardboard you need to draw a wing, portholes, tail, screw, stars. You can use self-adhesive for small parts.
Then the assembly of military equipment with their own hands begins. Crafts will be beautiful if you choose the following colors: khaki, dark green, light green, sand. First, large parts are attached: the wing is inserted, the tail of the aircraft is assembled and glued. Then, after unscrewing the cap of the bottle, a screw is inserted, cut out according to the diameter of the neck.
The last stage of work will be small details: portholes, stars. Sometimes terrifying shark teeth are painted on military aircraft. You can offer the child such an idea. He will like it. The toy turns out to be strong, it can even be thrown into the air, landing on the water.
wooden plane
To perform such a craft, you need to take a few ice cream sticks and a wooden clothespin, PVA glue, if desired, the model can be painted in the colors of military equipment. A preschooler will make such an airplane with his own hands from improvised materials.
Two sticks are glued to the clothespin in parallel, like the wings of a maize. For the tail, you will need two thinner sticks. From one, two small rounded pieces of wood are cut out, and possibly sawed off, which are glued to the edge of the clothespin. For a short shank, you need to cut off the very edge from the second stick. It is glued to the end.

You can paint such an aircraft in different colors. Such a toy is suitable for younger students, it is easy to hide it in a backpack and get it at breaks for games. If desired, you can glue the wheels from an old broken car.
Tank in quilling technique
The most complex of materials at hand is a tracked tank. There are many details here that are made by twisting quilling ribbons. After making a row of wheels, they are glued together and glued with a strip. The result was a tank caterpillar. After completing a similar second part, a platform in the form of a square is glued, on which a tower is made separately from a thicker strip of paper.

A strip of paper is also wound around the tube from both ends and glued like a cannon to the side of the tower. Small details are added as desired: star, flag, hatch, etc.
Content
Sooner or later, if you have a child (especially a boy), you will be faced with the fact that you will have to make a tank from improvised means. Or you need to arrange a theatrical production, decorate a school museum, or pack a gift for a military man in an original way. We have already prepared, found valuable information and are ready to share with you the data and experience in creating a tank from cardboard.
How to make a war machine out of corrugated board
A corrugated cardboard tank is a rather interesting and simple option that does not require a template. For such a do-it-yourself cardboard tank, you will need the following materials:
- corrugated material in green, blue and dark blue shades;
- scissors (only sharp);
- PVA glue;
- School line;
- simple pencil.
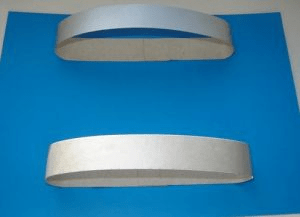
First you need to cut the dark blue material into thin strips, and green into wide strips. Now you need to twist the wheels out of the blue ones, and wrap them in green to make a caterpillar. Use PVA glue to join the pieces. If the wheels are too small, then you need to use several strips. You can also use double-sided tape, which holds small parts together quite well.
The future caterpillar of the combat vehicle will look something like this:
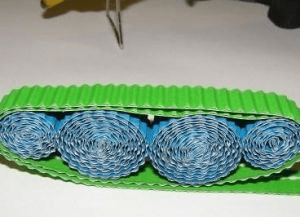
Please note that the wheels are not all the same size. Larger wheels are placed in the center, and smaller diameters on the sides. You need to make two of these tracks.
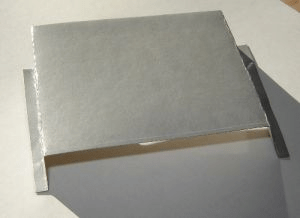
Now you need to prepare a platform from green corrugated material. You need to cut out a rectangle, bend the edges on both sides and glue the tracks, as shown in the photo:
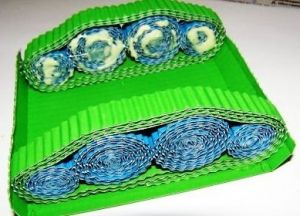
Now you need to cut out two wide strips from blue cardboard, bend them in half and glue them to the base of the product:
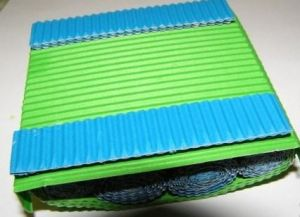
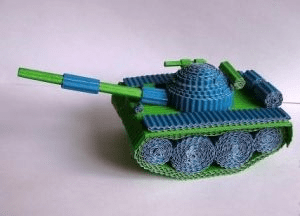
Next, you need to do the rest of the details. Make the tower according to the principle of the wheel, only much larger, also twist the fuel tanks, the cannon and other necessary components at your discretion. As a result, you will get a beautiful and bright military vehicle that you can present to a child or make with him.
Making a cardboard tank with your own hands without a template turned out to be not so difficult, but we offer another interesting option.
Colored cardboard tank
This is also a fairly easy option and you will need ordinary thin colored cardboard for it. So, first, from a white or any other color of the sheet, you need to cut out two strips of medium width and glue them into a ring. Now you need to take a sheet of a different color and glue the finished rings to it and press them down slightly so that they look like a caterpillar.
From a wide strip of the same color, you need to build a cannon of a war machine.

You can make it triangular, as shown in the photo, or you can simply twist the cardboard into a tube.
At the preliminary stage, your craft will look something like this:
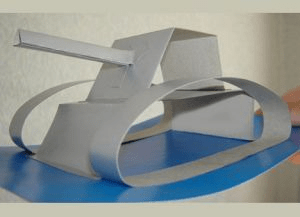
The tank can be decorated with military paraphernalia or left as is. Such crafts can be safely prepared for certain holidays to school. A cardboard tank is quickly assembled and does not require special financial costs.
Military vehicle from an old box
And now we will tell you how to make a tank out of cardboard using an old box. Suitable packaging from under the TV or refrigerator. The main thing is that the material is dense, without any visible flaws. What else is required:
- Scotch;
- any scissors;
- PVA glue;
- pen.
So, a do-it-yourself tank made of cardboard with a step-by-step description:
First you need to draw on the base material all the necessary details of the combat vehicle: 8 medium circles, two narrow and long stripes and two short wide stripes.

Now you need to make caterpillars - twist the parts into an oval and glue them together, glue wide stripes on one side. Use tape or glue to hold the pieces together.

Now, on the side where the caterpillar has an open part, you need to glue your rounds. They will act as wheels in the caterpillar. Therefore, they must be placed at the same distance from each other. In this case, use PVA glue.


We only guide you in the right direction, and you yourself can come up with options for how to make a tower or a cannon. You can also cut out additional decor from cardboard in the form of a shovel, bucket, or some other components.

How to glue a tank according to a template
You can come up with a template yourself, draw and print, or you can use it already ready-made pattern. Lately paper crafts have become very fashionable. Not only children, but also adults are fond of this technique. We offer do-it-yourself cardboard tank schemes:
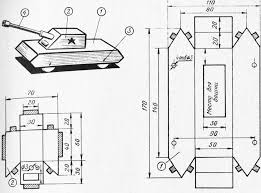
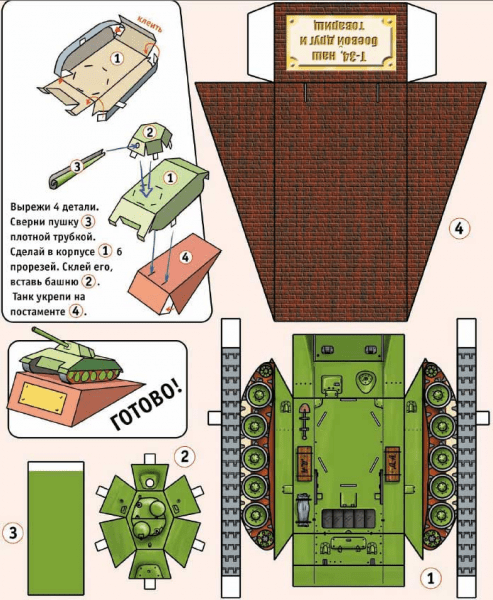
You can transfer the pattern with a pencil to the base material, or you can immediately print the pattern on a thin special cardboard.
Use an old pen or the non-sharp end of a pair of scissors to go over dotted lines folds so that the material folds neatly. Use a small amount of PVA glue to assemble the model.

Egg cage tank
We will assume that a model of a tank made of cardboard can be made not only from this material, but also from a cage for chicken eggs as a base. You will also need black or dark green paint, a brush, a cardboard base for the turret, and a cannon tube. By the way, the tower itself can also be made from part of the cage. The model will look something like this:

How to make a big cardboard tank
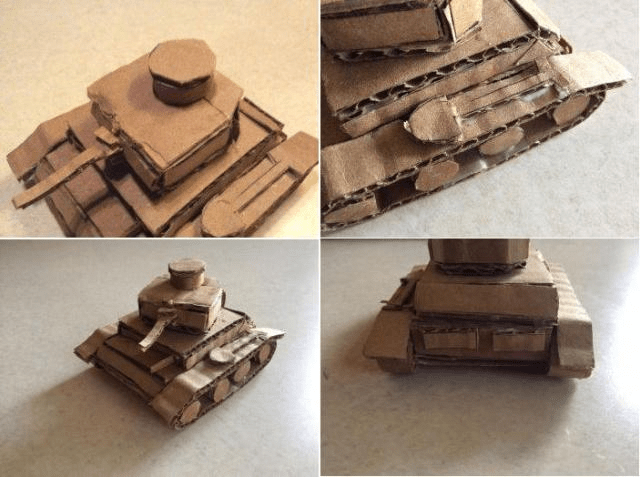
A large do-it-yourself cardboard tank can be made from an ordinary TV or refrigerator box. The principle of its creation is almost the same as in the case of a small model. We want to offer you some photo illustrations that (we are sure) will inspire you to create something really interesting and worthwhile.

In this case, a regular box from under office equipment was used. From above, a circle is not completely cut out, which plays the role of a hatch. And the plastic pipe acts as a gun.

Modular origami on a military theme
Modular origami - the ability to create a voluminous and realistic paper figure. The technique differs from ordinary origami, since all the figures are not made up of one sheet of paper, but of the same modules. In this article, you will learn how to make crafts on a military theme, method modular origami: an airplane and a ship that can be used as a visual aid in history lessons or presented as a do-it-yourself gift to grandfather and dad.
Materials:
- origami paper;
- scissors;
- Ruler and pencil.
1. A4 sheet can be cut in two ways, depending on which rectangles are obtained with a size of 53 × 74 mm or 37 × 53 mm. The first method is to divide the length and width into 4 equal parts, and in the second, divide the width into 4 parts, and the length into 8.
2. Cut the sheet along the marked lines and proceed to folding each part. To do this, fold the rectangle in half, turn it over and in half again. After that, unfold once to get a visible fold line.


4. Lift the edges of the triangle up and bend their corners through a large triangle.

5. After that, straighten and fold these corners into triangles along the marked lines.


To assemble this airplane, you need to make 89 modules according to the scheme described above. To make the product more original, use paper different colors, for example, you can make 18 blue and 71 yellow modules. Starting with 2 blue modules, add yellow and blue again. You can watch a more detailed master class in the video.

Another aircraft model requires more modules. You will need 1142 pieces of different colors: 40 gray, 242 black, 166 white, 694 red. You can choose the color yourself. Detailed master class will help you assemble an airplane, even without special skills, watch the video.

1. Make the first row of 47 modules and in the same way add 47 more modules for two rows.
2. In the fourth row of models there should be 51, since four additional modules need to be fixed on the sides of the bow and stern of the future vessel.

3. In rows five through seven, you need to attach 55 modules each, and do not forget to give the craft the shape of a ship. Lightly squeeze the sides so that the sailboat does not come out round, but slightly flat.
4. Then attach 55 modules, while shaping the nose of the ship so that it is a little sharp. In the ninth row, elements of a different color are put on with short sides so that the ship's structure is strong.

5. There should be 8 modules on the side parts of the sailboat in the 10th row, they are inserted between adjacent modules (the long side is inside, and the pockets are outside).
6. On the stern, you need to make a rim of a different color. To do this, insert the modules in the usual way, not as in paragraph 5.
7. In order to decorate the bow, put on symmetrically modular blanks in the extreme part. It turns out 9 modules in the 11th row, 6 modules will be in the 12th row and 3 in the thirteenth.
8. For the bottom you will need about 140 modular triangles. Start with three modules and add one in each row until you have 8 modules, but don't forget to try on the bottom of the ship. After that, you will need to make 9 rows without increasing, alternating 7 and 8 modular rows. Starting from the 17th row, reduce the number of modules from seven to one.
9. To make a sail, take 252 modules, while you can choose the color and ornament yourself. The first row should consist of 17 modules, in the next ten you need to alternate 16-17 modules, and starting from 12, reduce the number of modules (minus one for each side). You get 16 rows, but in the last one, fasten the modules on the contrary and slightly bend the sail.
10. Take a wooden kebab stick 20-25 cm long and glue it with colored paper. It will act as a mast, so fix it in the center of the ship and attach the sail to it.
11. Collect the flag, and also make portholes.
We hope you liked our article Crafts on a military theme with your own hands origami. Also go to other sections of the site, there you can find a lot interesting master- classes.
Absolutely any technique, including military equipment, has always attracted the attention of boys. In them, it not only arouses incredible interest, but also gives rise to a desire to do it yourself. a beautiful craft on military subjects at least from paper.
It should be noted that thanks to a wide range in stores, every year it becomes possible to use more and more different materials, in addition to those familiar to everyone.

At master classes, you can mainly see photos of military crafts made from plasticine or paper. However, for your children, you can opt for a more interesting solution.

For example, you can very easily and, most importantly, quickly, make a tank yourself, using only a green foam sponge.


What is modular origami
After reviewing a lot of ideas for military crafts of varying complexity, you will surely find among them the modular origami that is popular today. In fact, this is a real opportunity to create a real, voluminous paper figure.

The execution technique will be similar to origami, but will also have its own characteristics. For example, figures will be created from equal modules, not a paper sheet.

Below we will consider in more detail what military-themed crafts can be made using the modular origami method. As a result, such a toy can even easily become a gift for a birthday or any other holiday for dad or grandfather.

What materials will be needed?
- paper;
- pencil / felt-tip pen;
- scissors;
- ruler.

How are origami modules stacked?
The first thing you need to learn is the need to strictly follow the instructions for making military crafts if you want to end up with a beautiful figure that you will not be ashamed to show to others.


Sheet standard size A4 can be cut different ways. Depending on which method is chosen, the size of the rectangles will also differ in the end.

After you cut the sheet, you can proceed to the sequential folding of each individual part. To begin with, the rectangle must be folded exactly in half, turn it over and repeat the steps.


On both sides, it is necessary to bend the edges inward to the line of the formed fold. The main thing is to do this in such a way that they necessarily protrude beyond the lower part of the base of the figure.

As you can see, making military equipment with your own hands is a rather exciting process that will not cause many difficulties. The next step is to lift up the edges of the triangle. Immediately after this, it is necessary to bend the corners carefully through a larger triangle.

Unfold / fold the corners along the lines that were outlined, right into a triangle.

Lift up the edges of the figure. All that remains to be done is to bend the resulting triangle in half. On this craft can be considered complete. This is the module.

Modular origami - airplane
If you are interested in a master class on military crafts, then you will surely like the airplane toy. To assemble it, you will need to make 90 modules yourself according to the scheme presented above.


In order for the plane to turn out to be truly original, you can use colored paper. For example, models with 71 orange modules and 19 blue modules look beautiful.

The technology for creating crafts is extremely simple, but in case of difficulties, you can always watch a video tutorial with step-by-step actions.

Quilling technique
After reviewing many articles on the topic of how to make crafts on a military theme with your own hands, you probably already noticed that many of them contain such an interesting word as quilling. What does it mean?

First of all, it should be noted that this technique can be mastered with children from the age of seven. On a military theme, it is quite easy to make a craft in the form of a tank from special dark green corrugated cardboard.

First you need to cut out a couple of strips with a width of 2 cm from the prepared cardboard, and at least ten strips, the width of which will be 1 cm each.


You should get several wheels with different diameters. Three wheels with a large diameter are glued together, and small parts are attached to the side.

After that, it is desirable to glue the fastened elements along the edge with a strip of the simplest green colored paper and these will be the tank tracks. Quite simple craft, under the power of which to do together with the parent to any child.

Another wheel will become a hatch. A small muzzle of twisted paper is necessarily attached to it. After that, the caterpillars of a military tank are simply spaced out to an unnecessary width, a simple cardboard sheet is glued on top. The hatch is connected to the muzzle and is also fixed on the tank.

That's all - after these steps, we can assume that the craft is completely completed. All that remains to be done and this process can be completely entrusted to the child is to decorate the tank. For example, you can try to make a flag out of colored paper and toothpicks.

Photos of military crafts


If you are going to organize a creative lesson on creating crafts in the form of military equipment, then you have come to the right place. In this thematic section, you can find many master classes illustrated with photographs for making crafts in the form of tanks, planes, helicopters, ships, submarines. And also - binoculars, helmets, caps, military letters-triangles.
Such crafts can be a wonderful gift for February 23 or May 9, as well as decoration for thematic exhibitions. Admire the masterpieces of the children's "military-industrial complex" and choose the one you need in your work.
We make military equipment from a variety of materials.
Contained in sections:Includes sections:
Showing publications 1-10 of 457 .
All sections | Military equipment. DIY crafts, master classes
Since I always prepare for the holiday on February 23, this time we made Military aircraft. She told the children that watching the birds soaring in the sky, a person always wanted to learn how to fly. The first attempts to take to the air people made many centuries ago. They...
 Master- manufacturing class crafts for Victory Day"Tank". Victory Day Great holiday - Victory Day, memorable date for the country. Our grandfathers won it back, It cost them dearly! And we will remember this day forever, Their feat in the heart forever. They are eternally grateful...
Military equipment. DIY crafts, master classes - Abstract of the GCD on the application “Military transport. Tank" for the senior group
Publication “Summary of the GCD for the application “Military transport. Tank "for the senior..."  Kosheleva Anastasia Vladimirovna Abstract of the GCD on the application for senior group“Military transport. Tank" Educational area: « Artistic creativity". Types of children's activities: productive, cognitive, communicative, playful. Objective: To clarify and expand knowledge...
 MAAM Pictures Library
 Master class of cardboard crafts for decorating the hall by February 23 "Swift". Polkhova Julia School No. 1561 For the manufacture of my "Swift" I used a box (large) from the IKEA store. Paint knife, scissors, glue gun, putty, sandpaper, acrylic paint and of course...
 The plane flies around the world And the engine does not roar. If there is no motor in it, is it an airplane? It doesn't have a motor in it. One two Three! Take your seats! And tomorrow we will fold the motor From a sheet of paper. Shchedretsov A. In order to make such a plane, we need: - cardboard - scissors - glue ...
Synopsis of multi-age interaction "Gift to dad by February 23" Airplane "" joint visual activity Age of participants: children 5 - 6 years old and children 3 - 4 years old Form of organization: volunteer club "Dobrotop". Direction of activity: "You know how, teach another." Goal: developing interest in the volunteer movement, creating conditions for the self-realization of preschoolers and increasing their ...
Military equipment. DIY crafts, master classes - Craft for the exhibition "The famous T-34 tank" for Victory Day
 When the rain is crying over Russia And the thunders of spring are thundering, I remember with pain in my heart Those guys who did not return, Who laid down their lives for the Fatherland, For the happiness of their Motherland, And they themselves did not recognize life, And did not leave children ... They dreamed and loved, But, hugging mothers, fearlessly went to the front ...
 The victory in the Great Patriotic War of 1945 filled the hearts of servicemen and civilians of our country with happiness. This holiday comes to us in every home. On May 9, we solemnly welcome the military parade and honor our ancestors, who gave us a peaceful sky. We are transmitting...