How to make a tank from waste material. DIY cardboard tank step by step. Tank of two sponges
Introducing a completely harmless tank that will not shoot, destroy homes and families, but, on the contrary, will become interesting gift for a man for the Defender of the Fatherland Day. It just so happened historically that all residents of our country celebrate men's day, the fair half gives gifts to their beloved and dear defenders. It is impossible without them, because men are our support, inspiration, strong and courageous side of the family. Of course, in life it is better not to see a real tank, never to hear its deafening shots, unless at a festive training ground. But, nevertheless, representatives of the stronger sex are interested in detailed models exclusively from a technical point of view. Many of them serve in the army, are patriots of their great homeland. Therefore, a self-made tank is always actual craft... Now let's take a look at how to make a souvenir model in order to surprise your man with an unusual present. Master Class .
Materials (edit)
For the tank we need:
- 8 strips of regular or glitter foamiran white(2 mm thick) - 1 * 20 cm (for travel wheels);
- 2 strips of ordinary green foamiran (1 mm thick) - 1 * 20 cm (for modeling the top of the tower);
- 4 strips of ordinary green foamiran (1 mm thick) - 1.5 * 20 cm (for modeling the lower part of the tower);
- 1 strip of ordinary green foamiran (1 mm thick) - 5 * 20 cm (for the body);
- 1 strip of ordinary green foamiran (1 mm thick) - 0.5 * 30 cm (wrap a toothpick and make a barrel);
- toothpick;
- green rhinestone tire (you need to make a double track structure);
- 2 squares 2 * 2 cm made of red glitter foamiran (for two stars);
- 10 half-beads of black color - 6 mm in diameter.
How to make a tank with your own hands
1. Prepare the strips for work, instead of foamiran, you can use felt, but it is better to use a material of dense texture.

2. Cut strips from white foamiran. Twist each in the form of a flagellum, glue the ends. Thus, you get a kind of wheels. Roll the strip tightly to get all the wheels the same size. To begin with, you can prepare a toothpick, on which you can simply wind the strips.


4. Take the widest green strip. Glue the wheels on one side, on both sides, placing them standing. Thus, 2 identical white structures must be placed symmetrically.

5. Wrap the rest of the foamiran over the top of the wheel. Tape the end of the strip. The main part of the chassis of the tank is formed.

6. Glue the prepared strips of green foamiran 1 cm and 1.5 cm thick also into tight flagella. Connect 2 and 4 pieces by size.

7. From the green strass tire strip, cut 2 double wrapping strips on both sides of the side of the track. Stick on the strips, gently join the ends.

8. Collect upper part from two green wheels - it will be a tower.

9. Stick a small piece of green on a toothpick. This is the most scrupulous moment. It is necessary to carefully coat the surface of the material with glue, then smooth it out perfectly so that there are no creases and wrinkles. Stick small cords on the ends of the homemade barrel. Also cutting out thin stripes from the green canvas.

10. Glue the double turret onto the main body of the combat vehicle. Glue the barrel in front of the tower.

11. Next, according to the list, prepare black half-beads, 2 squares of red glitter foamiran. Cut out 2 stars. They can be glued to the structure of the tank, but instead, a tricolor tape or some kind of emblem will do.

12. Glue the black half-beads on the center of the wheels on both sides. A total of 10 black parts were prepared. Stick the remaining 2 on top of the tower and on the outer hole of the long barrel. Also glue the stars on the sides.

13. An interesting combat vehicle is ready. Beloved man will be pleased to receive such a kind of handmade. Another gift can be attached to it.
Other do-it-yourself tank options
You can also see how to make tanks as a gift from:


Do you like the product and want to order the same from the author? Write to us.
Still interesting:
See also:
Gifts for dad
This is what the son brought from kindergarten as a present for dad. Now our dad will celebrate the holiday in the best way ...
Men's mitts, crochet
We have a master class on knitting women's mitts. On the eve of the men's holiday - Defender's Day ...
Diary decoupage
Decoupage of the diary Another option for a gift for a man on February 23: a diary decorated in ...
Hello to all! On the agenda today are crafts that soon everyone will have to do with their children, because February 23 is such a holiday that is celebrated in every family. Of course, our beloved men should be very tasty to feed with a gala dinner, to make hot and of course salads. But what about gifts, you can't go anywhere without them, so take ideas and implement them.
Even if it will be a very small and modest souvenir, it will be made by hand, which will surely conquer your dad or grandfather. So sit back and watch, choose, and then get to work).
I remember when I was in school we made keychains from artificial leather in labor lessons, now you can make them from felt or foamiran.
There is nothing easier than taking a sheet of paper and folding amusing and funny little people out of it. This is me and such a famous technique as origami, such creative work suitable for a senior or preparatory group garden, look at this diagram and repeat all the steps. It turned out not that looks like a rocket, and your dad is sitting in it))).

You can also cut a rocket out of cardboard with the children, and then glue the windows, you get a simple application, children of the middle or younger group can handle it.

All men love tea and coffee, so why not take advantage of that.

But, as a teacher, you will have to make blanks from thick cardboard. Moreover, one part of the mug should be slightly smaller.

Fold in half using the accordion method.

Stick the label from tea bag on a string.

And then decorate by gluing the stripes that symbolize our flag.

It turned out to be simple and beautiful.
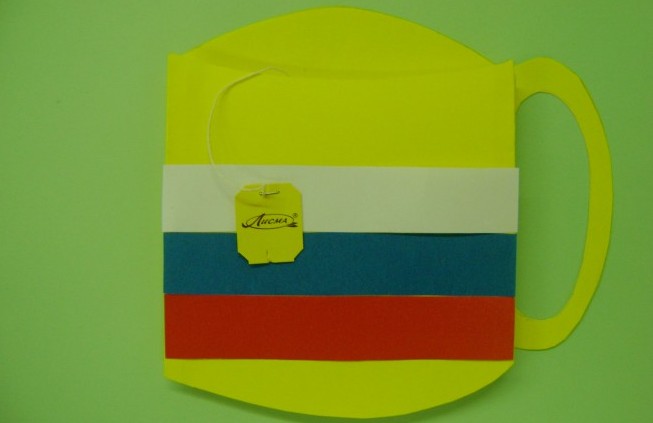
And most importantly, what the children liked and gave them great pleasure.

An interesting option would be a craft in the form of a locomotive.


Making gifts with schoolchildren to dads
Of course, on this day there will be congratulations and wishes, so I suggest that students primary school make a postcard out of paper using interesting stuff... For example, you can tastefully decorate a paper disposable plate.

Or create a real masterpiece postcard from very unusual materials in plasticine style.

We need:
- white A4 paper - 1 pc.
- printed text in the form of verses
- pencil, ruler, plasticine
- cocktail tubes
- fireworks or sparkles
- PVA glue

Stages of work:
1. Fold a piece of white paper in half. Draw a vertical line like this.

2. Then cut along its contour with special decorative scissors.


4. Lay out the flag from plasticine and arrange the numbers.

5. Then the straws different colors chop finely and stick them into the clay. Glue the salute, and then let the glue dry. Here is such a wonderful postcard, one might say it turned out to be a souvenir, all that remains is to add congratulatory wishes.

You can also, if you did not like the previous option, use the art of quilling for high school students.

Crafts from disks, the most ordinary CDs with the symbols of the holiday, look very bright and impressive.

Impressive, simple and quite creative looking.

You can resort to this method, it is more suitable for children from 5-10 years old, you will need glue, paper and scissors. This is the well-known shirt and tie.


You can complicate the task a little and make an origami-style tie.

A popular school children's craft can be a boat made of cardboard and paper.

An original present will be a photo frame, and you need to cut a rim from an ordinary solid box, and then use woolen thread arrange and refine with asterisks. You can use stickers, rhinestones and scrapbooking materials.

Can grandfathers make a medal from plasticine balls.

Paper soldier's master class for the little ones
The simplest and easiest is a plasticine craft. You can find a lot of variations, because the symbols of the upcoming men's holiday will be all kinds of cars and road transport.
In the first place, as always, is the tank, it is made by the majority, I do not know why, but it happened by tradition, probably this is one of the symbols of victory.

You can make it exclusively from modeling dough or plasticine, as well as using matchboxes.

There is another option, use all sorts of things like nuts, dowels and other working charm.

The second place is taken by airplanes.

If you have never done them, then here's a step-by-step instruction for you.

Or build a helicopter, just don't fly away).

For older children, you can make a gang of soldiers.

Do you want to know the features of their manufacture? Then see all the step-by-step steps further and repeat all the steps to fold and fold the paper.
Here's a set you need for work:

Now, with regards to actions, move from right to left, and then everything will work out for you.


In general, then you can make a wall newspaper and decorate the group or class. Looks funny and funny, isn't it?

Learning to make gifts for dad on Defender of the Fatherland Day
The first option that students use is the trimming method, when they cut out corrugated paper squares, then wound on a stick or pencil and glued to the sheet.


Or the real picture, well, of course, you have to tinker a little longer.

For younger children, the ball rolling technique is well suited.

Well, and the most difficult option is a do-it-yourself photo frame made of special material, like ball plasticine.

If your children are still very young, then you can offer them to make such a boat out of a sponge for dishes and chopsticks, this is just for kids).

In addition to everything, you can learn a poem.

Crafts master class with preschool children

We need:
- ice cream sticks - 8 pcs.
- juice tube - 1 pc.
- PVA glue
- gouache and brush
- scissors
Stages of work:
1. Make a base, so to speak, a rod, which will hold the wings. Take 5 sticks and glue them together with PVA glue.

2. Then glue one stick perpendicularly, but step back a little from the edge, as shown in this picture.

3. After that, glue the pieces of tubes on the sides.

4. Approximately the following should turn out. If you also have it, go to the next step.

5. At this stage, you need to glue the second stick parallel to the first stick, you get a wing.

6. Make the tail of the plane from another stick, just halve it.

7. The most long-awaited moment, this design, take brushes and gouache and paint the body.

8. And here he is such a funny and super-duper airplane. By the way, you still need a propeller, do not forget to glue it together with a button or a bead.

Or you can do almost the same thing with a clothespin.

I also really liked the option from the usual plastic bottle and tubules.

If you also liked this work, take it to yourself, here are its steps.

We make toys from various improvised means
In most cases, men like all kinds of equipment, including military ones, so from paper napkins and matchboxes you can do the following, tank:

Or an ordinary car, a car.

Using a dish scouring pad, fold the small tank up.

Or arrange a delicious gift using the pile of chocolates you can ask your mom.

Or you can make an applique.

In general, surprise your loved ones with something, I gave you ideas for reflection, so think and recreate. Good luck.

If among your acquaintances there are people who are fond of hunting, for example, grandfather, then you can give him such a junk souvenir in the form of deer antlers from a plastic bottle and lids.

You can use your Lego constructor and make a stand for pencils and pens, writing utensils.

You can build a racer from a toilet paper sleeve, take a man from a constructor.

Of course, papier-mâché toys are also made, but this is difficult.

Or such a small masterpiece from cotton pads- postcard.

And that's all for me. I wish you that you will succeed in everything conceived, patience and perseverance, as well as inspiration and creative ideas. Bye everyone, see you!
Best regards, Ekaterina Mantsurova
Where important historical dates are studied according to the program.
Young children are rarely interested in history, since what happened many decades ago does not fit into the framework of their understanding. However, they, especially boys, with a great desire to study the types of weapons and that were used during the war - in particular, the Great Patriotic War.
DIY tank out of the box
For example, when talking about World War II, you can offer to make a tank for children with their own hands from cardboard or even ready-made cardboard boxes. In the process of work, it will be possible to tell the children that at the time of the outbreak of the Second World War, the most powerful tank army was in Russia. And the biggest tank battle took place near Kursk, where the Russian army won.
DIY tank craft is done as follows:
Prepare in advance two flat boxes of different sizes, green paint, scissors, bottle caps, a brush and glue. You will also need thick paper or sheet cardboard. In the larger box we cut a fairly large window, slightly smaller than the area of the smaller box. And in the smaller one we will make a narrow small hole.

Let's arm ourselves with paints and glue. We glue a small one to the big box, just above the hole. Twist the tube out of cardboard - the muzzle - and fix it in a small (upper) box. Let's cover the resulting tank hull and the barrel with green paint.

Cut strips out of black cardboard, glue them on the sides of the case, insert a row of caps inside - we get tank tracks. We make tongues of flame from red cardboard, insert into the barrel.

If large box do not glue it, the tank can be used to store various little things, which is very convenient - it turns out that a self-created tank from scrap materials will also become a cache.
DIY plasticine tank
A very effective tank can be made from ordinary plasticine. We connect the plates of green and black plasticine.

We fix the turret of the tank from light green plasticine.

We mold and fix the muzzle of the tank.

We supplement the turret and the rear of the tank with small elements.

Making a tank track.

The plasticine tank is ready!

A toy tank can be made from a matchbox.
Perhaps the most needed, pleasant and beautiful tank is a tank made of socks, a pen and sweet chocolates.

Such a serious one will help children to join history and learn how to create interesting things from quite ordinary objects.
Modular military origami
Modular origami - the ability to create a three-dimensional and realistic paper figure. The technique differs from ordinary origami, since all the figures are not made of one sheet of paper, but of the same modules. In this article, you will learn how to make military crafts, method modular origami: an airplane and a ship that can be used as a visual aid in history lessons or presented as a do-it-yourself gift to grandfather and dad.
Materials:
- origami paper;
- scissors;
- Ruler and pencil.
1. A4 sheet can be cut in two ways, depending on which rectangles of 53 × 74 mm or 37 × 53 mm are obtained. The first way is to divide the length and width into 4 equal parts, and in the second, divide the width into 4 parts and the length into 8 parts.
2. Cut the sheet along the marked lines and start folding each piece. To do this, fold the rectangle in half, turn it over and again in half. After that, unfold once to form a visible fold line.


4. Lift the edges of the triangle up and bend their corners through the large triangle.

5. After that, unfold and fold these corners into triangles along the marked lines.


To assemble this airplane, you need to make 89 modules according to the scheme described above. To make the product more original, use paper of different colors, for example, you can make 18 blue and 71 yellow modules. Starting with 2 blue modules, add yellow and again blue. You can watch a more detailed master class in the video.

Another aircraft model requires more modules. You will need 1142 modules of different colors: 40 gray, 242 black, 166 white, 694 red. You can choose the color yourself. Detailed master class will help you assemble an airplane, even without special skills, watch the video.

1. Make the first row of 47 modules and add another 47 modules for two rows in the same way.
2. In the fourth row of models there should be 51, since four additional modules need to be fixed on the sides of the bow and stern of the future vessel.

3. In rows from the fifth to the seventh, you need to attach 55 modules each, and do not forget to give the craft the shape of a ship. Squeeze the sides lightly so that the sailboat comes out not round, but slightly flat.
4. Then attach 55 modules, while forming the bow of the ship so that it is slightly sharp. In the ninth row, elements of a different color are worn on short sides to keep the structure of the ship strong.

5. On the side parts of the sailboat in row 10 there should be 8 modules each, they are inserted between adjacent modules (the long side is inside, and the pockets are outside).
6. At the stern, you need to make a rim of a different color. To do this, insert the modules in the usual way, not like in point 5.
7. In order to design the bow, put on symmetrically modular blanks in the extreme part. It turns out 9 modules in the 11th row, 6 modules will be in the 12th row and 3 in the thirteenth.
8. You will need about 140 modular triangles for the bottom. Start with three modules and add one in each row until there are 8 modules, but remember to try the bottom to the ship. After that, you will need to make 9 rows without increasing, alternating 7 and 8 modular rows. Starting at row 17, reduce the number of modules from seven to one.
9. To make a sail, take 252 modules, and you can independently choose the color and ornament. The first row should consist of 17 modules, in the next ten you need to alternate 16-17 modules, and starting from 12, reduce the number of modules (minus one for each side). It will turn out 16 rows, but in the last one, fasten the modules on the contrary and slightly bend the sail.
10. Take a wooden barbecue stick 20-25 cm long and glue it over with colored paper. It will act as a mast, so fix it in the center of the ship and attach the sail to it.
11. Collect the flag, and also make portholes.
We hope you enjoyed our article Origami DIY crafts on a military theme. Also go to other sections of the site, there you can find a lot interesting master- classes.
These are not only activities for little boys, but also a hobby for real adult men. DIY mockups military equipment can become like good gift, and the next addition to the collection.
After all, all boys love to play "war", they like military vehicles, airplanes, armies of soldiers - sometimes it’s worth buying all this big money, however, do not forget that military crafts can be made from scrap materials on their own or with parental help. If you take the process seriously, work out all the small details, you can get an original model of equipment that can be used for playing or just put on a shelf as an exhibit.

Beginning with early age, you can teach a child how to do, of course, you need to start with something very easy, but with what is necessarily related to the military theme. Who among us did not play airplanes in childhood, however, no one thought that a real aircraft carrier could be made from an ordinary paper toy. Such a homemade toy can be made even by Small child who just learned to paint with paints. Take a sheet of paper from which you will make an airplane in the future, give the kid to paint it in camouflage color. You can show him an example on the Internet, what color a real military equipment can have, and then let the child turn on all his imagination. After the sheet of paper is painted, let it dry a little. You can also draw stars or other military symbols on it, write the brand of the aircraft on the tail, and then start forming the model. By the way, the paper airplane, so familiar to us from childhood, is part of the ancient Chinese art of origami, so you need to learn how to fold it according to all the rules. If the origami technique is violated, then your aircraft may not fly, but simply piloted to the ground.

If at home you do not want to invent anything, then you can buy a ready-made set " Military Equipment - Crafts", With which you can make any military model. Such hobby very often persists from childhood and into adulthood. Men like to collect and glue, and then decorate models of military aircraft or tanks, ships or cars, this activity is very calming, and at the same time, requires full concentration of attention, so a person is easily distracted from all other affairs and immerses himself in work. Therefore, such an occupation is not quite