Miracle origami peacock step by step instructions. Modular origami Peacock: a step-by-step master class. Materials for work
Patience is one of the most important qualities in any arts and crafts.
If you have this valuable quality, we suggest creating a real masterpiece from small pieces of paper - a peacock using the modular origami technique.
This art form of paper folding goes back many hundreds of years. His homeland is considered Japan, to which paper was brought from China along with monks. The earliest origami crafts were the Sanbo boxes, into which they put offerings to the gods - burdens. They were not yet full-fledged origami crafts and were primarily of a ritual and religious nature. Only at the end of the 12th century, origami emerges from the gates of temples and becomes an independent art. Origami figurines are even used as the coats of arms of noble houses. The ability to add paper crafts samurai trained. Butterflies and paper birds helped to express love and friendship. Possession of this technique of folding sheets of paper was considered a sign good taste... Noble men entertained ladies at receptions by creating various crafts origami. From the end of the 16th to the 19th century, new figures and folding methods were invented.
Since the second half of the 19th century, origami has come to Europe. However, some simple figures, for example, birds in Spain, have learned to fold on their own. Magicians in France, in front of the amazed audience, skillfully folded a sheet of paper into a mobile bird that could flap its wings.
Origami has several directions. One of the most unusual and beautiful - modular - was first mentioned in books from the 1700s.
So, if you have patience and a few simple crafts stacked of modules. It's time to try your hand at creating a magnificent peacock.
First, let's remind you how to make a module.
To create it, you need rectangular pieces of paper with an aspect ratio of 2: 1. The size of the module and the craft as a whole will directly depend on the size of the sheets.

You need to fold a piece of paper in half lengthwise. The fold line is on top. Then fold and unbend in half in width to outline the center line. Now we fold both upper edges into the middle. We unfold the paper blank with the back side on the face. Bend the extreme lower right and left corners to the base of the large triangle that we see. Bend over again lower part(now all) up. The fold line is the base of the triangle. It remains to fold the triangle in half, and the module is ready.
Let's start creating a peacock.
You will need:
- 856 modules yellow color.
- 114 modules white.
- 465 green modules.
- 1 black module.
- 1 red module.
- Some glue.
When creating blanks, make a little more than required. The paper may warp or tear as the modules are connected.
The first three circles will consist of 31 yellow modules each. The first circle is connected using the modules of the second. We simply insert two adjacent corners from different modules into the pockets of one module of the next circle.

Fourth row. We start in the following order: 1 green module, 1 yellow, 1 white, 5 yellow modules, 1 white, 1 green module, all other modules are laid out in yellow.

We do the next 8 rows with decreases. We turn the structure upside down. In each subsequent row, it is necessary to reduce by one the number of yellow modules that are between the green ones (the shorter side).

The photo shows that the modules are green and white flowers in each circle are obtained with an offset. White parts form an angle (see photo). Our figure begins to round off due to decreases. In the last two circles, the white modules are gone. In the 12th circle from the beginning, there should be only one yellow module between the green modules.
The peacock's body is already almost folded. We begin to shape the breast.
The first circle will consist of 1 green module, 3 yellow modules, 2 green modules, 3 yellow modules and 1 green module.
Now we will do each next circle by 1 module less.
The second circle of the breast. 1 green module, 3 yellow modules, 1 green module, 3 yellow modules, 1 green module.

Third row. 1 green module, 6 yellow modules, 1 Green colour.
Fourth row. 1 green module, 5 yellow modules, 1 green module.
Fifth row. 1 green part, 4 yellow parts, 1 green module.
Sixth row. 1 green module, 3 yellow modules, 1 green blank.
Seventh row. 1 green part, 2 yellow modules, 1 green blank.
Eighth row. 1 green module, 1 yellow detail, 1 green module.

It's the turn of our peacock's neck. It will have 17 rows. They can be conventionally divided into even and odd. The first and all the other odd ones will consist of two white modules. The second and all the other even ones will consist of 1 green module + 1 yellow module + 1 green module. In this case, the green modules will be put on the extreme corners of the white modules of even rows, and the yellow ones - on two adjacent corners from different white modules. The last 17th row will consist of only two white pieces.
Now we collect the head of our peacock.
The first, second and third rows are similar to the neck. The fourth will consist of two green modules, the fifth row - 1 green module. Next, we construct the beak. Now it is the turn of 1 black module for the next row and 1 red module for the final seventh row.

The next stage of work will be the wings.
We collect them symmetrically on both sides of the neck.
First row of the wing. 1 green module, 3 yellow modules, 1 green blank.

Second row. 1 green part, 2 yellow modules, 1 green module.
Third row. 1 green module, 1 yellow module, 1 green module
Fourth row. 2 green modules.
The last fifth row. 1 green module.

Our peacock will stand on a specially made stand of eight rows.
The first 4 will be made in the form of a circle of 27 pieces of yellow modules.
In the fifth row, add green modules in the following sequence: * 1 green module, 2 yellow modules *, repeat from * to the end of the circle. in total it turns out nine times.
Sixth row. * 1 green module, 1 yellow part, 1 green *, repeat from * in a circle. Only nine times.
Seventh row. Here we will divide our stand into 9 petals. The row will consist of nine doubles of green modules. We skip two corners from neighboring modules between them.
The eighth row will consist of 9 green modules.

Now comes the turn of the most interesting and beautiful fragment of the peacock - the tail.
Look carefully at the photos.
First p. consists of 9 modules of white color, located with the long side to the front.
Second p. consists of 8 modules in white. We put them on the modules of the first row, too, with the long side on the front side (LC).
Third p. we add similarly to the first of 9 modules, but already in green.
Fourth p. will consist of 8 green modules, located with the wrong side up (FROM) (see photo). It differs from the front side in that it looks shorter when the module is put on the corner of the previous row.

Follow step by step photo.


The final part is creating beautiful tail feathers with an "eye".
We put modules in a row in the sequence: 1 green, 1 yellow, 1 green, 1 white (2 times). Finishing off on white.
There are already two modules in the next row, both are yellow.
The next row consists of 1 yellow module, 1 green and 1 more yellow.
Follow the step by step photo. You can optionally change the color of the feathers and separately the "eye".

All the details have been created, it remains to collect them.
We just put the body of the peacock on the stand. We attach a tail to the back; beautiful feathers with "eyes" must be inserted between the teeth of the tail.
The head and neck will be a little more difficult. It needs to be bent. You can apply a little glue to the modules, this will help the neck not to break during the arching process.
Admiring the created peacock.
Peacock in modular origami technique(option 2)

Let's start with the body of the peacock.
You will need:
- 921 module of blue color.
- 371 yellow modules.
- 293 white modules.
- 254 orange modules.
- 35 modules of green color.
- 42 modules are dark green.
- 38 modules in red.
- 2 modules in pink.
- 1 black module.
In this master class, the modules are made of rectangles 1/32 from A4 sheet.
First, let's design the body of the peacock.
The first two circular rows will consist of 36 blue modules.
Third circle. 8 blue, 1 orange, 8 blue, 1 orange, 17 blue and 1 orange modules.

Fourth circle. For each orange module of the third circle, you must put on 2 orange modules. The rest of the modules will be blue. The number of parts in a row remains 36.

Fifth circle. We start with the green module, located on two adjacent corners of the orange modules. So, 1 green module, then 1 orange module, 6 blue parts, 1 orange, 1 yellow, 1 orange, 15 blue modules, 1 orange, 1 yellow part, 1 orange, 6 blue modules, 1 orange.

Sixth circle. We put on 2 green modules on the green module, then 1 orange module, 5 blue parts, 1 orange, 2 yellow, 1 orange, 14 blue modules, 1 orange, 2 yellow, 5 blue and 1 orange parts.
Seventh circle. 1 yellow module, 1 green, 1 orange, 4 blue modules, 1 orange, 1 yellow, 1 pink part, 1 yellow, 1 orange, 13 blue modules, 1 orange, 1 yellow, 1 pink module, 1 yellow, 1 orange, 4 blue modules, 1 orange, 1 green.

8th p. 2 yellow modules, 1 green, 1 orange, 4 syn. colors, 1 orange, 2 yellow, 1 orange, 14 syn. colors, 1 orange, 2 yellow, 1 orange, 4 syn. colors, 1 orange module, 1 green.
9th. 1 red module, 1 green, 1 orange, 5 blue details, 1 orange, 1 yellow, 1 orange, 15 blue, 1 orange, 1 yellow, 1 orange module, 5 syn. colors, 1 orange, 1 green module.

The 10th starts with 2 green modules, 1 orange, 6 syn. details, 2 orange, 16 syn. colors, 2 orange, 6 syn. colors, 1 orange.
11th we start with 1 green module, then 1 orange, 7 blue, 1 orange, 17 syn. modules, 1 orange, 7 blue, 1 orange.

12th 2 orange modules, 4 blue, 1 yellow, 24 blue, 1 yellow module, 4 blue pieces.
The next step is the poultry breast.
13th 1 yellow detail, 1 blue, 1 green, 2 blue, 1 orange, 2 blue, 1 green, 1 blue. details, 1 yellow.

14th 1 module yellow, 1 blue, 1 green, 4 blue, 1 green, 1 blue, 1 yellow.
15th 1 detail yellow, 1 blue, 1 green, 3 blue, 1 green module, 1 syn. colors, 1 yellow.

16th 1 F, 1 C, 1 W, 2 C, 1 W, 1 C, 1 J.
17th 1 F, 1 C, 1 W, 1 C, 1 W, 1 C, 1 J.
18th 1 F, 1 C, 2 W, 1 C, 1 J.
19th 1 F, 1 C, 1 W, 1 C, 1 J.

20th 1 F, 2 C, 1 J.
21st 1 F, 1 C, 1 J.
Now it's the turn of the peacock's neck.
The 22nd row consists of 2 blue modules.
23rd 1 F, 1 C, 1 J.

from the 24th to the 41st for even rows - 2 blue modules, for odd rows - 1 F, 1 C, 1 J.
42nd consists of 2 blue modules.
43rd 2 modules yellow.
The 44th row begins with a beak - 1 module in black.
45th 1 red module.

Now we will design the wings of our bird. We start with the 12th row of the torso.
13th 1 F, 1 C, 1 W, 1 C, 1 W, 1 C, 1 J.

14th 1 F, 1 C, 2 W, 1 C, 1 J.

15th 1 F, 1 C, 1 W, 1 C, 1 J.

16th 1 F, 2 C, 1 J.
17th 1 F, 1 C, 1 J.

Let's start creating the tail. Again from the 12th row of the torso.


The basis for the ponytail has been created, now we are starting to design its lush part.
You will need:
- 364 blue modules,
- 208 yellow modules,
- 202 orange modules,
- 176 modules of white color,
- 42 theme modules. Green colour,
- 36 modules in red.
The 1st row consists of 28 blue modules.
If you have a significant amount of patience and perseverance, then any applied art, including origami, is within your reach. Making paper crafts is a creativity that goes back hundreds of years. The birthplace of origami is Japan, to which paper was brought by Chinese monks many centuries ago. And only in the middle of the nineteenth century, the art of folding figures out of paper came to Europe.
Modular origami
One of the most popular directions of origami is considered modular. The first mention of it dates back to 1710. Learning this skill is not as problematic as it seems at first glance. The main thing here is to understand the technique of adding one module. And then it will not be so difficult to make an unusual flower, graceful bird or animal out of individual paper units.
If in ordinary origami the figure is made up of only one leaf, then in the modular one many multi-colored or plain sheets, folded in a special way, take part.
We suggest you stock up on a drop of patience and master this technique. The topic today is "Peacock from modules". The master class will consist of teaching the technique of folding a single module and a diagram that will help to assemble a beautiful bright bird. We will offer several photo options, which color scheme and technique to adhere to - everyone will already decide for himself.

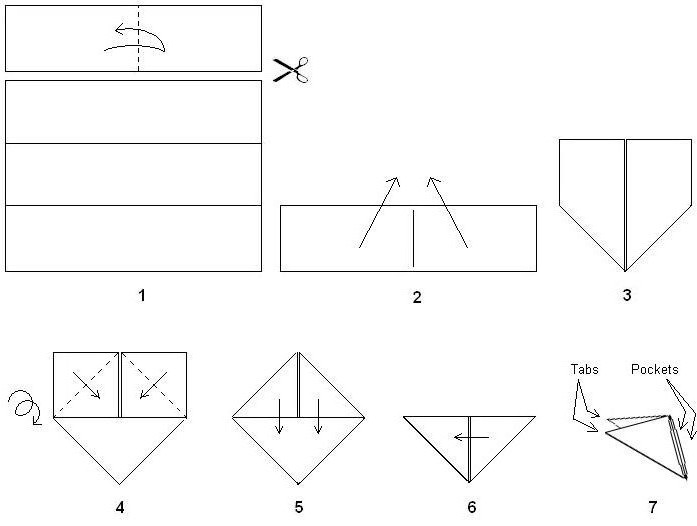
Making a module
First, let's learn how to make single parts - modules. Any figure in origami consists of them, and a peacock from modules will also fold. Step-by-step instructions are presented in the photo, but we will also add a little explanation in words.
To make a beautiful shape using modular origami technique, you need a piece of paper. The aspect ratio must be one to two. That is, one side should be exactly twice as long as the other. Depending on the size of the sheet, the size of the module and the craft itself will change.
The first thing to do is fold the piece of paper in half. Then, having outlined the center line, fold the corners of the paper towards the center. We turn over our workpiece and also bend the bottom edges to the base of the module. Now bend the bottom up completely. The last step - fold the triangle in half - and you're done. Now in the resulting "pockets" we will insert one triangle into another. And in this way we will get a beautiful peacock from origami modules, the scheme of which is clear and simple.
How many triangles with pockets need to be made? How many blanks do you need? The peacock, the scheme of which will be presented a little later, can include up to a thousand or more such blanks. It remains to decide on the color scheme and prepare as many modules of a certain color, which is necessary for each row of origami.
Tip: when you decide on the color scheme, then make a little more blanks for each color. Sometimes, during operation, modules can break or deform, and then they are no longer suitable for use. The stock should always be. We make more triangles so that we have a beautiful peacock from origami modules without problems and time consuming (the diagram will help you).
What is needed
We will offer you our color scheme, but it can be absolutely anything. If you plan that a peacock from triangular origami modules will "settle" in your living room or nursery, then color range you can choose so that the craft becomes worthy of the elements that fit well into the interior of the room. If you make it as a gift, then you can choose any color schemes that are simply "to your taste" and "to your liking."

- 856 yellow blanks;
- 465 - green;
- 114 white modules;
- one for the spout;
- one black triangle;
- glue.
Let's make a reservation right away. We offered the simplest set of colors, so that it would be convenient to talk about how to make a peacock out of modules. But you try to make the color scheme even richer, especially in the place where the tail is located. Then the bird will turn out to be truly graceful and bright.
First circles
Determine the size and make the first circle, inserting one triangle into the pocket of the "neighbor". In this way, yellow we will form three circles. Our initial circle will consist of the 31st triangle. In the fourth circle, we will already add other shades of "feathers". We do it as follows: the first is green, the next is yellow, then white, five yellow, one white, one green, the rest are yellow.

Making subtractions
Let's say right away that everyone has different ideas of how a peacock from origami modules should look like. The diagram can be borrowed from the Internet or drawn personally by you. Therefore, do the decrease in the tummy area as shown in your diagram. We will do this after the fourth row and up to the eighth.
To do this, turn the model over and insert the triangles so that in the next rows there is one less workpiece. Do not forget to follow the order of the colors specified in the fourth row. The body is ready.
Breast
Now it's the breast's turn. the scheme of which we offer has the same coloring in the chest area as in the tummy area. Therefore, we make the first row like this: the first triangle is green, three yellow, one green, three yellow and one final green module. Now you will need to make eight more rows, making decreases in the neck area.
Neck
The neck is one of the most graceful parts of any origami peacock. The layout and design of the neck for all models is similar to each other. Here it will consist of seventeen rows. Let's divide them in this way: even rows and odd ones. All even ones will consist only of white triangles, there will be two of them. But the odd rows are made up of three triangles: yellow - the first, then - green, the final - yellow. The last row is only white modules.

Head
We do the first three rows in exactly the same order as we did on the neck. The 4th is made up of two green blanks, the fifth is made up of one green triangle. Now it remains to fix the nose, that is, add black and white modules at the end of the neck.
Tail and wings
As for the tail and wings, here we would advise you to make a combo model. Take several options and connect them together. The tail starts at eight to nine modules and then grows. Try to add the blanks gradually so that the design is symmetrical.
As for the wings, things will be even easier here. They usually start with one of two triangles, then join two or three in one row. The upper, fluffiest part of the wing can include up to fifteen modules. So our peacock is ready from modules. The assembly diagram is simple, we hope it is described clearly. Everyone will cope with the task, even a beginner who decides to train his patience.

Stand
It remains to make an elegant stand on which the peacock will be located from the modules. The scheme for creating such a stand resembles the first rows of a peacock's body. That is, we make a circle of thirty modules, then add a few more rows. We insert the first rows of the body into the last rows of the stand.
If a person has good patience and determination, then you need to try to master the origami technology. This kind of creativity requires attentiveness, otherwise the result is unrealistic. Modular origami "Peacock" is a difficult scheme. Its highlight is a huge number of modules. Teenagers or adults can handle this craft.
Origami history
One of the most interesting directions of origami is modular. The first statements about this technology were back in 1710. Learning this technology is not as easy as it might seem at first.
The most important thing is to understand the technology of adding 1 module. And then it will not be so difficult to make an original flower, a beautiful bird or an animal from different paper parts. If in a simple technique a figure is made from only one leaf, then in a modular one, many colored or monophonic leaves are used, folded in a certain way.
Materials for work
Before assembling a peacock using the origami technique from modules with your own hands, you need to find materials for work. You will need the following:

Adding modules
The master class begins with the preparation of modules of different colors. You will need to create details while adhering to a specific shade. It is best for newcomers not to take many flowers, but to make a bird from three shades: yellow, green and snow-white. The modular origami peacock, the assembly scheme of which is available to many, has an unusual structure. It needs colors: red, orange, green, yellow, snow-white, blue. Add up the main elements according to the step-by-step instructions:

First circles
 Decide on the size and then create the first circle by immersing one triangle in the pocket of the "neighbor". In this way, 3 circles can be made in yellow. The entire first circle will be made from the 31st triangle. In the 4th circle, you will need to add other colors of the "feathers".
We carry out the work in the following way: the first is green, the second is yellow, then - snow-white, five yellow, one snow-white, one green, the rest are yellow.

Create subtractions. It is worth saying that everyone has different ideas about how paper origami should look, especially a peacock. The scheme can be taken from the network or created by you. Therefore, perform the reductions in the abdomen in the manner shown in your diagram. In this version, it is performed after 4 rows and goes up to 8. To do this, you need to turn the product over and insert the triangular elements in such a way that in the next rows it becomes one piece less. Do not forget to keep the order of the shades selected in the 4th row. The body is done.
Big breast.
 Now you can go to the sternum. The bird from origami modules, the scheme of which the master already has, has the same color scheme in the chest area as in the abdomen. Therefore, we perform the first row in the following way: the first triangular element is green, 3 yellow, 1 green, 3 yellow and one last green element. Then you will need to create 8 more rows, performing subtractions in the neck area.
The neck is one of the most beautiful parts of any modular bird. The scheme and design of this area for all products converge with each other. In this version, it will be created from 17 rows. Divide them in the following way: even rows and odd rows. All even ones will be made only of snow-white triangles, there should be 2 of them.
But the odd rows are made of 3 triangular elements: the first one is yellow, then green, and the last is yellow. The final row is only white details. Head... The first 3 rows are performed in exactly the same order as they were created on the neck. The fourth is made of 2 green elements, the fifth is made of 1 green triangle. Then it remains to complete the nose, that is, add a black and white element at the end of the work.

Ponytail and wings.
 As for the tail and wings, it is better to create a combined model here. First you need to take a couple of options and string them together. The tail starts with 8-9 modules and then grows. You should try to add elements slowly so that the design comes out symmetrical.
It's even easier with wings. They start, most often, with one of 2 triangles, then joining takes place on 2 or 3 in one row. Above is the most voluminous particle of the wing, and can include up to 15 modules.
And now you can understand how an origami peacock with an openwork tail is done with your own hands, and, on occasion, make this original craft.
Attention, only TODAY!
This is by far one of the most challenging models.
Be extremely careful when folding the peacock figurine for the first time.
Start with a large rectangular sheet of glossy paper with a 2: 1 aspect ratio. The peacock model, which has become classic in origami, can be rolled up from various materials... For example, famous master Adolfo Cerssda made his peacock from a banknote.
Unlike most other models, making a peacock figurine will require your own initiative and decision-making skills.
Knowing the techniques and a certain amount of experience will help you succeed, however, I do not advise you to take on this model until you have fully mastered the basics of the art of origami.
1.Place a sheet of paper on the table with the side you want to be facing down.
The long sides of the sheet should be horizontally in front of you. Fold the sheet in half in both directions, expanding it each time. You have formed central lines, which you will be guided by in the future.

2.Fold the two outer left corners to the horizontal center line.

3. Unfold and then fold the base water bomb on the same left edge of the sheet.

4. Lift the part of the water bomb farthest from you and place it at a right angle to the model lying on the table.

5. Squeeze the triangular lip, making sure the shape remains symmetrical.

6.Fold the compressed part of the model in half, from top to bottom, using the hinge fold through the center.

7.Fold the short free edge of this part of the model back and up to the horizontal fold line so that the color disappears. back side sheet.

8.Fold the entire compressed part of the model upward using the hinge fold, and then repeat step 7 on the reverse side.

9. Unfold the folds until the model returns to the state it was in after surgery 5. Take a close look at the folds you made.

10.Now open the petal. To do this, grab the inner edge of the compressed part of the model and turn it outward, to the left so that it touches the extreme left corner. Although you will need to make this fold, you are actually joining the ends of the two folds made during steps 7-8.

11. There is now a gap between the folds made in steps 7 through 8 as the edges of the paper are pulled forward and over and along the horizontal center fold. Smooth out the model.

12.Fold the petal fold back, obliquely and to the right using the hinge fold.

13.Fold the compressed portion of the model in half away from you, from bottom to top.

14.Repeat steps 4 - 13 on the lower half of the model.

15. Take each of the sharp corners (legs) in your hands and carefully spread them out to the sides, as shown in the photo.

16. Use the raised fold to hide the small center triangle inside the model.

17. Let the paper fold back. Smooth out the model.

18.Fold the sharp ends up using concave folds, creating guide folds for the next operation.

19.Fold both pointed ends with inner back folds to the position shown in the photograph.

20. Bend the bottom one layer of each peacock's leg upward, revealing the shape of the basic kite.

21. Sharpen each leg by bending the outer edges towards the center crease.

22. Bend the peacock's legs in half again upper part to the bottom.

23. Fold the remaining top edges of the base water bomb towards the vertical centerline, making sure they are tucked under the peacock's feet. In order to pass them, you will have to slightly lift the edge of each leg.

24. Pinch the horizontal raised fold across the model through the point where the corners of the flaps folded during step 23 meet. To do this, you will need to lift the paper with the folded surface towards you. Unfold the fold.

25. Operation 24 completed. The first fold of the tail is made.

26. Now pinch the other fold by grasping the raised fold made in Step 24 and pushing it away from you until it rests under the figure at the base of the leg section. Press down on the paper and make a new horizontal fold.

27. Let the fold made during operation 26 unfold.

28. Fold the bottom edge of the model up so that it touches the fold made in Step 26.

29. Unfold, and then again bend the bottom edge to the fold made during operation 28. Next, there is an alternation of operations: bending the paper in one way or another, you need to crimp the peacock's tail.
It does this by adding a series of concave and convex folds at the lower end of the model.

30. Change the fold made in step 26 from concave to convex and continue to divide it this way, dropping down to the line made in step 28. Then fold again.

31 Continue folding the paper until you have at least eight equal-width corrugated strips, as shown in the photo.

32. Flip the paper over, then draw additional horizontal lines between any folds that are already there, allowing you to split the tail into 16 stripes.

33. Start putting these stripes together. The first fold on the colored side of the paper, as seen in the photograph, is concave.

34. The stripes are brought together.

35. Holding the colored side of the paper up, unfold one final fold from the bottom of the model.

36. Turn the model over.

37. Fold back the top left loose fit the peacock's body is downward so that it runs along the horizontal line of the base. Unfold the fold.
Repeat this operation in the other direction. At the same time, the rabbit's ear will protrude from the hole in the upper part of the peacock's body.

38.Holding the model with the pleated side down, squeeze the top, focusing on the two folds made in step 37.

39. At the same time, fold the peacock's tail in half in a convex fold, bringing both edges of the shirred part of the model together.
Origami modular products are the best art. You can make really amazing masterpieces with little execution cost. Of course, you need to be careful and have patience. If you first practice creating ordinary crafts, paper triangular parts, you can achieve chic products from modules, come up with many different animals, birds, and other toys, for example, for Christmas. We will analyze step by step, for beginners, how to make a modular origami peacock in such a technique that it works out best.
One of the newest origami techniques is considered modular. The first responses to modular origami began in 1710. Learning this technique is not as difficult as it seems at first. The main thing is to begin to understand the technique of adding at least one module. And then it will not be so difficult to create a unique flower, a beautiful bird or an animal from individual paper units.
If in simple origami the craft consists of only one sheet, then in the modular, many multi-colored or monochromatic leaves work, folded in a certain way.
You need to be patient and learn this technique. main topic now "Peacock from modules with their own hands." The master class will consist of the rules for folding one module and a diagram that will help to assemble a beautiful colorful bird.
Gallery: modular origami peacock (25 photos)


Description of the master class
We create a module with our own hands.

So we disassembled our step by step master class to make an excellent fake.
Handsome man with colorful feathers

Scheme for creating a breast, assembly.
- The first row - in turn green (1), yellow (three), green (two), yellow (three), green (one).
- The second row is yellow (three), green (one), yellow (three).
- The third row is yellow (two), green (1), yellow (two).
- The fourth row is yellow (two), green (dino), yellow (two).
- The fifth row is green (1), yellow (four), green (1).
- The sixth row is green (1), yellow (three), green (1).
- The seventh row is all green.
- The eighth row is green (one), yellow (two), green (one).
For the neck, we will collect from seventeen color modules, alternating from one to the sixteenth module and expanding in turn: green, white, green.
Scheme for creating feathers, assembly.
- The first row is green (1), white (1), green (1).
- The second row is white (two), green (1), white (1), green (1).
- The third row is all green.
- The fourth row is green (two).
- The fifth row is green.
Create up five rows, make green modules in two rows. Then we put on the top one black module, one red.
Scheme for creating a tail, assembly.
- The first row is green (1), yellow (four), green (1).
- The second row is green (1), yellow (three), green (1).
- The third row is green (1), yellow (two), green (1).
- The fourth row is green (1), yellow (one), green (1).
- The fifth row is all green.
- The sixth row is green (1). Make two wings in the same design. For a product stand, four rows of yellow modules (twenty seven pieces).
- The fifth row is green (1), yellow (2);
- turn origami back side: yellow (one), green (one);
- We repeat nine rows;
- The seventeenth row is green (two).
- To create a tail.
- The first row is white (1-8-2) in one row;
- The second row is green (ninety four);
- So, up to the eighth row.
At the end, it remains to fasten all the particles, attach them to the body on the sides. We attach a peacock to the stand, feathers, tail, neck and head to it, slightly tilting it back. Last of all, you need to glue the peacock's eyes and attach a crest... You can make a blue peacock in the same way.