Sew a pirate hat with your own hands. DIY pirate paper hat
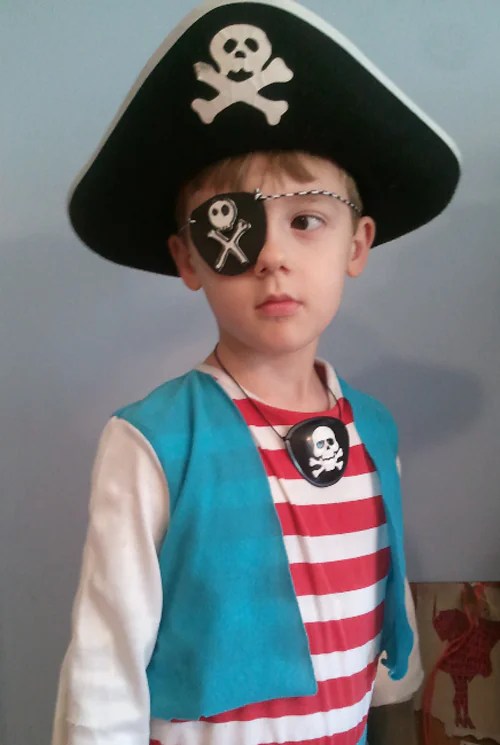
Pirate costume for a boy
Not a single pirate party children's party or the New Year is not complete without such a bright character as pirate... But for a character to be real and unforgettable, he needs the following attributes: pirate costume, a pirate's hat and hook, and an eye patch.
 In this article, the news portal "site" wants to invite you to try to make a pirate costume with your own hands from scrap materials. This undertaking will not take you a lot of free time, but it will have an impressive effect.
So, first of all it is worth understanding What does a real pirate costume consist of?
 The pirate costume consists of shirts with voluminous sleeves, a fluffy frill or an ordinary vest, pants, bandanas or cocked hats with a skull image, as well as all kinds of accessories in the form of an eye patch, a hook and a weapon.
If a pirate costume is necessary for a girl, then it can be any elegant dress, decorated with stripes with skulls and sabers, striped leggings or tights, and always a luxurious hat with a feather or a playful bandana.
So let's get started ...
We'll start with making a hat for a pirate .
 The most simple option a headdress for a pirate can become bandana... Use bright colors scarves, pre-decorated with thematic stripes and patterns. You can tie a pirate bandana according to the schemes below.
Pirate bandana


How to make a Jack Sparrow costume with your own hands?
DIY pirate paper hat
 To make a pirate hat, you will need a sheet of thick cardboard, paint, scissors and glue.
Cut out the silhouette of the future pirate hat from a sheet of cardboard. Separately make a cardboard headband that fits perfectly over your head.
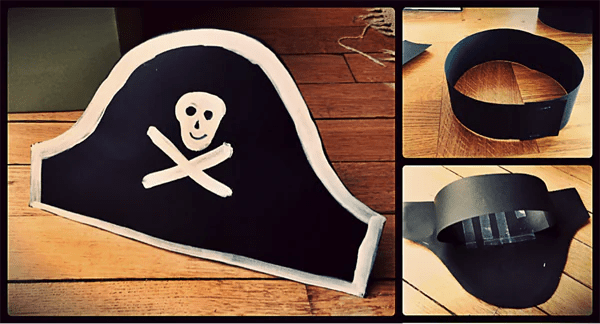 Now, using paints, decorate the future pirate hat. Remember that the real pirate hat is black. The decoration of the hat should be the crossed bones under the shard.
 If you stick a paper fringe to a pirate hat, then the hat will look much more interesting and voluminous.
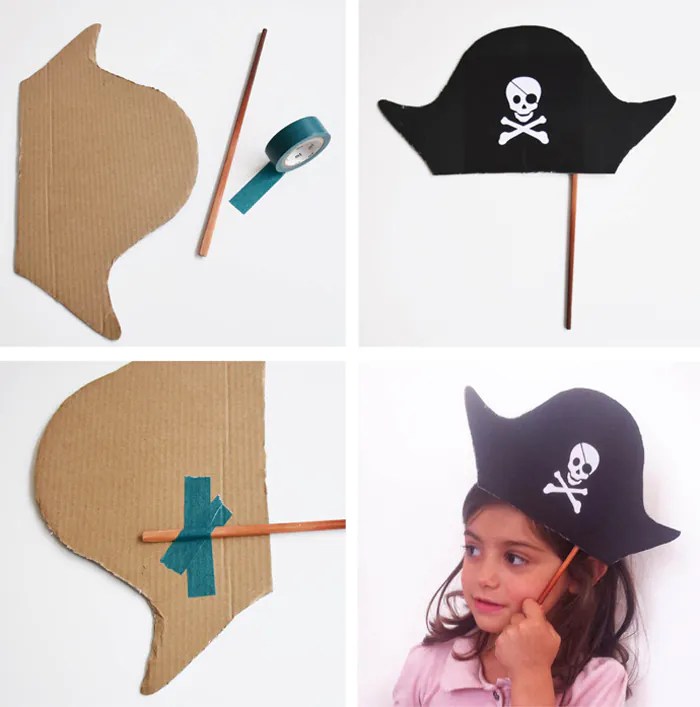 A pirate hat can also be made like a mask. Cut out the silhouette of a hat from a sheet of thick cardboard, paint it. And then use regular tape or tape to glue a stick or pencil to the hat. For this stick, the child will be able to hold the hat and apply it to the head.
DIY pirate eye patch
 What is a pirate without an eye patch?
Making such a bandage yourself will not be difficult.
 Cut out the circle required size from a sheet of thick black paper or cardboard. Thread a thin elastic band into the circle. The black circle itself can be decorated with a skull and bones.
The same can be done with fabric.
DIY pirate spyglass
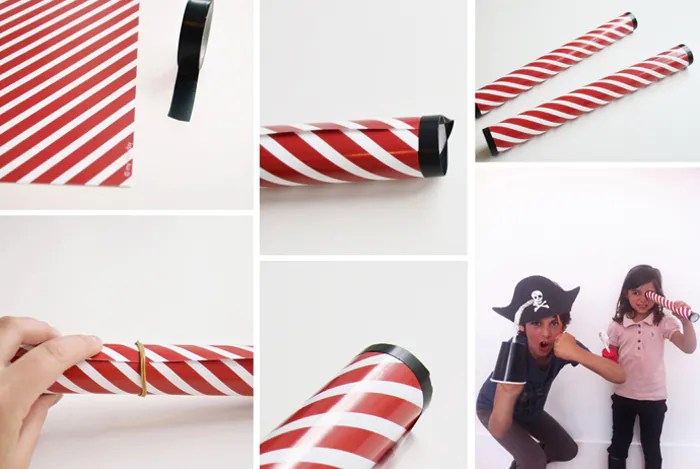
 To make a real pirate pipe, you will need several toilet paper rolls, glue, imitation leather or fabric, and paint.

 It is necessary to make a blank pirate telescope from toilet cardboard rolls. Wrap each cardboard roll in a piece of faux leather or paint with black paint. Then combine the finished cardboard rolls into a single whole (see photo).
DIY pirate hook
 Use a disposable cardboard cup to craft the Pirate Hook.
Punch a hole in the bottom of the disposable cup. Make your own hook out of cling foil and thread it through the hole in the disposable cup. Fix with glue. Now you can start decorating the cardboard cup.
 If you have used all the master classes presented in this article, then you should have a very bright and original homemade pirate costume. Be sure to complement the costume with weapons and makeup.
The tricorne hat of pirates, in the 17th century, was a gloomy hallmark of sea robbers. Boys are characterized by a considerable interest in the life and life of these heroes of various legends, legends, fairy tales and horror stories. And it is not surprising that on the eve of the holidays, which are often accompanied by carnival costumes, many mothers face the problem of creating a pirate costume for their little son. And the costume is quite difficult to imagine without a black cocked hat. Therefore, we will again turn to the topic of making a pirate cocked hat quickly and simply with our own hands. This article will present ways to make a cocked hat from fabric and paper.
We sew a pirate cocked hat from the fabric with our own hands in a step-by-step MK
To make a pirate hat, you need to prepare:
- Thick fabric - black.
- Cardboard - if necessary to seal parts of the hat.
- Scissors, thread with a needle.
- Decorative elements - picture, beads, braid.
You need to measure the head circumference of the future pirate. This distance will become the circumference of the cocked hat and the length of the crown. The inner circumference of the brim of the hat will also be equal to the circumference of the head, their length should be about 15 cm. The pattern of the crown, if desired, you can think of a little curved, so that the hat looks more naturalistic and beautiful. As a result, you need to cut out 9 details: the brim of the hat - 2 circles (4 halves), 4 details of the crown (inner and outer), and a circle that covers the crown. We sew the details, we get: two circles, 2 strips of the crown (inner and outer), a circle for the crown.

Now we sew double-sided details on a typewriter. Fold the brim of the hat with stitches outward. We sew the details of the crown and fold it so that the seams are inside. It is necessary to sew the margins of the cocked hat along the outer contour of the cocked hat, and then you need to turn the margins to the front side. Iron the seam with an iron and make a decorative stitch on the outside of the front side.
We trim the details of the crown, and connect it with the circle-bottom of the pirate's hat. Then we turn out the stitched parts and iron the lines with an iron.
Now we sew the margins with the crown. To make the product even, make four marks on the fabric - on the sides, front and back. These will be landmarks, following which will allow you to sew the details exactly. To decorate the hat, you can sew on the edge of the brim with a braid of gold, silver, red or white.

To complete the work, you need to give the hat a daring, robber look. To achieve this, we decorate the center of the front crown with the symbols of pirates - a skull against a background of crossed bones. The picture (thermal sticker, metal fittings) can be found in a craft store. But if there are no stores, then it is possible to create a picture yourself - we print and cut out, draw or embroider. At the end, we hem the edges of the brim of the hat so that we get a cocked hat as in the photo below.

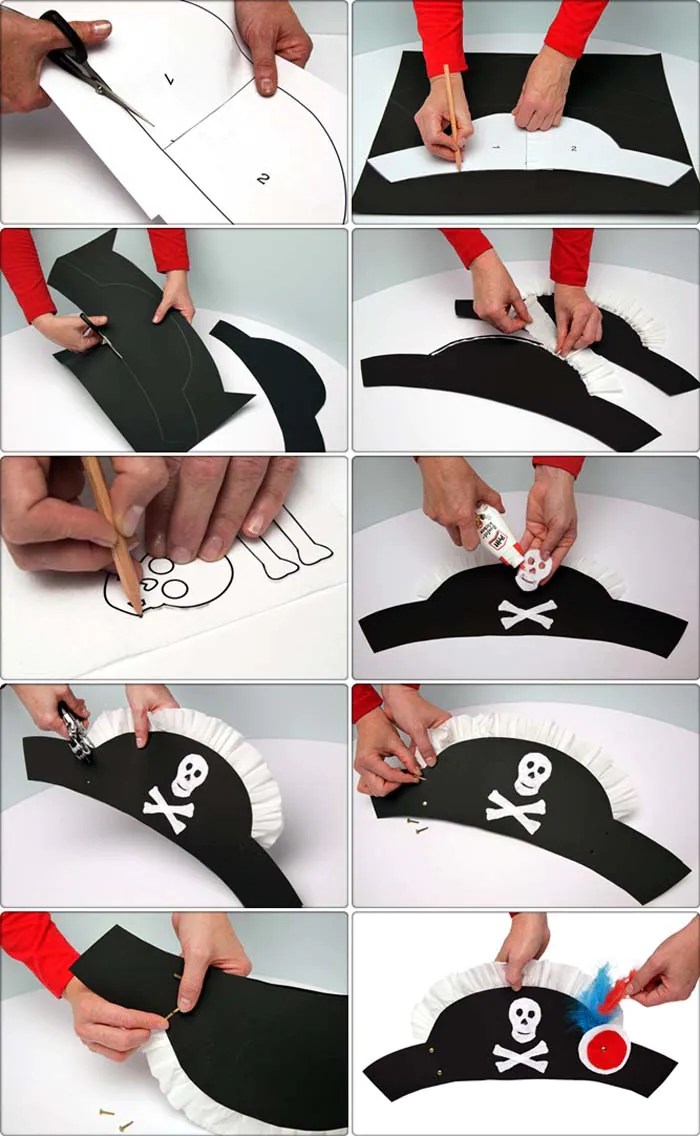
Consider the option of a children's paper hats
You can make a children's pirate hat out of paper in less than an hour, and by connecting the children to work, you can have an interesting and meaningful time.
For work we need: a sheet of A3 paper in black. If this is not the case, you can glue two A4 sheets. Two sheets of A4 white. Scissors, glue, elastic to tie.
1) We fold a square from a black sheet. We cut off the excess. We make a circle from the sheet, cutting off the corners with scissors.
2) We make a fringe. We take a sheet of white paper, fold it four times, and cut the strip into thin strips, not reaching the edge. Curl the fringe with scissors and glue it onto a circle.

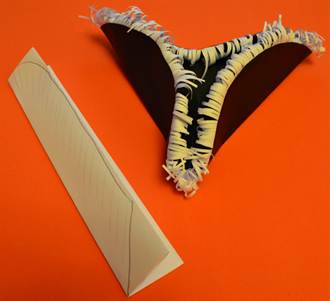
3) We mark 3 points on the circle - the distance between them should be equal to each other. And we bend three sides so that we get a triangle. Push the middle of the triangle from the bottom up and, lowering the sides, press the corners.
It turns out a cocked hat, but it still needs to be decorated.
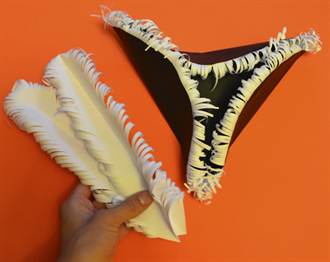
4) Take a sheet of A4 white paper and cut it into two halves along the long side. We bend each half again along its length and cut narrow strips with scissors at an angle, so that feathers are obtained.

We twist the edges with scissors or a pencil and glue the feathers on one side of the cocked hat.
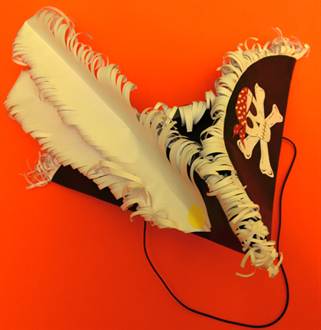
Then we cut out the skull and bones from white paper, which we glue together crosswise. Glue a piece of red paper to the skull and cut it out along the contour of the skull. We finish drawing the tails of the scarf in red, and the details of the skull (eye sockets, nose, cracks) black pen and glue everything together on the other side of the cocked hat. We make holes with an awl and fix a hat elastic in them.
The pirate cocked hat is ready.

Related videos
So that you can consolidate the knowledge gained in practice and get even more information on how to make a pirate cocked hat, we present you with several video lessons on this topic on how to work with your own hands.
Tell me, which of the boys did not dream of being a pirate, especially if there is such a reason as New Year. Fancy dress a pirate with a chic pirate hat is every boy's dream, which you can easily fulfill. We offer you a small master class on creating a headdress - a pirate hat for a child. I would like to clarify right away that the product has a classic character, but you can always turn on your imagination and "modify" the pirate image to your taste. As a basis, you can take a pirate character who has fallen in love with your child.
How to make a pirate hat
To create it, we will use:
- a piece of black or brown fabric;
- flizilin cut;
- thick white threads.
And so, first of all we need to make a pattern. It will consist of three parts:
- bottom;
- hat brim;
- crown-rim.
We measure the volume of the child's head. Add a few centimeters to the seam and cut out a rectangular piece of fabric. Now you need to cut the bottom on m. Its diameter should be equal to the length of the rim. Finally, we cut out the fields of the future cocked hat. The margin will be slightly wider than the border.
We cut out 3 pieces of each part. two of fabric, 1 of non-woven fabric.

Now we begin to sew our parts together. We take one piece for the bottom and fields and smooth the non-woven blank to them. This will help our hat to keep its shape better in the future. And so now we have two parts of each type. We sew them together so that the non-woven insert is inside each element.

Sew the bezel and sew it to the bottom of the cocked hat.

We turn it on the front side and we get such a mini "hat".

Now we smooth the non-woven blank to one of the parts of the hat brim. We attach the parts with the front part to each other and completely sheathe the edge. We turn the parts over to the front side and iron them well so that the outer seam is smoothed out.

Sew the "hat" and the fields of the cocked hat together from the front side.

We take thick threads and sew the brim to the rim, forming a cocked hat from our hat.

Here we have such a beautiful pirate headdress. You can additionally decorate the cocked hat with a large feather or a thematic applique.
Until four centuries ago, the pirates' cocked hat was considered the hallmark of these grim sea robbers. In this article, we propose to create a pirate cocked hat with your own hands, which boys will definitely like. Why exactly them? Well, most of all, a huge interest in pirates was shown precisely from the male representatives. They are madly in love with interesting legends, fairy tales and horror stories about pirates. Any holidays are accompanied by carnival costumes, and therefore the problem arises of how to complement the image of a little pirate boy with a beautiful cocked hat. Without her, it is completely impossible to imagine a costume of a sea villain.


The highlight of the costume and image
The process of making a children's pirate cocked hat, which we sew from fabric, can be followed on the example of a step-by-step master class.
In order to sew a hat, you need to prepare materials such as: black fabric (preferably thick), scissors and threads, and also braid, beads, any pleasant little things. If your fabric is not too dense, then use cardboard to seal some parts.

Let's move on to the creation process. The first step is to make the headdress patterns. To do this, you need to measure the circumference of your child's head. The result obtained will be the circumference of the cap and the length of the crown. Also this result will be the inner circumference of the brim of the hat. The very length of the brim is about fifteen cm. If you want your hat to look like a real one, then you will have to think through every bend of the fabric. In total, you will need to cut out four halves for the fields, as well as four details of the crown, a circle. Then we need to sew all the details, and in the end we will get: a couple of circles for the fields, a couple of stripes of the crown and a circle.

The next step is to machine stitch the double-sided pieces. Fold the margins out with the lines and sew. The crown is sewn, while the seams should be inside. We sew the fields of the headdress along the outer contour, turn the blank onto the front side. We carry out a machine stitch along the details of the crown and connect it with the bottom of the circle. After that, everything is sewn and ironed. Next, we sew the fields and the crown together. It is best to make four marks - front and back and sides. This is necessary in order for the hat to come out very beautiful and even. Also, four marks are considered landmarks, thanks to which you will be able to sew on these details. Optionally, you can sew on decorative elements: gold or silver, red or white braid.

Moving on to the last step of creating the cocked hat. In the end, you need to achieve a rogue hat look. In order for you to achieve this effect, you need to decorate face hats with various pirate symbols: crossed bones or a skull. This can be a picture that you can buy from a specialty store, or an image that needs to be printed and embroidered. At the very end, we hem the edges of the pirate hat, you should get a cocked hat, as in the photo below.

Paper tricorne
If you don't have time to sew a hat, you can also make one out of paper. You will need very little time for this, less than sixty minutes. If you have children, we suggest involving children in this process. Thanks to this, you will have an interesting and fun time.
Take a sheet of A3 black paper (or two A4 sheets), scissors, glue and an elastic band for tying, a couple of A3 sheets.
We make a square from a black sheet, cutting off the excess part. A circle is made from it, cutting the corners with scissors. Take one sheet of white paper and fold it four times. Before reaching the edge, we cut the part into thin strips. And also with the help of scissors we curl the fringe and glue it on the circle.

We make three points on the circle, the same distance between them. As a result, we bend the whole circle so that we get a triangle. Press down on the corners and push out the middle of the triangle. As a result, we got a cocked hat, which we will decorate in the future. Cut out the feathers from the second sheet of white paper.

Take your scissors and twist the edges again. You can also use a pencil. On one side of the hat, glue the finished feathers of white paper. Then we cut out the main pirate emblem - a skull and twisted bones, glue them on a cocked hat. Then a couple of holes are made on the hat in order to attach the hat elastic. Here we have such a cute hat for a sea pirate.

Related videos
We offer you to watch a selection of videos on how to create a pirate cocked hat with your own hands.
Costume carnivals are loved not only by children, but also by adults. When choosing an outfit for such an event, the choice often falls on the image of a colorful character - a sea robber. For a pirate costume, it is quite possible to pick up things from everyday wardrobe, providing it with characteristic accessories in the form of a neckerchief, a ring in the ear, etc. Still, a headdress is considered a distinctive feature of the outfit. At the same time, a pirate's hat is made with your own hands pretty quickly.
Paper cocked hat
The choice of this type of hat is based on reducing the time spent on the product. The paper accessory is not quite reliable, but with careful treatment it can serve more than once.
To work you will need:
- Black paper (A3 or glued A4 sheets);
- A4 white paper (thin) - 2 sheets;
- Scissors;
- Glue;
- Thin elastic band for hats;
- Gel pen with black paste;
- Awl.
At the initial stage, a square blank is cut out of black paper. To do this, fold the prepared sheet at a corner and cut off the extra rectangle.


The resulting square is converted into a circle by cutting off the corners from all sides.

The circle should be trimmed with paper fringes. A sheet of white paper is taken. Divided into four sections by re-folding along the long side of the sheet.

The paper is cut at the folds into strips. Frequent incisions are made across each strip. You should end up with four fringed stripes. The fringe is twisted with longitudinal pressing movements of the scissors. Alternatively, you can adjust the pencil and twist the paper with it.

Glue is applied to the uncut portion of each fringed strip.
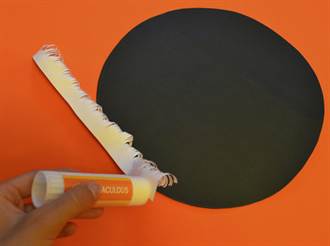
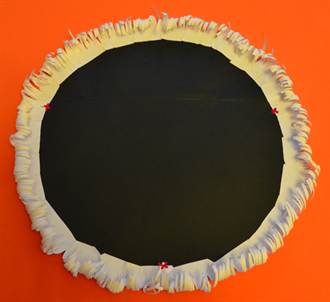
The stripes are fixed along the edge of the black circle with the fringe up.
Three points are laid along the cuts of the circle at approximately equal distance from each other.
Between the points, lines are visually marked along which a fold should be made. This should form three raised sides of the hat.
The center of the circle is manually extruded from the inside of the headdress, and the edges of the hat are slightly bent down. This is necessary so that the accessory fits comfortably on the head.
The second white sheet is cut in half along the long side. Each strip is folded in half again and the corners are sharpened.
Frequent cuts are made along the edges of the strips, imitating feathers. It is advisable to slightly twist the paper for believability.
Skull and bones are looming and carved from the paper remains.

The skull is made out with a piece of red paper (scarf).

The prepared parts are drawn with a helium pen.

On one side of the cocked hat, the skull and crossed bones are glued, and on the other side, paper feathers are fixed.
On the decorated parts of the hat, small holes are pierced with an awl, where the hat elastic is inserted. It is fixed by means of knots on the inside of the product.

Tricorne fabric
The pirate accessory is sewn in the basic version. Its subsequent decoration is carried out exclusively at will.

The work involves the following elements:
- Black or brown fabric;
- Non-woven glue-based;
- Strong threads.
An ordinary newspaper is used to build a diagram of the future product. It has three parts.

The circumference of the child's head is measured. Based on the resulting measurement, a rectangle is laid down, where the long side is equal to the girth of the head. Next, a circle is drawn with a radius equal to half the girth of the head. From the center of the previous circle, another circle of larger diameter is outlined.
The difference between the two circles is based on the desired brim of the hat. Paper parts are cut out.

The resulting pattern is alternately applied to the fabric and non-woven fabric and outlined with an allowance for the seams.
Parts are cut in double size from fabric and a single copy from adhesive material.

Fabric parts are reinforced with non-woven material by heat treatment. Parts of the bottom are taken and grinded with the right side out.

Cut rectangular pieces are attached to the inside of the bottom of the hat.