Pattern of home boots made of fur 23 size. How to sew boots from fabric - a pattern, a step-by-step description and recommendations. Uggs are the best friends for our feet.
We will need:
Fleece for the inside and outside of the boot,
Sole fabric (I cut old jeans, you can also take leatherette, raincoat fabric, etc.),
interlining for soles,
Safety pins, scissors, fabric marker, sewing machine.
Pattern.
The pattern I presented is given for size 37-38, if you need a different size, do not forget to increase or decrease the pattern.
For the top, we cut out a rectangle measuring 38 in length and 20 cm in height (you can vary the latter value as you like, up or down). 
Sewing.
You can take the pattern presented by me as the basis of the sole or circle your favorite slippers.
We pin the patterns with pins to the fabric, circle and cut out with allowances of 1 cm.
Do not forget that we cut the soles for the inside of each boot in the same way as the main parts from fleece, and for the outside - from another material of your choice. 

Next, we cut off the details of the upper part of the boot with pins, as shown in the photo (face to face). 

Cut off the seam allowances, fold the back sections of the boot and grind. Trim the seams again. (when sewing this seam on the lining part, it is necessary to leave a hole through which we will turn our boot inside out) 

We glue the outer sole from the inside with interlining. 
We pin the foot and the upper part of the boot with pins with the front sides to each other, starting with the heel and toe. 
Sew and cut seam allowances. We make notches in places of bends (if there are zig-zag scissors, then we cut the allowances with their help). 
We do the same thing 4 times. 
Let's move on to assembly.
We turn the outer part of the boot on the front side, insert it into the inner one and fix it with pins. Please note that the parts must be located facing each other. 
We grind the details along the upper edge and cut off the allowances for the seams.
Through the hole that we left on the back of the inner part, turn the slippers inside out. The hole is closed with a hidden seam. 
We insert the inner part of the slipper into the outer. 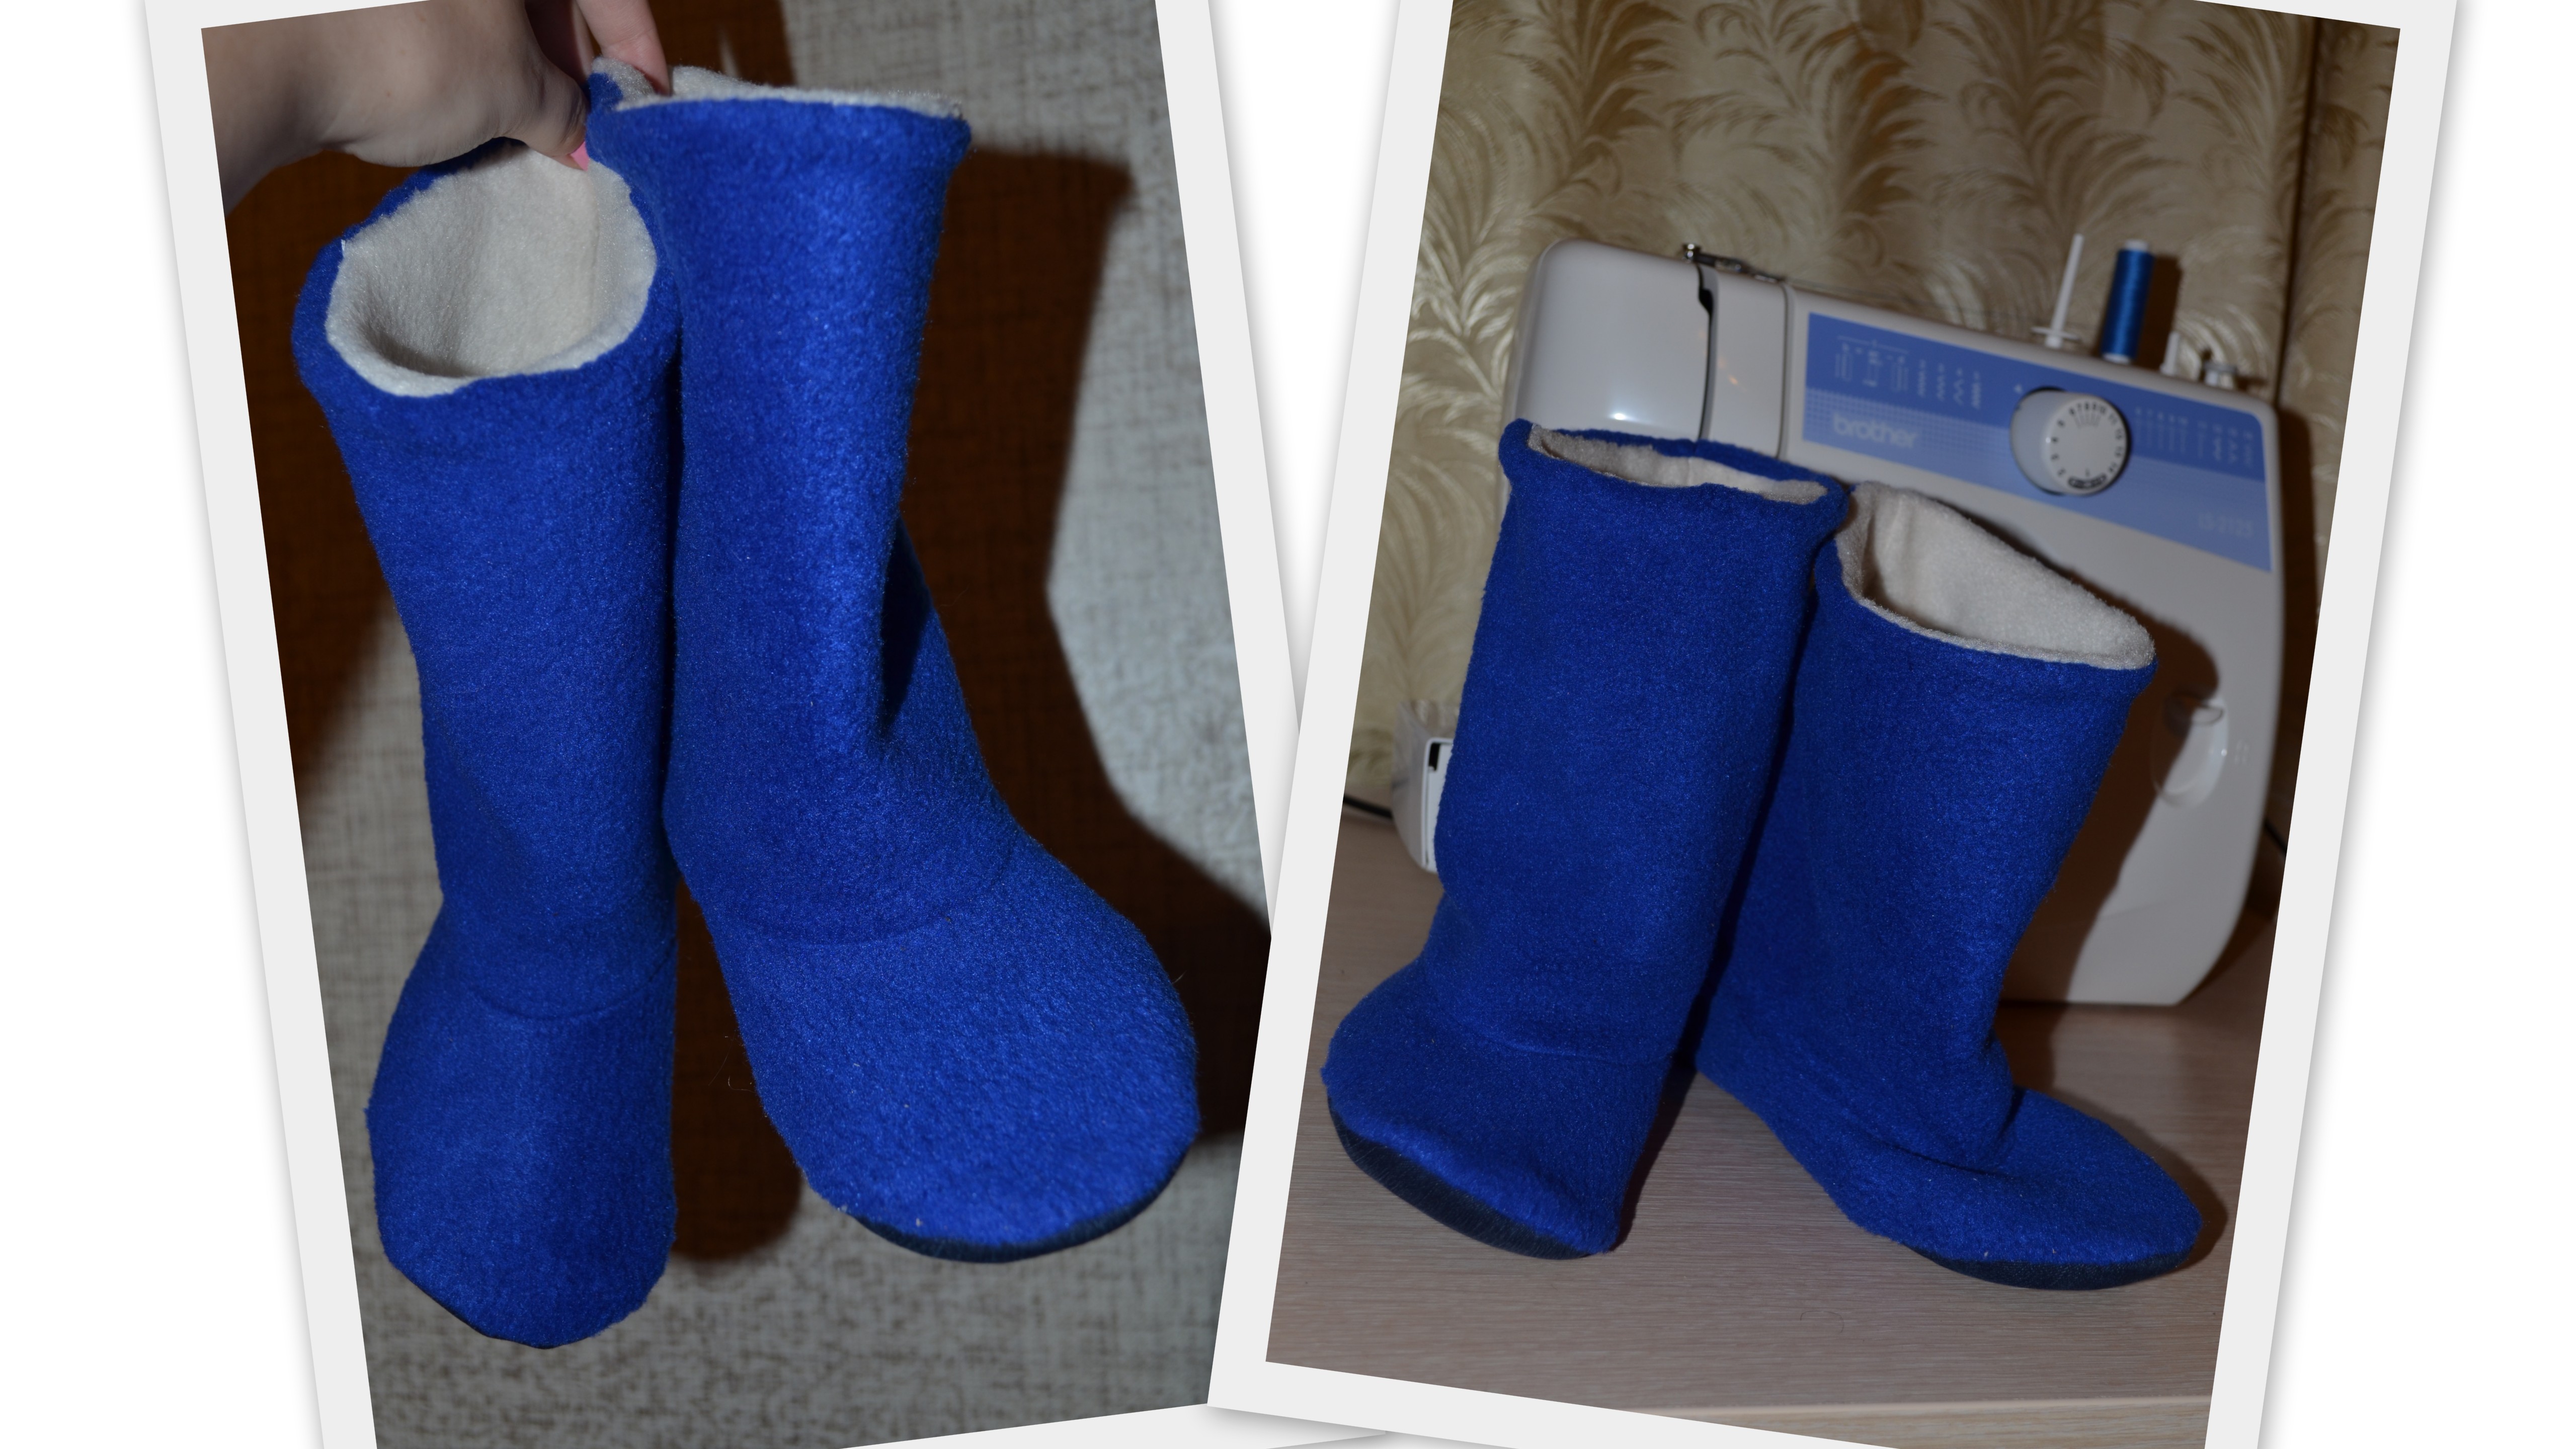
In principle, you can finish this, or you can set the longest stitch length on the machine and stitch our boot from the edge to about the middle or a little more. Then, pulling the lower thread, we form an assembly on the front of our slippers. We fix and hide the threads from the inside. And fold the top out. 
Now it has become very fashionable to wear at home not only slippers, but also slippers. They sew not only women's slippers, boots, but also men's. In order to understand how to properly sew boots, you need to read our tips and instructions.
In the course of working on home boots, we will need:
- fleece or velor suitable color;
- a piece of leather fabric;
- threads that match the color of the fabric;
- pins;
- synthetic winterizer;
- scissors;
- pattern paper;
- needle;
- sewing machine;
- figured rulers for sewing.
The work is divided into three stages:
- building a pattern;
- preparation of parts;
- product collection.
Building a pattern
- First of all, we prepare the pattern. The finished version can be printed from the site here (you can make boots with ears from this pattern, but if you don’t need ears, you just don’t use them in your work), or you can design it yourself.
- To do this, we apply a foot to a sheet of paper, circle it and add 1.5 -2 cm for allowances around the entire perimeter.
- We build the toe-heel part as follows. We measure the drawing of the foot along the perimeter, divide by two and add allowances of 1 - 1.5 cm. We build a line of the resulting size with an upward bend on the right side. Then, perpendicular to the extreme point on the bend, we set aside 12-15 cm, and from the side of the heel we raise the line up by 6-7 cm. After that, we connect the front and back points using a curly ruler.
- We measure the width of the bootleg along the leg and build a rectangle of the required length and width (approximately 18 by 32 cm). Do not forget to add allowances of 2-3 cm.
- Cut out patterns.
Part preparation
Let's start making parts:
- Cut out the details for the sole:
- 2 leather details;
- 2 fleece parts;
- 2 parts from sintepon.
- For the toe-heel part, it is necessary to cut out:
- 4 fleece parts;
- 2 parts from sintepon.
It is necessary to cut double elements that are not cut in the front.
Cut out double tops right size from fabric. They need to cut 2 pieces. The cut should be on the side of the heel.
Product collection
- We assemble the sole: we connect the leather and sintepon parts. We sew them together on a typewriter, previously fastened with pins.
- We collect the toe-heel part. We should get 4 parts, on two of which we sew a synthetic winterizer. The heel should be free.
- Lightly steam the parts with an iron.
- We connect the previous part with the shaft on sewing machine, then we sew the back seam with one line and at the same time leave small unsewn sections, through which it is then necessary to turn the boots inside out. Thus, we get 4 parts.
- We sew leather soles to the parts with padding polyester so that the connecting seam is in the middle of the product. And fabric must be sewn to the rest of the details with the tops.
- We turn the product inside out.
- We connect the upper parts of two different boots and sew them together. The result is double boots.
- Through the left hole in the heel area, we turn the product on the front side and carefully sew the left unfinished parts. We hide the lining part of the product in the boot. In order for it not to constantly jump out, the inner boot is sewn to the main product in the heel area.
- Steaming ready product iron. Thus, we made warm house boots.
Following our instructions, you can sew boots for home use. If you are not yet ready to sew boots yourself, make homemade slippers. Detailed instructions You can take
It's time to warm up and today I'll show you a simple way to build home slippers boots. For a long time, natural sheepskin on a knitted basis lay, such knitwear is used for sewing blankets and children's products, I found a piece for two pairs of slippers. Searching the Internet for patterns, I found a large number of them, but not for my size, but too lazy to redo, and the result will not always be as expected. Therefore, I made everything very simple, such a pattern can be made for any size, even a child.
These are the boots we will handcraft.

And so the leg, remember how in the movie "Office Romance", such a simple leg. I didn’t want the boots to be sticky and therefore I put on a knitted footprint and wrapped a scarf around my shin, otherwise I would have to insert a zipper or change the pattern, which I don’t like, longtime visitors to my site remember my love for simple recipes.

With adhesive tape, as in the case of making a mannequin, wrap the foot and lower leg in several layers, it is important to remember that the foot must be placed “iron”, more precisely, check the angle of the foot as in a standing state.


The blank is ready, you can start making patterns.

Let's draw constructive lines along the fold of the foot to the line of the sole, along the heel in its most concave part, as well as along the middle of the upper part of the foot to the upper cut of the boot. Cut off the upper part from the future sole, cut the boot along the marked lines of the heel and the fold of the foot.

To lay out the part, cut it in the middle, circle it, mark the connection points with the sole and the upper part. Straighten uneven lines. On this part, it is imperative to mark the inside and outside, so that when assembling with the sole, you do not sew the left boot to the right sole.

Let's make a boot with a seam at the back, for this, lay the upper part, folding together the previously cut ones from the inside, circle. For accuracy, I folded along the middle and aligned the lengths of the concave parts with each other and shortened the shaft to the desired height. Do the same with the heel part, here make a small incision 1.5-2 cm from the bottom in the middle of the heel (no photo). Align the sole detail so that it would be nice to see, outline the connection points (I recommend doing this for all the details of the boots) and cut it out. At all stages, compare the cuts of the pattern so that the distance of the heel fits exactly in length into the arc of the back part of the shaft, and the toe also clearly coincides with the line of the arc of the shaft and heel.

The pattern is ready. It is quite possible to sew such boots from fleece or an old sweater, attach a ponytail, nose, ears and eyes.

Cut the boots according to this pattern with seam allowances of no more than 5 mm, it took me about 40 cm by 80 fabric for these boots. Cut out the sole so that it doesn’t wear out much from the remnants of the skin, even a piece of tighter jeans or a top from old boots will do. Combining the points, slightly fitting in the toe and heel parts, we connect the details of the top with the sole. On the heel, I did not build up the tuck, because the fabric is soft, if you sew such boots from jeans, I recommend sewing a tuck.
These are so cozy house slippers boots in the end it should work.

There are no words for how warm. While the sewer remembered the remnants of the once shortened sheepskin coat and decided to sew boots with a zipper, but more on that in the following articles.
Warm slippers and boots on your legs, my dear needlewomen!
Home slippers should be comfortable, light and soft so that your feet can rest after a hard day's work.
Today, various styles of slippers do not cease to please our female eye. We cannot pass by beautiful slippers that are embroidered crystal stones, embellished with sequins and rhinestones. Winter options for slippers enchant us even more: boots with ears or warm flip flops with fur. In this article we will tell you how to sew slippers according to the pattern.
Models of home shoes
Today in the shop windows we can see a huge assortment of home shoes. Modern designers annually update the range of slippers with new types and interesting colors.
Home slippers are not a cheap pleasure, so many women are interested in how to make a pattern of home slippers with their own hands and sew shoes on it. But for this you need to decide on the style of the product.
Home shoes can be divided into several types:
- slippers;
- slippers with a closed toe;
- slippers;
- home shoes 3D;
- ugg slippers;
- moccasins;
- slippers socks.
To understand how to make a pattern of slippers, boots or uggs, slippers with a closed toe or slippers, you need to take into account a few tips:
- In order not to take measurements, you can take an old slipper, put it on paper and outline the sole.
- You will need an awl to sew on the edging.
- As a rule, the sole is cut out of leatherette, split leather or leather.
- The insole can be cut out of cloth or suede.
- To sew a high-quality and durable product, you need to purchase special nylon threads.
Material for sewing home shoes
To pattern home slippers with your own hands, you need to pick up the fabric and stock up on all necessary Material for sewing home shoes should be of high quality and light, for example:
- fleece;
- mahr;
- jeans;
- wool;
- plush;
- suede;
- felt.

From jeans, felt and suede, you can cut out and sew light home slippers or moccasins. Beautiful products are obtained from fleece, terry and plush. From these types of fabric you can sew any model of home shoes.
How to sew home slippers: felt pattern
To create this home shoes, you will need to make a complex pattern. You will need the following materials:
- 0.5 m felt;
- scissors;
- gypsy needle;
- glue from a gun;
- bright floss threads;
- patch in the form of an apple;
- cardboard;
- pencil.
DIY slippers pattern will look like this:

Manufacturing process:
- Take the cardboard and put your feet on it, using a pencil, outline the left and right feet.
- Now cut out the soles with scissors and circle them on the fabric.
- Cut out these elements.
- Next, we need to create the upper of the shoe. To do this, we again take cardboard and draw two semicircles. The dimensions of these details depend on the completeness and length of your foot.
- After that, we transfer these two details to the felt and cut them out.
- You should have four patterns.
- We must sew the upper part of the slipper with the sole.
- This can be done with the help of floss threads.
- After the two elements are sewn together, we can move on to decorating.
- We must sew a colorful patch to the top of the product.
- Now, according to the same pattern, we sew and decorate the second slippers.
- Home shoes made of felt with bright stripes are ready!
How to sew house slippers uggs
Fleece slippers are ideal for sewing such a product. They will turn out warm, soft and will serve you for more than one year. To create a pattern of slippers-boots, you will need 1 m of fleece, 0.5 m of suede and 0.5 m of leather. It is good if these materials are matched to the tone. You will also need the following sewing supplies:
- threads to match the fabric;
- needle;
- scissors;
- glue "Moment";
- centimeter;
- ruler;
- cardboard;
- pencil;
- pins.

Pattern of house slippers uggs:
- Cut out cardboard rectangles 38 × 20 cm for the shaft (two parts).
- We pin the patterns with pins to the fleece, circle and cut out with an allowance of 1 cm.
- We cut out the insoles from suede 23 cm long.
- Now we take the skin and cut out the soles of about 24 cm in length.
- With the help of pins, we chop off the upper parts of the boot face to face.
- Trim the seam allowances, fold the back sections of the boot and sew them down, leaving a hole in the lining part through which you will turn the product inside out.
- Sew the top of the boot from the foot to the top vertically.
- So that the boots do not hang out and sit beautifully on the leg, we turn to the tucks. Make four notches in the places where the product is bent (in the area of the shaft) and carefully sew them, cut off the excess.
- Now turn the outer part of the slipper on the front side, insert the suede insole into it and sew the hole with a blind seam.
- We carefully coat the leather sole with glue and connect it with pins to the foot of the product.
- We do the same with the second boot.
- When all the work is ready, take the boots and fold the top of the products.
- On these lapels, you can make embroidery or decorate ugg boots with ribbons.
How to sew your own slippers-socks
Building a pattern of house slippers with your own hands is a rather time-consuming and scrupulous work. To simplify the task, you can use beautiful terry socks. Thus, you can create original slippers in just 10 minutes!
For this you will need:
- red terry socks;
- leatherette - 0.5 m;
- glue "Moment" (or glue from a gun);
- decoration (bows, beads and stars);
- scissors;
- needle;
- marker;
- red threads.
Step-by-step guide on how to make slippers-socks:
- The sole should be made of leatherette. To do this, place your feet on the material and use a marker to trace the outline of the feet.
- Cut out the soles with scissors and glue them to the socks.
- After the slippers dry, you can proceed to decorating.
- Make a lapel on the workpiece.
- Take slippers and on the side (from the outside) decorate it with a striped bow, right on the lapel.
- Sew beads a little lower and attach a couple of metal stars.
- Thus, the second slippers should be decorated.
Based on this pattern, you can sew similar indoor shoes, but come up with other ways to decorate. It all depends on your taste and ideas!
how are the shoes decorated?
The fashion trend in 2017 was chic fur slippers and slippers with fur. The pattern of home slippers made of fur is easy: for this you can take an old fur coat from a fox (nutria or rabbit) and cut out four details according to your measurements - two semicircle tops and two insoles (the process has already been described).

Then we carefully sew the upper parts of the shoe with the lower elements using special nylon threads. From leatherette, we cut out the sole according to old slippers and glue it to the insoles.
If you want to surprise your guests, you can decorate slippers in an original way. Here everything will already depend on your imagination. should be based on the general colors slippers, no need to glue on them a large number of versatile decorations. Everything must be tasteful. For example, after you have made a pattern of slippers, boots, decorate the product with bows. Attach embellishments to the sides of the outside of the boots. So, how else can you decorate slippers?
Elements for decorating home shoes:
- tapes;
- stars;
- zigzag braid;
- floss threads;
- buttons;
- stones;
- embroidery;
- rhinestones.
In order for the decorations to sit firmly on the product and not fall off after the first wash, they should be put on glue or sewn tightly with threads.
Most often, we are used to buying shoes, even home shoes. However, many craftswomen fell in love with making these wardrobe items on their own. Especially when a child appears and you want to do something unique, interesting, safe for him. You will be surprised, but comfortable and warm shoes for the house in winter are boots. But, of course, not their street look, but a cozy and homely version. These boots look like trendy ugg boots today, and by the way are very comfortable to wear, and the dense leather sole will completely turn them into practical slippers. Next, we will focus on how to sew slippers-boots or fur felt boots and slippers with our own hands - patterns with product sizes based on step by step instructions it will be easy for you to do.
The first option: graceful boots "Snow White"
To begin with, we note that we will take as a basis the parameters corresponding to 37-38 foot sizes.
Important! It is not difficult to adjust patterns to a different size. What you need to pay attention to is the disproportionality: changing the size affects the length of the product, but the boots practically do not change in width.
Basic elements
A do-it-yourself pattern of fabric boots is applied to graph paper. It consists of the following elements:
- The foot is the sole of the shoe.
- Toe-calcaneal part.
- Circle as an element of decoration of the finished product.
- Shaft.
To sew slippers and boots with your own hands in full size, patterns should be prepared in the following quantities:
- To make the sole, cut out: from fleece - 4 elements, from synthetic winterizer - 2 elements, from raincoat fabric - 2 elements.
- For the heel-toe part, prepare: 4 fleece parts, 2 from padding polyester.
- Shaft: 4 fleece elements.
- Circles, which, in fact, will be a decoration in the form of a flower, cut out in the amount of six pieces. They are made from fleece.

What materials should be prepared?
For this model of slippers we will use:
- Fleece white or milky.
- Insulation. Batting or synthetic winterizer.
- Raincoat fabric.
How to sew homemade boots with your own hands - patterns in stages
The algorithm of work will be detailed, therefore easy to perform.
Starting with the sole
To determine its length and width, we take measurements. To do this, draw an ankle on a piece of paper.
Important! Hold the pencil evenly and perpendicularly, do not wind it under your leg. We add about 2 cm in length to the resulting drawing - such a margin is determined by stuffing the product with synthetic winterizer.
Another option is to outline your own shoes, such as autumn flats. But in this case, there is no need to add additional centimeters. From the resulting sketch, we build a pattern for our sole.
Important! The length from the middle of the toe to the center of the heel should be 25-26 cm.
Toe and heel part:
- From the middle of the toe to the top of the boot, the distance is about 12.5-14.5 cm, and this value is suitable for any size.
- Another important indicator for building a pattern is the height between the center of the heel and the shaft, which is 6.5-7 cm.
- The next step is to measure the perimeter of the foot pattern. Divide the resulting value by 2, and add 1-1.5 cm. This margin is necessary for adding the heel and toe.
Shaft
The simplest cutting is for this element of shoes. It is a rectangle of fleece measuring 18 by 32 cm.
Important! The width of this part of the boots does not change. But the height can be modified depending on your preferences and tastes.
Circle about 10 cm in diameter.
Important! In the process of constructing part diagrams, apply marks that will be extremely convenient for you to navigate in the future. These points are: the center of the heel and the center of the toe on the sole.
Sewing
Well, the most crucial moment is the assembly of all the parts together:
- We fasten the upper toe-heel element of the boots with a heater, and sew it on a typewriter along the edge.
- Then we form the sole, which is a multilayer element. You can do this by hand or on a sewing machine. Try to connect the materials evenly. We recommend steaming the synthetic winterizer quite a bit through a damp, clean cloth.
- We attach the toe-heel parts to the bootleg. As a result, four connected elements are obtained.
- Sew the back seams.
- It is necessary to leave small unstitched areas on the lining, through which we will later turn our boots on the front side.
- Now we sew the soles into the obtained four parts.
- Turn the top of the product to the right, and the lining to the left.
- Well, now it’s quite simple: we put a front boot on our hand and insert it into the lining. At the same time, carefully align the heels and toes of both parts.
- We connect the upper edges in the direction from the back seam, fix and sew.
- We turn the product through the unsewn sections of the boots, close them with a line.
- Inside, we install the lining, straighten and align the fabric. It is best to put boots on your feet and pull so that everything straightens out as best as possible.
Boots are ready! It remains only to decorate them.

decorative trim
In this regard, you can be guided by your imagination and decorate shoes with whatever you want: beads, flowers, bows, rhinestones, etc.
In this master class, we consider the design in the form of flowers, three for each shoe. They are located in the center.
Flower assembly scheme:
- Armed with a needle and thread, we assemble in a circle, then tighten the thread.
- We pass the needle through the center of the circle and draw it through the edges again to the center.
- We do this four times, the distances should be equal.
- Slightly tighten the thread, getting the petals.
- In the center, decorate the flower with a beautiful shiny bead.
Option two: tight boots
You can sew homemade boots with your own hands in this manner. This model is distinguished by a more adjacent shoe silhouette. Note that the assembly of elements and tailoring do not differ from the previous version. The difference lies only in the pattern of the product, namely in the shaft:
- Its length increases by approximately 50 cm, and the top expands.
- Half of the shaft at the top is approximately 23 cm.
Again, it should be noted that these parameters are conditional, and you can change them at your discretion.
On the shaft we form an assembly of four rubber bands - they are sewn in parallel and at an equal distance from each other. There should be a gap of 4 cm from the elastic band to the edge of the bootleg.
Important! The insulation for the toe of this model should be very thin. And we advise you to choose fleece or velor as a suitable material for shoes.
Third option: shoes with ears
How to make boots with funny ears? Such home shoes will look very original and cute.
Work materials
To create it you will need:
- Textile. It will be fleece in two colors - black and red.
- Insulation - sintepon.
- Sharp scissors.
- A piece of skin.
- Patterns - ears, sole, toe-heel part, shaft, bows.
Sequencing:
- Based on the patterns, we cut out the details from fleece and synthetic winterizer. And the sole is leather.
- We form the ears. To do this, we connect the black and red elements of the pattern and sew them together. In this way we create all the ears - 4 parts.
- Turn them right side out, stitch at a distance of half a centimeter from the edge.
- In pairs, we connect the elements of the padding polyester with black fleece parts.
- We sew the base of the boot with a sock.
- We sew the edges of the main pattern so that there is a small opening through which you can turn the product on the front side.
- We attach the sole.
- We perform the same manipulations with red fleece parts.
- Sew on the leather sole.
- We attach the ears to the red boot with the black side to the product.
- We sew parts of the red and black color of the product.
- The soles of the products of both colors are combined, processed with three fasteners at the back and front.
- Turn the resulting boot inside out and fill in the opening.
Important! As a decor, you can make a bow for each slipper:
- We make a pattern in the form of a rectangle measuring 6 by 10 cm - two such details are needed.
- We sew both elements of the fabric along the edges, leaving a small segment through which we turn the rectangle inside out.
- Then in the middle we make a beautiful assembly with a needle and thread and form a bow that is attached to the back of the boot.
- We repeat the steps and sew a bow on the second shoe.
Boots for children
How to sew boots for a child from fabric? A kid can make slippers in the same way, the main thing is to correctly outline the pattern. And the assembly principle and manufacturing technique are similar.
Important! Such a product is not suitable for constant wear, but serves as a prop and accessory.
Work materials
To create soldiers' boots, you need to prepare:
- Leatherette. If you cannot find a suitable material, you can use a dense tarpaulin.
- Dense base for the sole.
- Glue.
Important! The peculiarity of these boots is that they are put on over the child's shoes, i.e. like a stocking.

Sewing technique:
- The base of the boot is made in the form of a tube, which must be installed vertically directly on the boot. On the material, make several cuts in front, which will simplify the formation of the boot, since top part will lay flatter.
Important! The width of this part should allow the foot to pass freely in the shoe.
- Attach the second piece of fabric to the toe of the child's shoes. Position this piece so that the notches are hidden. Trim excess fabric along the arc.
- Fix the details with pins, sew them on a typewriter.
- Now we move on to the sole of our boot.
- We make a template according to the shape of the shoe, transfer it to the fabric, cut out four such details from dense material.
- Install one element of the future sole on the sole of the shoe itself, make several cuts on the fabric to the line of the foot. With a needle and thread, pull the edges to the center. On the sides should not end up sticking out anything.
- Then generously lubricate with glue, put its next element on top of the sole. Press firmly and leave to dry.
- When the product is completely dry, remove the resulting boot from the child's shoes. Treat the inner edges of the sole with glue, fix and leave to dry.
Important! To make it easier to secure the elements, turn the boot inside out. And a zigzag seam at the junction of the parts will only add reliability to the product.
- And at the end we make out the top of the boot, namely its upper edge. Gently bend and make a beautiful line on a typewriter.
Do-it-yourself boots for a young soldier are ready! The material of the product is quite durable for gentle washing and gentle socks.
Important! You can also make other models using this technique, for example, stylish cowboy boots.
You can not dwell on such decorative products, but sew children's boots out of fur with your own hands - patterns can be found on the Internet or feel free to use the above master classes. The main thing is to correctly adjust the size and buy high-quality beautiful material.
Sewing homemade boots with your own hands is not at all difficult, on the contrary, the process of creating original slippers will give you pleasure. And besides, such hand-made products can be presented to your friends and relatives, and they will definitely appreciate your efforts and invested emotions.