Knit lightweight napkins. How to crochet a simple napkin: diagrams and photos of work for beginners. Oval crochet napkin for beginners, a diagram with a description
Crocheted napkins have long ceased to be an attribute from grandmother's chest and are actively used in interior design, for example, in the Provencal style, which is popular today. Even a novice needlewoman can master knitting a napkin, since a variety of techniques allows you to choose the work that you can do... With just a few simple knitting techniques, you can create original decoration do it yourself. Those who have long mastered crocheting can perform fabulously beautiful napkins more complicated, using diagrams or descriptions from numerous magazines.
The most common forms of knitted napkins
Crochet napkins come in different forms:
- round;
- oval;
- radial;
- square;
- rectangular;
- diamond-shaped.
The knitting method depends on the shape of the future napkin.
Round napkin
We start knitting from the middle. We connect the air loops in a chain. In each next row, you need to make uniform increases, forming a pattern from circular rows.

Oval napkin
We start knitting from the central chain air loops... All the following rows are knitted around this chain on both sides. Knitting takes place in circular rows, but the increments need to be done only on the rounded sides on both sides.

Lucid napkin
As with knitting a round napkin, start in the middle. We connect the air loops in a chain. We expand the canvas in circular rows, making increments in the same place.

The principle of knitting round, oval and radial napkins is not much different. You can often see how needlewomen knit napkins from the same pattern. different forms making this a variety of kits.
Square napkin
A square napkin should be knitted, like a radial napkin, starting from the middle. To expand the circular rows, increments are made in four places, which will become the corners of the square.

Rectangular napkin
Knitting rectangular napkins combines the techniques of performing square and oval.
We knit a central chain of air loops. All the following rows are knitted around it on both sides. The additions must be made on four sides (at the corners of the rectangle). But if in a square napkin the increments were made at the same distance, then in a rectangular napkin they are added at the beginning and end of the central chain, thus forming two corners on each side.

Diamond-shaped napkin
The diamond-shaped napkin should be started from the chain of air loops. Further, the expansion of the canvas occurs following the example of a round or radial shape. After knitting several rows, subtractions should be made from two opposite sides of the napkin, continuing to knit the other two sides.

Sometimes, to give the napkin the required shape, it is not knitted in a circle, but starting from one side, such as napkins made by crocheting sirloin. In this way, you can achieve not only a square or rectangular shape, but also any other.


You can crochet a napkin using detailed description or a diagram. Schemes are image of the future product made with special icons. Legend is attached to each diagram.

- Start reading the scheme, as well as knitting, need from the middle- from the central chain. Sometimes the number of air loops in it can be counted, or it is indicated by a number.
- The beginning of each row is indicated by a number - number of this row... After the figure, lifting loops are required.
- Sometimes on the diagram it is indicated arrow knitting direction.
- If the badges are connected below, knit them need from one point(air loop, column or arch of the bottom row).
- The icons connected at the top of the diagram indicate that they have there must be a common top.
- Each next row of loops should be more than in the previous one.
It is easier for novice needlewomen to use a verbal description of the pattern.
Video about how to disassemble and understand circuits crochet napkins with a detailed description.
Crochet napkin patterns in various techniques
Crochet is distinguished by a variety of techniques and ways of making the canvas. Some of them are very simple and accessible even for beginners, since they use the most simple tricks: single crochet, double crochet and air loops. Others are "aerobatics" of crochet, but if available detailed diagrams or descriptions can be mastered too.
The following techniques are used for knitting napkins:
- fillet knitting;
- openwork knitting;
- Irish lace;
- modular knitting with motifs;
- bruges lace;
- Romanian (lace) lace.

Simple crochet napkin patterns
Professionally written pattern descriptions use generally accepted universal abbreviations for brevity.
Cast on 12 air loops (VP) and connect them in a circle.
- 1st row: Run 3 lifting loops (instead of the first double crochet), then knit 31 single crochets under the ring (st. S / n), finish with a connecting loop in the third ch. lifting.
- 2nd row: Perform 3 lifting loops then 3 tbsp. s / n, one in each st. s / n bottom row; 3 vp, * 4st. s / n in the next columns of the bottom row, 3 VP ** repeat the rapport * - ** 6 more times, end with a connecting loop in the third lifting loop.
- 3rd row: Perform 3 lifting loops then 5 tbsp. s / n (the first in the lifting loops of the lower row, one in each item of s / n of the lower row and one in the upper row of the lower row); 4 vp, * 6 st. s / n in the last VP, the next columns of the lower row and the first VP, 4 VP ** repeat the rapport 6 times, finish with a connecting loop.
- 4th row: Perform 3 lifting loops then 7 tbsp. s / n (the first in the lifting loops of the lower row, one in each item of s / n of the lower row and one in the upper row of the lower row); 5 vp, * 8 tbsp. s / n in the last VP, the next columns of the bottom row and the first VP, 5 VP ** repeat the rapport 6 more times, finish with a connecting loop.
- 5 row: Perform 3 lifting loops then 9 tbsp. s / n (the first in the lifting loops of the lower row, one in each item of s / n of the lower row and one in the upper row of the lower row); 10 vp, * 10 art. s / n in the last VP, the next columns of the lower row and the first VP, 10 VP ** repeat the rapport 6 more times, finish with a connecting loop.
- 6 row: Perform 3 lifting loops then 3 tbsp. s / n, one in each st. s / n of the lower row of 10 vp, we skip 2 tbsp of the lower row, 4 tbsp of s / n in the next 4 columns of the lower row; 11 vp, * 4 st. s / n, 10 vp, 4 sts / n, 11 vp. ** repeat the rapport 6 more times, finish with a connecting loop.
- 7 row:* 5 vp, 15 st s / n under the arch from vp bottom row, 5 vp, half-column in the sixth vp next arch from vp. ** Repeat the rapport 7 more times. Finish with a connecting loop.
- 8 row:* 6 vp, 1 tbsp. s / n, pico repeat 8 times (in each odd column of the lower row), 6 vp, half-column in half-column of the lower row **. Repeat the rapport 7 more times. Finish with a connecting loop.
Here is a diagram of this napkin:

And here are some more simple schemes.:


Napkins made in technique sirloin knitting crochet, have patterns that contain the simplest knitting techniques: double crochet and air loops.


Crochet napkins video tutorials
Fillet napkin with roses
Oval napkin "Larch"
A simple openwork crocheted napkin. The lesson is divided into two parts. The needlewoman explains how you can increase the size of the napkin, if there is such a need.
(continuation of the lesson)
Napkin "Sun"
This unusual napkin, thanks to its volumetric elements, can serve as a table decoration or a plate stand.
Caring for knitted napkins
All handicrafts require proper care. After knitting, the finished napkin is smoothed and steamed to give it the required shape. If you wish, you can lightly starch the product
The topic of knitting napkins is very wide and multifaceted. It is impossible to describe everything in one article. If you are interested in the above ideas, leave your comments. The advice of experienced craftsmen will be especially valuable for readers.
V modern world, when many functions have been taken over by machines, hand-made things are especially highly valued. The art of crocheting lace is easy enough to learn, and very easy to fall in love with - just look at the masterpieces coming out of the hands of the craftswomen. Of course, it is best for novice needlewomen to learn from simple products. For example, make simple napkins.
Crochet napkins for beginners
Small napkins are good because they knit quickly and, thanks to this, help to “fill your hand” well. We have selected a scheme that is easy enough that even a beginner could cope with it.

To knit a napkin, we need to take a crochet hook and thick woolen threads.
Step 1: we collect air loops in the amount of 6 pieces, after which we combine the ends with a connecting post.


Step 2: in the first row we knit 3 air loops (this will be a rise), we knit 11 columns, which are divided by one air loop.


Step 3: knit the 2nd row. Again we knit 3 air loops as a lift and knit a column through the 1 row air loop.

4 step: we knit an air loop, we knit into the previous V.P. two columns and 1 yarn. Then again also to the end of the row. The row will be closed. column.
Step 5: knit row 3. We knit a connecting post and raise it with three air loops.

This row is knitted further according to the following pattern: when we made a rise in the 1st chain stitch of the 2nd row. After two columns are knitted, we knit 1 VP, and in the next 3 columns with 1 crochet are knitted. The row is closed with a column, similar to the previous one.
Step 6: knit row 4. This is done in the same way as with the third. You only need to knit 4 columns with one crochet. And we close, respectively, as row 3.


Step 7: fifth row. We go to the double crochet from the 4th row and knit 5 VP.

We knit a single crochet through the air loop of the 4th row.

Then we knit 5 VP again and knit a single crochet between the two columns. And thus we knit the 5th row.

Step 8: in the extreme arch we knit 2 VP and a double crochet.
Step 9: knit the sixth row, extreme. In it, you need to knit 8 columns with 1 crochet, and in the arch of the napkin, a single crochet is knitted.
Step 10: we knit 8 columns with 1 crochet into the next arch. And we knit in the same way to the end. We end the row with a connecting post.
In the next arch we knit eight columns with one crochet. So we continue to knit until the end of the row. We finish with a connecting post.

So we told you how to tie crochet napkin, and as a result of our lesson, you should have a small miracle napkin.
Other napkins and schemes for them
We continue crocheting napkins: diagrams and descriptions are attached.
Using a crochet hook, for example, you can knit a wonderful napkin, the pattern of which resembles a pineapple:


To knit these napkins you will need AIDA threads and crochet hook No. 1.25.
Knitting of napkins should be started according to the patterns from point A. The pattern is knitted around the circle. The number of loops you need to dial is on the diagram.
The star napkin looks no less elegant:


Its final diameter is 49 cm. In order to knit it, you need: Cotton white yarn, about 280 meters, hook number 1.25-1.5.
In addition to such openwork and lace napkins, you can also knit a very stylish, modern napkin on the table:


To knit such a napkin, you will need multi-colored yarn and a 2.5-inch crochet hook. Since the napkin is knitted from 2 parts, the first part is knitted first, then we begin to knit the second and only on the fifth row should we begin to combine these parts.
All the napkins that we mentioned in our article must be washed after they are completed, and then very carefully straighten and stretch, otherwise they will lose their shape.
We hope we were able to interest you with this beautiful and graceful handicraft!
Video tutorials to help beginners
We offer a master class with a diagram and step-by-step description for knitting the simplest do-it-yourself crochet napkin, which is suitable even for novice needlewomen.
Tools and materials Time: 2-3 hours Difficulty: 1/10
- 100% cotton yarn;
- hook number 3;
- scissors.
Napkins have always been considered an integral part of the interior and were appreciated as original things that create a certain homely atmosphere, so to speak, homeliness. And the most common are small simple napkins.

Abbreviations
- C3n: a column with three crochets;
- C2n: a column with two crochets;
- Cn: connecting loop;
- St: column;
- VP: air loop;
- PP: lifting loop.
Step-by-step description of the master class
Step 1: knit the middle section of the napkin
We start knitting napkins focusing on the attached diagram.
- Row 0: From 9 VP, we complete the ring.
- Row 1: 5 pp, 1 s3n, 5 vp, 2 s3n, 5 vp, 2 s3n, 5 vp, 2 s3n, 5 vp, 2 s3n, 5 vp, 2 s3n, 5 ch, 2 s3n, 5 vp, 2 s3n , 5 VP, 2 S3N, 5 VP, 2 S3N, 5 VP, 2 S3N, 5 VP, 2 S3N, 5 VP, 1 SP.
- Row 2: 3 sc to the middle of a chain of five VP. Then 4 pp, 4 s2n, 5 s2n in the central VP of the chain of the previous row. We carry out the rest of the c2n in the same way. At the end of the row 1 bn.
- Row 3: 4 pp, 4 c2n in each column of the previous row, 3 ch, 5 c2n, and so on until the end of the row, then 1 cn.
- Row 4: 4 pp, 4 c2n we connect in one loop, 9 ch, 5 c2n in one, continue to the end of the row, then 1 bn.

Step 2: knit the center napkin pattern
- Row 5: 6 sc along the chain from the VP of the previous row. 4 pp, 3 vp, 1 s2n, 9 vp, 1 s2n, 3 vp, 1 s2n and so on, at the end of 1 cn.
- Row 6: 4 pp, 2 s2n, 2 vp, 3 s2n, 6 ch, 3 s2n, 2 vp, 3 s2n, 6 vp, etc., at the end of 1 bn.
- Row 7: 4 pp, 10 s2n, 3 vp, 11 s2n, etc., 1 bn.
- Row 8: 4 pp, 3 c2n in one, 3 ch, 5 c2n, 3 ch, 4 c2n in one, 7 ch, 4 c2n in one, 3 ch, 5 c2n, 3 ch, 4 c2n in one and so on until the end , 1 bd.
- Row 9: 5 sbn, 4 pp, 2 s2n, 2 s2n into one, 6 vp, 1 s2n, 3 vp, 1 s2n, 6 vp, 2 s2n into one, 1 s2n, 2 s2n into one, until the end, 1 cn.
Step 3: knit an edge napkin pattern
- Row 10: 4 pp, 2 s2n in one, 6 vp, 3 s2n, 3 vp, 3 s2n, 6 vp, 3 s2n into one, 6 vp, 3 s2n, 3 vp, 3 s2n, 6 vp, 3 s2n into one , 6 VP, so to the end, 1 bn.
- Row 11: 7 sbn, 4 pp, 5 s2n, 3 vp, 6 s2n, 11 vp, 6 s2n, 3 vp, 6 s2n, etc., 1sp.
- Row 12: 4 pp, 8 s2n, 3 vp, 9 s2n, 9 vp, 9 s2n, 3 vp, 9 s2n, etc., 1 bn.
- Row 13 (final): 1 pp, 20 SBN, 3 SBN, 3 VP, 2 SBN, 3 VP, 2 SBN, 3 VP, 3 SBN, 20 SBN and so on until the end of the row, at the end of 1 SP.
Step 4: Taking proper care of the product
In warm soapy water, hand wash, napkin and rinse well. We stretch the product as best as possible in all directions. We put it on waffle towel and stretch it again. We dry the product at room temperature. After complete drying, we iron the product with the set iron mode No. 1 or No. 2, from the wrong side. You can also starch the garment when rinsing.
A simple crochet napkin is not only a way to decorate your home, but also a great DIY gift for your loved ones. Tie this product and give a piece of yourself to your loved ones.
Handicraft has always had its value, and such art, Products made with this technique, will decorate any interior. Where to start if this is your first time using this technique? Do not tackle complex products right away, for a start it will do simple circuit for beginners. To get started, you need to learn some of the features of knitting.
Choice of materials
For each napkin, depending on its purpose, a certain thread thickness is suitable. Preference is always given to pure cotton, a fiber such as iris or snowflake is ideal. Acrylic is also very widely used. The threads can be in spools or skeins, on which you will always find the number of grams and meters in one unit. These parameters will help you determine the number of skeins required for a given job. The size of the hook will depend on the selected thread thickness, the thinner the thread, the lower its number. When starting out, use a medium-sized thread and hook for test pieces. After you have mastered the simple elements, you can use yarn of any thickness.
Symbols
Any for beginners consists of certain icons, which are deciphered as follows:
Oval is an air loop, it is obtained by pulling the thread through the previous one;
A stick - a single crochet, is performed as follows: the loop put on the hook remains in place, the hook is inserted into the loop of the previous row, where it is necessary to complete the column. The working thread is captured and pulled. The hook makes two air loops. Then the thread is again captured and pulled through these loops, as a result, only one remains.
A cross or a black dot is a connecting post designed to complete a row.
Long stick with an oblique line - double crochet.
These are the simplest elements, they will be enough at the first stage of training. Usually a description is accompanied by a crochet napkin scheme, by which you can find out the moments incomprehensible in the scheme. If you find other symbols in the diagrams, it will be more complex. For beginners, at the first stage, it is better to give preference to simpler options.

Doing the basics
Each crochet napkin pattern for beginners assumes the same beginning, regardless of the subsequent pattern. A chain of air loops is knitted, the number of which is determined by the density of the product. If an openwork napkin is intended, a chain of eight loops will do. If the product is dense enough, five pieces will be enough.
The resulting chain must be closed; for this, a connecting half-column is used. All subsequent rows of knitting will end in the same way.
The ring that you formed during the connection is tied around the entire circumference with columns with or without a crochet. It is necessary to start work by lifting the loops, for this, at the beginning of each row, which will be performed by this element, three air loops are knitted.
The second row must be done with double crochets, therefore, as a lift, it is also necessary to knit air loops, the number of which will vary from three to five. Knit air loops follows from the base of the connection. Then a double crochet is performed, which is located in the formed loop of the previous row. After that, two air loops are knitted, and using this technology, the elements are repeated. The crochet napkin pattern for beginners can have another combination of the second row.
Now you can proceed directly to drawing a napkin.
We knit a small napkin
To do this, you will need acrylic yarn and hook number 2. The figure shows a diagram of a small crocheted napkin. The sequence of work will be as follows:

We knit a chain of 6 air loops and connect it into a ring.
First row. We lift with 4 loops and begin the first row, which consists of 30 double crochets.
The second row begins with 4 air loops, we knit two double crochets. Then we make two air loops and the next two double crochets. They are not knitted over the next column, but over the next one after it. The operation is repeated until the end of the row. After completing the pattern, we close the knitting with a connecting post.
In the third row, the air loops of the previous row are tied in this combination: 2 double crochets, 2 air loops and 2 more double crochets. Then 2 more side chains are knitted, and the combination is repeated.
The fourth row is performed in the following sequence: 4 lifting loops, 2 double crochets. A connecting column is made on the side loops of the previous row. In medium air loops, 3 double crochets are knitted, two loops and 3 more double crochets, a connecting column. Repetition occurs to the end of the row.
The fifth row is knitted identically to the fourth, only instead of connecting posts, 3 air loops are performed.
In the sixth row, the crochet small napkin scheme includes additional elements that will lead to an increase in the diameter of the napkin. The row is knitted according to the fourth pattern with an increase of up to 3 double crochets, and 2 air loops are included on both sides of the connecting post.
At this stage, you can finish knitting, you get a small napkin, if you need a product bigger size... Rows 5 and 6 should be repeated, only in each next row one single crochet and two air loops are added to the pattern.
Openwork napkins
To make a beautiful openwork napkin, you need to choose the thinnest thread possible, then you will get an exquisite product. The scheme has no special features. For such a product, you will need 50 grams of 100% cotton yarn and a maximum size of 1.5 crochet hook.

We collect a row of 8 air loops, connect in a ring, in which we knit 15 double crochet stitches of the next row. In the next row, we increase the number of columns to 32. Then we continue to knit according to the pattern shown in the diagram. The entire pattern of the openwork napkin consists of 9 rows.
Rectangular napkins
The technologies for making such products are different. You can knit a whole napkin at once, or you can make separate fragments or modules, and then combine them into a single whole. The crochet pattern of a round napkin considered in the previous version is made using the technology of knitting in a circle. In this case, the direction of work alternates from right to left and in the opposite direction. Let's consider both options.
Plain rectangular napkin

The size finished product will be 15x20 cm. For work you will need cotton threads of medium thickness and a hook number 1.5. Napkin pattern crocheted has its own uniqueness, if you finish the work on the second step, you get a square napkin. You can not stop at the presented number of circuit elements, increasing their number, the length of the product will increase up to required size... The work begins with 64 air loops and, according to the pattern, the main pattern of the canvas is performed, the change in knitting directions is shown by arrows.
Modular product
Let's consider the second option. represented by two figures. In accordance with the pattern, we make a fragment of the napkin.

According to the pattern, knitting starts from the corner, and the direction of the rows changes. After the square is obtained, it is tied around the perimeter with a rim row, with the help of which the fragments will be connected into a single product. The size of the napkin will depend on the number of fragments made. After you have received the required number of modules, you can start assembling. The connection points are shown in the diagram with arrows. The resulting canvas must be tied with three rows of finishing around the entire perimeter of the scheme.

Caring for knitted napkins
Now you have the first handmade crocheted, and you need to be able to properly care for it. The finished product after knitting is smoothed and steamed. A crocheted napkin for beginners will hold the necessary shape if you lightly starch it. After long-term use, there is a need for cleaning, it can be done in the following order:
We release the napkin from the accumulated dust, for this we shake it.
Prepare a soapy solution, it is best to use shampoo or liquid detergent.
For a while, we immerse the product in a soapy solution. In no case should the napkins be rubbed.
We carry out rinsing by immersion in clean water, also without friction.
The push-up is done with a terry towel, in which the napkin is placed.
There are two ways to dry the product. A natural option when a crochet napkin for beginners is laid out on a towel under the press. You can also dry it with an iron, which will significantly speed up the process.
From time immemorial, the border has been considered the element of knitting that gives any product true tenderness and sophistication. It can be used to decorate any crocheted items - from clothing items to kitchen accessories (napkins, tablecloths, towels, curtains and much more). Moreover, not only ready-made ones are tied with a decorative border knitwear... Openwork lace, knitted along the free edge of the fabric, is able to breathe new life into an old, long-forgotten thing from a woman's or children's wardrobe.
Tags:
"Pineapple" is considered one of the most common openwork patterns in crochet needlework. The whole point is not only in the relative simplicity of its knitting, but also in the end result of the process - the "pineapple" pattern made according to any of the numerous schemes turns out to be truly magnificent! 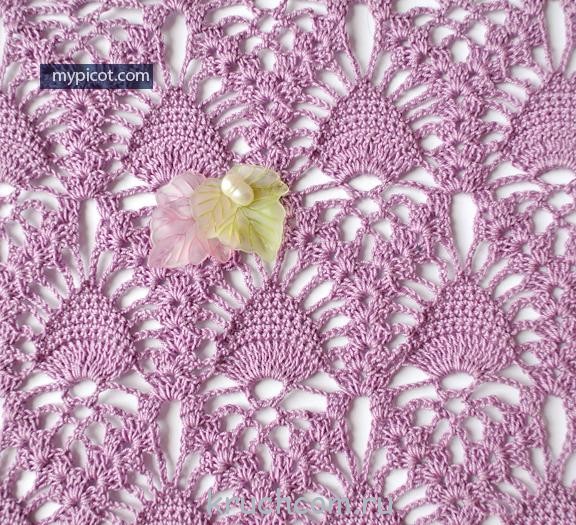
Tags:

A skilled craftswoman of crochet needlework will “put on” any little thing in a case - from your favorite smartphone to a cute vase that serves as a decor in the corner of the room. Although, in terms of the degree of complexity of knitting, the covers are among those items that lend themselves even to beginners who hold the hook in their hands for the first time.
Tags:
Japanese openwork - an original, but very laborious crochet technique Today japanese knitting is at the peak of popularity - knitters around the world are actively studying specialized books and magazines from Japan, trying to reproduce exclusive wardrobe items and home furnishings.
Tags:
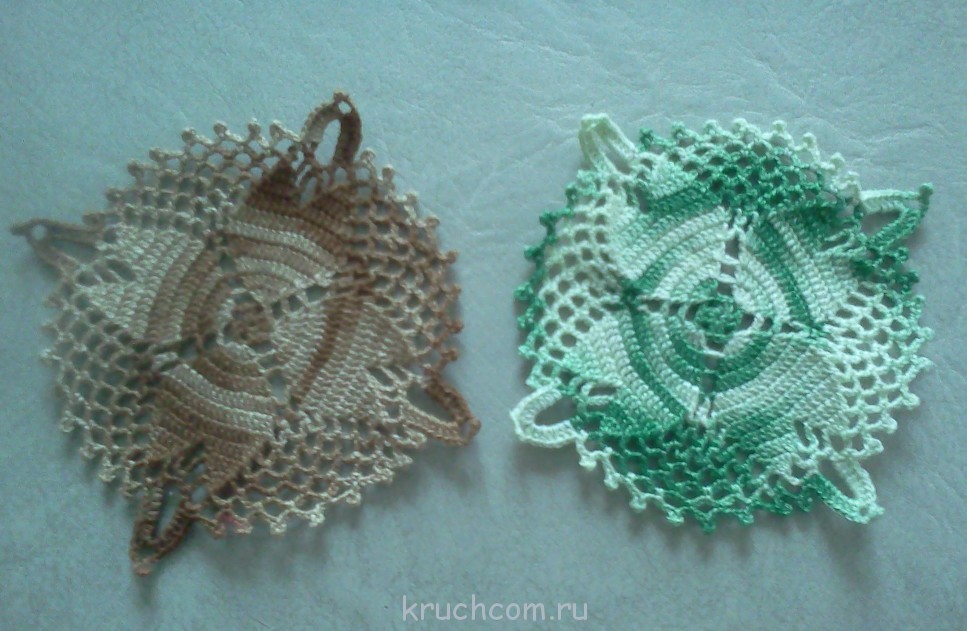
Competition work number 24 - Knitted napkins "Leaves" (Shcherbakova Ksenia)
Hello needlewomen! My name is Ksenia. I have been crocheting since childhood. I love to knit all sorts of little things for the house. I present to your attention two small napkins "Leaves".
Yarn PNK them. Kirov "Iris", hook number 0.95
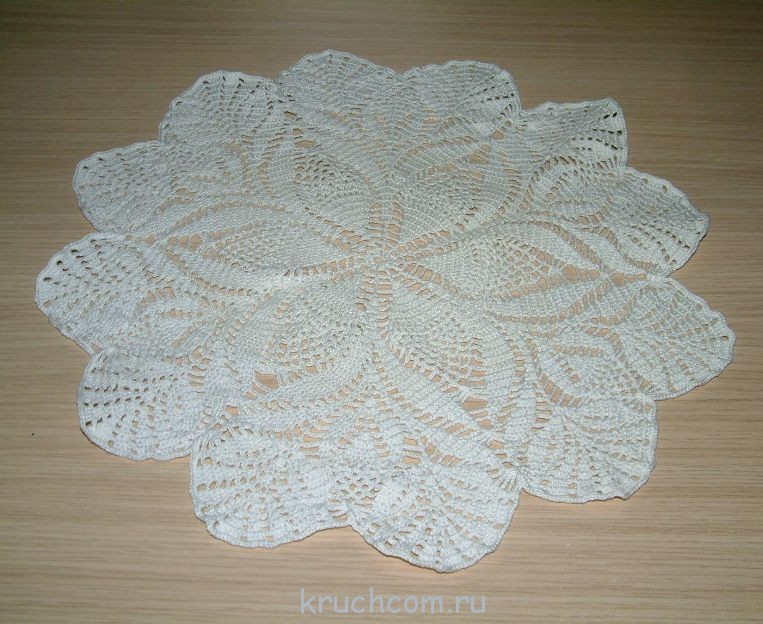
Competition work No. 20 - Openwork napkin (Strogalova Nadezhda)
Good day! My name is Nadezhda. I was fond of knitting at school, and with the birth of children it turned into love. I just can't imagine my life without knitting. I love both the hook and the knitting needles. I present to your attention openwork napkin... It has 12 petals, which makes it possible to make a rustic wall clock from it. I think they will be adorable. I will definitely find the time someday and I will))

Competition work No. 19 - Napkin "Happy Star" (Ksenia Shcherbakova)
Hello dear needlewomen! My name is Ksenia. I have been crocheting since childhood. I love to knit all sorts of little things for the house. I present to your attention the Lucky Star napkin.
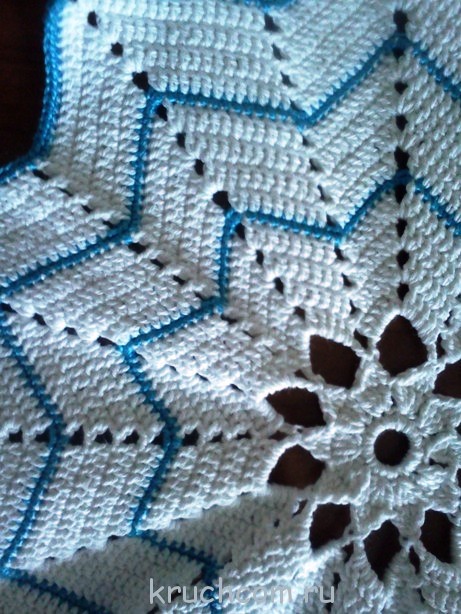
For knitting you will need: thread PNK them. Kirov "Lily" (white), "Iris" (blue), hook number 1.5

Competition work No. 14 - Oval napkin crochet (Anahit)
My name is Anahit, I knit with knitting needles for a long time, crochet - for the last two years you are already familiar with some of my works. This time I present to your competition an oval napkin knitted from harsh yarn -100% cotton, hook number 2.


Competition work number 12 - Knitted napkin for Easter (Alla)
Good afternoon! My name is Alla. I crochet recently. I want to present to your attention a napkin for a GREAT DAY !!! Soon the holiday of Bright Resurrection of Christ is approaching - the main event church calendar, the oldest and most important Christian holiday….
I have been staring at napkins for a long time and decided to knit.


Competition work No. 3 - Knitted napkin "Contrast" (Shcherbakova Ksenia)
Hello! My name is Ksenia. I have been crocheting since childhood. I learned to knit in labor lessons at school.
I want to present to your attention knitted napkin"Contrast".
