Slippers knitted in Japanese style. Simple knitting - Japanese slippers. How to knit slippers on two knitting needles: a description of creating a model
Hand-knitted shoes have long earned well-deserved love from both those who knit and those who wear: needlewomen have learned to knit everything - from warm boots to stylish sandals - even fashionable beach slippers can be knitted by yourself!
But if such work is sometimes only possible for masters, slippers can be knitted not only by an experienced knitter, but also by a beginner in this branch of needlework. Knitting patterns are incredibly simple, but the products themselves are amazing, warm and beautiful. And from some types of yarn, it is also delicate, like a lilac mist. In just a few days, you can make soft indoor shoes for all family members.
Slippers for women can be knitted and crocheted. At the same time, the number of knitting needles varies - each knitter chooses a knitting method for her hand - whether she will create a future masterpiece for the house on 2 knitting needles, or 4 knitting needles, or even on circular knitting needles. Below we will just analyze these methods.
Knitting slippers can be knitted not only by an experienced knitter, but also by a beginner in this branch of needlework.
Knitting slippers in this way is possible even for those who, up to this point, have never held knitting needles in their hands. If you are looking for simple and easy-to-use sneakers for the first experience, this is the place for you! The scheme is very simple, even a child can handle it.
We knit step by step:
- Cast on 48 stitches and knit in first row.
- Starting the second row, attach yarn of a different color and knit a couple of rows for it.
- Alternating color every couple of lines, make 13 cm of the product.
- After that, close eight loops on both sides and knit the remaining section with a length corresponding to the length of the foot.
- Then knit a row with a decrease in the loop on each side.
- Make the next row without decreasing, and on the last row remove a couple of stitches again.
- Pull the thread through the stitches with a crochet hook, pull them together and secure.
- Make the top seam of the foot and the seam on the heel.
By the same principle, knit the second sock.
Gallery: knitted slippers (25 photos)


Simple knitted slippers for beginners (video)
How to knit slippers on two knitting needles: a description of creating a model
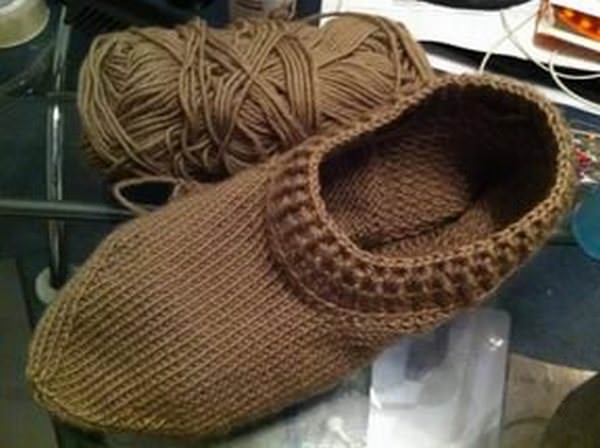
Guided by simple description, you can knit the original indoor slippers with just two knitting needles. This greatly simplifies the knitting process. Seamless patterns can be easily created. And the size of the product can be any, it is enough just to increase or decrease the number of loops. Try it and make sure that even with just 2 knitting needles you can create real masterpieces!

Guided by a simple description, you can knit the original indoor slippers with just two knitting needles
Progress:
- Cast on eight stitches in total, then knit one row with the front stitches.
- In the next row, make an increase according to the following scheme: a pair of front ones, a yarn, four front ones, a necklace and a pair of front ones.
- Draw the line again without increment.
- At the next stage, the increase should be made according to the following scheme: four facial, yarn, a pair of facial, yarn and four facial.
- After that, continue knitting with a pearl pattern until the item is nine centimeters long.
- At the end of the next pair of lines, cast on nine loops.
- Continue to knit with a pearl pattern until the garment has a length of 21 centimeters.
- After that, knit nine knit stitches and turn the work, start knitting the reverse row.
- Close the first twenty-one stitches, and on the remaining, knit a couple of rows and finish knitting.
- Across initial loops stretch the thread, pull off the sock and sew the socks along the central part, while leaving open a segment six centimeters from the top of the product.
- Sew the edges along the back.
Knitted baby slippers: step by step instructions
When making your own slippers for children, you need to take into account that such products should be not only soft and warm, but also beautiful. Fun, colorful yarns can be used to create bright and unusual models- it can be slippers in the form of cars, or resembling marshmallows in shape, or slippers-piglets, which are popular this year. The most unusual option for home shoes for a child is mouse slippers. The kid simply does not want to part with them, and, accordingly, his legs will always be warm.
Progress:
- Cast on 28 stitches and work in twelve lines alternating between knit and purl.
- After that, continue knitting with the front stitch.
- In order to form the heel, divide the loops into three parts and place them on three knitting needles (there should be ten loops on the outer ones, and only eight on the central one).
- Knit only the central knitting needle, and at the end of the row, connect the last loop with the first one on the other knitting needle.
- After there are no loops on the side knitting needles, continue knitting in a circle. To do this, lift ten loops from the side of the elastic band, dial ten more on the third, and raise ten from the elastic on the fourth.
- Knit six centimeters of the product in a circle.
- After that, start knitting a pair of loops together when switching to a new knitting needle.
- When there is only a loop on each of the knitting needles, they must be knitted together, and the thread must be pulled and hidden on the wrong side.
- Crochet the eyes and nose.
- Crochet the ears, for a start, simply by typing three air loops.
- In the first row, make a couple of single crochets.
- In the second, there are already three, and in the third, four.

When making your own slippers for children, you need to take into account that such products should be not only soft and warm, but also beautiful
Sew on the finished ears to the sneakers.
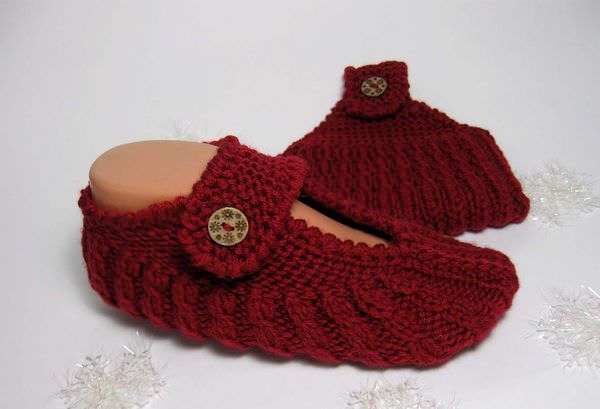
How to tie men's footprints
Footprints for adults are no more difficult to knit than for children... For men, these socks will be simply irreplaceable. For an experienced needlewoman, their manufacture is a matter of a couple of hours. Of course, one cannot say that they are downright lazy, but they knit quite simply even for beginner knitters.
Footprints for adults are no more difficult to knit than for children
Progress:
- Cast on sixty stitches at once.
- Knit fifteen rows with an elastic band.
- Immediately distribute the loops over a pair of knitting needles, and leave one in the center.
- Knit one half with a garter stitch, make a yarn over, knit the central part.
- Make the yarn over again and knit one more piece.
- Thus, to make the boring depth of the future track.
- Divide the work into three parts, selecting fifteen stitches in the center.
- Initially, half is knitted, then the middle of the loops, leaving only the last one.
- Knit it with the first loop of the second half.
- Turn the product and therefore knit this row on the same principle.
- Continue working until there are only fifteen loops left in the center.
The loops that remain, knit in several lines and finish with the first part, not side.
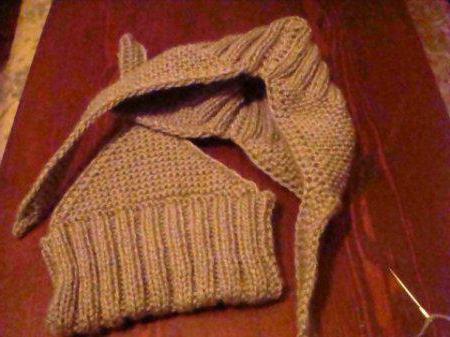
Japanese footsteps with knitting needles: master class
Ethnic style slippers and footprints are very popular - for example, Turkish footpaths, or Scandinavian pointed toe slippers with beautiful Norwegian patterns. Japanese footprints look incredible... It even seems to many novice needlewomen that their manufacture is already very difficult and beyond their strength. But this is not so, having dealt with the scheme, the work will be fun and simple.
Japanese footprints look incredible
Progress:
- Cast on 40 stitches on the needles and knit with an elastic band, alternating a pair of knit stitches with a pair of purl stitches eighteen centimeters in height.
- Continue to knit already in garter stitch, while decreasing a pair of loops on each of the two sides.
- Continue knitting in this manner until only five stitches remain on the needle.
- Knit twenty rows of strings.
- Do the same on the other side.
Fold the workpiece in half and immediately sew from the sides.
Home boots: knitting with knitting needles
Such small chuni will help warm the baby's legs in winter. They fit quite simply, while looking quite impressive. And the child is unlikely to want to take them off, unlike ordinary slippers.
Progress:
- Cast on ten loops and tie the sole of the desired length on them.
- After that, cast on the loops on all sides.
- In a circle, knit five lines with front stitches.
- On the next three rows on the front knitting needle, knit three purl, then six front and again three purl.
- On the next line, turn the loops to form a coil. To this end, knit three purl loops and remove three stitches on the same knitting needles.
- Hook the next three stitches and move the stitches from the first knitting needle.
- Knit alternating six purl and only three front ones, not letting in the loop, which is located near the last knitting needle.
- Move the left loop to the front knitting needle and knit together with the adjacent one.
- After that, knit in accordance with the pattern until only one stitch remains, it will need to be knitted with the side.
- Expand the row and continue knitting, knitting the last loop with the adjacent one.
- In total, knit six rows.
- Continue knitting in a circle (24 rows in total).
- Close the loops.
Insert the lace at the ankle.
Knitted slippers (video)
Home slippers can be simple, classic or original. If they are tied with their own hands, then they have much more advantages. The legs are very warm in them, and the skin does not dry out at all. After all, they are made in accordance with personal preferences. Any needlewoman very carefully approaches not only the choice of the model, but also the yarn. Naturally, the shoes are of high quality.
Knitting is considered the most in a simple way do the thing with your own hands. This process takes time, but it's easy to pick out, especially when watching a movie or relaxing after a hard day at work. True, this process also requires effort and preparation, which we will discuss below.
Preparation phase
Before you start knitting, you need to collect everything in one place so that it is at hand. For successful work we need:
- knitting needles;
- wool;
- scheme;
- desire and mood to knit;
- time.
So, when all the components are assembled, we can begin the process of knitting such a wonderful thing as Japanese slippers.
Basic step by step instructions
First, you need to fold the thread in half and cast on 40 loops on both knitting needles. Then we begin to knit Japanese slippers with an elastic band 2 x 2 (front 2, 2 about 18 cm.

The second step is to make the starting piece 2 loops less on each side. Then we apply another type of knitting - garter stitch (we will tell you how it looks later in the article). In the process, we remove one loop on each side, so that as a result, only 5 of them remain on the knitting needles.
The third step is to knit another 20 rows. As a result, you should get a narrow tie detail.

The fourth step is to tie it from the other end of the workpiece. This should also be done with garter stitch and in the process remove one loop at both ends until there are 5 pieces left on the needles.

The fifth step - after finishing the second tie, fold the resulting structure in half and sew on the sides, in the place of the elastic bands. Everything, Japanese slippers can be worn. As you can see, it is not difficult.
Types of knitting
We present to your attention a description of the above two types of knitting, which are used to create such a thing as Japanese slippers.
The classic gum, for example, is used for a variety of products. As a rule, it consists of 2 front and 2 purl loops.

And it is considered basic at all. For this you need:
1. Cast on 2 knitting needles.

2. Taking out one of them, knit the entire row as the front one.

3. After finishing the row, turn the knitting needle over and begin to knit in the same rhythm. We continue the process until the required length of the canvas is obtained.
Creative option
As they say, how many housewives, so many opinions. Earlier we examined the most simple instruction, showing how to knit Japanese Now we will see not a dry compressed version, but its creative alternative.
To implement this venture, we need lilac threads (two shades) and knitting needles number 14. The process looks like this:
- Cast on 34 sts.
- We knit the first row with front loops, and the second with purl loops, after which 2 rows - garter stitch.
- Knit again with the front stitches and the row with the purl stitches.
- Two rows of garter stitches.
- Next, the part is knitted with front and back stitches, but at the same time from the front side it should be closed in a loop until there are six of them left.
- We knit a tie.
In this case, the main part of the slippers can turn out in any color that you choose, and the ropes in a different shade.

After the Japanese slippers are sewn, they can be decorated with beads and flowers. To do this, you need to choose the material to match the color and then weave the decoration into the canvas using a thread.
To decorate the product with a flower, you first need to crochet it from threads of the same color as the Japanese slippers themselves. Once the flowers are ready, sew them onto the strings or socks. How to decorate is up to you.

As a result, you should have some gorgeous fancy Japanese slippers. They will definitely be a great gift for any occasion.
Summary

Finishing our step by step instructions, we want to note that Japanese slippers, knitted, look charming, and most importantly, the technology used in this process is available even to those who take up such needlework for the first time. Simple knitting is our main goal when creating beautiful things from threads. Knit with pleasure!
How to knit Japanese slippers using a photo and video tutorialHow to knit Japanese slippers using a photo and video tutorial
Almost all of us like a variety of
... This wardrobe item, along with mittens, scarves and hats, is most often wanted by needlewomen to knit, because socks and slippers are extremely comfortable. They do not constrain movement, and also perfectly warm the legs. There are a huge number of techniques and schemes in order to make knitted socks, slippers and footprints. We also add that all these techniques are completely uncomplicated, which means they are available for beginner knitters. If you choose an original and comfortable model, then you can not only wear it at home with pleasure, but even give it to your family or friends. In this lesson, we will talk about how to knit one of the varieties of indoor shoes called Japanese slippers. Here you will find a photo with step by step description works, as well as video materials. We suggest you understand the technique of knitting Japanese slippers, and try to make them yourself. This technique is new for us and therefore very interesting. 


Features of making Japanese slippers
This model is original and therefore very different from other footprints and slippers. It has long ties, with the help of which the sneakers are fixed at the back of the foot.
Now it is necessary to consider appearance ready-made Japanese slippers when they are not yet on the leg. 

As you can see from the attached photo, the central part of Japanese slippers is a rectangle tied with an elastic band. On the sides there are triangle-shaped figures, ending with long ties for fixing. After finishing the work, the rectangle is folded in half, vertically, and sewn along the edges, forming the inner surface of the sneaker. Garter stitch triangles are wrapped around the foot on both sides and tied at the back with strings. If you wish, you can change the decorations on Japanese slippers to diversify their design and get original models. 
Master class on knitting Japanese slippers
This master class will consider knitting Japanese slippers in more detail. In the photo below you can see an elegant and festive version of Japanese slippers. They are knitted in the same way as simple models, but at the end they are decorated with mother-of-pearl beads. 
In addition to beads, these elegant Japanese slippers are decorated with a flower, crocheted from the same yarn that was used for the Japanese slippers themselves. Now let's take a step-by-step description of the technique that is used to knit Japanese slippers. This is the basic version, guided by which you can dream up and perform variations on main theme... Fantasy will allow you to knit original slippers decorated with bows or beads. Let's start knitting with a set of forty loops, and doing a two-by-two elastic band. The length of the elastic should be eighteen centimeters (cm). For needlework, you will need very dense yarn, or threads in several folds. 
Having connected such a rectangle, we will subtract two units along the edges, and we make a garter stitch pattern. In the course of knitting in garter stitch, we must reduce the loops (P) in each row by one. We carry out these reductions until there are five units left on the needles. 

After that, it remains to knit long thin strings. We perform this technique on both sides of the elastic, after which we get this shape of the canvas. 

Next, the resulting workpiece must be folded in half, and sewn along the edges in the elastic zone. As a result of needlework, you will get such an original product. 
Video tutorial on knitting Japanese slippers for home
This video shows knitting house slippers. This type of Japanese slippers is a cross between slippers, socks and socks. They differ from the previous models of the lesson in that they do not have long strings, but are fastened with a button. For work, a knitting technique is used that differs from that used in previous models. We collect with knitting needles three loops, and with them we will start needlework. We knit in garter stitch, adding loops. It is necessary to increase P through a row. We add one loop after the first edging, and the second in front of the last edging in the row. We knit the even rows of the seamy side with knitting needles with purl loops. We will add the number of units until there are twenty-seven loops on the needles. Then we knit with an elastic band 2x2 a canvas fifteen cm long, after which it is necessary to knit the same triangle shape, but in mirror image... Just as in the beginning we added loops, now we need to decrease them. Having knitted up to one loop with needles, take a hook, and use it to knit a rope for fastening. At the end of the video, it is shown that it is necessary to fold the shape in half and sew it with threads in the part where the elastic is located. Now our Japanese slippers can be considered completely finished.
Comments
Related posts:
 We knit the pattern "leaves" with knitting needles according to the video lesson and read the diagrams
 How to weave a panda from rubber bands different ways by photo and video lesson
Almost all of us like a variety of knitted home socks and slippers. This wardrobe item, along with mittens, scarves and hats, is most often wanted by needlewomen to knit, because socks and slippers are extremely comfortable. They do not constrain movement, and also perfectly warm the legs. There are a huge number of techniques and schemes in order to make knitted socks, slippers and footprints. We also add that all these techniques are completely uncomplicated, which means they are available for beginner knitters. If you choose an original and comfortable model, then you can not only wear it at home with pleasure, but even give it to your family or friends.
Features of making Japanese slippers
This model is original and therefore very different from other footprints and slippers. It has long ties, with the help of which the sneakers are fixed at the back of the foot.

The central part of Japanese slippers is a rectangle tied with an elastic band. On the sides there are triangle-shaped figures, ending with long ties for fixing. After finishing the work, the rectangle is folded in half, vertically, and sewn along the edges, forming the inner surface of the sneaker. Garter stitch triangles are wrapped around the foot on both sides and tied at the back with strings. If you wish, you can change the decorations on Japanese slippers to diversify their design and get original models.
Master class on knitting Japanese slippers
This master class will consider knitting Japanese slippers in more detail. In the photo below you can see an elegant and festive version of Japanese slippers. They are knitted in the same way as simple models, but at the end they are decorated with mother-of-pearl beads.

In addition to beads, these elegant Japanese slippers can be decorated with pom-poms or crocheted flowers from the same yarn that was used for the Japanese slippers themselves. Now let's take a step-by-step description of the technique that is used to knit Japanese slippers. This is the basic version, guided by which you can dream up and make variations on the main theme.

Fantasy will allow you to knit original slippers decorated with bows or beads. Let's start knitting with a set of forty loops, and doing a two-by-two elastic band. The length of the elastic should be eighteen centimeters (cm). For needlework, you will need very dense yarn, or threads in several folds.

Having connected such a rectangle, we will subtract two units along the edges, and we make a garter stitch pattern. In the course of knitting in garter stitch, we must reduce the loops (P) in each row by one. We carry out these reductions until there are five units left on the needles.


After that, it remains to knit long thin strings. We perform this technique on both sides of the elastic, after which we get this shape of the canvas.

