Do-it-yourself cardboard packaging scheme. Making decorative boxes with your own hands: some interesting ideas (MK). Big gift box
- What is a holiday? they ask you once.
And you immediately answer with a smile:
- This is when everyone is happy, they say good wishes, give gifts…
And in response to you:
- So, if today you give someone a gift and wish something wonderful, then there will be a holiday?
And it's true ... And you can even give a handful of sweets. The main thing is how to do it. Perhaps we should start with unusual packaging. DIY paper box is a great idea for original gift or surprise.
Even a purely symbolic gift will be worthy of admiration if you present it in its own packaging.
Materials and tools
So, what may be needed in the manufacture of all kinds of boxes.
- Paper.
It is best to take scrapbooking paper - it is good because it can be double-sided, and with a different pattern on each side. Also suitable is thick design paper, colored pastel paper, cardboard (200-300 g / m2), a simple sheet of drawing paper or watercolor paper that you can color or tint yourself.
You can also use "yellow" note paper (or an envelope from it), wrapping paper ... and any other that you can use for decoration. - Corrugated cardboard
- Napkins (preferably thicker)
- Ribbons, ribbons, laces
- Beads, buttons
- Ready labels
- Scissors, stationery knife
- Double sided tape, glue stick
- Superglue or glue "Moment" universal (transparent gel) for fixing beads and other things
- Ruler, pencil
- Compass
- Hole puncher
- Nail file (for creasing)
Useful advice. Before you take directly on the paper from which your box will be, try to collect it from plain paper. You will understand where to cut, how it is more convenient to make folds, how to assemble the box. Plus, you can estimate what size box you need. Often, after all, the first pancake is lumpy - so let this lump be made of simple cheap paper.
Decor. As for the elements for decoration, here you can not limit yourself: make flowers from fabric and paper, combine ribbons and raffia, lace, whatever you think of. The main rule is not to overdo it.
And now for the boxes themselves. There are a lot of options, models and schemes for their manufacture. We offer you the most popular ones - from classic round and square boxes at the base to unusual bonbonnieres. But first things first.
square box
You can give anything in it. From sweets and cookies to soap self made and decorations. Naturally, for each gift there should be an appropriate decor of the box.
In this case, the packaging is stylized as a postal parcel. This gives it a special romance, because the services of traditional mail for sending letters and gifts are used less and less today.
If use colored paper with a picture - the box will have a completely different mood. Choose yours!
You can create such a beautiful paper box in just a few minutes.
This is one of the possible options for making a square box. It will be from a single sheet, without a separate cover. Let's start.

We redraw the scheme of the box on paper. We think over in advance right size. Cut out.

Carefully bend the workpiece along dotted lines that are shown in the diagram.
If the paper is thick enough to make it easier to fold, you can creas it first. To do this, attach a ruler to the fold lines and draw along them with a nail file (with the tip of a compass, the tip of scissors). You should get a groove - a recess along the line. Now all the folds will be clear.

Glue the strips of double-sided tape as shown in the figure. Instead of adhesive tape, you can use a glue stick, but adhesive tape is still more reliable and more convenient.

We decorate the walls of the box from the outside, while it itself is still dismantled. And then we glue it. It remains to invest a gift and bandage the package!
Round base
The box of this model is more suitable for gifts for women. Although everything again depends on the gift and decor. It can be presented with both beads and a tie (if twisted with a snail), as well as an aromatic candle, christmas ball or even a cupcake!
Such a do-it-yourself paper box can later serve as an excellent box for small things (buttons, beads, etc.). 
So let's get started.

Select the desired radius of the circle at the base. We draw with the help of a compass 4 such circles on thick paper and 2 on corrugated cardboard.
We measure 3 strips on paper. Their length will be equal to the circumference of our circles (yes, you have to remember your favorite formula 2πR). The widest strip will be the height of the box, another one will be 1 cm narrower, and the third strip will be the narrowest - for the height of the future lid.
Difficult - only while you are reading this, you should start doing it - and everything becomes simple and understandable! 

We glue the circles of corrugated cardboard with paper. We got the bottom and base of the lid.

We glue the first and second strips, as shown in the figure (vertical shift is approximately the thickness of the bottom of the box, horizontal shift is 1 cm). The front side of the paper should be facing out. We decorate the future wall of the box.

We glue the bottom of the box in a circle with a double strip of paper. Then we glue the base of the lid in a circle with the remaining narrowest strip.
The box is ready! We place a gift inside and close the decorated lid.
Separately, you can not decorate the lid, but tie the entire box with a ribbon. For example, like this: 
Graceful boxes and not a drop of glue!
Is it possible to make a paper box with your own hands quickly and without any glue? Voila! There are more examples of such packages than you can imagine.
Everything is made from one sheet of paper. The main thing is to carefully cut the workpiece and bend it correctly. At first glance, the schemes for some boxes are tricky, but in fact everything is much simpler. Each next box will be easier to collect. We advise you to practice on plain paper first!
When working with thick paper, creasing will again help you a lot. Let's try!
1. Strict box - male version.
Although if you make it larger, made of paper with a delicate print and decorate with a flower, it will be just right for giving lingerie. 

Ideal for sweets and anything lush and airy.
In order to thread a ribbon or lace, make holes in the workpiece in advance with a hole punch. 
Suitable, for example, for loose aromatic tea. Or for some bottles, candlesticks. 
It looks very concise, perfect for a men's gift. 

And with a brighter decor - it will be a good option for a gift to a woman.


Here is the same case, but a little different configuration. This option can be opened and closed, thanks to a kind of clasp.
Lovely bonbonnieres
Bonbonnieres are a special kind of boxes. Bonbon in French - candy, and the name of the boxes comes from the word "candy box". It is bonbonnieres with sweets or sweet dragees that the newlyweds give to the guests at the wedding - in response to congratulations.
Ordering a bonbonniere for each guest is not a cheap pleasure. But it will not be difficult for the bride and her bridesmaids to make bonbonnieres in the style and tone of the wedding.
1. One of the easiest options

2. Elegant.
Reminiscent of a box or a small chest.
Just a little harder than the first. We make cuts in them stationery knife, holes, if we want to pull in a ribbon or lace, - a hole punch. 

3. Unusual and delicious.
As a rule, bonbonnieres are located on a special separate table and often on a dish or tray. You can play beautifully with this situation and make bonbonnieres in the form of cake slices. And you need to place them together, as if it were a paper cake. 
To begin with, we draw a large circle (the plane of the cake) and divide it into sectors in order to know the parameters of our pieces.
Then, according to the dimensions, we draw a diagram of the scan of the piece. We make the required number of scans, cut them out and glue them together. You can decorate before gluing, or after - it all depends on the idea of your decor. 
Often we are used to seeing in films how happy people get out from under the Christmas trees or receive some kind of gift as a gift, but the key here is that the gift is packaged in nice box. This is done mostly to create intrigue, less often - to preserve the integrity of the gift. Of course, it is much easier and less time-consuming to pack a prepared gift into a package from a store, but it is much more interesting to make a box.
So, your product will look the way you want, besides, such boxes are unique in their kind, so you will make them yourself. It is not difficult to make such boxes, and most likely you yourself will get indescribable pleasure from the work done by your own hands.
First, you will need to roughly estimate the size of your gift, considering several important factors such as the height, thickness of the gift, and gluing allowances. We will take these dimensions as a basis for the manufacture of the box on New Year with your own hands.
The sharp ends of the box must be bent inward, to the center of the bottom square. With the remaining not bent ends, we grab the bent ends and wrap them inward. This will be our cover.
We make the second box according to the same principle, and due to the fact that this square is less than a centimeter, the box will close perfectly. Moreover, if you are thinking about how best to make a beautiful gift box, then for the other half of the box, take thick paper, not cardboard. 
In such a hand-made box, a gift 5 or 6 cm in size and up to 3 cm high will fit, i.e. about the size that could fit in the palm of your hand. If the gift is very small, and you do not want it to hang in the box like a rattle filler, then you can put a light one on the bottom tissue paper, prudently crumpling it.
A more convenient alternative would be plain napkin. As you can see, making such a small gift box is not difficult at all.
Such a box with a gift inside should be tied with a ribbon or a beautiful ribbon.
And since making such boxes for packaging is not difficult, we want to show a few more options.
Box-cone
The bottom for such a gift box will be a piece of foil, with which you will seal your box. The cone can be beautifully disguised by making a Christmas tree out of it.
Try it - it's very inspiring!
box in the form of a prism
- A square cut out of thick paper measuring 18x18cm;
- Scissors;
- Ruler;
- Pencil;
- Ribbon and hole punch.
So, we draw a square in half and diagonally. We bend the corners to the center, and then from the center of the edge in the deflections of the central square, you need to draw even arcs. 
After that, cut off unnecessary corners with scissors, and at the rounded ends we pierce small holes with a hole punch and stretch a thin ribbon into them.
Box with a secret
And now we want to offer to make such a box for a gift, which will be with a little surprise. The box is a snag - when you remove the lid, it will fall apart. By the way, the lid is made according to the same principle that we described in the classic box.
The inner surface can be decorated to your liking, glue the pictures of their old postcards, beads, and then put the gift in the finished box and pack it.
Don't forget the tape!
felt box
You can decorate the box however you like. Such a box will be good in the role Christmas box for a handmade gift.
So, that's it. These are just the basics, more complex patterns will suit those who already have experience in creating simpler box models.
Good luck and inspiration!
Viewed: 757
You have chosen a gift, it remains only to pack it beautifully. But you know that standard gift wrapping is not very original, and often even tasteless. But the gift should cause delight immediately, even when it has not yet been opened! Let's try to make a beautiful gift box with our own hands, and pack the gift with taste, in an original and unusual way. What's more, it's easy!
Important: to pack a gift with your own hands, you have to dream up. Making a gift box is very easy, but only you can add originality and uniqueness to it. Don't be afraid to dream and be creative! Add decor, the most unexpected and unusual, use threads and ropes instead of simple ribbons, attach toys, flowers, sweets to boxes - in general, create! You will enjoy this creative process, and the one to whom the gift is intended will be delighted!
small
These schemes are suitable for you if you have prepared something miniature as a gift. For instance, jewelry or jewelry, miniature gadgets, or maybe the keys to a new car? Let's see how interesting it is to pack it all with your own hands.


Medium
Medium-sized gifts require larger boxes, and their design is slightly different. For them, use thicker paper or cardboard, and choose the shape and design of the package to your taste.


Large
For a big gift, you need a big and beautiful box. Let's try to make it ourselves! Choose very thick cardboard to keep the packaging secure, and a strong adhesive to keep the seams of the packaging from coming apart.


Choose the option to your taste, and do not forget - this is a creative process, which means that there are no strict rules not here. You can change the sizes yourself and even experiment with shapes, let your imagination run wild! And your gift will immediately cause delight, from its mere appearance.
The cardboard box is amazing! You can pack something big in it or, on the contrary, collect some little things, or maybe it will come in handy for gift wrapping if you work hard on it. Of course, nowadays we can buy a box of any format, but why? It is so interesting to make it with your own hands - it will be beautiful, original and meet your requirements.
First, decide for what purpose you need a box, what shape and size it should be. If just a box for things, then you will need thick cardboard. If you want to make a gift option, you will also need beautiful wrapping paper or fabric and other decor. In addition, prepare: PVA glue, scissors or a construction knife, a ruler. You can download gift box schemes on this site or. But let's start from the very simple option. Even if you do not have a diagram, you can calculate and draw it for a simple square or rectangular box yourself. First of all, on a sheet of cardboard, you need to draw a rectangle (or square) of the size you need - this is the bottom of the box. Then draw straight lines from each side of it with a ruler - these are the sides, the depth of the box depends on their size. On two opposite sides of the box, we finish the protrusions of 1-2 cm, the edges of these protrusions are cut off at an angle of 45 degrees - with their help we will glue the box.


As you can see, there is nothing complicated in making a cardboard box! Its strength will depend on the selected material and adhesive, and appearance- from your imagination. Do not be lazy, go for it - handmade will always be appreciated.
Summary: DIY gift boxes. How to make a paper box. Box diagrams. Cardboard box. Origami box. How beautiful to wrap a gift. Gift wrapping with your own hands.
Now there is no shortage of choice in stores gift wrapping. Helpful sellers will offer you gift boxes, decorative bags, gift paper for every taste. But you must agree that it is much more interesting to make packaging with your own hands. And the recipient of the gift will be doubly pleased, because by taking the time to choose and pack the gift, you thereby showed attention to it. In this article, we want to offer you different options for making paper and cardboard boxes with your own hands. All crafts are accompanied by ready-made box patterns. You just need to choose the gift box you like, print the diagram and glue the box with your own hands according to the instructions.
1. DIY box
We will start our article with the original boxes in the form of pyramids. Download box diagram, print it on thick paper or cardboard, make holes with a hole punch as shown in the instructions for making a box with your own hands. Gather the box, tie it up beautiful ribbon. Gift wrapping is ready! Note: boxes made of corrugated cardboard will look beautiful.
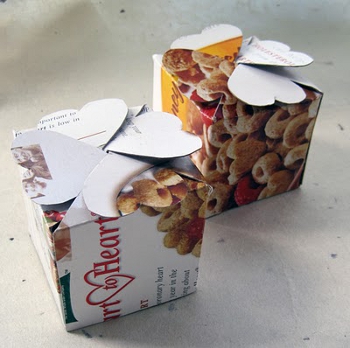
2. How to make a paper box
Don't know how to make a box with your own hands? Then use our ready-made paper box designs.
Gift box with a heart. Such packaging for a gift for February 14 or March 8 will be especially relevant.
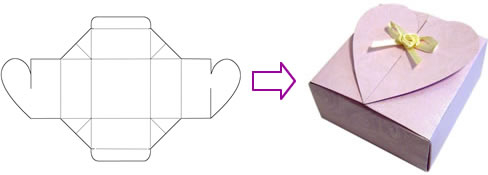
Here is another version of a cardboard box with hearts >>>>
3. Gift boxes. Gift boxes
Pink and blue gift boxes with white polka dots. You can put cookies or sweets in such a gift box. It would be great if you bake your own cookies.

Diagram of a pink box >>>>
Diagram of the blue box >>>>
Instruction >>>>
4. How to make a paper box. Box schemes
Ideal for making paper boxes with your own hands decorative paper for scrapbooking. Make a festive package out of it according to the scheme. Use the instruction

5. DIY cardboard gift box
We suggest you make a bonbonniere with your own hands. A bonbonniere is a beautifully designed candy box. It is customary to give bonbonnieres to guests at a wedding as a token of gratitude for the fact that they attended the celebration. Also, such cardboard boxes filled with sweets and nuts can be presented to kids who came to your child's birthday. In the photo below you see the classic version of this handmade gift wrapping.

6. Do-it-yourself packaging. How to make a box
The largest selection of do-it-yourself boxes is presented on the Creative Park website from Canon.


8. Do-it-yourself box. How to make a box
You will find original boxes for small gifts or sweets in the section