Bouquet of Kinder Surprise sweets. DIY kinder bouquet for girls. Creative materials
How often do we want to give our child or dear person a gift made with your own hands - it’s so nice to please your loved ones with exclusive sweet gifts! We will tell you in detail and step by step, how to make a bouquet of kinder surprises with your own hands at home from available materials.
At the first stage, you should consider the size, color and design of your bouquet.
The main cost-generating elements are:
kinder surprises (45-70rub/piece for December 2015)
corrugated paper/crepe paper (120-150rub/roll 50*250cm)
felt (400-600 rubles per roll)
heat gun (from RUB 800 and above + glue sticks RUB 40/piece)
holders (100pcs about 300rub)
organza, if you decide to use (250-350rub/meter)
less
satin ribbons, raffia ribbons, ribbons for fresh flowers, etc. (estimated costs will be 100-300 rubles per head)
wide tape (30-50rub)
any decor (beads, hearts, toys, etc.)


Surely you are interested size of the future bouquet. For example, a bouquet of 19 kinder surprises will be approximately 30 cm in diameter, of 31 kinders - approximately 35 cm in diameter, of 51 kinders - 45-50 cm. The height of the bouquet is at least 30cm, usually varies from 30 to 50cm.
Where to buy materials for your bouquet? - In any florist shop where you can find huge selection materials and you will definitely choose the right color and size. In one store you are unlikely to find everything you need at once, so you need to be prepared to visit 2-3 or even 5 stores.
Of course, your noble impulses may end at the time of purchasing components, because you will have to invest a substantial amount/buy more materials than is necessary for one bouquet, spend several days searching and purchasing materials, then a day to make the bouquet, but we believe in you, therefore,
as promised, we will describe, how to make a bouquet of kinders:
1. Take holders with clamps (a stick with a cup) in the required quantity. We decorate the holders with felt or organza, and as a result we get blanks.
2. Then insert the kinder surprise inside the holder with the fabric - you need to do it carefully so as not to melt the kinder. This way we get a kinder on a stick, decorated with fabric/felt in the color of your bouquet.
photo 2 expected
3. When your “kinder flowers” are ready, you can start forming a bouquet:
- Collect the holders into a bouquet and fasten them with tape one by one.
- IMPORTANT! - watch the distance between the kinders in the crown of the bouquet, the location of the kinders, the pattern (if you use kinders different color or use a different color substrate for kinders). As a result, you will receive a finished bouquet core. It's just a matter of small things - registration ;-)
- You can simply decorate a bouquet with corrugated paper in one or two layers, or corrugated paper with organza, as in these examples /;
To decorate a bouquet simply with corrugated paper in one or several layers: measure the corrugated paper according to your bouquet. If there are several layers of paper, then according to your idea, measure the paper directly according to the bouquet. Then glue the edge of the measured sheet of corrugated paper. Place it on the crown and tie it tightly with any ribbon on the stem of the bouquet. Do the same with the remaining corrugated sheets. As a result, you will receive a bouquet like this:

To arrange a bouquet in organza, you should glue the fabric onto the corrugation. This will give the bouquet additional volume and a beautiful shimmer of color, as in this bouquet

- After decorating the bouquet in corrugated paper, you can start decorating. The decor of a bouquet of kinders can be bows made of satin ribbons, beads, small flowers, hearts and much more. Here you can see examples of decorating a bouquet: ;
- As soon as you finish decorating the crown of the bouquet, you can tie the bouquet with a beautiful satin ribbon, floral ribbon or raffia ribbon.
- Your bouquet is ready! Enjoy the result and give joy to your loved ones!
P.S. Don’t be discouraged if your result is a little different from what you expected. Beautiful bouquets obtained through hard work and long training.
If for any reason you change your mind bouquet of kinder surprises with our own hands, then we will be happy to bring your fantasies to life with maximum precision in detail and accuracy of execution. You can view existing works in our catalog and order them in any way convenient for you.
Sincerely, Your Plushkin-mir!
All people, to some extent, remain children. After all, sometimes you really want an unusual thing, an extraordinary gift. So fashion came to us in Lately make gifts with your own hands. It is not only beautiful, but also quite interesting activity. This article will describe how to make a delicious bouquet of kinder flowers yourself quickly and easily with your own hands. Such an unsurpassed gift will bring only the best emotions to everyone!
This type of craft is very easy to implement; you don’t need any special craftsmanship skills. Children really like this surprise, because who doesn’t want to get a lot of chocolate eggs, and even with toys inside!
Master class on a bouquet of kinder flowers with your own hands as a gift
Many children love sweets, but if the goodies are also in beautiful packaging, it’s doubly pleasant. You can make such a simple bouquet with your child, for example, a gift basket with sweet gifts. The simplest master class in which you create a bouquet of kinder surprises will help you create unusual gift with your own hands. Guests will be delighted with such a composition. Bouquets can be very different and it is not necessary to adhere to standards, because handmade loves creative ideas.
For a simple bouquet you need to take eggs, tape, tape, and thread.
The wire must be prepared so as not to perforate the egg.

Now the kinder needs to be wrapped with tape, about one third of the part, the rest should be in its original form.


Insert the finished wire and secure it with thread or a drop of hot glue.

Glue it on top again with tape, and for beauty with tape.

Wrap each egg in organza and arrange into a bouquet. Decorate with leaves or flowers. We wrap it in a beautiful wrapper, and an interesting bouquet is ready!

Crafts creativity
But people dear to you appreciate not only the sincerity of the gift, but also interesting ideas. The same bouquet can be placed in a beautiful basket, and it will turn into a very original gift. After all, it is now so fashionable to give bouquets in baskets!
Making a basket for our kinders
To decorate the basket, you need to wrap it in crepe paper. Stretch carefully, align, glue the ends. You need to glue it using hot glue. To ensure that the paper lays flat, try making undercuts.

We make baskets at the bottom beautiful stripe ruffle, so the basket will stand out.

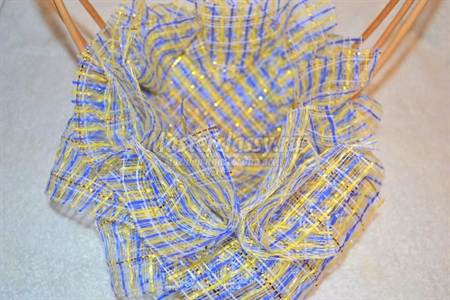
Very carefully remove all irregularities. Simply cut the decorative mesh into squares. They need to be glued inside the basket.

Then you need to decorate the inside of the basket, arranging squares of decorative mesh in a special way. The photo shows how to fold a square:
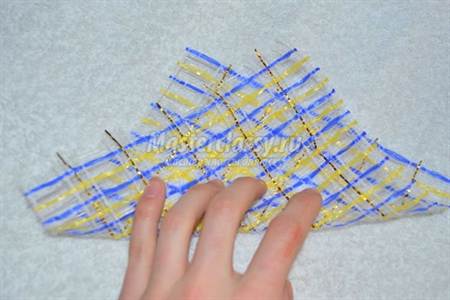

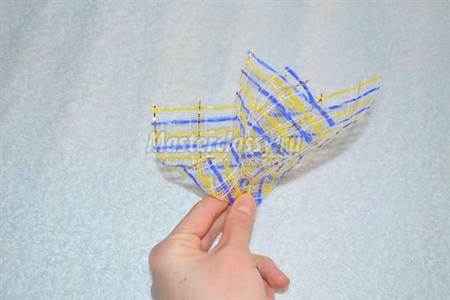
All workpieces must be secured inside the basket. Do all the work very carefully.
Now you need to decorate the handle of the basket. Cut long strips from the remaining crepe paper, making them thin rather than thick.

Now you need to wrap the handle of the basket with these strips. Where the paper comes away from the handle, then you need to glue those parts. When this part of the work is ready, then we decorate the handle additionally, wrap it with a beautiful ribbon.

These ribbons, which were used to decorate the handle, are tied Stuffed Toys. They should be small. And we decorate the handle with decorative flowers.

Next comes the turn of working with chocolate eggs. Each egg needs to be wrapped in organza. This procedure will avoid damaging the chocolate or the packaging itself. Place a piece of paper under the egg, in the mesh itself. This method will prevent glue from seeping onto the egg.
The bag must be tied beautiful bow or a special ribbon to match the one on the handle.

Special work needs to be done to prepare the bottom of our basket. We put a piece of foam plastic on it. It must be glued to the very bottom of the basket.
Before attaching bright kinders, make sure once again that all irregularities are hidden in the craft. If they are visible to the naked eye, then cover the defects with crepe paper.
Just glue the pieces or strips onto the foam. If you have some tape to spare, add it to the mesh.

To ensure the strength of such a bouquet, chocolate eggs need to be glued to the bottom of the basket. You need to apply glue where there is a layer of paper near the kinder.

Only minor improvements remain. Place organza between the eggs. If desired, it can be decorated with rhinestones or beads. If the mesh sticks out somewhere, you need to trim its ends. And now the wonderful work is ready! You just need to admire your beauty. Your birthday boy will definitely like such a gift, which simply feels unique and individual. Be sure to take a photo of your work so you can preserve your beautiful handiwork for your history. A very beautiful and elegant gift will definitely please many people, but the most important thing is that it was made with great love!
Video on the topic of the article
A special point in the work is a video on a master class of such bouquets. In them you can see small nuances of the work that cannot be noticed in the description.
All kids love sweets, especially chocolate eggs with a surprise inside. Therefore, with a little imagination, you can create a bouquet of delicious kinders as a gift for your baby, and quickly and easily with your own hands.
Here you can see what cute bouquets are created from this sweetness:

We make a children's bouquet of kinder surprises with our own hands
The article describes an excellent master class on a bouquet of kinder surprises.
In order to create such a bouquet, you need to purchase kinders, small toys, corrugated paper of various colors, floral ribbon and frame, wire, satin ribbon, for decoration - an artificial rose, various butterflies, rings.
To fix the kinder in the flower, use cling film to wrap the egg and twist the tail. Prepare the rest of the eggs in this way.
After this, petals are cut out of paper. You will need two colors. Some petals will be short and wide, measuring approximately ten by five centimeters, while others will be long and narrow, twelve by three centimeters. The short petals need to be stretched a little in the middle, and the long petals should be slightly twisted inward. Wide petals need to be fastened together or glued with glue so that the flower does not fall apart. Narrow ones should not be fastened. They need to be folded into a flower and the base wrapped with an elastic band.
Next, the toys are fixed. This is done using wire. And so that the wire is not visible, you can wrap it with floral tape. Wrap the finished wire around the toy. To prevent the base of the wire loop from being noticeable, you can glue a bow to this place. All toys and flowers from kinders need to be dressed up in “skirts” made of organza.
To make the bouquet more neatly shaped, a floral frame is used for this. If there is none, you can make a cardboard frame.
The middle of the bouquet is left empty in order to insert an artificial rose and butterflies. Nice decoration Children's bracelets and spirals made of wire can also be used for a bouquet. Butterflies are attached to the spirals, after which the spiral is secured to the rose using floral tape. Rose also dresses up in a “skirt”. The handle of the finished bouquet is fixed with tape, after which the entire bouquet can be dressed up in a “skirt”, which will be made of corrugated paper. The color is selected appropriately. The final step will be tying the handle of the bouquet beautiful ribbon. The bouquet of kinders is ready. The following are provided step by step photos for making this bouquet:


The second option for a sweet gift for a child is quick and easy
The article will help even the most inexperienced learn how to make a bouquet of delicious, beloved kinders with your own hands as a gift. This is perhaps one of the easiest ways.
To create a bouquet you will need chocolate eggs, any colored napkin, green corrugated paper, cardboard, wooden skewers and scissors.
The bouquet will consist of tulips. To create these flowers, you need to take a napkin and wrap a chocolate egg in it. Trim the edges of the napkin and secure it to a wooden skewer using floral tape. The skewer is wrapped with tape until the very end. Next, a sheet is cut out of cardboard to be attached to the stem. Thus, the tulip is ready. To make a complete bouquet you need to make the required number of such flowers. Below you can see step-by-step photos of making tulips:


The third way to please your loved one with sweets
In the article you can find a lesson on making a bouquet of kinder flowers that you can give to your beloved. This method creating a bouquet is also quite simple.
First of all, for production you will need chocolate eggs. The quantity can be taken at the above discretion. You will also need corrugated paper in red, green and yellow flowers, for wrapping, floral mesh, wooden skewers, tape and scissors.
All eggs must be secured on skewers with tape. Cut out a rectangle from yellow and red corrugated paper, which then needs to be folded in half. Then fold it in half again, and then cut the resulting square into four rectangles. The resulting rectangles need to be folded like an accordion and tied with a ribbon in the middle. Then slowly and carefully lift up all the layers of the accordion. They need to be lifted from all sides. The kinder on a stick must be threaded through the resulting flower made of corrugated paper.
I was ordered this bouquet for the birth of my baby, a boy. That's why he's blue and has a rattle toy)
What you will need:
- corrugated floral paper (dark blue and light blue)
- packaging film for flowers (blue)
- thin satin ribbon, 3 mm thick (white and dark blue) * not pictured
- cling film
- toothpicks
- spare part from a greenhouse (Leroy Merlin sold a set of 5 of these pieces for 80 rubles)
- masking tape
- scissors
- compass
- base-circle made of polyurethane foam, D=10 cm, height=3-5 cm (apply polyurethane foam and let it dry for a day. Then cut it out stationery knife required forms)
- cardboard (I have from one package of dry porridge “Fruto-nanny”)
- 1m of beautiful blue packing tape
 And:
And:
- 9 kinders
- toy rattle “Baby Elephant” (“World of Childhood”)

Description
- We wrap the base with blue corrugated paper. To do this, cut out a 27x17 cm rectangle from paper.

- We use scissors to round off one layer of paper and make cuts to make gluing easier. We round the second layer exactly along the base.

- Glue the paper to the base using a heat gun. Here we have such a beautiful base.

- We cut the stick from the greenhouse to a length of 28 cm and tighten it tightly packing tape, carefully gluing from time to time with a heat gun. We coat the edges of the stick with a heat gun and quickly screw it into the base.

- Now let's move on to the kinders. We cut out semicircles D = 10 cm on cardboard according to the number of kinders, i.e. we make 9 semicircles. These will be stands for kinders.

- We cover each semicircle with masking tape on both sides.

- We crush the cardboard with our fingers so that it bends better and we get a rosette, which we glue together well with a heat gun. The outer side (front) side of the cardboard should be light, without drawings. Let the rosette dry for 5 minutes.

- Spread the cling film and place the kinder.

- Then we cut the film so that there is a tail of about 4 cm. We grease a toothpick with a heat gun and screw the tail of the film onto it.

- Now we put this kinder into the socket.

- We cut out a strip of blue corrugated paper 16x5 cm and make a ruffle with our hands. Then we glue the ruffle to the kinder with a heat gun. It turns out like a frill on a kinder 😉

- We cut out a 22x50 cm rectangle from dark blue corrugated paper. We also make a ruffle on top with our hands. Press the paper tightly against the workpiece and glue it. Now we tightly tie a white and blue ribbon onto double bows and our workpiece is ready!

- We make 10 pounds: cut out 10x5 cm rectangles from blue film. Fold in half... ADD
- We make 20 decorations from white and blue ribbon. We cut strips 12 cm long. Lubricate the toothpick with glue in a circle and quickly apply the ribbon on both sides.

- Now we collect our bouquet:
- First we insert the toy into the center, and then we stick the kinders in a circle.
- We fill the voids with pounds and ribbons.
- The original gift is ready! Be careful, the bouquet is quite heavy, and its center of gravity is greatly shifted;)) It’s better to put it in a vase right away!

A chocolate egg with a toy inside is a favorite treat for many children, and if you buy several sweets and decorate them beautifully, you will get original bouquet. This craft is a great gift for a child, friend or bride. A bouquet of kinders can be the main gift, but it is better to present it as a pleasant addition or give it instead of flowers.
Before you start making any sweets, you need to consider 2 points. Firstly, the egg is easy to damage, since the layer of chocolate in it is quite thin. Secondly, you cannot hold the product in your hands for a long time, as the filling will melt from the heat. Making a bouquet of kinder eggs with your own hands, following all the steps step by step, is quite simple; it is more difficult to maintain the integrity of the eggs, so you will have to be careful. In this master class for a bouquet of kinder surprises you will need the following:
- several chocolate eggs;
- corrugated paper of different colors;
- ribbons, beads and other small items for decoration;
- thin wire or tape;
- thread and needle, scissors;
- chopsticks 30 cm long or longer (suitable for Chinese or barbecue);
- basket (not always used).
To give the composition integrity, you can use natural berries, flowers, lace, decorative mesh, sequins and much more.
Simple craft
 The master decides for himself how many eggs there will be in this bouquet. For each kinder you need to prepare 4 sticks. First, everything you need is laid out on a wide table. Take 4 sticks and fasten them together with tape or thin wire. The fastening is placed in 3 places: in the middle and 2 cm away from each edge. The edges of the sticks are bent slightly in different directions to create a space where the chocolate product will be inserted.
The kinder is inserted between the sticks and be sure to glue their ends and the surface of the egg (foil) with tape. If you don't do this, everything will fall apart. Do the same with the rest of the sticks and kinders.
The next stage is the production of sepals. They are made from green or light green corrugated paper, winding it in the place where the kinder connects to the sticks. Now you need to wrap paper of a similar shade around all the sticks to make stems. That's it, the flowers are ready.
The bouquet needs to be decorated to make it look more elegant. First, the flowers are glued with tape, trying not to damage the sticks, then the kinders are wrapped in a net, positioning it airily, and also secured with tape or wire. They are decorated with rhinestones, beads, ribbons, dried flowers, etc. If desired, the bouquet can be presented in a wicker basket.
Composition for the bride
A bride's bouquet of kinders is made on a hard backing. Every craftswoman usually has everything she might need to create it at home. You will only have to buy chocolate eggs and corrugated paper, and also stock up on a glue gun. The bouquet turns out no worse than a traditional floral arrangement. It should be small so that the bride can hold it comfortably in her hands.
Creative materials
It is best to take 7 or 11 sweet products. With a different amount, the composition will not look so beautiful. You will also need wooden skewers for kebabs, toothpicks and a piece of foam.
To make a bouquet stem, you can use a cardboard tube from disposable towels or another similar device. Other items that may be useful:
- scotch;
- awl;
- thread, needle;
- decorative tape;
- wrapping paper;
- scissors.
Making crafts
 First of all, make the base of the bouquet. A hemisphere with a diameter of 10-15 cm is cut out of foam plastic. Skewers are stuck into this blank closer to the center, placing them around the circumference. Subsequently, they will be attached to the inner surface of the sleeve, forming a frame. In this case, they will need to be glued to the cardboard. You can do it differently and place the skewers not inside, but outside the sleeve, and then wrap them with tape.
The finished base is draped corrugated paper or beautiful stickers. A piece of foam plastic should also be decorated. For example, you can wrap it with threads dipped in glue, giving it an original shape, and then cover it with colored paper.
The next stage is securing the kinders to the legs. To ensure they stick well, it is better to glue them with a gun. Then you should cut the organza into squares with a side of 20 cm. They will serve as a decorative wrapper for the eggs. Each chocolate product is wrapped in several layers of organza, straightening the material to form petals. The details of the composition are secured with packing tape and a stapler. If everything is done correctly, the decorated kinders will look like tulips.
Now each egg on a stem is attached to a sleeve, which by this time should already be glued and decorated. Kinder flowers are arranged as freely as possible. Compositions made of beads, corrugated paper, and organza are inserted into the space between them. You can also decorate the bouquet with sweets and beaded branches. The beauty of a sweet bouquet will be emphasized by the finest lace, which is wrapped around the entire product, or a special mesh.
Craft for your loved one
You don't need a reason to please your girlfriend with a bouquet. But you can deviate a little from tradition and make a bouquet for your beloved that will delight you not only with its beauty, but also with its taste. For a sweet souvenir you will need skewers, scissors, tape, floral mesh, yellow, green and red corrugated paper. Operating procedure:

The details of the bouquet are collected and decorated with corrugated paper Green colour, and then wrapped in a net and tied with a ribbon. You can decorate the craft with bows and other accessories.
Bouquet with toys
You will get a beautiful bouquet for a girl if you use small soft toys in addition to chocolate eggs. Small figurines depicting your favorite cartoon characters are also suitable. Several of these bouquets will serve as decoration for a child's room. festive table, for example, on a birthday. You will need the following:

First, wrap each egg in cling film and twist the ends to make tails. Several short and long petals are cut out of the fabric. Long ones are bent inward, short ones are stretched. Wide petals are fastened together with glue, and narrow petals are placed in the middle of the flower so that the bases protrude slightly downwards. Then all the lower parts are fixed with a thin elastic band.
Three small toys wrapped with wire so that it is not visible. They fasten toys and kinders together, wrapping the composition with an elastic band. An artificial butterfly is attached to a skewer in the center. Then a wire loop is placed on the top side of the bouquets to form an arch. The edges of the wire are twisted, and to hide them, they are decorated with corrugated paper. A wire loop is wrapped with the same paper, and one or more bows are attached to the middle. The sweet present is ready!

Making a basket
Bouquet for children's party will look impressive when placed on a table in a basket. The easiest way is to take a ready-made one, woven from wicker, and decorate it at your own discretion. To decorate the basket you will need:
- bouquet of chocolate eggs;
- Stuffed Toys;
- artificial flowers;
- scissors;
- ribbon;
- colored crepe paper;
- floral mesh.
The inside of the wickerwork is lined with paper, glued with hot glue. Bottom part the outside is covered with ruffles. Several quadrangles are cut out of the decorative mesh, each is rolled up like a flower and attached inside the basket. These parts need to be placed around the perimeter, closer to the edge, because there will be kinders in the center.
Ribbons 1 cm wide are cut from crepe paper of two colors and wrapped around the handle. The colors should alternate with each other. In several places, corrugated paper flowers or soft toys are glued to the handle. Important: large bears and hares can fall off or move, so it is better to choose from those that are smaller. Now all that remains is to make a bouquet of kinder surprises with your own hands and put it in a basket. But there is another, no less interesting option.

The eggs are wrapped in a layer of organza and a cardboard square is placed under the lower end. It is needed so that the packaging of the kinders is not damaged by the glue. From above, the edges of the organza are collected and tied with a bow using thin tape. A thin sheet is cut out of polystyrene foam and placed on the bottom of the basket. The surface is covered with crepe paper.
Apply glue to the bottom of the egg, where the paper square is attached, and then secure the kinder in the basket. The same goes for other sweets. The final stage is decoration with organza, beads, ribbons and other accessories.
Attention, TODAY only!