Thin ribbon bow. How to make a bow from a satin ribbon with your own hands with photos and videos. How to make a ribbon bow for wedding paraphernalia
Gift wrapping matters a lot. Beautifully wrapped box with puff or original bow produces a good effect. In the article we will present several options for how to tie a bow on a box. different ways. To do this, you need to purchase a satin ribbon in the hardware store and wrapping paper in stationery.
There are many gift options. This is the simplest single with two rings, lush multi-layered. You can make a separate flower or a ball of ribbons and then introduce it into the tying already in finished form. You will also need templates made of dense material and scissors for this. Some people simply put such a finished flower on tape in the middle of the lid, without tying the box itself.
The tape is used in completely different widths. It can be very thin - 5 mm, or you can take it wider - 5 cm. It all depends on the creative idea of the author. If you are trying this simple art for the first time, then see how to tie a bow on a box in the easiest way.
Plain single bow
They begin the design of such a bow by running the ribbon under the bottom of the box. Both ends are crossed from above in the center or with a shift to the side, and long edge tape once again held under bottom boxes, but already in a vertical position. Then a knot is tied at the intersection of the two ends. It remains only to make a simple bow, like on laces.

With this method, there will be no knot on the bottom of the box, the ribbons are even, so that the gift will have a solid base. The edges of satin ribbons can be cut in different ways: with a bevel, a corner, evenly. It is advisable to singe them with a lighter or a candle so that the tape does not split.
Lush bow
Let's look at another way to tie a bow on a box. The tape is divided into two parts. One is used to tie a gift. The ribbon is passed under the bottom of the box and tied in a knot in the center. Then work begins on laying another piece. To make the bow lush, you need to fold the ribbon in turns one on top of the other, as in photo number 3. Then this pack is woven into a knot. To do this, it is placed in the center of the box and tied with the ends of the first ribbon.

The more turns, the more magnificent it turns out finished decoration. It remains only to spread each ring with your fingers and unfold it so that they are arranged in a circle.

Such a magnificent bow will turn out only from soft and thin tape if the material is denser, it will bulge and the knot will be rough and thick. This can be avoided if you know how to tie a bow on the box in the following way.
Stitching individual elements
This decoration is made separately. Subsequently, it can either be glued to the box with adhesive tape, or tied into a tape in finished form. Make such a flower from several strips different lengths. Since the turns are sewn in pairs, you need to prepare two long segments for the bottom, two medium and two short ones for the middle. Consider step by step how to tie a bow from satin ribbon.
1. Prepare segments of the desired length. The shortest is the middle, it is presented in a single copy.
2. From each segment, you need to roll up the figure eight and sew the middle with a stitch.

3. Fold the same eights perpendicular to each other and sew together. Cross-shaped blanks are obtained.
4 - 5. All parts are fastened together. From below - the largest, then - the average size, from above - the smallest. A part is inserted into the middle, represented by a simple ring. Place it with the seam down so that it is not visible.
6. It turned out a magnificent and durable bow. It can be made from any material, even from dense rep or velvet.
paper version
From special paper packing tape you can make a beautiful composition. To do this, you will need a template and sharp scissors. Instead of a template, you can make several turns around the palm. Then it is folded in half and on one side cut off from two sides, as in the photo below. This is done so that the central knot is not thick. The ribbon is unfolded so that the cuts are in the center, and tied with a thin strip. We look further at how to tie a beautiful ribbon bow.
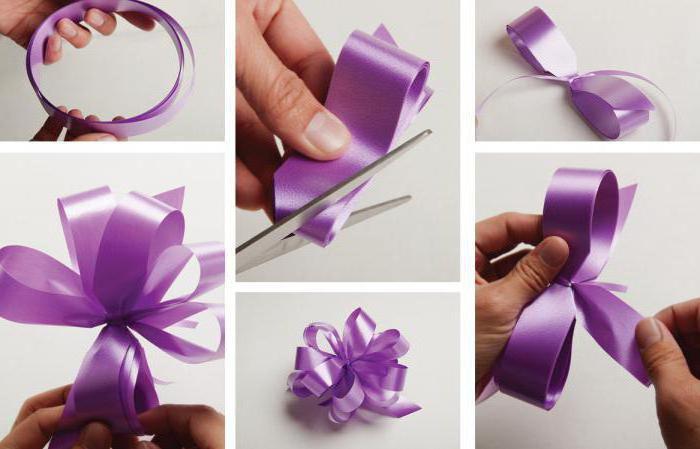
It remains only to carefully straighten all the turns and deploy in all directions. This is done so that they are distributed throughout the circle. At the end, the bow is attached to the gift box or tied into a weave of stripes around the box.
Now you know how to tie a beautiful ribbon bow. But you can arrange the edges in different ways lush flower, and it will look more original.
1. A lush paper bow is made, described in the previous section. Next, you need to cut each turn of the ring in half with scissors. If you look at the red sample, then all the edges are notched with corners, forming aster petals.
2. Second option Pink colour in the photo has rounded edges with a recess in the middle. To do this, each end of the tape was folded in half and a corner was cut off from one side and the other.

3. A pale green flower looks interesting. Before tying a bow on a gift, each of its turns in the middle of the ring is cut with the ends of the scissors into several parts, depending on the width of the ribbon. It turns out a chrysanthemum, which looks very impressive on the gift wrapping.
You can come up with your own method of notching the edges. There will be the most unique design solution.
original decoration
From satin ribbon? It’s not difficult, and this method looks unusual. After all, the bow is horizontal. You can do it in different ways. The first option is to correctly fold the tape in turns, from the largest to the smallest in the center. It is better that the bow does not spread apart, fasten it with glue or grab it with stitches.

The second option is to compose a composition of individual elements, gluing together segments of different lengths, folded in half. We insert a separately cut piece of the strip into the central coil and tie a bow beautifully. More turns can be cut from a satin ribbon, then it will be more magnificent. It's a matter of taste and quality.
Composition of several elements
Gift wrapping made from several ribbons looks beautiful different quality and colors. Consider also such an option as tying a bow. From a satin ribbon, wide and narrow, cut into two pieces. For a change, an element from a different material can be included in the creation of the product, as in the photo below. Then three bows are sewn separately in descending order.
Then you need to attach the finished bow to the package.
In the article, we introduced you to the various basic options for tying bows. These skills will be useful not only for those who do not know how to arrange gifts in a box or bag, but also for mothers who want to learn how to tie a bow on their daughter's dress beautifully. So try it, and maybe you will come up with your own way, the most unique and original. After all, this is a creative and interesting process.
Elizabeth Rumyantseva
For diligence and art there is nothing impossible.
Content
Is it hard to imagine a solemn moment without decorating or decorating with elegant bows? Lush and strict, elegant and frivolous - they create a special mood at the holiday. Making a hairpin or a bow tie for an evening dress from satin ribbons is not difficult if you follow the instructions.
How to make bows from satin ribbons
Jewelry assembly technology requires ribbons different color, special width according to your idea. You will need a minimum set of tools and materials for manufacturing. In the case of passing the master class, you will not have a question about how to make a bow from a satin ribbon. Suggested step by step instructions turn the process of work into a pleasant and understandable. You will need:
- lighter;
- scissors;
- threads;
- needle;
- ruler;
- glue or heat gun.
Depending on the purpose of the bow, there are various options for manufacturing technologies. He can be:
- small, made using a fork - suitable for decorating a postcard;
- magnificent, elegant - in the style of kanzashi - for a holiday in kindergarten;
- a strict bow tie - for an important banquet;
- double - for decorating hair, attached to a headband or hairpin,
- solemn - on a gift box.

Satin bows can be made in the form of an original flower. If you choose the right color and shape, they will become unique decorations:
- elegant evening dress;
- frivolous sundress;
- styled hair;
- in the form of a bracelet on the hand;
- stylish handbag;
- bridesmaid dresses;
- elegant blouse;
- as a pendant around the neck;
- furniture in the interior;
- stylish dress on the prom;
- curtains in the apartment.
How to make a classic satin ribbon bow
The most popular and simple, this bow is used to decorate clothes and interiors. Even a modest gift, decorated in this way, becomes elegant, solemn and attractive. To tie a bow you will need:
- take a workpiece 20 cm long;
- burn the edges
- fold in half with the smooth side inward;
- bend the edges outward again;
- pick up, so that each has a loop at the top, and a bend between them at the bottom;
- cross the folded parts in front, forming a ring under them;
- pass one loop through it, tie.

Strict beautiful do-it-yourself satin ribbon bow
You can tie a strict stylish bow for a special occasion. It will become an ornament. handbag, dress or gift. Here it is important to choose the right colors for crafts so that it looks elegant. How to make a bow from a satin ribbon, for example, such as in the photo. Prepare scissors, glue, material of three colors for work. You should:
- take a blank 30 mm wide with a length of 18 cm;
- roll into a ring;
- connect the edges with glue.
The next steps to assemble the decoration are:
- fold the ring so that the seam remains at the bottom in the middle;
- iron;
- take a ribbon of a different color of the same width, with a length of 7 cm;
- wrap a ring around the workpiece across;
- fix with glue;
- prepare a tape of a contrasting color of the same length, but thin;
- wrap around, in the middle of the previous ring;
- seal;
- iron.

Two-tone beautiful bow from a satin ribbon with your own hands
A stylish and very elegant decoration can be assembled from blanks of two colors. Ease of manufacture does not mean that it will look modest. Elegant and spectacular, it will decorate the hairstyle and the original dress. You will need a wide and narrow blank. To make jewelry:
- measure 2 pieces 15 cm long - one narrow, the other wide, cut off;
- put one on top of the other;
- roll into a ring;
- fix the joint with glue;
- iron;
- tie a bow in the middle with a narrow ribbon, closing the junction, forming a knot;
- cut off the ends;
- glue.

DIY gift bows from satin ribbons
An anniversary or birthday gift box will look much more impressive if you decorate it with a bow. It can be, depending on the situation, small, elegant or voluminous and lush, for example, like this. It is very easy to tie it - you can quickly learn, even without a master class, following the instructions:
- take a workpiece two meters long;
- wrap it around the open palm of your left hand;
- remove carefully;
- leave the end free.
- on a workpiece folded in several layers, cut off both corners on one side, by about 5 mm;
- burn it so that it does not bloom;
- repeat operations on the other side;
- fold the workpiece so that the cut parts are aligned in the middle;
- tie with the free end of the ribbon;
- straighten each petal, giving it volume.

A lush bow made by yourself can please a young beauty if it is woven into her hair or becomes an ornament. gift box. For its manufacture, you will need 6 blanks 12 cm long, 5 cm wide, the same number 11 cm long and 30 mm wide. First, they need to be burned around the edges. You will also need elegant thin braid, small beads and a piece of felt. Next, you need to do this:
- take wide blanks;
- fold in half;
- sequentially collect on one thread;
- pull, fasten;
- repeat the process for narrow ribbons;
- cut a circle with a diameter of 40 mm from felt;
- stick a large blank on it;
- take pieces of thin braid 12 cm long - 6 pieces;
- fold each into a ring;
- glue on the front side by laying on the petals;
- fix the workpiece from a narrow ribbon on top;
- pour glue, approximately 10 mm in diameter, onto a piece of fabric;
- lay the beads on it tightly in a circle;
- cut in a circle;
- glue the decor in the middle of the decoration.

If you want to decorate holiday card tiny bow, try using a fork. The process will go like this:
- take a fork in your left hand;
- loop a ribbon over it so that the edges remain on the right;
- throw the far end behind the fork through the lower one in front;
- insert it in the middle between the teeth and bring it back;
- enter the remaining tip of the ribbon on the right into the same gap, but from above;
- turn the plug over and tie both ends with two knots;
- remove the bow;
- cut the ends, singe.
DIY openwork satin bow
Do you want to learn how to wrap gifts like at Dior? The technology will not cause difficulties, and the view will be unusual and original. For manufacturing, you need satin blanks 25, 20, 16 and 10 cm long. To make such an ornament:
- burn the edges of the ribbons;
- roll the longest into a ring;
- glue the ends;
- repeat operations with other blanks;
- stack all the rings on top of each other, starting with the larger one, place the glued sections from below;
- pass an additional ribbon on top of the rings (as an option, it can pass inside the small element);
- fix with reverse side.

Bows are an invariable attribute of a solemn hairstyle for any girl. And if earlier they were the same, and differed only in the pattern of the ribbon itself, today the choice of bows is quite wide. A bow can decorate a hairpin or hair band. A huge number of varieties can be made from the same satin ribbon. It's enough to arm yourself necessary tools and materials, as well as carefully study our master classes, which present step-by-step actions with photos.
Step-by-step instructions for making a satin ribbon bow
It is not difficult to make a bow from a satin ribbon with your own hands. A high-quality master class will turn any work into a real pleasure. Depending on the type of bow and the technology of its manufacture, different materials and tools are used. But most often scissors, satin ribbon, glue, needle, thread, ruler are used. The bow can be small, designed for decoration, or large and elegant, in the style of kanzashi. Bows can be attached to a headband, hair clip, or even to the paper of a gift box. In other words, there are many options for using satin ribbon bows.
Master class 1: a beautiful satin ribbon bow

To make such a bow with your own hands, you will need:
- several types of ribbons: satin, thin yellow, leopard, brown thin;
- cardboard box;
- elastic;
- matches;
- glue.

Master class on making a bow from a satin ribbon with your own hands:

Master class 2: satin ribbon hairpin bow
The next option for making a bow from a satin ribbon is more laborious, but appearance products confirms that the time spent pays off with a vengeance.

He will decorate any hairstyle. To make this version of the bow, you need to use:
- blue satin ribbon 5 and 2.5 cm wide;
- silver ribbon 3 mm wide;
- a circle of felt with a diameter of about 5.5 cm;
- a thread;
- needle;
- scissors;
- matches or a lighter;
- glue;
- hairpin.
The satin ribbon, whose width is 5 cm, must be cut into 6 pieces of 14 cm long, with a width of 2.5 cm - into 6 pieces of 10.5 cm. Then you need to divide the silver ribbon into 6 parts of 15 cm long, as well as 6 pieces of 8 cm each.

The master class consists of the following:
- Fold six pieces of the widest satin ribbon in half. Collect them on a thread, and then pull off the petals, forming a flower. Fasten with thread.


- Similar actions must be done with segments of another blue ribbon.


- Glue a felt circle from the back edge of the flower. This will give him a more solid foundation. Then prepare pieces of silver ribbon. Fold them into the shape of ears and secure the ends with glue.

- Lay out the resulting "ears" from the silver ribbon around the large flower, as shown in the photo.

- Place a smaller flower on top. Fix it with glue on the main.

- Fold the remaining pieces of the silver ribbon in the form of ears.

- Try to stick them on the top flower.

In fact, the satin ribbon bow is ready. It remains only to paste in the middle of a pebble or other decoration. A hairpin can be attached to the back with a drop of glue.
Master class 3: a lush satin ribbon bow

To make this version of a satin ribbon bow, you should prepare:
- kapron tape 5 m long and 5 m wide;
- 2 needles;
- a thread;
- the tape itself.
Step by step with photo:
- Prepare the ribbon to make the first petal. To do this, fold one end into a triangle. The result is the inner side of the petal.

- Fold the triangle in half, and then fasten the corners so that a petal forms. How to do this is clearly visible in the photo.


- Then, in the same way, you need to make another petal.


- The resulting triangle must be folded with the tape in such a way that a large triangular figure is obtained.

- Next, fold the product in half. You need to make another side of the petal. The resulting triangles must be fixed at the corners with glue.

- Fold the ribbon again in the form of a triangle, then again in half. This will be the next petal of the flower. Repeat the same steps until the tape ends.


- At the lower and upper ends of the figures, connect the extreme petals.

- The upper and lower edges of the flower (middle) are fixed.

The resulting bow can be made even more beautiful by attaching a bead or button in the center. From below, you can sew an elastic band for hair or glue a hairpin.

Master class 3: satin ribbon gift bow
In previous master classes, options for making bows as a dye for an elastic band or hair clips were considered. But, as already mentioned, the scope of various bows is quite wide, so they are also used for other purposes. Alternatively, make a decoration for gift wrapping.

To make such a bow, you will need to follow these steps:
- Fold the satin ribbon into several rings, the diameter of which will correspond to the same parameter of the final bow.
- Smooth out the resulting loops, and then make diagonal cuts along the edges, as shown in the photo.
- Fold the loops again, but now the section of the cuts should fall into the center.
- Using ordinary wire or thin ribbon, fasten the bow in the middle. Then you need to straighten each loop so that the edges of the product look in different directions.
Thus, you get a magnificent bow, which will become a worthy decoration for any gift wrapping.
How to make such a variant of the bow is shown in the figure below.

Video: how to make a bow from a satin ribbon with your own hands
In the video you can see a simple, but original version making a bow from a satin ribbon.
Another simple version of a satin ribbon bow is presented in the following video.
The following video features more difficult option making a bow from a satin ribbon with your own hands. Despite the laboriousness of the process, the product turns out to be so beautiful that it is perfect as a decoration if you stick a hairpin or hair band to it.
Content
Sooner or later, everyone has to learn how to tie a bow: both men and women. And if someone is limited to tying shoelaces, then someone discovers the real art of creating magnificent products that can decorate and holiday hairstyle daughters, and wedding cars, gifts and clothes, interior and even pets. To create, you can use both a traditional ribbon and very unusual materials, and to master tying, you can turn to a master class.
Classical
This is the most common and, at the same time, the simplest option, for the creation of which you do not need anything other than:
- satin ribbon;
- Scissors.
1. Cut enough tape first.

2. Then fold it, according to the illustration, crossing the folded sections.

4. Then one of the sections must be skipped into the resulting ring.

5. And tighten the knot. Now you can straighten.

Strict

To create it, you will need more materials and tools:
- Satin ribbon of the main color;
- A piece of satin ribbon for decoration;
- Fabric glue or clear instant glue;
- Scissors.
1. Cut off a piece to the size of the future bow.

2. Fold it, according to the method indicated in the figure.
3. The connection is fixed with glue.
4. Then this area is gently smoothed out.

5. Now the junction is closed with a finishing tape and the resulting bow is wrapped around it.
6. On the reverse side and carefully glue it.
These bows can be made from different materials, and they are good for decorating shoes, accessories, in particular, bags, as well as children's and women's clothing.
Longline

To make this multi-tiered bow, you will need three types of satin ribbon of different widths, a small segment of a narrow one to secure the entire structure, and scissors.
Colors can be different, the main thing is that the bow turned out to be harmonious and fit the range chosen for the entire festive package.

1. At the ends, folding them lengthwise, make triangular cutouts with scissors.
2. Then put one on top of the other, from the widest to the narrowest.

3. The resulting blank in the center is intercepted with a narrow ribbon, tied into a knot, and long ends used to tie boxes.
Bicolor

Despite the ease of manufacture, the bow looks very impressive. To create it you will need:
- Two types of tape of different widths;
- Narrow tape;
- Fabric glue or other transparent glue;
- Scissors.
1. The tapes are laid one on top of the other, then a ring is made from them, which is carefully glued together.
2. Now the center of the doubled ring is intercepted by a narrow auxiliary one.
3. The bow is smoothed, and the knot is fastened with glue.

4. After tying, there should be ends of sufficient length to cover the gift being made out.
Openwork "Dior"

An extremely effective bow for decorating magnificent gifts will require a little more strength than previous samples, but after a little training, the design will no longer have secrets. To create this splendor, you need to prepare:
- A skein of satin ribbon of the desired width and color;
- Fabric glue or stapler;
- Scissors.
1. Cut off four segments of ever-increasing length.

2. Rings are glued from these segments.

3. Then these blanks are superimposed on each other so that the bottom is the most big ring, and on top - the smallest.
4. In the center, the resulting workpiece is fastened or carefully glued together.
5. Now this place can be covered with another piece of tape, which is glued to the back of the bow.
It is important not to wrinkle the design during manufacture, and the bow can be glued to the gift box with double-sided tape or tied
DIY flower gift

If the previous bow is mastered, then it's time to move on to the study of the most elegant and complex decoration. For a flower, it will be important to take a sufficient amount of the main tape and a narrow additional tape to pull the structure.
1. First you need to form a ring from the tape, holding it with your thumb and forefinger.
2. Following the example of the first ring, about ten more similar ones are made. In this case, it should be noted that the more turns will be on the fingers, the more magnificent and denser the bow will turn out.

3. When all the planned turns are made, the bow in the center is pulled with a narrow auxiliary tape.
4. The bow can be straightened and decorated with a gift or costume.
A ribbon bow is an invariable decoration of a gift, piece of clothing or headdress. There are many ways to make it, not to mention those that you can think of yourself.
How to choose a ribbon
When choosing a ribbon for a bow, it is important to decide on the color and texture. The shade should be chosen so that your decoration naturally complements the dress, hat or gift box. The bow should not be conspicuous, but only add a slight accent of solemnity.
To make a fluffy bow, you will need more than one meter of ribbon; it takes a lot of length to knots and folds.
As for the quality of the ribbon fabric, satin or satin material is usually chosen. However, those who are just learning how to form bows will find it difficult to tie slippery ribbons, so you are advised to use fabric with a denser texture. For a beautiful bow, velvet or nylon ribbons, lurex or print fabrics are quite suitable. When decorating bouquets, ribbon with wire inserts is often used.

Bow making basics
There are certain rules, knowing which you will be able to form bows of any model in the future. The universal procedure for making a bow looks like this:
- Prepare a ribbon of the calculated length with a small allowance for adjusting the bow.
- Straighten and lay out the cut on a smooth area of the table.
- Pull the edges of the tape to the middle, overlapping to form "two ends and two rings."
- Achieve the same size and symmetry of the two halves.
- Lay one loop over the other, loop around and pull through the circle in the center.
- Tighten the middle of the bow well.
The bow looks complete if you carefully trim its ponytails diagonally or at the corners.

Terry bow
To make it, it is better to take a tape made of a tough, durable fabric that can keep the shape of the product well. Let's start forming a bow:
Wrap the ribbon in several rings the size of the product being created.
Smooth out the rings and make diagonal cuts.
Now fold the rings so that the cut corners are in the center of the folded ribbon.
Tighten the slots with ribbon or wire.
Gently straighten the bow rings, alternating in one direction and the other.
Fluff the product - the decoration is ready.

Classic or strict bow
The classic bow has a simple shape of two loops and two tails of the ribbon, sometimes this particular model is able to emphasize the importance of a gift. When forming a strict model of a traditional bow, the ribbon must be folded in half, and the place where the ends join is fixed using glue. It is better to wrap the intersection with a piece of tape neutral shade and glue the ends on the reverse side. Such a bow differs from a simple classic one by an underlined middle.
When choosing an adhesive, test it on a piece of tape so that there are no traces left after drying. Otherwise, when making a bow, you will have to carefully hide the traces of gluing.
Bow in two shades
Prepare ribbons of two colors - one wide, the other narrow, do not forget about the ribbon for tying a bow to a gift, preferably a neutral shade.
Procedure:
Fold the loop with a wide ribbon, reinforcing the ends with glue.
Put a narrower ribbon on it, and repeat the same procedure.
Fix the resulting "sandwich" in the middle with paper clips or glue.
Secure your item to the gift box with the third ribbon.
To determine the length of the ribbon to fasten the bow to the gift, wrap it around the package, add another 50 cm on both sides, taking into account the tying.

Bow in layers
To make such a bow, you need to take ribbons of three colors and different widths. The wide tape must be cut to the greatest length, and the narrowest one should be made the shortest. Carefully trim the ends of the bow with corners. Arrange the ribbons so that the wide one is at the very bottom, and the narrow one is at the top. Then tie the folded parts with an additional ribbon so that long tails remain to strengthen the bow on the gift.

bright chrysanthemum
Prepare a thick ribbon, scissors and wire.
Procedure:
We turn the tape into rings according to the size of the future flower.
Smooth out the rings and make corner cuts.
We turn the rings in such an order that the cut out triangles are in the middle of the product.
We fix the cuts with wire.
To form petals, make successive cuts on the loops folded together.
Spread the petals of the "chrysanthemum" in different directions, starting from the center.
holiday flower
Form an ordinary ring from the prepared ribbon, holding it with two fingers. Then repeat these manipulations until at least ten rings are formed. The number of rings is arbitrary, depending on the intended volume of the bow. The rings are tied in the center with a thin ribbon, then the loops are straightened, and the bow is fixed on the gift.
Those who find it difficult to tie bows can use a bow maker.

openwork bow
It will take a little more time and effort to make this unusual bow. stock up the following materials: satin ribbon, scissors, glue and stapler.
Follow these instructions:
Cut the ribbon into desired lengths.
Glue them into rings.
Lay the rings on top of each other, placing a piece of tape with cut tails at the base.
Fix the center of the product with a stapler or glue.
Cover the joint with a small piece of tape.
Using a separate long piece of ribbon, attach your openwork bow to the gift box.
