Christmas balls braided with beads schemes. Christmas ball made of beads. Snowflakes like beaded Christmas tree decorations
Christmas ball from beads do it yourself
Master class with step by step photo... Beaded Christmas ball.
Brief description of work: New Year's ball, braided with beads using the technique of openwork weaving with embroidery on the net.Such a toy can be made by someone who already has certain skills in beading and knows the rules of weaving an openwork fabric. But if you really want to - you can learn everything, there would be a desire.
Target: Formation of interest in children for design christmas balls beads.
Tasks:
improve the ability to work with beads using the lace weaving technique;
improve the ability to work with the scheme;
develop artistic taste;
develop visual and color perception;
develop fine motor skills fingers, the ability to control their movements;
to educate diligence, accuracy.
Step-by-step process of making a Christmas ball
1. Necessary materials: beads (I took Czech beads # 10, as it does not need to be calibrated), a bead needle, threads, scissors, a napkin for weaving.
These materials are selected depending on your ball, a plastic ball with a diameter of 4 centimeters, threads to match the beads.
2. According to this scheme, it is necessary to weave a net-cover on our ball.

3.Since we start weaving from the net, we fix the bead at one end of the thread so that our weaving does not move, for this we take a bead of a different color, we pass the needle into the bead so that the end of the thread remains long enough (about 20-25 cm.) , again we go into the bead only from the opposite end and we go through the bead again. We try not to sew the thread in the beads, otherwise it will be difficult to untangle the thread later.

4. The bead is fixed, we start weaving: we collect 37 beads.

5. Move one bead from below and use the needle to return 9 beads upwards.

6.We select 5 beads, count 5 beads on our chain and go up in 6.


7.Get 5 beads again, move 5 on the chain and go to 6.

8.Now we collect 5 beads, count 5 beads on the chain and with a needle go through all the remaining beads on the chain, except for the fixed bead.


9.Now we need to make a turn and weave the mesh down: we collect 13 beads and go through the middle bead from the previous five.


10.Then we collect again 5 beads, we also go through the middle beads from the previous five.
11.At the end of the row we collect 12 beads, move the last one and go back with a needle of 9 beads.

12.Thus, we weave a net around the girth of our ball. On a ball with a diameter of 4 centimeters, it is necessary to weave a net of such a length that 18 peculiar needles are formed at the bottom. There may be a little more or a little less of them, but then we will not be able to embroider on the mesh through the mesh, so we follow the weaving.


13. When the mesh is ready, we need to butt-weld the ends of the mesh. We do the connection like this: when weaving the mesh, we fixed the beads on top, weaved the mesh when the mesh is woven the right sizes, the weaving should remain at the bottom and start the connection from the bottom up, this is well shown in the diagram; then the thread from above must go back down the weaving and leave for further weaving.


14. Now it's time to remove our extra bead and start securing the top of our mesh. We go over the topmost beads of the mesh, insert an additional bead through two beads, and tighten. So weave all over the circle.


15. It turns out a ring, we go through this ring again and fix the thread. It remains to secure our weaving: for this you need to pick up the thread between the beads with a needle, pull out and make a small loop, pass the needle into this loop and gently tighten (the thread is fastened by analogy with fastening the thread when sewing, only the basis is not the fabric, but the thread between the beads) ... In one place we make two knots, then we go through the weaving of several beads and again make two knots. In total, you can make two knots three times each - this is enough to secure our weaving. After fixing the thread, carefully cut it under the spine, being careful not to cut the main thread.


16. We put a beaded case on our ball.

17.Now we connect the bottom beads with the thread that was left when fastening the ends butt-ends. You don't have to add additional beads here. If, of course, the distance between the beads is greater, then additional beads must be added. This may be due to a different number of beads or the ball is taken larger in size, in general, you need to watch the weaving.


18. We get a ring, we go through it twice.

19. Scheme for weaving mesh embroidery.

20. We put the thread in a diagonal path on the grid and start embroidering our paths with glass beads: one path - we embroider from bottom to top, turn along the beads and start embroidering already down.


21. When the embroidery is finished, the thread must be secured in the same way as described above.
New Year's vintage - beaded fantasies.
Master class for Christmas toys.

You will need:
Silver beads size 0.3 mm,
white pearl-like size 0.3 mm,
transparent 0.3 mm.
wire No. 02 silver,
small Christmas ball,
line

First, we begin to braid the ball.
On the fishing line, alternate through the bead as many beads as can fit in the girth at the base of the ball.

Then we connect into a ring, passing the fishing line 2 times, and put it on the base of the ball.

We tighten it tightly and do it in two knots. We do not cut the fishing line and then string the beads alternating through one, white, silver, and so on.

From the base of the ball, we circle the beads strung by alternation along the radius of the ball and connect closely to the base of the ball as shown in the picture. We tie in two knots.

For the fortress, you can go to reverse side beads and secure also with two knots.

So, then along the base we draw the line through the beads to the cross-shaped side of the ball and also pick up the beads by alternating

At the bottom of the ball, connect the fishing line crosswise and continue to braid the ball.

We always go out with the fishing line to the top of the base of the ball. Then we slightly shift the braid of the ball. And we continue to braid.

It should look like this.

Braided like this. View from above.

Side view.

This is how the ball braid should look at the bottom.

Then we tie it by passing a wire through the bead at the bottom. We select one main color of the beads, for example, white, or one color of silver. You need to dial 12 pcs. of beads and rising to the top in a spiral, pass the wire through the bead in a row, stepwise passing 1 bead each time.

Spiraling upward.

Each time we go up 1 bead to the top, we collect 12 pieces. beads.

It should look like this.

The first row should go to the base of the ball like this, and from the base with the second row we will go down if the wire is not over. If there is not enough wire, then at the base we also fix the wire through the bead by twisting it. Well, if there is enough wire to walk in stages, as well as climbed down, then we continue to descend keeping in the middle between the row and the base.

When the second row go down the ball. Then you immediately fasten the wire through the bead, twisting it. then you again take another wire, fix it and you will already see where you can go by the third row according to the description to the top, adhering to the middle between the next and the bottom of the ball. It should look like in the photo.

View of a braided ball at the base.


Christmas balls. Master Class.

We need:
1. Nylon threads (I use threads for leather)
2. Beads or beads in two colors. In this case, take seed beads # 10 and # 7
3. Bead needle
4. Christmas ball

We thread the needle. I rewind about 2 m. We collect 1 bead, fasten the thread on it several times.

Then we type 1 orange, 3 purple, and do it 6 times. Next, we type 1 orange, 1 purple.

We pass the needle into the first orange bead. And we start a new row ...

Collect 3 purple, 1 orange, 3 purple

And we go through with a needle, as shown in the photo (in the third orange bead)

It should look like this.
Now we are constantly collecting 7 beads, reaching the end

Then we type 3 purple, 1 orange, 1 purple
Thread the needle through the first orange bead.

Cast on 3 violet, 1 orange, 3 violet again and pass through the third orange bead with a needle.

We continue to weave this way, trying on the ball. There should be a short distance.
The places from where we started and where we ended should be as shown in the photo.

Pick up 3 purple beads and pass through the second orange bead from the opposite edge.


And we pass through the third orange bead from the other side ...

Thereby connecting our mesh. Etc.


And we thread the needle through the orange bead

We collect 3 purple beads and pass them through the orange beads as shown in the photo.

And we fix

Trying on the ball. This...

Now let's start braiding the bottom of the balloon.
It is necessary to calculate how many corners have turned out. In my case, it turned out 23

We collect 23 beads and connect them into a ring. Tied a knot.

Put it in the middle of the ball and try on how many beads you need to collect.
I decided to dial 12

We thread the needle as shown in the photo.

And we return through the beads back

We drag the needle through the bead in the ring. And again we collect 12 beads, etc.
It's better to work not on a ball.

It should look like this

Final stage. We collect the beads again, but here we must take into account the circumference of the fastener on the ball. We must try on. Obviously, there are more beads. The beckoning came up with 29 pieces. We also connect in a ring ...

And we put it on the ball.

Now the hardest part (in my opinion). We string beads and try on. ATTENTION: when pulling the thread, the beads should fit snugly against the ball, not dangle. Less is better than more.

The connection principle is the same as with the bottom. Only now we are working on the ball. And since we have more beads in the ring, sometimes we thread it through two. Here you just need to calculate approximately.

It should look like this

The ball is ready!

Instead of beads, you can use bugles and cuttings. Then we collect 1 piece of bugle ...

And the cabin is two things.

DIY sequin Christmas toys.

Sequins used for the toy white snowflake-shaped, purple flower paillettes, raised paillettes Pink colour, purple foil and pearl-headed needles. We will attach all this to the workpiece - a ball of construction foam with a diameter of 6 cm.

The first step is to wrap the workpiece with foil and flatten it. Then we start a set of sequins on the needle, while placing our sequins in the following sequence: first a snowflake, then a pink sequin, and then a purple one. It remains only to attach the pin to the ball as it was done in the photo above.

We carefully fill the entire surface of the ball, while trying to keep the gaps as small as possible. You can, of course, go in one set of sequins to another, but then you should make sure that all the snowflakes are at an equal distance from each other.

So our Christmas tree toy is ready.

Arm yourself with your own imagination and start creating original toys that will surely bring a truly fabulous mood into your home.
Good luck in your endeavors!


Balls in snowflakes. Master Class.

You will need
Beads size 03 mm, color for gold, silver, pearl, fishing line.
First, make snowflakes for the balls. Pick 6 beads, connect them in a circle, fasten them on two knots. Then we pass a bead through the middle, it turns out like a flower.

Then we attach one more bead to each bead, you get a snowflake.

We fix it with two knots, this is a snowflake that should turn out. 3 photos. We take a ball like a snowball, white snowflakes, 03 mm beads for pearls and large transparent beads, fishing line. We collect the ring for the base of the ball by alternating beads, white, transparent. We connect with two knots.

We put it on the base of the ball, then we attach a transparent bead to the base and already a snowflake to it, and so we attach it crosswise along the entire base. All line should go inside the beads.

We attach 2 transparent beads to these snowflakes and again snowflakes to them. (A total of 29 snowflakes will be spent on the ball.) By the circumference of the diameter of the ball, there should be 9 snowflakes in a circle photo 4.

Be sure to place 2 transparent beads between the snowflakes. Respect the proportions. Also fasten the snowflakes which will go crosswise photo # 3. In photo # 4, the bottom should look like this.

Then, between the cross-shaped fixed snowflakes of photo №1, slightly going down, we also fasten 2 transparent beads. There are always 2 transparent beads between the white snowflakes. I will show the connection of snowflakes in detail below on a blue ball.

It should turn out to be such a delicate ball.

Take the ball slightly smaller than the white one. It will take 21 snowflakes, you will need 03 mm silver beads, large transparent blue beads, fishing line. Everything is the same as on that ball, we collect by alternating beads, silver, blue transparent and so on. We connect at the base of the ball.

We attach a snowflake through a transparent bead, and so we attach 4 of them. Then to each 2 transparent and again snowflakes.

There should be 7 snowflakes along the radius of the girth. Cross to cross with 3 snowflakes on both sides. We alternate snowflakes through two transparent beads. Photo №4 the bottom should be connected like this.

Now we attach the snowflakes in the gaps of the cruciform ones in the same way as in the photo.

Attach 2 snowflakes between the cross-shaped snowflakes as in photo # 3. The ball should look like in photo # 4.

Christmas balls-decoration with beads. Master Class.

For work you will need
1-plastic ball with a diameter of 6 cm
2-Czech beads in red, white and gold colors
3-plastic round and curly beads in white transparent and red

Cut off 1m of thread, it is desirable to pass the thread through the wax, dial 40 red bis.

Pass again through the first bead, closing the circle.

You can go around the circle a second time, securing it.

Second row - dial 1 red bis., Pass the needle through 3-third bis., Skipping one, dial 1 red bis again. and go through the 5th-fifth encore. etc.

Pull up the thread so that the beads fit snugly against each other, dialing the last encore. second row, pass the needle through the first encore. the first row (in the ring) and the first encore. second row. Only then should the next row be woven. Thus, the beads are divided and staggered - this type of weaving is called "mosaic".
Third row - cast on 1 white encore, go through the protruding bead of the previous row, cast on 2 gold encores, go through the next protruding encore. the previous row.

And so on until the end of the row, not forgetting, closing each row, draw the needle through the first beads of the previous row and the one that has just been woven.

Fourth row - dial 1 white encore. and go through 2 gold of the previous row, collect 9 gold and go through the same 2 gold previous. row., dial 1 white and go to white.

So until the end of the row there is an alternation, a set of 2 white and 9 gold.

Fifth row - the needle came out of a white encore. and you have to go through another 5 gold encores. previous row-rings. Cast on 4 red, 1 white, 4 red bis. and go to the mid-5th golden encore. next ring.

Again they recruited 4 reds, 1 white, 4 reds, and so on until the end of the row.

Sixth row - the needle came out of a white encore. Cast on 6 red, 1 gold, 1 round plastic white bead, 1 gold, 1 large clear plastic bead and 3 gold bis.

Leaving 3 gold biscuits at the end, pass the needle in the opposite direction through - plastic beads and gold beads.

Cast on 6 red bis. and go to the next white encore.

Cast on 8 red bis., 1 gold, 1 small clear bead, 1 gold, 1 red bead, 1 gold, 1 large clear bead and 3 gold bis.

Leaving 3 gold biscuits at the end, pass the needle in the opposite direction through all the plastic beads and gold beads

Cast on 8 red bis. and go to the same white encore.

Repeat the alternation of small and large pendants. Here I ran out of thread, with the tip I need to go to the first row, securing the thread. And also draw a new thread from the first row so that nothing falls apart at the most inopportune moment.

Well, in fact, our napkin mesh is ready.

We put it on a ball, you can glue it with glue near the base, then our decor will not be lost anywhere. Or you can leave it as it is and then you can change it to different balls every year.

The following nets are woven according to the same pattern, only other beads are taken.


And here they are our beauties.

Competition work: Irina Leonova
New Year not far off, many decorate Christmas trees. I would like to hang an unusual toy on my Christmas tree. This master class is devoted to tying a Christmas tree ball with a lifting loop (in the Russian way) and working with a scheme for it.
Materials:
- Czech seed beads # 10;
- denim thread or its analogs to match the beads;
- needle;
- hook;
- Christmas ball with a diameter of 6 cm;
- small pieces of paper.

To draw up the diagram, the DB-BEAD program was used to draw the harnesses. It exhibits 30 beads in a circle and draws a figure (photo 1), in which there are 17 beads in the widest part. With the simultaneous tying of five elements, like this figure, you get a canvas that tightly covers a ball with a diameter of about 6 cm (I used a purchased Christmas tree ball, girth - 17.7 cm). The thread "Pekhorka - White lace" was used in the work. Parts of those elements where there is an addition and a decrease will be called wedges.
The scheme needs to be edited depending on the materials used and the knitting density. For example, using Iris will make the shape smaller.

Let's consider a specific example (photo 2). There are three colors on the diagram, we are only interested in white and purple. We rewrite the report (if there is no blank) from top to bottom in a column (photo 3). Yellow divides the ranks. The knitting of the ball will start from the bottom of our ball, so we put the beads on the thread from above, but RIGHT TO LEFT (as the program reads) 5 times in a row each line. We divide the rows with small pieces of paper (photo 4). On them you can make notes about the number of beads in one row.
Stage 1 - increments.
We collect two air loops without beads (photo 5) and knit 4 columns with beads in the first of them (6-7). We knit the fifth bead with a half-column into the second air loop(photo 8). We get the first row.

We make a lifting loop - an air loop without beads (photo 9), so we rise to the next row. Here we make increments as follows: in the first four loops we knit two columns with beads (photo 10-11). In the fifth loop (half-column) we knit one column with a bead (photo 12). We knit the last tenth bead with a half-column, inserting the hook under the loop and under the first bead of the second row (photo 13).
We knit a lifting loop without beads (photo 14) and proceed to the third row. In the first loop of the previous row (it will be slightly hidden by the lifting loop) we knit one column with a bead (photo 15), in the second loop - two columns (first wedge) (photo 16), in the third - again one column, in the fourth - two ( second wedge), etc. in a circle (photo 17). In the 9th and 10th loops, we knit one column at a time. The last bead remains. We knit it with a half-column, inserting a hook under the loop and under the first bead of this row (fifth wedge) (photo 18-19).

We start the fourth row with a lifting loop (photo 20).
Comment. In order not to get confused where to make increases and decreases, I move the beads of only one wedge to knitting (photo 21), after tying them I move the beads of the next wedge, etc. In this case, I know exactly where to add and then where to subtract. When knitting a wide part, division into sections is not necessary.
In the first (photo 22) and the second loop we knit one column, in the third - 2 columns (first wedge), in the fourth and fifth - one each, in the sixth - 2 columns (second wedge), etc. in a circle (photo 23). In the 13th, 14th and 15th loops we knit one column at a time (photo 24), and the last bead we knit with a half-column under the loop and under the first bead (fifth wedge) (photo 25-26). The fourth row is ready (photo 27).

Let's summarize the knitting technique with increments. We start the row with a lifting loop without beads. We knit from the first to the fourth wedges: first, one column in each loop and at the end of the wedge we make an increase - two columns in one loop. The last wedge: in each loop we knit one column, and the last bead we knit with a half-column under the loop and the first bead of this row (photo 28-30). The drawing does not twist in a spiral (photo 31). Having knitted the 17th row (photo 32-33), we finish knitting with increments.
Stage 2 - knitting without changing the number of beads in a row.

Here we knit like in bundles, but I would like to note some features. The row begins with a no-bead lifting loop. In each loop, starting with the first, we knit all the beads one column at a time, except for the last one (photo 34). The last loop skip and knit a half-column with a bead. The hook comes out below and to the right of the first bead of this row (photo 35-36).
We knit the 38th row and insert the ball into our knitting (photo 37).
Stage 3 - Decreases.

Here we are using wedges again. First, we knit a lifting loop without beads. We make decreases at the beginning of the wedges, skipping one loop (photo 38-39) and knitting one column into the remaining loops (photo 40). Skip the last loop of the fifth wedge (photo 41) and knit the remaining bead with a half-column, inserting the hook under the loop and the first bead of the row (photo 42-43).
We knit all the rows to the end (photo 44), put the tip of the ball back in place, hang it on the tree (photo 45) and admire it.

Remarks. Knitting, especially at the beginning, should not be tight, otherwise it will be difficult to find the right loops. But at the second and third stages of the loops that we will skip, you need to knit tightly, otherwise the beads will sink inward. You also need to make sure that the lifting loop passes between the first and last beads of the row.
Thank you for your attention!

Happy New Year and Merry Christmas!
Christmas balls made of beads: DIY decor options (diagram)
Any needlewoman will certainly wish to decorate her christmas tree homemade toys. And it's not a secret for anyone that toys woven from beads will surely become the brightest and most sparkling ones. Indeed, no other material can possess such a variety of shades and shine. A beaded ball will not only become a wonderful and unusual decoration for your Christmas tree, but can also serve as a delightful and unique gift for your loved ones and friends on New Year's Eve. These Christmas balls are usually created using the weaving technique, using various patterns for this. 


The most magical and charming Christmas tree christmas ball you will succeed if you can braid a ball made of glass. After all, it is such a ball that has a mysterious shine and is painted, usually in colors that are more delicate than plastic toys. However, this is not so easy to do. After all, such Christmas tree toys are quite fragile and you can easily make a bunch of New Year's fragments out of them. It is much easier to reproduce a master class explaining the braiding of a plastic ball. Such new year souvenir will be both practical and durable. To repeat our master class on weaving a ball and make a wonderful decoration for the New Year tree, pick up beads of a bright color. It is better if it shines and shimmers. Beads, pebbles and ribbons will also come in handy. In general, everything that can be used to make our balloon even more attractive.
Master class of simple braiding of a New Year's ball

Christmas ball braided with low beads in a simple way weaving Christmas balls, it is to use for this purpose a few lows collected from beads and beads. To make such a toy, purchase a ball equal to the circumference of 21 centimeters, beads with a size of 7/0 and of various shapes, but not exceeding the size of 5 mm beads. Don't forget about the line that will hold all your crafting materials. new year miracle... To make your ball the most beautiful, use beads and seed beads in a color that works well with the color of your ball. There should be a lot of beads on a ball, so you shouldn't use their glass version. After all, then your new year gift will be too heavy.
First, it is necessary to carry out a set of beads and beads on the fishing line and, by connecting the ends of the fishing line, make two rings in size with a diameter of 3 cm, with the number of beads in multiples of twelve. After all, later you should get twelve lows connecting both "poles" of the Christmas tree ball. These rings will wrap around our Christmas ball at the top and bottom. Attach these rings and lightly mark their place with a marker or scratch the surface of the ball with a needle. Take a centimeter and measure the distance between the points. This must be done in order to determine the length of the weave is low.
You can position the beads as low as you like. Experiment to do later the best option... Low weaving is done according to the following pattern. 
Secure the thread to the bead of one of the rings. Place the beads and beads on the thread in the order you like. After that, pass the needle through the corresponding bead of the second ring and back through the entire bottom. Here you must pull the string tightly and draw it back into the bead you started with. And then move on to the second bead of the ring, repeating the whole process. Therefore, you must make twelve low. After the ninth is woven, you can insert your New Year's ball and continue working. At the end of weaving, fasten the thread, mask the knot. Tie an interesting loop to your ball using a ribbon and a small christmas decor... All this must necessarily match the color.
Weaving a Christmas ball with parallel weaving
Purchase a 7cm plastic Christmas ball and 10/0 seed beads in two vibrant and contrasting colors. Let it be blue and white in our example. You will also need the same of blue color beads, but in size 5/0 and beaded wire. 
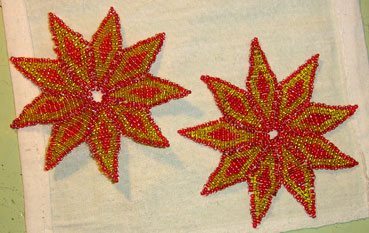
Parallel weaving pattern for braiding a New Year's ball Let's start our master class. To start, take a size 10/0 seed bead and braid a nine-piece star on the wire. To create each part, a rhombus weaving pattern is used.
Cut 60 cm of wire, put a blue bead on it, and then two more and pass the other wire edge through them in the opposite direction. Now you need to make a good pull on your weave. This is two rows ready. For the next, cast on blue, white and blue beads and again pull the other end of your piece of wire through them. Continue to weave according to the diamond pattern. At the very end, twist and cut the wire ponytails, leaving 1 cm to be bent to the inside.
The next rhombus should be made in the same way, but when you get to weaving the widest place, pass the wire through the wire loop of the rhombus made earlier. And then connect all the rows in sequence. So all nine rhombuses should be collected together. The last diamond will merge with neighbors on both sides. All of your ponytails should be folded to the same side. Now you have got a star and you need to make another one the same. This will be the longest part of your New Year's work.
After both stars are ready, you will need to connect them. For connecting weaving, it is better to use a fishing line. With the help of loops, we connect the stars to each other, working with both ends of the fishing line.
Christmas ball, braided with parallel braiding on wire Fold the stars together so that the sides with the ponytails are turned inward. Place one blue 5/0 bead on the line, then four white 10/0 beads, one blue, and again four white beads on each end of the line. Pass the edges of the line through the beads of any diamond pair and repeat the same set. Finally, pass both ends of the line through one bead and pull together. You get a loop that connects your stars together. Instead of beads, size 5/0, you can use beads of the appropriate diameter or stones, or even create crosses at the location of these beads with small beads.
When you are finished weaving the closing loop, stretch it and insert the Christmas ball. Then tighten the weaving again. The ear of the Christmas tree ball should fall into one of the loops. When all the work is completed, secure the line and hide its edge so that it is not visible.
You can also braid the whole ball with a continuous beaded fabric, depicting some kind of New Year's pattern or drawing on it. A properly selected pattern for weaving from beads will help you with this.
Now decorate your Christmas tree with a lovely tandem of beaded balls. It would also be nice to make a beaded Christmas tree and place it next to this beauty.
Video: Making decorations for Christmas balls
Comments
Related posts:
 Snowflakes from beads: new Year decoration do it yourself (diagram)
 Jasmine from beads: do-it-yourself weaving pattern (video)
Friends, today we will tell you how to make a Christmas tree ball from beads with your own hands using our step by step master class with a photo and a weaving pattern. Using beads different colors, you can create many balls and decorate the tree in a beaded style.
Tools and materials Time: 3 hours Difficulty: 2/10
- beads of bright lemon and raspberry color with a diameter of 2 mm;
- red beads with a diameter of 2 mm;
- a skein of fine wire and fishing line;
- red silk ribbon;
- a plastic or glass Christmas tree ball of silver color and a diameter of about 7 cm.
Step-by-step weaving instructions
Very soon, before we all have time to blink, the long-awaited, cheerful and joyful New Year will come. So it's time to think about how we will decorate our Christmas tree.
I propose to weave a Christmas ball with your own hands from beads. It will be possible not only to use it for its intended purpose for your Christmas tree, but also to give it to a loved one to decorate his home.

Those who already know how to weave flowers from beads will certainly immediately understand how this fragile toy is made. Quite right - this is parallel braiding using wire.
So, let's get down to weaving.
Step 1: weave a star
We make a star using raspberry and lemon beads. The asterisk consists of 9 petals, each of which is woven according to a pattern. However, you can use any other that you think of yourself. The most important thing is to keep the number of rows.

For those who don't remember, let me remind you what the parallel weaving technique is. We take a thin wire about 60 cm and put a raspberry piece on it. Then - 2 more crimson ones, we pass the second end through them in the opposite direction and align along the length. The initial two rows are obtained.
- For the next third row, we collect raspberry, lemon, again raspberry beads and pass the other end of the wire through them in the opposite direction. So we continue to the end, twist the ends of the wire, leave a small tail, and cut off the rest. Bend the tail to the inside.
- We also weave the next petal in the same way. After the widest middle row is ready, we bring one end of the wire into a loop, which is formed by the rows of the first petal and we connect both parts in parallel.
We continue to weave according to the pattern and connect the petals in each row. There should be 9 such rhombuses in total. The ninth is the closing one. You need to make 2 of these stars.
Step 2: connect the stars
We connect the asterisks. It is better to use a fishing line for this purpose, although you can use all the same wire. Fold the stars with the wrong sides. Put one big red bead on the line. On each side of it there are 4 yellow, 1 red and again 4 yellow.
We string another red one and pass the ends of the fishing line through it in opposite directions. The resulting loop connects the stars. We also connect the rest of the petals. It will be more convenient for you if you put the ball at the very end. The ear of the ball should fall into one of the loops. Tighten and secure the line again.

Step 3: attach the tape
We attach the ribbon. Voila - the beaded Christmas ball is ready! As you can see, the weaving pattern is not at all complicated, and the master class is quite understandable.