Do-it-yourself postcards are the most interesting. We make beautiful cards for any holiday with our own hands. Volumetric postcards in the technique of scrapbooking
I like it very much appearance 3D postcards, so I prefer to give only this kind of postcards, and of my own making. Make a card with, Happy Father's Day, Happy Birthday, etc. is a great way to show your loved ones how much you love them, care about them and want to do something nice! I have created several types of postcards, which will serve as an example for you to make personalized postcards for any family holiday. You just need to buy necessary material, show imagination and a little patience.
Every year I make an original postcard and give it to my girlfriend, congratulating her on her birthday. This year I was able to surprise her with a very unusual postcard, which is shaped like a corset!
What unusual can a child give on March 8 to his mother or grandmother? Of course a postcard! I work as an educator in kindergarten, so every year I help children create postcards for people close to them. In this article, I will tell you about two very beautiful postcards that you can make with your children.
As you know, on February 23, it is customary to congratulate all men, regardless of age, profession and position, on Defender of the Fatherland Day. Usually on this day, men receive purchased or homemade gifts and postcards with warm, congratulatory words.
Mom's Day! Have you thought about what to give? Show your love for your mom by giving her a card self made depicting beautiful, delicate flowers. Believe me, it will be a much more unexpected surprise than a traditional bouquet of flowers. This project may seem complicated at first glance, but once you read the instructions, you will understand how easy it is to do.
A holiday is coming, and you don’t know what present or card to make to your dear and close person, then we recommend reading our article! After reading our master class on, you can easily make not only a beautiful, but also a useful postcard - a notebook with your own hands. Having spent a minimum of money and time, you can make a wonderful gift.
I love butterflies very much - they are so delicate, graceful and unusually beautiful. It was with their image that I decided to make a card with butterflies with my own hands for the birthday of my 14-year-old niece.
My mother loves flowers very much, so she devotes all her free time to growing and caring for them. Getting ready for mother's day birthday, I made a postcard, the main decoration of which were hydrangea flowers. This is her favorite flower, so I decided that it should be on the greeting card. In this article, you can familiarize yourself with the process of making do-it-yourself postcards with flowers.

Agree that a unique handmade postcard can be an ideal addition to a gift. In this article, we bring to your attention an interesting manufacturing project for postcards that will appeal not only to adults, but also to children. The highlight of this unusual idea with potatoes is that to decorate postcards you will need stamps made from ordinary potatoes.

Almost all of us know the famous words of Igor Nikolaev's song:
Even a child of two or three years old can draw this postcard or picture. Although by the look of the drawing you will never guess the age of the artist! It turns out very beautiful and original!
You may need a little help from an adult to draw a flower stem, but you can safely entrust the main part of the picture for a postcard to your little creature!

Want to cheer up your child or loved one - give him a postcard! Postcards are comic, souvenir, collectible and simple. In this article, we will make a children's birthday card that will melt the heart of anyone, be it a man or a woman for a birthday.

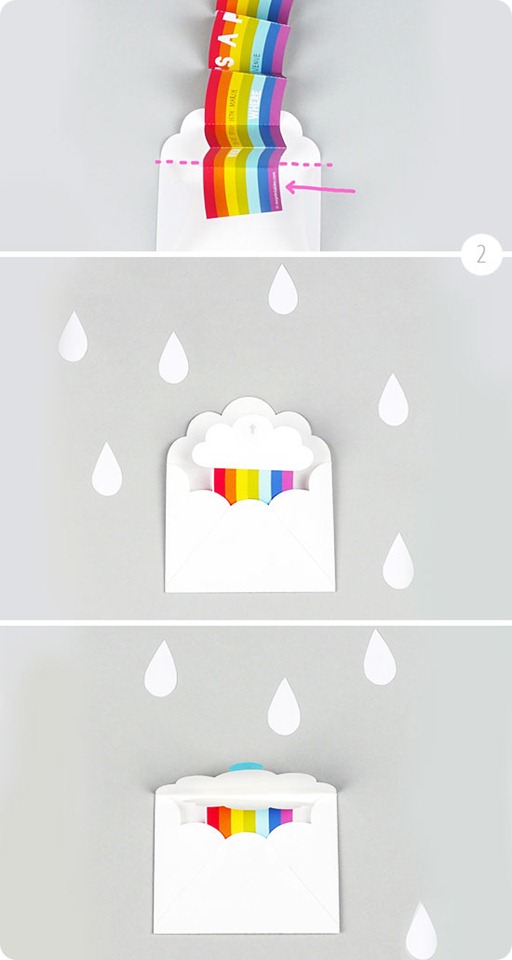
I love the tradition of making birthday invitations in the form of cute postcards that indicate the place and time of the celebration, they can be handed in person or sent by mail. In the age of the Internet and phones, this seems superfluous and difficult to do, but believe me, it's really nice to receive and give these cute messages, especially if they are handmade.

As children, we loved to make postcards with our own hands and give them to our mothers and girlfriends. Why not remember this hobby and start making postcards, but on a different level?
The holidays that appear in our lives are remembered by the sea of sensations, gifts, fun with friends. Years later they are remembered interesting postcards that were once given by friends, relatives, work colleagues. It is especially pleasant to take a handmade postcard out of the box, in the creation of which the author has invested a part of his soul. DIY postcards - very popular, every fifth Internet user asks about how to make a simple postcard.
Making postcards is a wonderful distraction from the monotony of life. Even the most ordinary working day in winter or rainy autumn will brighten up such an interesting, vibrant hobby. All worries, unnecessary troubles, resentment, sad thoughts fade into the background. A goal appears - to create a postcard to which a person devotes himself, because with each stage of its creation he sees the birth of a masterpiece.
Second positive moment of this hobby is the reaction of the recipient of the postcard. The delight of the hero of the occasion, to which the manufacture of a gift is timed, is worth the labor and time for making the product. Therefore, here, the expression “Combine the useful with the pleasant” is the best fit.
Making cards with children: a useful hobby for the whole family
Making a do-it-yourself postcard, just like, and, can be a great joint hobby for children and parents. Operations with small details for a postcard perfectly develop the motor skills of the kids' hands, train their attentiveness, and provide an opportunity to show talent.
It is very important for a child to express his opinion. He can show his parents that his vision of the world, his presentation of things is also very beautiful. Maybe it is different from the vision of adults, but it is original and unique. Moreover, they also carry a psychological moment. They bring people together, find brighter points for intersection, while the age of the child is not important.

When children are still small, the work of adults is a guide and a model for them. The finished card will delight the baby. When the children are older, then joint creativity will help to avoid the struggle of generations: it will eliminate misunderstanding between children and parents, or at least reduce it to a minimum; will establish verbal contact, which is very important in a fast-paced life, now parents will have something to talk about with their children.

Giving grandmother a postcard made by himself, the child will enjoy the praise for his work. This is also a very important point. Any work must be rewarded, otherwise it loses its meaning. Praise your children, because their good work is a particle of the merit of their parents. Good training produces excellent results.
How to make a postcard with your own hands - let's move on to practice
To create postcards with your own hands, you need material that can be bought in bookstores, in the stationery departments. Paper rhinestones, stapler, glue, silicone pencil, quilling paper, corrugated cardboard and so on - all this will come in handy.
Also, do not throw away interesting things that are at home. For example, torn lace can be cut off and the whole part can be used to create a postcard, or old guipure gloves, unnecessary buttons, leather pieces of different colors, ribbons, braid, etc., are perfect for decorating the front volume of a postcard.

by the most important point is the choice of the basis of the postcard. It can be crafted in two ways: fast and thorough. A quick one is pasting with a hot iron, cling film and a colored cardboard napkin.
On the cardboard you need to put a piece of film, on top of the top layer of a napkin with a pattern and hold it with a hot iron. Trim the edges. Everything, the base is ready. The second way is more laborious. This is paper baking. A mixture of napkins, dry leaves and petals is prepared, which is then baked in the oven. Such a base is equivalent to real scrap paper, it is very much appreciated and used in.

If there is a basis for a postcard, you need to arrange its front and inside parts. Congratulations on wishes can be pasted, pre-printed or handwritten. The front side of the postcard should contain a congratulatory designation: "Happy Birthday!", "Happy Fisherman's Day!", "Happy son's birth!" And so on.
To do this, use a flare, or a three-dimensional element is glued. Then the decoration itself. It can only be made of paper (quilling), you can add rhinestones and beads. Guipure, organza, knitted elements look very gentle. It all depends on the chosen direction of work.

The finished postcard can be sprinkled with sparkles or artificial dew can be applied to it, the droplets of which will play very beautifully in electric light. In addition, they can be colored.
Passion can turn into business
After making a lot of postcards, you can put up for sale a few of them. Many sites sell handicrafts online. For starters, you do not need to set very high prices for postcards. You can calculate the manufacturing costs and add 5% of the resulting amount to them as a bonus. Yes, this is not much, but more guarantee that the postcard of an unknown master will be realized faster.
When regular customers appear who will order thematic works, the pricing policy can be revised upwards. In this case, you need to take into account the cost of similar postcards from other authors. The buyer must have a choice, so he will definitely consider several options and choose the best one.

Creating postcards with your own hands brings tremendous pleasure. With the help of this hobby, you can meet interesting people by chatting on forums, gain experience by watching master classes and join the high by visiting exhibitions and participating in competitions. This is a pleasant thing that makes the world a little better. Making the world kinder is a noble cause, so you should put your hand to it.
Master classes on creating postcards
And now it's time to try in practice creating postcards with your own hands. Go to the master classes you like and follow the step-by-step descriptions.


A voluminous postcard, which is made by hand, will be an unexpected and very pleasant surprise for your loved one. There are a huge number of beautiful cards for any occasion, so you can simply find the right holiday gift.
This is an original postcard, despite the apparent intricacy.
It is wonderful for every person close to you. The occasion can be Women's Day, and New Year and even Valentine's Day.
To make a postcard, you will need:
- cardboard or paper thick enough
- knife
- First of all, you need to make a printout of the postcard template located here. There are several copies there.
You can try to sketch a drawing with a heart on your own. To do this, you need a ruler and a simple pencil. - Take a knife and use it to make special cuts on the resulting template.
- Try to fold the card as carefully as possible so as not to wrinkle it. First of all, you need to make folds, in the picture they are drawn with a yellow pencil. Then, slowly, bend where you need a postcard.
The rest of the pieces will fold themselves. Iron each curve well on the card for a clear work of each individual element.
To make it convenient, you can attach the postcard to the table with tape. - Now it's time to decorate the postcard. Glue the edges with colored paper.
Almost everything is ready, you just need to add nice and good words.


Volumetric postcard Volcano of hearts
Such a postcard consists of several parts that need to be connected with glue.

To create a postcard, you will need:
- cardboard and colored paper
- scissors
- white glue.
- Download the template in the appropriate format.
Templates for a volumetric postcard, which is made by hand.
Knowing some rules, you can draw hearts yourself. You will find the rules below. - Take out a huge heart from the middle. It is located on the fold.
- When cutting out the hearts, try not to touch the places where they bend (see picture).
- On the hearts that are shown in this figure, you need to make cuts to connect them together.
So that the voluminous postcard can be closed as tightly as possible, you need to cut the paper at the middle fold to glue individual hearts to the base in the form of red cardboard. This cardboard is the background base of the postcard. - After you have glued the halves to the base, you need to fasten the hearts using the cuts previously made on them.
The size of the hearts should be the same on all sides.
The line in the diagram, which is drawn in blue, indicates the same distance that is from the central fold to the beginning of the incision, and the red lines indicate that there is exactly the same distance between the hearts, which are located closer to the middle part of the postcard.


Ideas to keep in mind


If you have a desire, but no ideas, this article is for you. We have selected several step by step master classes for manufacturing greeting card with your own hands. Of course, today there are thousands of beautiful and ready-made options in stores that you just need to buy. But a gift in which you invest a little human warmth will be appreciated many times higher. So, we make universal and simple do-it-yourself birthday cards.
Idea 1
Do-it-yourself voluminous birthday card
We will make flowers for this postcard using the popular quilling technique. This decor turns out to be very stylish, voluminous and spectacular. The minimum time that you have to spend on work is half an hour.
You will need:
- paper or thin cardboard ( different colors);
- curly scissors if possible. If not, then we use simple ones; adhesive tape (double-sided);
- ribbon; PVA glue or glue stick;
- a special tool for quilling (can be replaced with a wooden skewer).
We start manufacturing:

We complete the production by creating a bouquet: the flowers are carefully glued to the background. Try to make the bouquet lush: this way the card will look more voluminous and spectacular. A small satin ribbon and a card with a signature should be glued to the vessel. The center of each flower can be decorated with pearls or rhinestones. original postcard ready for your birthday!

Idea 2
How to make a paper birthday card?
This is the fastest and easiest way to make a DIY 3D birthday card. And for the manufacture you will need an extremely simple set of materials. The average time you spend on the craft is only about fifteen minutes.

- a set of colored paper;
- a pen; scissors;
- glue stick or PVA glue.

We start manufacturing:
First you need to roll the paper candles. As you can see in the photo, it is best to use stylish striped wrapping paper. It is not difficult to find it in specialized stores, and candles in this design will look perfect. We cut several strips of paper (depending on the desired number of candles), and wind them on a pen or a simple pencil. The edges are fixed with glue. Now we cut out the lights from red or orange paper, collect all the elements together on a postcard, glue it. As the basis of the postcard, you can use ordinary cardboard folded in half. Ready! For more DIY birthday card ideas, see the article below.

Idea 3
How to make a do-it-yourself birthday card with the age of the birthday?
This do-it-yourself postcard master class will also not take you much time, but the birthday boy will really like it. On the postcard, we will beautifully indicate the age of the person to whom it is intended. Perfect for anniversaries. The average production time is about twenty minutes.

You will need:
- special paper or a sheet of cardboard for the basis of a future postcard;
- a set of colored paper;
- a set of threads; scissors;
- glue stick or PVA glue.
We start manufacturing:

Idea 4
Beautiful do-it-yourself birthday card
This tutorial is our favourite. A card with gifts is made elementary, but it looks incredibly stylish. And for the materials for its manufacture, you may not even have to go to the store. The average production time is about thirty minutes.

You will need:
- a sheet of cardboard or special paper for the base of a future postcard;
- several sheets of paper of various colors. Choose different patterns, but with one condition - all selected options must be in harmony with each other;
- twine or thin satin ribbon;
- glue stick or PVA glue.

We take pattern paper and cut out several squares. It is desirable that the squares be different sizes(look as in the photo). Attach the squares to the base of the postcard, and make sure the size is optimal. Now a small piece is carefully glued to each “gift” satin ribbon or whips. Separately, we make and glue a small bow. We glue the "gifts" to the card. Finish making a beautiful congratulatory inscription, and you're done! See other photos of birthday cards with your own hands below.

Idea 5
Stylish DIY card for mom or girl
To make this postcard, it is very important to choose gentle, perfectly combined colors. As you can see in the photo below, the postcard looks perfect: you can’t even say that it can be made in thirty minutes. 