How to make a carnival doll with children. We make a Maslenitsa doll with our own hands. A selection of master classes with step-by-step photos and videos. Dear friends, thank you for your attention and support.
Summary: What is a carnival doll. Carnival doll photo. Pictures of the carnival doll. How to make a carnival doll with your own hands. Maslenitsa doll master class. Homemade carnival doll.
One of the indispensable attributes of Shrovetide is the Shrovetide Home Doll. Just please do not confuse it with the Scarecrow of Shrovetide, which is burned at the stake on the last day of the oil week. The Maslenitsa doll is a home amulet, which is made with your own hands from scraps of fabric, straw, birch bark. Made in a good mood and with good thoughts, the Maslenitsa doll will bring to your home family well-being, prosperity and health. There are many ways to make a Maslenitsa doll with your own hands. Here we will give examples of the simplest and most accessible, including for children, master classes on creating a Maslenitsa doll with their own hands. It will be especially interesting for girls to make Shrovetide with their own hands, because then such a doll can be used in games. Please note that the Shrovetide doll has no face. Such dolls are especially valuable for children's games, because the child can endow the toy with any emotion according to the play concept.
1. Doll Shrovetide. Doll Shrovetide do it yourself
In order to make a Maslenitsa doll you will need:
White fabric - 1 square 20x20 cm for the body, 2 squares 10x10 cm for pens;
- bright, colored fabric- 2 squares 20x20 cm for a skirt;
- red fabric - a versatile triangle with the largest side 12 cm for a scarf;
- a piece of padding polyester or cotton wool to form the head;
- red threads.

We draw your attention to the fact that for the manufacture of Maslenitsa dolls it is recommended to use threads or yarn of exactly red color.
1, To make the head and body of Shrovetide, we form a ball from cotton wool or synthetic winterizer (paralon) and put it inside a square (20 * 20 cm) of white fabric. We rewind with a red thread.

2. We continue to make the Shrovetide doll with our own hands. Now we need to attach the handles. We make such twists from two squares of white fabric 10 * 10 cm (see the photo of Shrovetide below).

3. We put our hands between the folds on the skirt of the Shrovetide doll and rewind with a thread. At the ends, also wrap the handles with red thread.

4. Now let's make our Shrovetide doll a skirt. To do this, fold two squares of colored fabric diagonally, you get two triangles. Place them on top of each other at right angles, as shown in the photo of the Shrovetide doll. Now you need to twist the skirt and rewind it with thread.


5. It remains only to tie a red kerchief on our head to our Maslenitsa with our own hands. Look at what a glorious Maslenitsa doll we got as a result!

2. Doll Maslenitsa master class. Homemade Shrovetide doll
Previously, in Russia, Maslenitsa was celebrated in early spring, on March 1. Shrovetide is folk holiday meeting of Spring and seeing off Winter. With the arrival of spring, it was customary to make such mischievous and bright Vesnyok dolls. This doll is a talisman of youth, health, prosperity and happiness. With the introduction of Christianity, Maslenitsa began to be celebrated in the last week before Lent, so now Maslenitsa falls on different days in each year. But even today Maslenitsa is a holiday in honor of Spring and the Sun. Therefore, in the form of such a doll, it will be appropriate to make a homemade Maslenitsa doll with your own hands.

So, to make a Maslenitsa doll, you will need:
1. White (or beige) flap of fabric 35x12 cm. (Body and head)
2. Two colored pieces of fabric (different colors) 35x15 cm. (Dress)
3. A flap of colored fabric 12x16 cm. (Hands)
4. Plain piece of fabric for an apron 9x7 cm. It can be lace, fabric for embroidery, etc.
5. Various ribbons, braid, red strong threads, synthetic winterizer, any bright knitting threads for hair.

1. We shape the head and body of the Maslenitsa doll with our own hands.

2. Making Shrovetide hands.

3. We connect the arms to the body. We rewind the Maslenitsa doll in the chest area with threads.

4. We put on the skirts of Maslenitsa.

5. We tie an apron to the Shrovetide doll with our own hands.

6. Making Shrovetide hair.

7. We braid a braid to the Maslenitsa doll at home. Do not forget to weave bright satin ribbons into your braid.

That's all! Do-it-yourself Maslenitsa doll is ready!
Prepared by: Anna Ponomarenko
Other publications related to this article:
Our ancestors are ancient Slavs great value gave amulets and amulets, literally flooding their life and their way of life with them. According to their beliefs, only such magical items could reliably protect them from evil intentions and the intrigues of dark forces, and also attract prosperity and tranquility into their lives. Motank dolls occupied a special place among such items: such powerful amulets had many types, each of which was responsible for its own special sector of human life and everyday life.
Shrovetide folk doll
Such dolls were made both for performing their special tasks, and for participating in certain important events, for example, national holidays.
It was for one of the largest spring festivals that the carnival doll was created.
The meaning of carnival motanka
It is difficult to overestimate the significance of the Shrovetide holiday itself: it is on this day that the harsh winter is seen off, followed by spring. Winters for our ancestors always meant a test and difficulties, so the end of cold weather is always significant event in the life of any person.
It has long been customary for this holiday to symbolically burn the symbol of winter, which is traditionally performed in the form of a doll. However, this is not the only thing made in the form of a doll for the spring holiday.
There is also a tradition, from Shrovetide to Shrovetide, to keep in the family a homemade reeled doll, which is called Shrovetide. It symbolizes all the benefits of the coming spring and warmth: prosperity, fertility, health and, at the same time, protection for the home and people.
Such a doll was made for the holiday itself and was carefully kept in the house throughout the year, so that then, on the eve of Shrovetide, a similar coil could be burned or floated down the river and created a new one.

For such a talisman, the most the best place in the house: in front of front door or in the red corner of the hut so that the carnival doll can effectively perform its functions.
Doll making rules
In order for a home amulet created with your own hands to be endowed with the correct magical power and to be able to successfully fulfill its duties, in the process of its creation, one had to adhere to certain simple rules:
- Like any magical motanka, a handmade carnival doll is traditionally performed without the use of sharp and cutting objects. This practice allows you to fill it with the correct creative, not destructive energy. However, in modern world there is a departure from this rule, which makes the process of making the doll itself much easier.
- The ancient Slavs used traditional material for those times: reeled dolls were made of straw, bast or bast, using a small twig or chip from a tree as a solid base. However, in modern conditions, you can safely use paper, thread or fabric for its manufacture.
- The classic size of such a home amulet doll was about 25 cm.
- V colors fabrics that decorated the amulet were traditionally used a large number of bright shades: red, orange, blue and green. This variety allows you to give the amulet magical powers to attract prosperity and health to the house for its owners.
- Also, in decorating a do-it-yourself rag doll, red threads, best made of natural wool, were necessarily used. A similar element strengthened protective functions reels.
- Since the carnival doll was also a kind of appeal for spring and warmth, it was necessary to use floral and plant ornaments in the prints of fabrics to decorate it.

Fulfillment of all the established rules will allow you with your own hands to simply create the right amulet for your home.
How to make a carnival doll with your own hands
In order to make a carnival motanka according to all the established rules, you will need the following items:
- Washed, preference should be given to natural unpainted material.
- A smooth twig about 20 cm long. Do not use aspen or alder wood, as these trees at the base of the carnival doll can weaken the protective powers of the amulet.
- A piece of burlap.
- Decoration fabric.
- A bit of cotton wool.
- Threads white.
- Braid.

Stage 1
Wrap the prepared twig with a piece of triangular burlap, loosely letting a wide edge along the bottom. The narrow edge of the triangular cut should be tied tightly to the tree with a white thread. The free edge forms the hem of the doll's dress.
Stage 2
From a piece of white cloth, form a ball filled with cotton wool. Tie it with white thread and attach with the same thread to the branch as the doll's head.
Stage 3
We take about 15 cm of the length of the washcloth and tie it 7 cm from both edges with threads of any color. In the resulting free centimeter of the bast, in the middle, insert the blank body of the carnival doll in such a way that the bast grasps the base on both sides. We tie the edges of the improvised hands with a red thread, beautifully forming the edges.
Stage 4
To the neck of the body we tie 20 cm long bast sections so that the free edge is directed upwards. Having secured the washcloth with a white thread, bend it down, forming a fluffy skirt, and carefully tie it at the waist with a red thread.
Stage 5
Home Ragdoll almost ready: it remains to decorate it with cuts of colored fabrics. To do this, one flap is tied as a skirt, and a shirt is formed and tied from the other. This stage should be carried out according to your taste and idea of appearance the amulet itself. The doll's head must be stolen with a scythe from a bast and a colored handkerchief.
Traditionally, the face of the motanka is not depicted: all individuality should be shown in the external design of the carnival doll dress: braid, various fabrics and prints will come to your aid.
Making such a folk amulet with your own hands, you will inevitably tie more than one knot, which is a necessary attribute of any motanka-amulet. These knots are a powerful protective element in themselves, so don't miss the opportunity to make a wish for each of them, or just say words of gratitude or hope. Each of these wishes will necessarily come true in the year that the amulet will spend in your home.
Do-it-yourself carnival doll made of paper
Nowadays, it is very popular to make such a spring amulet from plain paper... Such a doll is created in a matter of minutes, but it will not work to attribute it to the classic version of the motanka. Nevertheless, such a craft will fulfill the functions assigned to it to attract spring and warmth.
All you need to make such a doll is a few sheets of paper, preferably colored paper, stationery glue and felt-tip pens. With a little imagination, you get a wonderful doll.
To get a beautiful base for the amulet, fold two sheets different color even accordion. Next, you need to glue the edges of one of the accordions together, forming a volumetric triangle. This craft will become the skirt of the future carnival doll.
From the second colored accordion, you can easily make craft sleeves if you glue all the folds of paper in a central place. By combining the two elements into one whole, you will have an excellent basis for the amulet.
All that remains is to make the doll's face and stick it on the proper place: cut a scarf out of red paper and glue a circle of white paper in its center. Using felt-tip pens, draw eyes, cheeks and mouth on it.
Such a craft will not only decorate the interior of your home for the coming year, but will also protect you from any negativity.
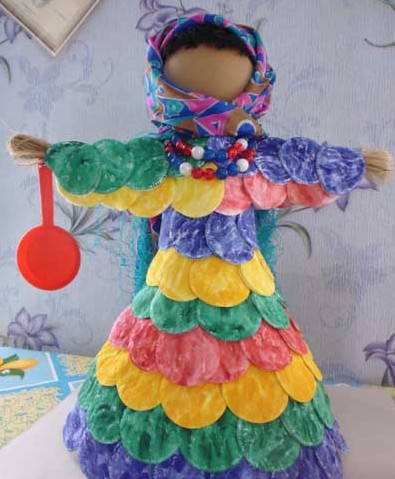
Greetings to all! Is coming Maslenitsa week and as everyone knows, there will soon be a performance dedicated to the farewell to winter. And how can we see off the winter without the main character, and I mean the stuffed Maslenitsa.
Every year she appears in the winter open spaces, she is made from different materials, but in most cases made of straw, and then wrapped in brightly painted beautiful fabric, it turns out such a big funny girl who looks like a doll or a grandmother.
Usually on this day, a fair is organized, at which, according to tradition, the main dish is exhibited, so tasty and lacey that you just lick your fingers, because in the cold there is always more fun, and even with the company. You can also see all kinds of exhibitions with different ones that are made by hand.
At the very end of the holiday, it is burned at the stake and at the same time, spring is welcomed, which means the sun will shine brighter and more loudly and the singing of birds will be heard.
Everyone knows that in Russia such amusements were made from simple material, like straw, it is the most common type, and in our time too). Using this simple scheme with a description, you can easily decorate the upcoming celebration, which can even take place in school and kindergarten.

Such a Maslenitsa stuffed animal turns out to be very large, it looks like a girl or a symbol of a female image.

Of course, they burned big huge stuffed animals on fires, sang songs, but children could make small creations themselves, also from straw.

Here they are what beauties).

Often the straw was hidden under any act or unnecessary things, or they did the job without it at all.

In my opinion, it looks more like a scarecrow).
Therefore, of course, do from what you have at hand, choose your favorite option.

Moreover, when there is a place to look and see all the step-by-step steps of making a work:

The result is pretty and you must agree that such a craft is done quite simply. Any stuffed animal made of straw can be hidden with any openwork or multi-colored material.

Or do you still prefer the usual option, then at least decorate with a satin ribbon.

Here's another step-by-step instruction from the bast.

It turned out quite modern and very impressive.

We make crafts from a broom
The next option is so funny, because it is made from an ordinary broom or broom. Yes, you yourself probably already guessed how to make such a stuffed animal and what is taken as a basis.

In general, create and make everyone happy).

I have no doubt you will succeed.

Making a Maslenitsa doll for a holiday to school for an exhibition
In one of my articles, I have already shared with you the master of the class of such crafts from the usual plastic bottle and cotton pads, I hope you really liked that doll, if you want to make the same, go to
Or make just such a miracle for a meeting with spring from a tree twig, which will look like a slingshot, about 26 cm long.


Or the one you like best?


Schoolchildren and preschoolers can come up with anything, here's an idea for an exhibition, do you like it?

Or else usually children make drawings, pictures with images of the symbols of the upcoming holiday.
This can be done using pencils.

Or felt-tip pens, of course paints.


Schools also decorate the hall for this event.

Posters and stand newspapers are being made.

Master class stuffed paper at home
I suggest you watch this video, which I liked, I think you will do this too interesting souvenir, and made of paper.
On one site I came across another such paper idea, looks perky.

Straight like a girlfriend)).

You can use newsprint or magazine paper, even colored paper.

Small souvenir made of fabric and thread
I propose to all craftswomen to do the following, take ordinary fabric and threads and build a doll that will symbolize Shrovetide. Often, such dolls were made and they were a kind of amulets for children.

Do-it-yourself Shrovetide - a selection of workshops on making Shrovetide dolls from different materials and different levels of difficulty.
The Shrovetide doll is an invariable attribute of the farewell to winter holiday, which is rooted deep in the past.
Previously, the Shrovetide doll had to be present in the house. Traditionally, it was a doll-amulet, which was made on the eve of Maslenitsa, kept in the house all year, and then burned on the next Maslenitsa or floated on water.
Do-it-yourself carnival was the keeper of the family, a symbol of its prosperity. The doll was usually placed in the so-called "red corner" of the house or in front of the entrance. Until now, in our country, there is a belief that such a doll is made by hand. can keep you from running and bring prosperity and happiness to your home.
Diy Shrovetide: history
Do-it-yourself ritual Maslenitsa doll, according to tradition, is made of thread or straw, bast or cloth stuffed with hay, cereal or cotton wool. Although, in Lately it has become fashionable to make children's crafts for Shrovetide from paper. Including dolls.
Today, anyone can make Maslenitsa with their own hands - both young and old. The main thing is to have at hand necessary materials and desire. And the rest is done quickly and easily - thanks to diagrams, photo master classes and descriptions. which contain the secrets of folk craftsmen.
Do-it-yourself carnival: how to make a doll for the holiday: tips

- If you want to make a doll with your own hands, close to the traditional ritual doll, then follow the traditional sizes. The carnival amulet doll should be no more than 20-25 cm.
- Do not forget that the farewell to winter is a fun celebration of the awakening of nature. Therefore, for the Shrovetide doll, choose bright colours materials - be it thread, fabric or paper. The Shrovetide doll should always be bright and elegant.
- For tying the doll, only threads or rope, painted bright red, are used. This color is considered protective in our country.
- If you want to make a Maslenitsa doll in a sundress or dress, then choose bright fabrics in a colorful print for this - a floral or plant pattern must be present.
Also, in making Maslenitsa with your own hands, the master classes we have selected on self-production carnival dolls. Moreover, all dolls are different and each has its own level of difficulty. So everyone can work on making crafts for Shrovetide with their own hands - both adults and children.
Diy Shrovetide: with the star of the goddess Lada

Protective doll Shrovetide made of bast, fabric and cotton wool with Slavic amulet, a symbol of love and peace - the star of Lada.
How to make a carnival doll with your own hands in stages:


DIY crafts for Shrovetide for children: simple master classes
You can offer to make such dolls for Shrovetide with your own hands for children for your children:


Dolls are made of threads and scraps, bast and fabric - be sure to take part in children's creativity and spend time with your child for a pleasant and useful activity!
Do-it-yourself carnival: a doll for adults and children
 |  |
 |  |
 |  |
Maslenitsa will come to us very soon, so we have prepared for you do-it-yourself collection of ideas and crafts for Shrovetide!
Maslenitsa is an ancient holiday in Russia, which was celebrated 7 days before the equinox and 7 days after. It was on this holiday that pancakes were baked in honor of the worship of the Sun, which gives all life on earth. On the last day of the week, at forgiveness resurrection, on the festivities, a straw doll was made in human height, she was seen off with songs and dances, and then burned at the stake, it was believed that by doing so she would take everything bad with her and give a place for a new life, full of strength and goodness. Home doll Shrovetide was made in a smaller size and kept at home, as a talisman, for a year.
Fabric applique. Shrovetide portrait. Master Class
Manufacturing workshop fabric appliques- a portrait of Maslenitsa. New Year, Christmas - these are our favorite holidays. But there is another holiday in Russia, which is fun and stormy. This is everyone's favorite - Maslenitsa! For a whole week, all the people, both young and old, have fun, dance and laugh, bake pancakes, go to visit and invite them to themselves.
Pancakes are the main dish at Shrovetide. They are baked from Monday to Sunday. What different pancakes are obtained. Each housewife has her own recipes and special secrets of their preparation. 
After all, then for seven long weeks it will not be possible to have fun. Indeed, to this day, people believe that if you do not take your heart out this week, then you will have to live in misery for a whole year, for real. Another rule is that food becomes the most important form of life. People say: "That at this time you need to eat as much as the dog waves its tail or crows the crows."
The marathon lasts a whole week and one day you can engage in joint creativity with the children.
After all, Maslenitsa is a family holiday. I propose to make a portrait using fabric applique technology.
- to form knowledge in children about such a holiday as Maslenitsa;
- to acquaint with the traditions and rituals of the national holiday;
- develop the cognitive interest of children.
- fabric scraps,
- card,
- a sheet of paper or fabric for the background,
- scissors,
- coloring with image 2 pcs.,
- glue,
- pencil is simple.

Cut out details from coloring pages (face, headscarf, shirt, sundress, mittens, pancake).

Select fabric for the cut out details.

Glue the coloring and the fabric together, transfer the drawing to the fabric. Cut along the contour.

Decorate the face (draw the eyes, glue the cheeks, pick up a scarf).
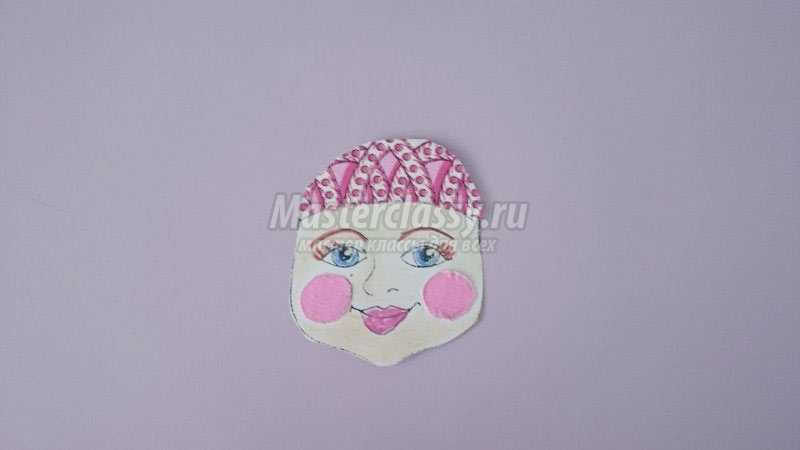
Put all the parts together.

Choose a background for the received one. 
So it turned out to be a fun job for the holiday. And if the work is placed in a frame, then you can use it to decorate the interior for the holiday.
Doll Shrovetide with their own hands. Master class with step by step photos

Make the head from magazine sheets, previously crumpled and glued with tape.

Decorate the dress with ruffles, sewing them with a hand stitch forward with a needle directly on the doll.

Make the face of Shrovetide out of papier mache: mold the base from sculptural plasticine and glue it with paper using PVA glue, make 4-5 layers of paper, let it dry.

Although Maslenitsa does not have a face, we decided to paint with gouache, first apply a beige background to the face.

It turned out to be a pretty face.

Glue your face to Shrovetide with hot melt glue.

Glue the threads-hair to the head with hot glue or scotch tape and braid the braids, weave satin ribbons into the braids.

Put on a handkerchief for Shrovetide and sew it on the back and under the chin so that it does not fall off the head.


It remains to put on a handkerchief, and the plasticine craft is completed.

Such children's crafts from plasticine will be very useful on Shrovetide.

Head: Vasilyeva Nadezhda Mikhailovna
Master class number 7. Scarecrow of Maslenitsa with their own hands
In this master class, we will show you how to make do-it-yourself stuffed carnival... Shrovetide is one of the most ancient and happy Holidays... Its history is connected with the pagan Slavic gods, who were worshiped, asked for their protection, good harvests and offered sacrifices to them. The tradition to see off winter and joyfully meet spring has been preserved for many centuries in a row. One of the ritual actions is the burning of a stuffed animal - the personification of winter. This doll, made of hay and straw, should be both funny and scary at the same time. Perhaps in order not to cause regret during the burning of the effigy. But, at the same time, it should be bright and attract attention, since the carnival bonfire is the culmination of the holiday.
since ancient times they have been creating it with their own hands. It should be based on hay and straw, as well as linen and cotton fabrics. But in the conditions of the city, at the end of winter, it is very difficult to find both hay and straw, if they are not prepared in advance. Therefore, we will make the stuffed animal proposed for manufacturing using the decorative and applied technique "papier-mâché" and stuff it with the usual recyclable materials.
Necessary materials:
Newspapers or unnecessary paper;
PVA glue;
Paper tape;
Paper napkins yellow color or paints (gouache, acrylic, aerosol);
Colored paper;
Multi-colored ribbons;
Two long wooden sticks;
Clothes not needed.
work description.
At the first stage of work, we will make a head for a scarecrow. We will do it using the papier-mâché technique.
We form a large lump from the newspaper. Its dimensions should be commensurate with the size of the stuffed animal that you want to make. In creating a doll, you can focus on human height and volume.
In order for the newspaper to be in a tight lump and not to bloom, it must be fixed with tape. It is best to use paper tape.

From A4 paper, we form five bags. They also need to be secured with tape or a stapler. We stuff the bags tightly with newspaper and glue them to the newspaper ball. In this case, paper tape comes in handy again. The base is ready.

Now we glue the entire structure with strips of paper using PVA glue, creating an even coating.

Glue the Shrovetide head on top paper napkins yellow color.

You can do this with white napkins or toilet paper, but when the glue dries, the entire surface of the head will need to be painted with yellow paint. You can use gouache, acrylic paints or spray paint from a can.


We form lumps from two sheets of paper and glue them with paper napkins. When the glue is dry, paint the eyes blue. Place the eyes on the prepared base for the head of the scarecrow.

From yellow napkins moistened with PVA glue, we form a triangular nose. Twist a long sausage out of red paper in the form of a mouth. We also glue them, creating the face of the future scarecrow.

We continue to apply makeup to our scarecrow. Cut out two small circles for the pupils from black paper. And on top of them we glue two small circles of white color in order to give sparkle to the eyes of our charming Maslenitsa.

Black paper is useful for making eyelashes and eyebrows. For eyelashes, you will need rectangles, which need to be cut in small strips not reaching the edge by 1 cm. Then, using scissors, we give the eyelashes a bend and glue it around the eye. Place the eyebrows over the eyes.
Add red circles for the ruddy cheeks. Well, that turned out to be a beauty.

Now let's decorate it. We will do this using multi-colored ribbons. We cut them into strips about 20 cm long.

We collect strips of ribbons of different colors in a bundle and tie them in the middle with a thin ribbon.

With the help of nail scissors, in one of the rays of our scarecrow we make a hole and thread the tip of the ribbon into it, which holds the bunch. Tie tight. We repeat this procedure with each ray.

The head is ready, so we move on to the next stage - the formation of the torso.

The carnival effigy will be based on a cross made of two wooden sticks.

We put a garbage bag on the bottom of the stick, making a small hole in it. We stuff this bag tightly with newspapers or paper. Tie tightly at the neck.

We put on a white shirt on the sticks. We fasten it and tie it at the bottom. We stuff the sleeves with newspapers and fix them with ribbons.

We use as a dress bright fabric sewn with a pipe. We fix the dress on the shoulders and tie it with a belt. Below, under the dress, to add volume, you can also place a trash bag filled with paper. In addition, the scarecrow will burn a little longer this way.
We put on our head, we knit a scarf. The scarecrow is ready! It remains only to burn it!

what else can you make, you will learn from our master class, which you will find on this website.
Master class number 8. Shrovetide doll

Today, on the eve of the forgiven Sunday, I want to tell you about a small Maslenitsa doll, which is made according to folk motives. You can give it to your family and friends. Remember that when making such dolls, you must be in good mood and in good spirits

The Shrovetide doll is small in size and fits in the palm of your hand.
Materials for its production: bead, fabrics, sanitary linen, wire, yellow yarn.

Per square knitted fabric, put a bead in the center.