Christmas trees made of paper for the new year scheme. We make a voluminous Christmas tree out of paper with our own hands. Christmas tree made of paper: scheme
The original Christmas tree-beauty will decorate the festive interior. Of course, a round dance around her is not to be led, but such a miracle will certainly raise the mood. Here is such an interesting desktop craft that can be made from the simplest things that are in every home.
Necessary materials:
- A4 sheet, cardboard;
- dense threads (preferably wool mixture);
- 2 "yolks" from kinders;
- wooden sticks for sushi;
- plasticine;
- Styrofoam;
- stationery knife;
- stroke corrector;
- red nail polish;
- PVA glue;
- fabric scraps;
- little things for decoration.
Make the frame of the future Christmas tree from A4 sheet - fold it into a bag. Insert the foam inside.

Apply glue to the surface of the cone in not wide strips and wind the thread around it.

Secure the end of the thread with glue.

Sushi sticks will serve as the legs of our beauty. To do this, they need to be painted with a proofreader.

While they dry from the "yolks" make boots, as shown in the photo.

Fill them up to half with plasticine and wrap with a cloth.

Insert stick legs into boots, decorate the Christmas tree with various bows, ribbons. Paint the legs with stripes of red varnish. ready!

You can make a hat out of cardboard, cover it with a cloth and sew on a pompom.
DIY shabby chic Christmas tree
Let's make such an amazingly beautiful and original craft in fashion style shabby chic.

Necessary materials.

For the base, we take a large paper cup or any plastic utensils. Separately, we dilute alabaster or gypsum with water to the density of liquid sour cream and pour it into the future pot. We fix the trunk of our tree, plant a branch in the center and fix it in this position until it hardens.

We make a cone out of cardboard using a stapler.

We make the top of the spruce from wire and foam rubber.

We connect the top with the trunk and attach the cone.

We wrap the base of the tree with white fur.


Cut off excess from below.

Then we fold the ends of the burlap inward and attach it with hot glue.

Let's get down to the fun part - decorating our Christmas tree in the shabby chic style.


To create a finished composition, we need a stand.

We make a bench from a bamboo napkin.


From white fur- a snowman.


We attach a bell to the top of the spruce.

We decorate Christmas tree beads, pearls, flowers, lace, etc..


We apply transparent glue to the very top of the tree.

And sprinkled with artificial snow.

We do the same with the bench.


Our composition "Winter's Tale" is ready!


Decorative Christmas tree made of napkins
We will make it from cardboard and single-layer napkins. You will also need beads for decoration.

First of all, we will build a frame for our Christmas tree. We fold the cone from cardboard, fasten it (I sewed it with threads) and cut exactly the bottom of the cone so that it can stand.

The base is ready, set aside for now. Now let's move on to napkins. From them we will make roses. Single-layer plain paper napkins are suitable for us.

We take a napkin and cut it along the folds. Then fold it in three and cut along the folds again.

The resulting strips are still tripled and cut again. We got a square equal to 1/9 of the napkin.

We fasten this square in the center with a stapler.

Then cut out a circle from it. Mega-accuracy and accuracy are not required here at all, the finished rosette can be slightly corrected with scissors.


Thus, a rose is formed. If the finished rose seems uneven to you, then you can trim it with scissors.

The number of such flowers depends on the size of your cardboard cone. My Christmas tree turned out to be 21 cm high and I needed 59 roses for it.

When all the flowers are ready, we return to the cone. Starting from the crown, glue the flowers onto the cone so that the base is not visible. I glued it with hot glue (it’s more convenient for me), but the most ordinary PVA will do.

I made a Christmas tree from napkins in two colors. If you also decide to create your own craft from multi-colored roses, then you can safely experiment with their alternation on the cone. If the result does not suit you, you can always tear off the flower and re-glue it to another place. In this case, only the lower layer of the flower will suffer. It (the bottom layer) is simply torn off. The rosette will not lose its appearance.
So, we glued the flowers to the cone. The Christmas tree itself is ready and you can stop at this stage.

I also decorated it with beads - I glued it on the same hot glue, here PVA will no longer help.

DIY decorative Christmas tree made of napkins
As you can see, even a beginner can make such beauty, so you can safely involve children in the process.

Another version of the Christmas tree from napkins

Craft from cones, balls, ribbons and beads
How to make such a craft - see the video tutorial at the end of the article.
Christmas tree made of plasticine with sweets
What do we all associate a wonderful New Year's holiday with? With the smell of pine needles, bright lights, garlands, sweets. And children still create unusual crafts with their own hands, thereby bringing closer the pleasant moment of the onset of a fabulous night. Lessons of creativity of such subjects they like most of all. It is in crafts that you can realize any fantasies.
We offer to make an elegant Christmas tree, which is easy to decorate with sweets. Blind crafts from plasticine - the cheapest and most popular material. You will definitely make a beautiful souvenir if you follow our tips - they are simple.

To sculpt a Christmas tree with your own hands, prepare:
- green plasticine for the crown;
- a stump in the form of a cap or an empty spool of thread;
- toothpick, red and white plasticine for sweets.
Choose a green block of plasticine from the set. The body of the Christmas tree itself will be made from it, and in the future we will make small sweets as toys. Of course, a small souvenir does not have to be green, any other color that you choose at will will do. If you manage to find a set for sale that has a gold bar, then this option will look rich.

Thoroughly knead the entire prepared bar in your hands and prepare for further work. It is necessary to form a cone-shaped crown, and not quite the usual even, but curved, similar to the cap of a fabulous gnome. Since we are talking about a magical holiday, it is not forbidden to fantasize and create something incredible.

Pull all the soft plasticine into a long cone. top sharpen as much as possible, press down the bottom around the circumference with your fingers, showing the skirt. Then take and bend to the side the entire structure. Sometimes Christmas trees do not stretch up perfectly evenly, but lean to the side like this.

To model Christmas tree decorations - small sweets - use white and red plasticine. Form red round pills (the inside of the candy), as well as white triangles (the twisted part of the candy wrappers).

Glue delicious sweets. Glue a white dot on each red circle and push in the center with a toothpick. Glue triangular pieces on the sides.

Make enough decorative details to fill the entire surface of the Christmas tree, evenly distributing sweets around the circumference at some distance.

Glue all the resulting blanks to the crown. Beautiful New Year's craft almost ready. From below, press down a small lid - a stump (or mold it from plasticine).

And the top is still missing. She just asks to complete the resulting fabulous Christmas tree. Come up with some option, for example, the same spruce branches in combination with red berries. All this looks festive and bright.

This is such a fantastic Christmas tree. This is an elegant version of crafts for the New Year, which will be a great gift for your favorite holiday.

The New Year is just around the corner - you need to hurry up to catch everything.


How to make such a postcard.

Do-it-yourself Christmas tree made of felt
Let's do Christmas trees felt is great Christmas decoration and perfect for school or kindergarten.
Prepare for them:
- A set of colored felt;
- cotton wool;
- glue "Moment" transparent;
- any beads;
- threads for knitting and sewing;
- a needle;
- scissors;
- felt-tip pen.

Select matching colors felt. It can be different shades of green. Or you can show your imagination and make an unusual red or blue spruce. Fold a couple of sheets of felt together, draw the shape of a spruce on the top.

Cut a piece of patterned felt along the entire length and fold it in half as shown in the photo. We do this only if the felt is not very thick, otherwise it will be difficult to cut 4 layers at once.

Cut out 4 blanks.

To give them a bulge, put some cotton wool, as shown in the photo.

Lubricate the edges of the workpiece with glue.

Cut a piece of knitting thread and attach it to the top of the workpiece, directly on the glue. For him, it can be hung. Attach the second blank and press along the edge so that both parts stick together.

On a light Christmas tree, make stitches with threads of a darker green color. This will add originality to the craft.

Decorate the second with a border of pearl beads. To do this, make a layer of glue along the edge and put beads on it.

Now let your kid decorate them however he wants. After drying, the craft is ready for use.

Such simple craft will be a great decoration for your Christmas tree. It can be given to grandparents. Older kids can do it completely on their own. By this principle, you can make any decorations from felt. Anything your imagination tells you.
From natural materials with flowers from foamiran do-it-yourself video lesson
Herringbone-sachet - to create a festive aroma
A sachet is a small bag filled with dry fragrances that is used to create a fragrant background in a wardrobe or chest of drawers. If you put such fragrant bags on the shelves with things, then a pleasant and subtle smell will settle in your closet.

It will not be difficult to make such a sachet with your own hands, and if you create it in the form of a Christmas tree, then in addition to the aroma, the festive composition will also set the appropriate mood.
Materials for the master class:
- Peel from citrus fruits;
- essential oil of orange;
- thread, needle;
- beads, beads, sequins;
- satin ribbon;
- green fabric, cotton;
- scissors and pencil.

On a sheet of paper, draw a spruce template and cut it out.

Finely cut the peel from citrus fruits, and to give more flavor, you can also add a few drops of essential oil.

From a thin green cotton fabric, cut out two blanks according to the template, fold them with their right sides inward and sweep.

If possible, sew and finish the edge on sewing machine, if this is not possible - process the edges manually.

Turn out.

From a silver thread, make a loop with a voluminous knot at the end, use a needle or a hook to thread the loop into the top of the spruce.


Tie a satin ribbon into a bow and secure at the top with a couple of stitches.


We fill the craft with fragrant peel from citrus fruits, sew the edge.


If desired, do-it-yourself Christmas tree-sachet can be decorated with different beads and sequins.

Our affordable and easy-to-make sachet is ready, now its aroma will please, and beautiful appearance will give an unusual and festive energy.

Photo of Christmas tree-sachet with orange flavor
Pasta tree toy

You can make a lot out of paper and cardboard beautiful Christmas trees for the New Year.
The very first way to make a Christmas tree new year holidays, is to take the green colored paper, you can blue or light green, you need to draw a circle on paper, for this you can use any round object or a compass.
We divide the circle into 12 equal parts, cut it slightly, it is desirable that the cuts are not cut to the middle. From the corners we make cones, fix with glue. In this way we make several tiers for spruce, if the spruce is large, then there will be a lot of green leaves, about 20 - 30. If you need to make a small spruce, then it will be small.
The next step is to pierce all the leaves in the center of the leaf, for this you can use a needle or other sharp object, we glue the spruce with a thread or a thin wire. The top of the spruce we will have a triangular hat made of green paper, which should be glued to the top of the New Year's beauty.
The next spruce will be made of green stripes. To do this, take green paper, cut strips out of it. The length of each strip will be different, as spruce has different tiers. The strips should be 40, 30, 20 and 15 centimeters long. The next step is to carefully twist the strips, for this you can use a pencil or a toothpick. We remove the rolls made from the toothpick so that the spruce is lush, you need to let it fluff up a little.
The end of the strip, after they have fluffed up, must be fixed with glue, we make it look like small droplets to the strips, which we lightly press.
We string small rolls on a toothpick, which need to be glued together with glue. The next step is to glue our droplets to the trunk of the future spruce.
We make the top from a roll, make it in the form of a droplet and glue it to the top of the spruce.
On the prepared Christmas tree can be glued beautiful toys made from colored paper.

A very beautiful spruce is obtained made of colored cardboard.

To do this, take cardboard, draw a spruce on it. Cut out the Christmas tree along the drawn lines.

We bend the Christmas tree in the middle, make small cuts. We cut the first spruce from the top to the middle, the second from the bottom and to the middle. Then carefully insert the cuts so that they coincide with the tree. Fasten with tape.

In order to decorate the spruce, you can use a brush and paints, felt-tip pens or pencils, different sparkles.

The next spruce is very simple. To do this, you should take circles to draw with a compass different sizes. The circles need to be folded in half, then folded again. It should happen about three times.
The resulting circles need to be straightened, and then cut a small hole. Glue the pencil with shiny paper, you need to spread it with glue, string the tiers of spruce, make the top out of foil or just glue the bead. Everything, the New Year's beauty is ready.
Coming soon New Year! Do you already feel it coming? An active mother opens another series of materials dedicated to the most long-awaited holiday of the year. And we will start with the most important attribute of the New Year's festivities - the Christmas tree. For the manufacture of New Year's cards, fabric and felt crafts, window decorations for the New Year, Christmas tree templates are needed that can be printed, cut out and used as a stencil. We are pleased to present to our readers a selection of 30 Christmas tree templates for paper cutting.
Christmas tree templates for crafts
These templates will serve as blanks for creating, applications, cardboard Christmas tree decorations,. They can also be used as a pattern for, textiles, a stencil for Styrofoam Christmas trees and plywood.
All images enlarge when clicked:

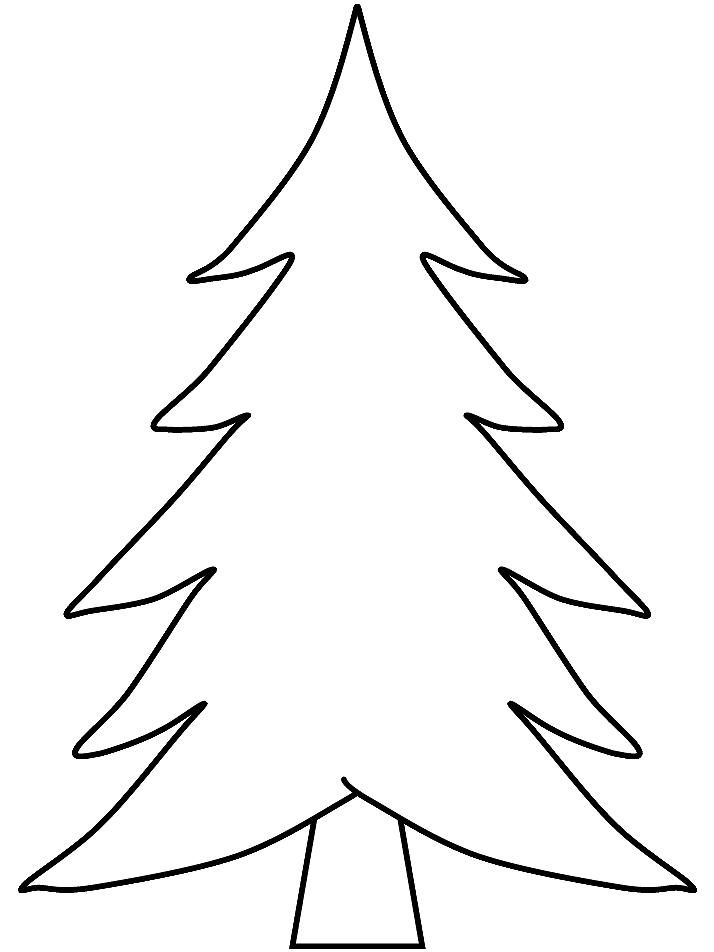


Christmas tree templates
Vytynanka in the form of Christmas trees is a beautiful decoration of the New Year's window and interior design. Using these templates, you can also create three-dimensional Christmas trees by printing each stencil in 4 copies and gluing their sides together. Such Christmas trees can also be used to make greeting cards, decorate a Christmas tree with them, make a garland out of them.
To carefully cut out a protruding Christmas tree, attach the cut out template to a sheet of thick paper or cardboard using a stapler, place the resulting blank on a rubber (silicone) needlework mat and cut it out using a special stationery knife first the internal elements of the image, and then it along the contour.
All images are enlarged by clicking. For the convenience of cutting out a template with a symmetrical pattern, fold the sheet with the Christmas tree pattern in half.


More difficult to cut, but insanely beautiful Christmas trees with an asymmetric pattern.

A do-it-yourself Christmas tree made of paper is a very good and, most importantly, timeless idea when the question arises: what can be done and presented for the New Year. A good gift combines sophistication of style, originality of ideas and warmth of the soul.
Of course, all these features are especially noticeable during big holidays. When the magical New Year's days come, we have much more free time, and it can be spent not only with benefit, but also with pleasure.
Here, for example, you can make New Year's crafts with children in kindergarten or school. And you can make a Christmas tree - an original decoration for the office, make it unusual gift to your friends and colleagues.
We have prepared for you interesting ideas Christmas trees from paper, which you can do with your own hands, including with children. Consider a few simple and at the same time original models - both for a gift and for decorating a home or workplace.
Let's start, of course, with crafts for the little ones. These green beauties are not the most difficult, but they are definitely made, as they say, with soul. You can give them to mom and dad. And most importantly, such a decoration can be put under a real Christmas tree next to a gift for a baby.
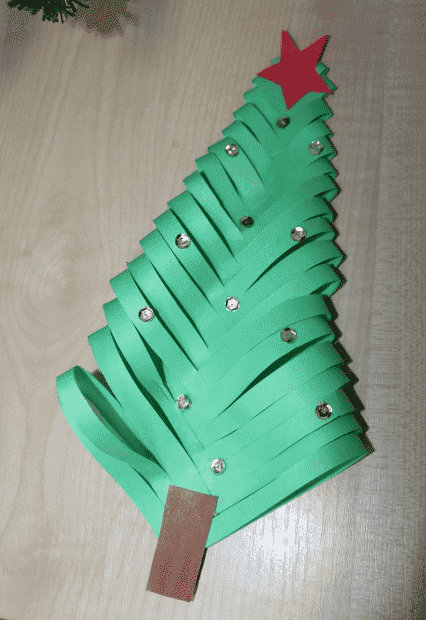
Christmas tree with rhinestones
Here, for example, is a universal model that can be done in almost any group kindergarten. The only condition is that for the smallest it is better to limit yourself to paper and glue, but in senior group You can also use beads for decoration.
We will need:
- sheets of colored paper in green, brown and red;
- glue;
- scissors;
- ruler;
- beads or beads for decoration (you can also take sparkles, artificial snow and much more).
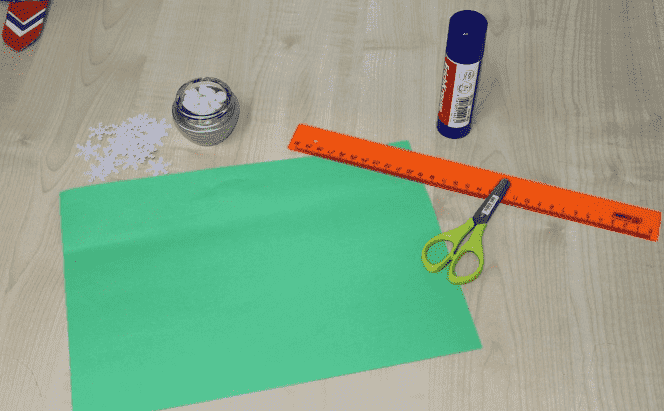
How will we do:
Step 1. First we need to make a square blank. To do this, we bend the triangle on sheet A4, and carefully cut off the rest.
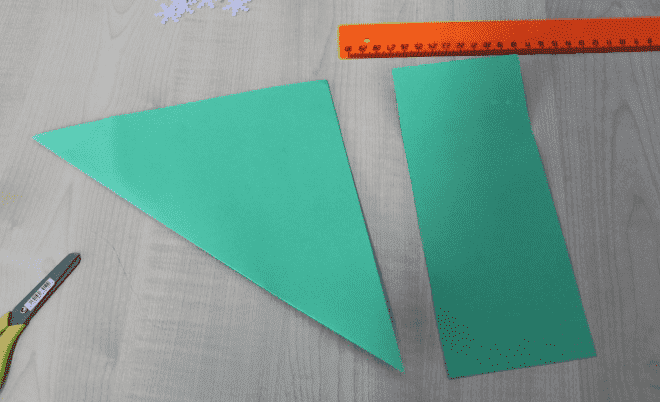
Step 2. Turn the triangle over and draw strips of 1 cm.
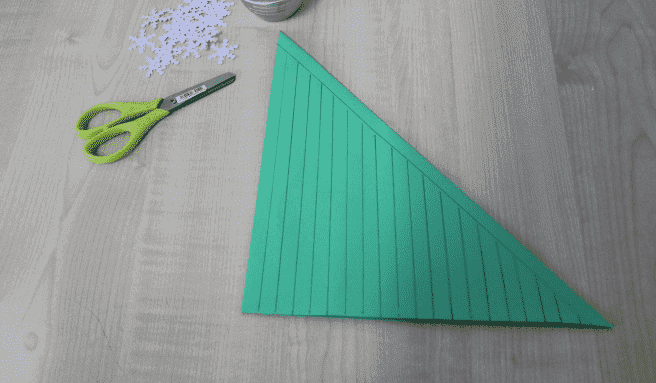
Step 3. We cut them from the bottom up, but literally 1 cm does not reach the top edge.
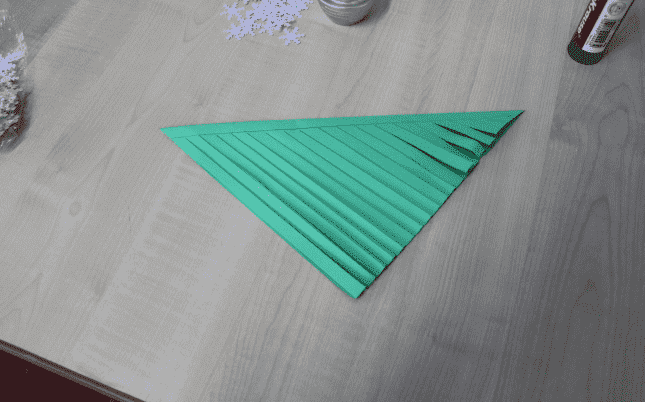
Step 4. We unfold the workpiece and glue each strip to the center in turn.

Step 5. After all the strips are glued, let the workpiece lie down a bit and dry. In the meantime, cut out the star on top.
By the way, you can also cut a lot of decorations from colored paper - balls, cones and other figures. Rhinestones, beads, beads also look spectacular - in a word, everything that glitters and creates festive mood. We glue the trunk from below - and you're done.
Original postcard with Christmas tree
It is customary to give cards for almost every holiday, and this good tradition is well suited for the New Year. A best gift- This is the one that is made by hand. Therefore, with the kids you can make another interesting figure - voluminous postcard, which is easily folded between two pieces of paper and becomes flat.
We will need:
- sheets of colored paper;
- a thick sheet of cardboard for the base;
- scissors;
- glue.
We will act like this:
Step 1. First you need to take a sheet of cardboard and bend it exactly in half so that the colored part remains outside. It can be any color leaf, but it is preferable to choose shades that contrast with green - for example, dark blue, chocolate, blue colors.
It is important that not only the Christmas tree looks good against their background, but also other decorations - for example, stars, which also need to be glued to the card so that it does not seem empty.
Of these, you need to fold an accordion with the same folds (about 1 cm each). In the middle, the craft is bent so that the result is a bow.
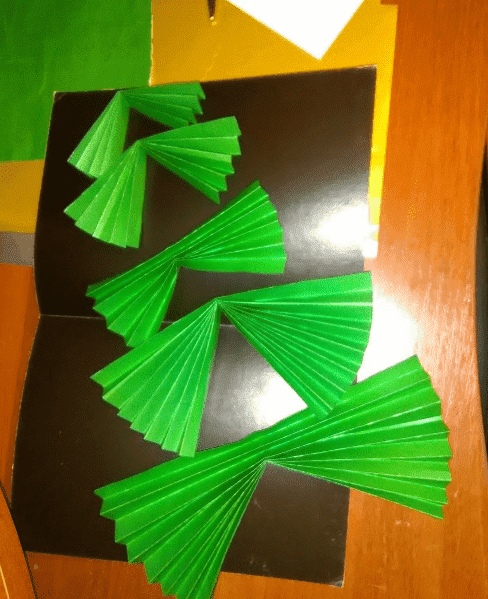
Step 3 . All these accordions must be glued in sequence to the center of the future postcard. They should fit snugly enough to each other so that the tree looks like a holistic, single composition.
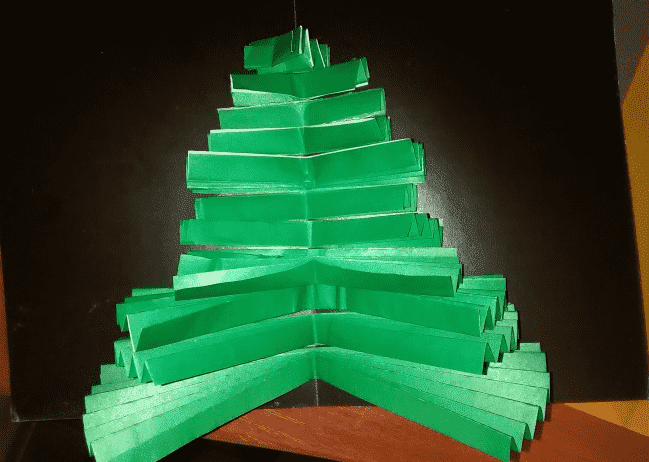
Step 4. Now we carefully straighten each strip so that the Christmas tree takes on a three-dimensional look.
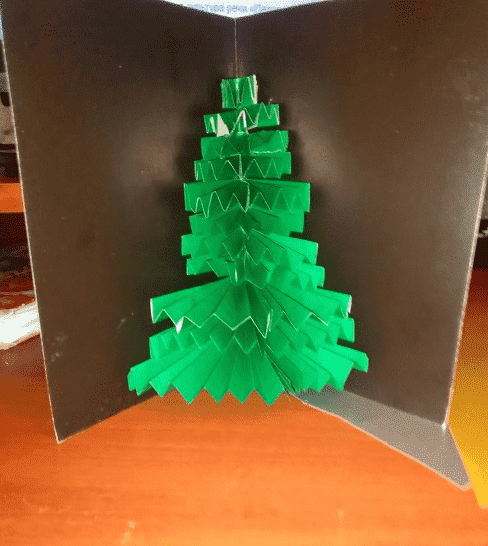
Step 5. It remains only to glue the crown, stars and other decorations on the background of the card. Can be glued on the back beautiful inscription made in advance, as well as snowflakes, cones, artificial snow and other elements of festive decor.

Velvety Christmas tree - an unusual photo stand
And now let's move on to more complex models that you can give to colleagues, relatives and friends, and just please yourself. original decoration for your favorite holiday.
Each person has, perhaps, hundreds and thousands of photos in stock, but among them there will surely be that very favorite photo, which in itself creates a festive mood. Why not make a special stand for such a picture?
For the manufacture we need:
- green cardboard - 1 sheet;
- a skein of thick threads of green or blue-green color;
- white boucle threads or cotton balls;
- glue;
- pencil;
- scissors;
- beads;
- glue gun.

To make a Christmas tree out of cardboard with your own hands, we will act in stages:
Step 1. First of all, we fold a sheet of green cardboard in half with the wrong side outward, after which we depict a half of the Christmas tree on it. To do this, you can simply print the template or draw from the sample.
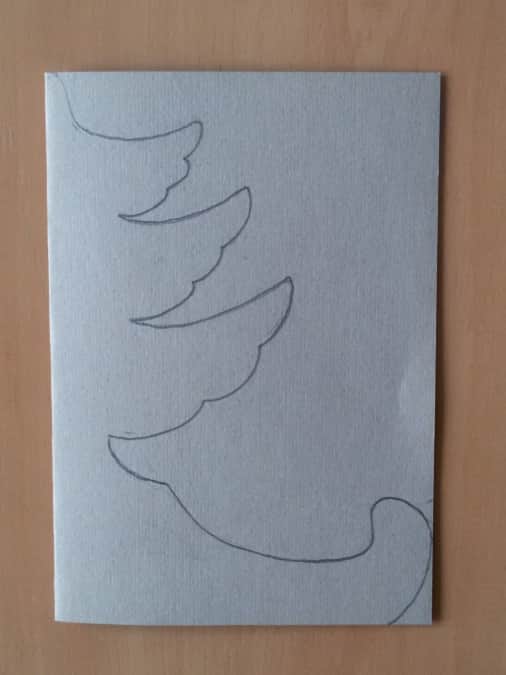
Step 2. Cut out the workpiece along the contour (when folded).

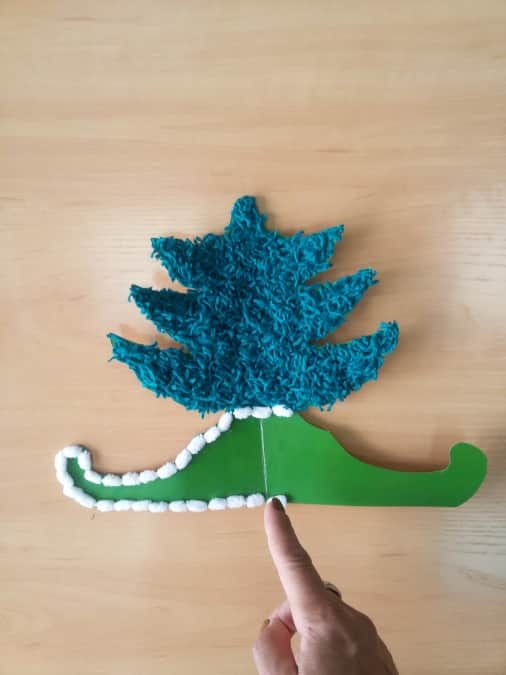
Step 3. Now let's take up the threads. They need to be folded in layers several times and cut into small pieces (1-2 cm each), putting them in a previously prepared container.

Step 4. Now comes the rather painstaking stage of work. Lubricate the surface of the Christmas tree (each branch separately) with a glue stick and stick the skeins on it. It is better to do this in stages so that dust does not accumulate on the sheet.

Step 5. In this way, you need to decorate only the top 3 sections, since we will decorate the bottom one differently.

Step 6. Let our tree lie down for a few minutes, and the glue will dry a little. In the meantime, take a boucle thread or just roll up a few small lumps of snow-white cotton wool.

Step 7. These lumps can be glued with a gun or glue stick. The work must be done carefully enough so that no glue stains remain on the surface.
Step 8. And now you need to make tinsel for decoration. For this, a thread-grass or other similar material is used.
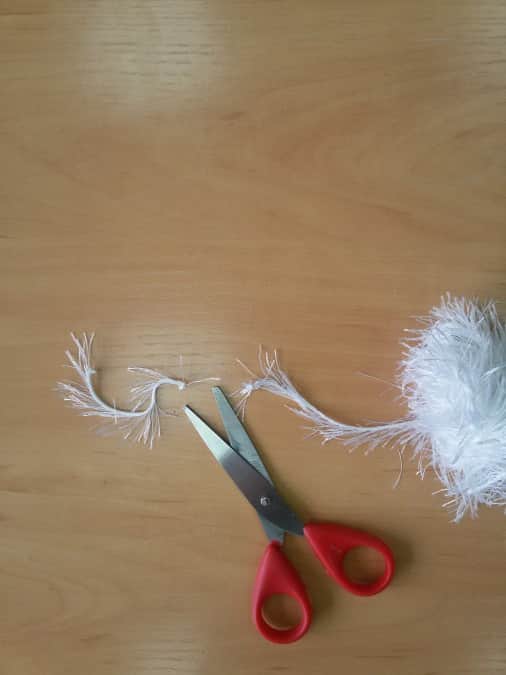
Step 9. Glue tinsel and other decorations - we get such a festive photo stand. The original New Year's gift is ready!

origami trees
Origami is a classic style of craft making. Anything can be made from paper in this way: from flowers and animals to houses, airplanes and even submarines. But today we are waiting for the New Year, so let's look at some simple and at the same time interesting models of origami Christmas trees.
One tree and a garland
By itself, one craft may not look so impressive. But if we made 10 or even more models at once and strung them in a garland - this is truly festive! Moreover, they should be as simple as possible and produced quickly.
So, we will make one tree, and then a lot of such trees will create a real New Year's fairy tale. Here's how to make such a Christmas tree (see diagram):


Well, then everything is very simple. Such Christmas trees can be put on a New Year's shelf or picked up on threads and hung over a false fireplace or in the corridor, next to a real fluffy beauty, etc. - it all depends only on the imagination and the possibilities of space.

And here is how the instructions for making a Christmas tree out of paper without glue on the video look - simply and clearly.
Modular tree
But a variant of a more complex craft, resulting in a real masterpiece. It can be kept as a keepsake until the next holiday. Moreover, it is not at all difficult to assemble such a charm, since all the modules add up the same way: you just need to sit a little and try.
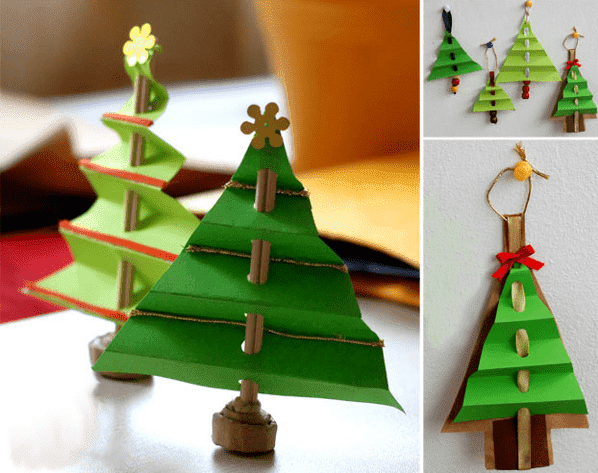
Christmas tree for a corporate party in the office: simple and fast
And what about a friendly team that is preparing for the holiday, as they say, in an accelerated mode? Do you need to buy gifts, think over the scenario of the event, and perhaps put something on the table? For decorating the workplace and holding funny contests you can make such a model in haste.
For its manufacture, you will need a minimum of materials that are likely to be found in every office:
- green cardboard;
- hole puncher;
- skewer or wooden stick;
- scissors;
- glue;
- decorations (figurines made of colored paper, cotton balls, ribbons, and in general everything that is at hand).
A Christmas tree can be made in just a few minutes. We will act like this:
Step 1. First, fold a sheet of cardboard in the form of an accordion with a side of each fold 1.5-2 cm.
Step 2. Then we carefully make a hole exactly in the middle - if there is no hole punch, this can be done with a thick needle or awl.
Step 3. Cut off the side parts in the form of triangles on both sides to get the shape of the Christmas tree.
Step 4. We insert a skewer or a wooden stick into the holes (in extreme cases, a pencil is also suitable), after which we decorate our crafts.
Here's what it looks like step by step instructions on the picture.
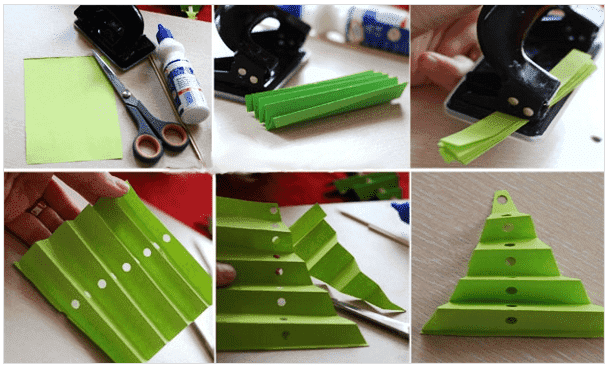
And here is what the finished crafts look like. They can be hung and put - solid advantages.
Corrugated paper Christmas tree: options for a gift
Paper is simply an inexhaustible source of creativity. Even from a regular sheet, you can make dozens of different models of Christmas trees. What about corrugated paper? It is indispensable for such crafts, because it imitates needles very well and also looks very attractive.
For the manufacture of such new year gift we will need:
- white cardboard;
- corrugated paper green and red;
- scissors;
- glue;
- cotton wool and other decorative elements for decoration;
- toothpicks or wooden sticks;
- compass;
- pencil;
- ruler;
- bow.
We will act like this:
Step 1. First you need to make a cardboard cone - this is the basis of the future Christmas tree. To do this, we draw a longitudinal line 30 cm long on the surface of the cardboard, divide it in half (15 cm each), and draw a circle with a diameter of 15 cm (i.e., a radius of 7.5 cm) in the center using a compass. We cut out this circle and make a cone from it with the same height of 15 cm. You can fasten it with a stapler or glue.

Step 2. Now you need to paste over the surface of this cone with green corrugated paper.

Step 3. While the workpiece dries, let's proceed to the main stage - the creation of needles. To do this, from corrugated green paper, you need to cut 120-130 strips 1 cm wide and 15 cm long.
Then we put several pieces one on top of the other and make cuts 0.5 cm wide, as shown in the photo. After that, roll them up with a toothpick or stick. Glue the ends of the strip to make a fluffy pompom.

Step 4. We fluff each of these lumps and glue them onto a cone - that's all.

Step 5. It remains only to decorate as your creative imagination tells you - with bows, beads, sparkles. It turns out a model of a real Kremlin Christmas tree - very impressive and at the same time simple.

Here is a visual video instruction that will help you understand in detail how to make a Christmas tree from corrugated paper with your own hands for the New Year or Christmas. Here is another model, which, by the way, is made even easier, but it definitely looks no worse.
Christmas trees in quilling technique
Quilling is one of the modern trends in decorative art, which, however, has already become widespread among amateurs and professionals. Without exaggeration, we can say that any beautiful model can be made from twisted paper (namely, this is what is called quilling).
Here, for example, are several options for Christmas trees for New Year's cards.


And here are three-dimensional figures, which consist of several modules glued together.


To understand how to make such masterpieces with your own hands, you just need to master the torsion technique. paper strips. From them, you can make almost any model of a Christmas tree from paper.
Can help with this step by step instructions on video:
Christmas tree from old magazines - for lovers of nostalgia
Old glossy magazines or even ordinary newspapers can probably be littered in the house. To “breathe” a second life into these things, you can simply use them for New Year crafts, including making a Christmas tree.
Do not think that the model will turn out to be some kind of “not like that”. In fact, it will give odds to even the most beautiful figures made in other ways. Of course, it is best to use colored glossy pages - then the Christmas tree will turn out to be truly festive.

Here is an example of creating one of the most simple crafts.
Happy New Year!
On the eve of the New Year, it becomes relevant to make Christmas trees with your own hands. Volumetric Christmas trees made of colored paper will perfectly decorate the apartment. Such creative gift will be a pleasant surprise, especially if it is made together with children.
It will be very exciting to make such a Christmas tree with children.

Such Christmas trees will perfectly decorate the apartment on a festive night.

Before the New Year, it is very popular to make Christmas trees out of paper.
To make crafts, you will need green corrugated paper, PVA glue, green cardboard, scissors, and a toothpick.
Before starting to make a Christmas tree, you should prepare the main tool for twisting paper "rolls". To do this, the toothpick is cut off at the edges. On one side, make a small incision with a knife, slightly dividing it in half.

It is not difficult to make such a Christmas tree

To create such a Christmas tree, prepare paper, glue and scissors
Christmas tree making steps
Draw a large circle on the cardboard using a compass. Next, cut it out. This will be the basis of the future Christmas tree.
- In order to roll a cone from the resulting circle, it should be connected in half, and cut along the fold. Form a cone from the resulting semicircle. Glue the junction of the edge of the cone with its base with glue. Wait a few minutes to allow the glue to hold the cardboard together well and dry.
- For the manufacture of quilling strips, green corrugated paper is taken, and cuts 1.5 centimeters wide are applied to it.
- On the resulting tapes along the entire length, make frequent cuts, not reaching the edge. This will turn out a fringe of needles for a tree.
- To perform the main element of paper rolling, the spiral, one end of the strip is inserted into the forked part of the toothpick and a piece of paper is wound along the entire length onto the toothpick. In this case, it is better to twist the toothpick itself, and not the tape. To get the same elements, try to twist evenly and neatly.
- To prevent the twisted paper roll from untwisting, the free end is glued to the base. Let the glue dry.
- After all the elements are made, to give them the correct volume, you need to gently fluff the chopped fringe on them.
- Glue the prepared paper rolls onto the cone. It is better to start doing this from the top of the cone. To do this, the pointed end is lubricated with glue and an element is put on it.
- Press the item. Next, glue the entire cone with fluffy spirals.
The Christmas tree will look brighter if it is decorated with bows and corrugated paper balls. To do this, you can roll multi-colored balls or squares out of it, connected twice, tied in the middle with a thread. Made Christmas decorations glue.

Such Christmas trees will create a festive atmosphere in the apartment.

To make the tree look beautiful, decorate it with bows

To make a Christmas tree, you can use the instructions
Herringbone in quilling technique
A quilling Christmas tree will become a beautiful and original decoration for a holiday card.
To make a Christmas tree, you will need A4 colored paper, scissors, a toothpick, PVA glue, a Christmas tree base (it can be colored cardboard or a postcard)
To make the Christmas tree look more creative, you can use green colored paper, but in different shades, to make paper spirals. Roll up 4-5 elements of each color.
- On colored paper, draw stripes 3-5 millimeters wide, cut.
- Next, use a toothpick to start making paper rolls. To do this, insert one edge into the incision made with a knife on a toothpick and twist evenly. Instead of a toothpick, you can use wooden skewers for barbecue or a regular rod. Then you can simply wind in the middle of the selected tool.
- In order for the resulting spiral to be free, it is better to let it go. When it blooms a little on the table, fasten it to the selected diameter.
- For a more interesting Christmas tree, the bases of the spirals can be twisted in various diameters.
- Laying out Christmas trees on cardboard is best to start from the top, taking the smallest element. Glue in the shape of a cone did everything. Maybe in an irregular order.
- The Christmas tree can be decorated with ornaments in the form of twisted spirals of a very small diameter or beads.

For the manufacture of spirals, you can use colored paper

A quilling Christmas tree will become a beautiful and original decoration for a holiday card.
Christmas tree from a cardboard cylinder from toilet paper
An unconventional decoration of the New Year's room can be Christmas tree-shaped pendants made from a cardboard sleeve from toilet paper. Such holiday symbols can be hung as separate decorative elements or as a garland.
For decoration you will need:
- cardboard, the inside of toilet paper;
- emerald or green acrylic paint;
- bright ribbon;
- flat pieces for decoration. it can be buttons, rhinestones;
- glue (for gluing plastic, the “crystal moment” is perfect, its transparent texture will be invisible, plus it dries instantly).
- scissors.
When everything you need is prepared, you can start preparing the decoration.

Christmas trees made by yourself will perfectly decorate the apartment

Such Christmas trees can be hung on the ceiling or Christmas tree.

Making a Christmas tree this way is a little easier
First, the roll should be painted with paint in several layers and allowed to dry well. This may take up to half an hour.
In order to make a spiral out of a roll, you need, starting from the top, cut it in a single line to the bottom of a 1.5 cm wide. The ends will be pointed.
To give a tree correct form, twist the cut strip into a coil. To fix the shape, put the resulting spiral under a heavy object, such as a stack of books, for 30-60 minutes.
Unwind the future New Year tree a little, and glue the prepared round elements on the outside, which will imitate balls. You can arrange them both in a chaotic manner, and according to a certain algorithm.
Glue a bright thin ribbon to the top of the craft. It can be a red ribbon to decorate flowers, or even a thick thread, yarn.


Making your own Christmas tree is not difficult.
Japanese paper Christmas tree
For crafts, you can take either a special Japanese paper, or glossy cardboard in a bright color.
You will also need: wrapping(sheets of a magazine with a bright image), A4 white sheet, skewers, pencil, scissors, ruler, PVA glue.
For the base of the Christmas tree, cut a regular sheet of paper into strips 2 cm wide. Twist all the strips into circles. Attach all the elements to each other in a circle with glue. You should get a large circle of spirals. The width of the circle is arbitrary. The wider, the more stable the figure will be.
Cut out two rectangles of cardboard measuring 21 by 28 cm. Bend each of them with an accordion so that the sides are 1.5 cm wide. Round off the ends of the accordion.
Fold the part in half, gluing it end-to-end. A semicircle is formed
Glue the resulting semicircles with each other so that you get a circle. This will be the bottom row of tree branches. You can replace the glue with wire by piercing both semicircles and twisting its ends.
Make rectangles in two pieces of the following sizes: 18 by 28, 16 by 28, 14 by 26, 12 by 26, 8 by 25, 6 by 23.
Make an accordion from all the rectangles, connect the same semicircles in 6 circles.
Now you need to prepare the skewers. They need to be wrapped. To do this, you will have to cut a strip several centimeters wide from a bright sheet, wrap it in a spiral.
Put on a skewer all the circles of the branches made. There should be wider circles at the bottom.

The herringbone is a very beautiful decorative element.

A Christmas tree made by one's own efforts will perfectly complement the festive atmosphere.

To create such a Christmas tree, glossy paper or cardboard is suitable.
Christmas tree in origami technique
A green paper Christmas tree is very easy and quick to make using the origami technique. Mastering the art will be happy not only for children, but also for adults. This technique is attractive in that figures can be made from it anywhere, without additional tools at hand.
You will need green colored paper and scissors.
Instruction
- Make a square out of paper.
- Connect first in half, running your finger along the bend. Then unfold and bend in half diagonally, on both sides. Expand. You will get a square with highlighted stripes.
- Fold along the obtained preliminary bends, as shown in the figure.
- Bend each side to the middle.
- Expand the resulting bend so that you get a pocket, and connect the edge of the pocket with the center.
- Turn the corners of the Christmas tree to the outside, then fold them inward.
- The Christmas tree will have 8 equal edges, which must be cut along the edges horizontally in 4 places.
- Bend the notched sides down diagonally.
- Bend the previous bend and tuck it inside the Christmas tree along the resulting line.
- The top of the head can be stitched with a thread, making it Christmas tree toy or pendant for interior decoration.

This Christmas tree can be made quickly and easily.

Such a Christmas tree can be made without additional funds
Christmas tree made of paper strips
Many mothers prefer to make gifts for grandparents not only with their own hands, but also begin to instill a craving for creativity in their kids. Young children will be interested in making such a Christmas tree themselves.
For crafts, you will need multi-colored colored paper, scissors, a sheet of cardboard.
Children 3-4 years old will be able to make blanks from strips on their own. For younger children, their mother can pre-cook them.
- Cut colored paper into even ribbons of the same width (1-1.5 cm), but of different lengths.
- Smear the blanks with glue and glue them on cardboard in the shape of a Christmas tree. From below, horizontally arrange longer segments, gradually shortening their length to the top of the tree.

These trees are very easy to make.

Such a Christmas tree will be a great decoration for a Christmas tree or apartment.

Children can be involved in the creation of the Christmas tree
Volumetric Christmas tree from old paper
To create a New Year's beauty, you can use various improvised means. A product made of sheets will look especially interesting. old paper or magazines.

Such a Christmas tree will look unusual

Herringbone made on their own will perfectly decorate the interior
A quick and easy way to make such a piece of Christmas decor
- Take 2 magazines, PVA glue.
- Fold each sheet into 2 pieces. Bend the protruding edge. Get half a tree.
- For the second half, perform the same procedure with the second magazine.
- Glue both halves to get the finished Christmas tree. You can make a base by gluing a few wine corks on the bottom.
To make the Christmas tree look more creative, you can sprinkle it around the edges with spray paint.
Video: How to make a paper Christmas tree with your own hands
50 photo ideas for creating a Christmas tree from paper with your own hands:


