Do-it-yourself chamomile from a plastic bottle: a detailed step-by-step MK with photos and videos. Daisies from plastic bottles master class Do-it-yourself flowers from spoons step by step instructions
Chamomile from a plastic bottle already used in the house is a budget beauty! flowers from plastic bottles needlewomen make an uncountable number. One of the beautiful and realistic flowers is chamomile. Large daisies from bottles are made to decorate flower beds, front gardens, summer cottages. And small ones can decorate the interior of an apartment or house, and you can also make a composition for a gift.
Below are step-by-step instructions for making both small and large daisies.
We make small daisies from a plastic bottle with sharp petals
These little beauties of chamomile look great in a bouquet on the windowsill in the apartment. You can also make a gift with these daisies or give them yourself.
To make these daisies you will need:- Small white bottles (for example, from Aktimel drink)
- yellow lid
- Wire
For one chamomile, three bottles are needed. The neck is cut off from the bottle, leaving a bend, future petals will curve beautifully from it. Next, the bottles are cut into strips along the entire length, not reaching the bottom of 1 cm. Each strip must be sharpened with scissors and bent to the sides. Then in the bottom you need to make slots or holes. Through the slot, put all the blanks of the petals on the wire, the end of which must be clamped with a loop. The first blank, go through with glue from below, no matter what the future chamomile falls. Pour glue into the middle of the blanks and put on the lid. Spread the petals. Chamomile, made by yourself from a plastic bottle, is ready.

Let's try to make a variant of delicate daisies with rounded petals
Such flowers can decorate both the interior of the apartment and the area in front of the yard. Densely planted daisies in front of the house resemble a chamomile field.
For crafts you will need:- Clean plastic bottles (white, green, yellow)
- Candle (lighter)
- Scotch
- Marker
- White paper
- Wire
- Scissors, awl, compasses, ruler, pliers
Cut off the neck and bottom of the white bottle. Cut the bottle in half and lengthwise to make pieces of plastic. On a piece of white paper, use a compass to draw a round template, the size is selected for the pieces of plastic. Transfer the template to plastic and cut it out. Draw strips on plastic circles and cut, not reaching the middle of 0.5-1 cm. Round off the edges and bend a little over the fire.

Draw a leaf and a sepal on white paper, cut it out and transfer it to a green bottle. Cut the leaves and sepals. Cut the rest of the bottle in a circle into a thin long strip. Wrap the strip on the wire and burn a little over the fire.
Core.Cut out one convex part from the bottom of the yellow bottle and bend it slightly over the fire
All blanks are ready. The flower is easy to assemble: a sepal is put on the wire, then white petals, round the end of the wire with pliers and glue the yellow center on top. Glue the leaves to the stem as well. Ready!

Flowers come out medium in size, look beautiful in front gardens or in flower beds.
Materials:- Three plastic white bottles
- yellow cap
- Wire
Cut the bottles in half, at the point of expansion. Cut off the necks of two bottles. Cut all blanks into petals and round the edges. Insert two bottles in turn into a bottle with a neck, pierce with an awl and insert a wire, fix with glue. Screw the cap on the bottle with the neck. Straighten everything. Chamomile made from plastic bottles!

Such daisies are very large. They decorate household plots, flower beds, front gardens. You can see these flowers from afar.
Materials and tools:- Large white plastic bottles
- plastic plate
- strong wire
- Candle or lighter
- Scissors, knife, awl
Cut off the necks and bottoms of the bottles. Cut lengthwise and cut petals from these blanks, give shape, slightly bending them over the fire. It is better to take a plastic plate yellow, if there is none, then it must first be painted. Make holes on the edges of the plate with a knife and insert the prepared petals into them. From the inside of the plate, gently burn the inserted edge of the petal with fire. This will not make them fall out. Make a hole in the middle of the plate and thread the wire through it, imitating the stem of a flower. Chamomile is ready!

From the same materials, everyone will get their own beautiful chamomile, with its own special zest, which will definitely fit either into the interior of the apartment or into the design of the backyard. And a creation made with your own hands will always please the eye.
Each craftsman has his own tricks for making daisies from plastic bottles, and some are willing to share them. A few little tricks can be learned from the video master classes:
Video on the topic of the article
Spring gives us white tulips. Making flowers from plastic spoons with your own hands. Master Class with step by step photos
Teacher of additional education Novichkova Tamara Alexandrovna MBOU DOD Lesnovsky House of children's creativity.Work description: I bring to your attention a master class on making tulips from plastic spoons. Making tulips is not a difficult process, it will not take much time, but it will give you a lot of pleasure. Get down to business and you will make a gift for the holiday with your own hands. Master class is designed for children school age, teachers, educators, parents and just creative people. For all those who love to surprise and delight their friends and loved ones.
Purpose: Tulips can be a wonderful gift for a birthday, March 8, other holidays and decorate the interior of a room.
Target: Formation of skills in working with waste material.
Tasks:
- to interest and involve in the work of making tulips from disposable spoons;
- to teach technologies for working with waste material (plastic spoons);
- improve the skills of working with a thermal gun;
- develop Creative skills children, initiative;
- educate diligence, accuracy in work.
Spring has arrived in our area. Summer is not far off. Exciting hikes, trips to the country, picnics are waiting for us. Remains of our holiday disposable plastic tableware: plates, forks, spoons, bottles and other waste material. But do not rush to throw it all away. Before you lies fertile material for the manufacture of crafts. There will be something to occupy the children with at their leisure and to engage in creativity themselves.
I offer you a master class on making white tulips from plastic spoons.
Tulips. They have always stood out for their grace among other colors, because they have something aristocratic and at the same time simple.
There are so many flowers on earth
But tulips are dear to my heart ...
Absorbed all the beauty in yourself,
They cannot be comprehended with the mind, with the eyes.
They are like angels from heaven
Came down to us on our land,
So that our mortal light does not disappear
And life triumphed over death.
Materials and tools needed for work:
- plastic spoons;
- yellow pieces of a plastic bottle;
- artificial leaves or green corrugated paper;
- satin ribbon, vase;
- scissors;
- thermal gun;

Stepping through tulips
To make one tulip, you need 5 spoons. Can be made from four. They will look like buds. Decide how many tulips you will make. So many leave whole spoons. Cut off the handles from the rest.


Take the yellow plastic bottle. Cut it and from the middle part, make stamens. You can use stamens from old artificial flowers.

Cut the yellow plastic rectangle into narrow strips, twist with a tube.

Take a spoon and use hot glue to glue the stamens.

Now glue the cut spoons in a circle.


Cut out the sepals from artificial leaves. Glue.


cut off corrugated paper narrow strip and wrap around the stem of the flower. You can use floral tape, thread. Everything that is in your magic chest.

Attach a sheet. First white tulip ready!


Using the same technology, make the rest of the tulips. If you want the tulips to have long stems, glue on the cut handles. Grow the stem.


These are the white tulips we made with our own hands.


Arrange tulips in a bouquet. Tie up beautiful bow. You can go to visit and congratulate your dear person. The child will be happy if you appreciate his work, diligence.


White tulips -
Gives me spring!
White tulips-
The glare of the moon is hazy,
What administers its distant
The path through the darkness of the night.
White tulips-
A modest sign of attention
Wishing you happiness
I'll take it to my heart.
White tulips-
In a crystal vase
With slight admiration
I put it on the window!
White tulips-
On women's day in spring
You for congratulations -
The best flowers! G. Bondarenko
Arrange tulips in a wicker basket or place them in a vase.


You can arrange a composition for the bright holiday of Easter. Put colored eggs in the basket or, as in our case, knitted ones.
See for yourself how modest and delicate flowers are, ready to give only joy and positive mood.


Tulips white heads,
Opening the petals in bliss,
How they catch with their mouths - sequins of the sun,
On a wonderful flower bed - by the river!
And if you have red, yellow or other color spoons, make a tulip and plant it in a beautiful pot. Such a tulip can be presented to mother, grandmother on March 8, to a veteran on Victory Day. I'm sure they'll love the gift.

How beautiful he is - that fiery flower!
On a long stem, proud and lonely.
The petals of a closed bud are beautiful.
Take 5 red spoons, cut off the handles from them. I want to give advice. Colored spoons are more durable, glossy. They are difficult to cut off. Use a candle. Heat the handle a little over the fire and the plastic will be easily cut off. The edge will be smooth. Just do not keep the spoon close to the fire, it will turn black. Prepare all five spoons for assembling the tulip.


Glue the stamens to the tulip stem using hot glue.


Start gluing the petals to the stem in a circle. Here's what we got.


Cut out two leaves from a plastic green bottle (at your discretion). There are many options.


Wrap the stem with floral tape. Or use what you have. I took the green tape. Attach the leaves to the stem.
The red tulip is ready.


Let's plant our tulip. I took a peat pot, a sleeve from an old velvet dress, a green sponge and a piece of Styrofoam. Here is such a velvet, elegant pot turned out.

Can we make delicate flowers from disposable spoons? How about a real flower garland? Crafts from junk material are becoming increasingly popular.
This is largely due to the current environmental situation in the world: having learned to use objects that have fulfilled their function in an unconventional way, we will thereby give them a second life, and delay the moment of their inevitable disposal.
For creative purposes, you can use various packaging and. For example, you can make a variety of and very interesting crafts from . The child will be very surprised to learn that ordinary plastic picnic dishes can be turned into amazing flowers - water lilies.
To make flowers from your own hands, you need to prepare in advance:
- disposable spoons (six pieces per flower), it is better if they are bright in color, but ordinary white ones can also be used;
- glue gun or polymer glue;
- corrugated cardboard or foam board;
- hole puncher;
- bright soft pompoms (one per flower);
- scissors;
- ruler;
- pencil or pen;
- decorative cord, braid or satin ribbon;
- an open flame source (for example, a gas burner).

Let's get started.
First of all, we cut off the hold of each spoon. To facilitate the task, we first heat the knife blade in an open flame.


We cut out triangles from cardboard, on one side of which we make a hole with a hole punch in each corner.
We draw a circle in the center of the triangle and glue scooped spoons along its edge - like water lily petals.


In the center of each such water lily, we fix the pompom with glue.

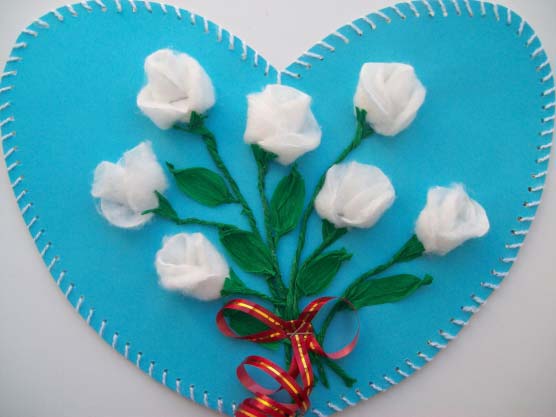
The flowering time for most flowers, alas, is short. But this is no reason to be upset. You can capture the natural beauty of daisies, roses, peonies, and other flowers by creating their artificial counterparts. This article "Cross" will teach you how to create flowers with your own hands from improvised materials.
Flowers from cotton pads
Many do not even suspect that cotton pads can be used not only as a means of hygiene, but also as a universal material for creating all kinds of inflorescences.
Surface cotton pads can be flat, or maybe with a printed pattern. Depending on the type of flower, choose the one that suits you best.
Even a child can make a spring card with a primrose using cotton pads, scissors, glue, colored paper, paint or simple felt-tip pens.

If the cotton pads are a little “fluffy” around the edges, then you will get such airy roses. Looks very gentle and original!
From cotton pads, a cotton swab and a straw for drinks, you can create an elegant calla.

Cotton pads and a clerical stapler will help to make an original chamomile) If desired, instead of clerical brackets, you can use glue, and paint the chamomile with gouache or acrylic paint.

Cotton pads are very often used in the manufacture of a very popular flower - roses. Pearls will decorate roses, which will give nobility to the resulting flower arrangement.

The secrets of creating flowers from cotton pads with your own hands will be revealed by SunduchOK113 in a video master class:
From a large number roses can be created such a festive Christmas. To do this, you need a round blank, glue, cotton pads and various elements for decoration (ribbons, beads, rhinestones, sequins, etc.)


Flowers from cotton buds
Cotton buds are also an affordable and wonderful material for creating beautiful flowers.
Via cotton buds, plasticine and colored paper you can create cute daisies.

Willow twigs from the tips of cotton buds look very natural on an Easter card)

Using the tips of cotton swabs, paints and colored paper, you can make bright and fluffy dandelions.

You can make creative ones from colored cotton swabs and a round foam blank. For example, such a mischievous chamomile.


When making flowers from cotton buds with your own hands, you can choose any paint (gouache, watercolor, acrylic):

From the colored tips of cotton swabs, you can make mini flower beds with carnations.

Flowers from egg trays
Egg trays are one of waste materials for needlework. Usually egg containers are thrown into the trash, not knowing what beauty can be created from them! DIY flowers from egg trays will decorate the interior of the house, photo frames, wreaths, mirrors, etc.
To make these flowers you will need:
- egg trays (cardboard and plastic can be used);
- brush and paint (gouache, acrylic);
- scissors;
- glue;
- wire.
We cut the egg tray into separate sections, after which we form each section with scissors. The height of such blanks may be different. The resulting petals are painted with paint, preferably in two layers. Further, depending on the type of flower you are making, one blank can be inserted into another, forming a bud. We fix the elements of the resulting flower with glue.

The materials and the process of creating flowers from egg trays are discussed in detail in the MK Masterpieces of Needlework:
We bring to your attention the most common types of flowers from egg trays. But remember that you can come up with the shape of a flower yourself!


The frame of the summer wreath is also made of egg trays. This can be decorated with chamomile, cornflowers or pansies.

From plastic egg trays, you can even make a small masterpiece of floristry!

For example, snow-white roses from plastic containers, combined with pearls and decorative gypsophila, form such a delicate bouquet.

Decorative moss or ferns, as well as red ribbons and beads, will add brightness and festivity to a Christmas wreath of plastic roses.

A personalized flower on the table will please a colleague or your loved ones:

Let's see how you can make an exclusive photo frame out of a simple one:

A simple mirror decorated with flowers from the trays will look more interesting and sophisticated.


Gorgeous mirror decorated with lush peonies

Flowers from disposable spoons
Disposable plastic spoons can also be used to create flowers.
From simple white spoons you can make this

Spoons can be used not only white, but also bright colors, especially when creating .

When creating flowers from, you can use spoons different sizes and colors:

To create these decorative water lilies, part of the spoons were painted with gold spray paint. White and gold water lilies side by side look very stylish!

In addition to all kinds of paints, you can decorate spoons with decorative sparkles and glue:

DIY Gifts and Crafts Ideas offers MK for creating a bright spring from disposable spoons:
From white spoons, drinking tubes, plasticine and colored paper, you can create a spring flower bed. Petals (white spoons) and stems (tubes for drinks) of snowdrops are interconnected using ordinary green plasticine. Cut out snowdrop leaves from colored paper. We make yellow ones from plasticine.

With the help of thermal treatment (lighter flame, candles), spoons can be melted and deformed into a petal of the desired shape. Then paint the petals suitable color and collect . It is convenient to use spray paint. Such flowers can be used even in the manufacture.

Using the same principle, you can make this. You can learn all the secrets of its manufacture in the master class.

wire flowers
There are different technologies for creating flowers from wire with your own hands.
Flowers made of wire and nylon
For example, from unnecessary nylon tights and wire, you can make nylon flowers.

The technique for making nylon flowers is quite simple, but you can create real floral masterpieces. For example, -phalaenopsis, which is not immediately possible to distinguish from the real one!) A wonderful element of decor for both home and office!


Wire flowers and nail polish
Another handy tool for creating wire flowers is regular nail polish.

It is better to use a fresh varnish of a more liquid consistency so that it flows from the brush.
The varnish is applied to the edges of the petals formed from the wire. After the first drying of the varnish, additional layers of the same color can be applied or, for example, topped with glitter varnish.
To prevent the varnish from dripping onto one side of the flower, secure the stem vertically in a dishwashing sponge.
Olga Lazarchuk reveals in her master class the features of making flowers in this way:
AND ladybug sure to bring good luck!

If you do not have time to take care of ordinary flowers, then your window sill can decorate this one.

A comb with delicate flowers will be a worthy decoration for your hair:


Flowers made of wire and floss
Ganutel - a technique for making flowers from wire and.

To create such a flower you will need:
- wire
- floss in different colors
- scissors (nippers)
- pliers.
We make a spring out of wire: we wind a thin wire around a long rounded object, for example, a pen rod or a simple knitting needle.
From the resulting spring we form the petals and leaves of the flower. Next, on the resulting flower frame, we begin to wind floss threads in a certain order. We connect the resulting flower details!
More clearly, this process of creating flowers can be seen in the DIANA Bilohorka master class:
From hard wire and soft threads, you can even create such airy beauty!

Burlap flowers
Anyone can create flowers from an unusual material - burlap. This is a very popular pastime that is born for!

Beginners can start with the simplest, make a rose from burlap.

To do this, you will need the material itself - burlap, matching threads and a needle.
If you can use it carefully, then the needle and thread can be replaced with hot glue.
We cut off the burlap 4-5 cm wide, about 1 m long. We fold the resulting strip in half along the entire length and begin to twist the rosette.
YOU WILL USE
See the step-by-step process of folding a rose in this way in the master classes "Cross":
Burlap roses look very stylish! They can decorate various things in your home, for example, make such designer lamps ...

... or make such a wreath-decoration for the door:


There is a universal technique for creating flowers from burlap. In this case, the burlap is glued onto the finished frame of wire petals.

First, the burlap is coated with PVA glue.
After drying, the fabric will become firmer and more comfortable to take on any shape.
From the wire we prepare the frame of the petals for the flowers, we wrap the wire with colored adhesive tape.

The resulting petals are superimposed on the glued pieces of fabric and are again treated with glue from above.

The workpiece must be allowed to dry in this form for 1 day. Next, cut out the resulting petals along the contour of the wire so that the edges are perfectly even. We bend the cut elements of the flower in the right direction and form a flower.
Thread flowers
Flowers from pom-poms
Thread pom-poms are a great element for creating flowers! With their help, you can create a spring mimosa:

Or a bouquet of summer dandelions.

MASTER CLASS ON THE TOPIC

Anyone can make flowers from threads with their own hands - and even without a crochet hook and knitting needles!

It is clearly shown how and from what materials such flowers can be made in the master class by Natalya Melnik:
Master class on creating a solar dandelion
To make a dandelion, you will need threads of two colors.

We wind yellow threads on any hollow frame. Next, we sew the middle of the wound threads with the same threads and coat with PVA glue. We remove the frame, and tightly wind the threads on the middle of the workpiece, stitched and smeared with glue.


After the glue dries, cut the workpiece in half. We cut the yellow threads and straighten the resulting dandelion.


We make sepals from green threads.


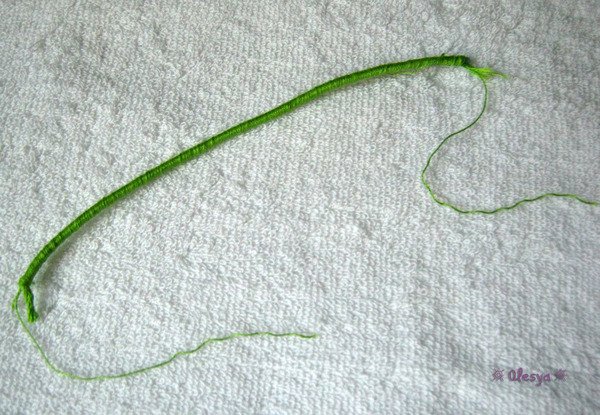
We make the stem from wire wrapped in green threads.
A dandelion leaf can be crocheted.

Thread flowers can be made using the Tenerife loom (flower loom). Flowers are created by winding threads in a certain order on circle skewers. This process is very addictive and captivates not only adults, but also children. The resulting flowers can decorate clothes, hats, scarves and bags.


In work, you can use twine or jute of natural color, dyed or bleached.

Twine flowers…

...and jute
The process of weaving flowers can be seen in detail in the Povyazuli master class:
You can buy a Tenerife machine at a needlework store.

Or do the same with your own hands. The easiest option is to cut it out of cardboard

There is another option for a homemade machine. To create it, you will need cardboard, needles, compasses, glue and a large needle.

Cut out two circles from cardboard and glue them together.

The resulting circle is divided into equal parts. According to the lines we stick needles or pins:


We form the core of the flower according to:


After the "birth" of the flower, remove the cardboard base:

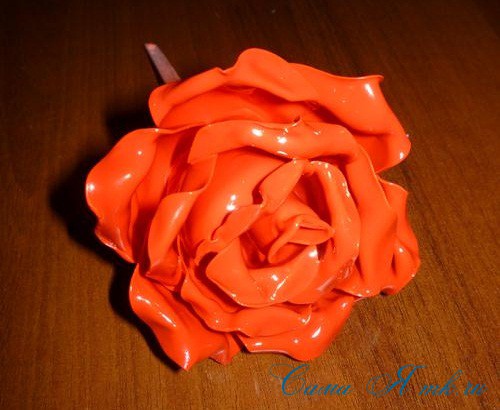
What they don't do disposable tableware. From the simplest plastic spoons, crafts are really interesting. Flowers look very nice ready product almost indistinguishable from porcelain.
On the Internet, of course, there are many master classes on roses from plastic spoons, I tried to explain everything intelligibly, once again adding my zest. 🙂
For this master class, I made a red rose with leaves from disposable spoons. The process of making a rose is not complicated, but it requires a lot of attention, patience and accuracy.
For work you will need:
- 24-26 plastic spoons
- candle,
- matches or lighter
- thin wire,
- electrical tape, teip tape or green corrugated paper,
- red paint can,
- green acrylic paint
- brush,
- scissors,
- round nose pliers (optional)
- hot glue gun,
- knife, thick needle or thin scissors.
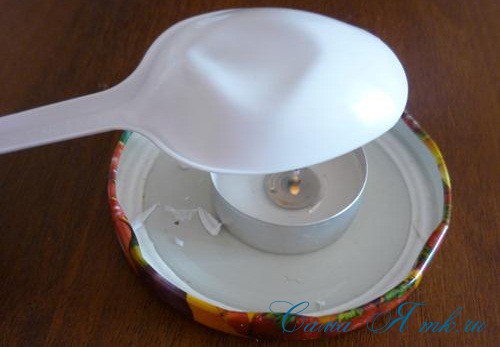
Light a candle and start...
Step 1: Rose petals from disposable spoons.
Petals for a bud:
Keep the spoon some distance from the flame and prevent the plastic from blackening.
We first warm up one side edge of the spoon, twist it a little.


And then do the same with the other edge.

Now we need to heat the tip and slightly bend it in the opposite direction.


We do the second petal for the bud in the same way, only we bend the edges of the spoon a little less. 
Petals of the second row ...
We bend the edges even less. We heat the edge of the spoon and symmetrically from the center, bend the spoon from one and the second edge into reverse side, twisting a little.


This is how it should turn out...


We need 2-4 of these petals.
On all petals, except for the first, we cut off the handles. We heat the junction, cut it off with scissors.


Large petals:
We warm the spoon a little inside to slightly straighten it.

Turn over and heat the tip of the spoon over the candle. When the tip began to deform, quickly twist the tip of the spoon with scissors or round-nose pliers on both sides symmetrically from the center in the opposite direction, giving the shape of a rose petal.

Here we should get such a petal ...
Front side…

And reverse...

We need 10-11 of these petals.
We form a rose flower.

We take a spoon with a handle, apply glue to the petal and firmly press the other petal to it. It turned out a bud on a leg.

Around the bud, carefully glue the petals of the second row. And then all the other petals. Apply hot glue to each petal. We go in a circle, adding one petal after another.
It turns out here is such a white rose.


Here is such a "butt" of a flower ....

Not very pretty, but we'll fix it. 🙂
Step 2: Rose petals and sepals from plastic spoons.
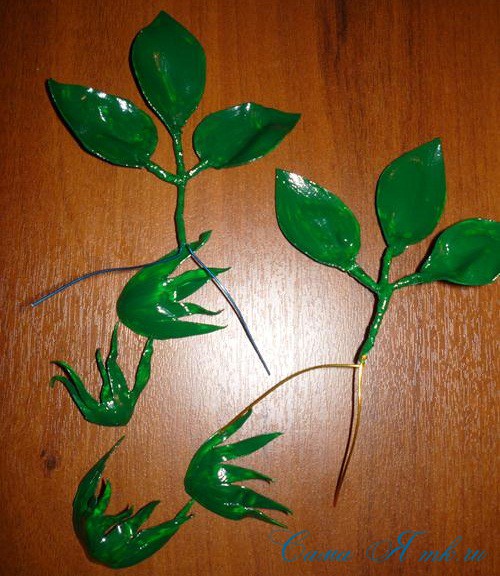
We warm the spoon from the inside so that it begins to straighten up a little and cut out a leaf with ordinary scissors.


Now we heat the tip a little and make a hole for the wire with something sharp.
Like this…

For the rose, I made 6 of these leaves. We connect them in 3 pieces on a thin wire.

To make sepals for our rose, we also warm the spoon from the inside and cut it out with scissors.

We will hide the wire with electrical tape, teip tape or corrugated paper.

Step 3: Coloring.
It is more convenient to paint a flower with spray paint. If you only have acrylic paint, then first paint the petals, and then assemble the rosette together.

We paint the leaves and sepals with green acrylic paint.
Step 4: Assemble the flower.
When the paint is completely dry, fix the sepals with hot glue. We fix the leaves with the remaining tails of the wire.
Yes ... To make the stem long, we will attach the cut handles with hot glue.


For strength and to make the stem even and neat, wrap it with green electrical tape.
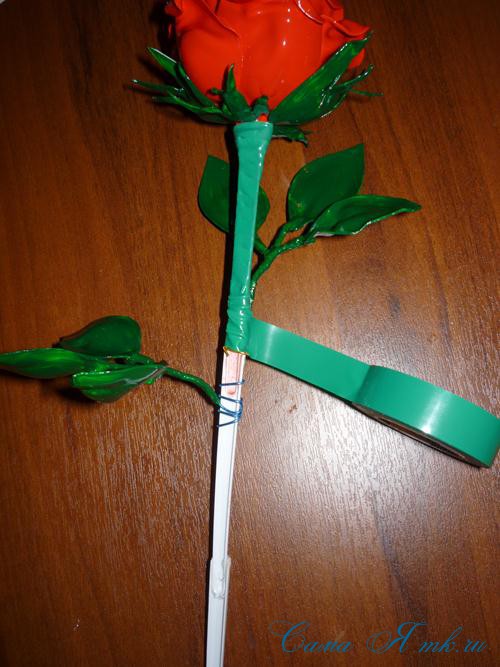

And color it in the tone of the leaves.
Here we have such a rose!

And from every angle...


Flowers from plastic spoons, of course, are a little inferior in their beauty to living ones, but they have an undeniable advantage: they will delight you for many, many years.
It is not necessary to make a flower on a stem. Fantasize! Roses can be used as a hair ornament by attaching them to a headband, hair clip, or the like. Topiaries with roses from plastic spoons look interesting, and the color of the flowers can be any, it all depends on your desire and imagination!!!
I was glad to help!