DIY topiary from different materials. DIY topiary for beginners. Step-by-step photo of the process. Workshop on making decorative poplar
In interior design, not the last place is occupied by a do-it-yourself topiary - a tree made of decorative materials. Many housewives who are fond of room decor try to decorate their homes with products of their own production. Decorative trees in the setting are becoming more and more popular - they are easy to make, besides, you can use absolutely any materials that seem suitable to you.
In interior design, not the last place is occupied by a do-it-yourself topiary - a tree made of decorative materials
Topiary is called ancient art landscape design. This concept includes curly shearing of plants in gardens, giving them beautiful forms- you can make designs in the form of geometric shapes, animals, and so on. The first topiary appeared several centuries ago. Today, such compositions, also known as "European wood", are very popular in decor. They are found both in the form of originally trimmed bushes, and in the form of decorative compositions that are easy to arrange and look great. DIY topiary tree looks great in the interior.
Other names for indoor topiary are the tree of love or the tree of happiness. It is believed that the presence of such a thing in the house lures good luck, great mood and money. Often, coins are placed in a pot-holder, and bills folded in the form of flowers are placed on the branches.
 Other names for indoor topiary - tree of love or tree of happiness
 You can make a topiary tree with your own hands as a gift for any of the holidays, simply by decorating it according to the occasion. For Valentine's Day, a love tree decorated with hearts is suitable. To make a wedding topiary, the tree is decorated with banknotes depicting doves. For the birth of a baby, you can build a product with balls and delicate flowers, for housewarming - with bows, flowers. The dimensions of the finished product can be different - both miniature, a few centimeters, and large, suitable for installation as a floor composition.

Classic tree of happiness (video)
How to make topiary yourself
Do-it-yourself topiary is easy to do. If nothing suitable comes to mind, you can view the photo on the topic and choose the option that suits you. Each product is made up of a certain set of parts, therefore, before starting work, you need to decide on them and stock up on the necessary gizmos.
First, think over the foundation. Most often, do-it-yourself topiary is made from a ball, but sometimes cones, hearts are taken as a basis, and a number is often used for a birthday present. They can be made from foam, papier-mâché, and an old ball is also suitable for a ball. Shaped workpieces are made of wire, cardboard, cut from foam.
 You can make a topiary tree with your own hands as a gift for any of the holidays, simply by decorating it according to the occasion
 Any do-it-yourself topiary should have a trunk - it can be made of wire, a thin twig entwined with twine or colored paper. You can also use wood-stained or varnished tree branches. Some craftsmen and craftswomen make trunks from ordinary pencils.
But the greatest imagination will have to be shown when making the crown. It is made from rods and wire, wrapped around the base, decorated with anything you like - they even use coffee grains, pebbles, seashells... Colored napkins, twine and multi-colored ribbons are used, artificial leaves and flowers, beads and elements from polymer clay, dried leaves and pasta.
Do-it-yourself topiary will not do without a stand. For her, you can take a small mug, a decorative pot, a stone, and even shells. For decoration, lace and pieces of fabric, beads, sequins are suitable. The diameter of the base should be no more than the diameter of the crown of the tree, otherwise the finished product will not look very attractive.
 But the greatest imagination will have to be shown when making a crown.
 The following advice can be given regarding the choice of the base. To make a topiary with your own hands, any fillers or materials are suitable on which you can strengthen the rod that supports the crown. For this purpose, floristic sponges, polystyrene, polyurethane foam are convenient.
Happiness tree (video)
DIY options
To make a topiary with your own hands, it is recommended to look at a variety of photos - they will help determine the composition you need. Pattern making will be much easier. You can also visit the topiary master class, where they will teach you how to make simple and beautiful jewelry interior.
- You can make a tree of happiness like this. Prepare a decorative pot, boxwood twigs, moss and some artificial flowers, a styrofoam ball, some gravel, and some wire. Boxwood twigs are stuck into a ball so that there are no voids between them. Fold the two twigs together and wire them together. Make a small hole in the foam and place the ball on the sticks. Put the topiary obtained at this stage with your own hands in a pot. Sprinkle gravel on the trunk and place some moss on top. You can take a photo of the finished work.
- A beautiful crown will turn out if you form it from bright colored ribbons, folding them in the form of tubes. You are not ashamed to present such a gift for your birthday.
Materials will be required such: a foam ball, a pencil or stick, glue, tapes, invisibility, a decorative pot.
Take the tape, cut it into small strips and make rings out of them. Pin the resulting rings to the base. There should be no empty space on it - holes look ugly on finished product... After that, put the ball on the pencil (you can sharpen it on one side). Place the finished topiary with your own hands in a pot, add gravel to fix it. To add tenderness and lightness to the structure, use decorative frost for decoration or cut the remnants of ribbons into small pieces and sprinkle them on the “tree of love”. - A decorative tree made of fresh flowers will turn out to be very romantic, but, unfortunately, it will not last long. Although you can take any indoor plant, for example, a tangerine tree and decorate it, giving the appearance of an artificial topiary. Prepare a floral sponge for work, a couple of chopsticks for Chinese food, a piece of plastic, a decorative pot. You will need some more fresh flowers on the stems, moss, wire and decorative tape. Place the plastic inside the pot. Then fill it with putty so that 7 cm is left to the edge - this space will be filled with decorative moss. Stick a stick for the trunk into the putty in the middle and leave everything to solidify. Cut the edges of the polyethylene with scissors. Cut the floral sponge so that it forms a circle that fills the rest of the pot. Wet it and place the moss on top. In the middle, stick the stems of the cooked flowers. They need to be tied decorative ribbon to a wood rod by making beautiful bow... You can stick a few more flowers into the moss at the foot of the flowers by cutting off the stems.
- A do-it-yourself topiary made of one hundred paper roses has a chic look. Even his photo makes an amazing impression, and it is not difficult to make it. The manufacturing scheme is extremely simple. This will require a base of expanded polystyrene, a decorative flowerpot and paper roses. It is easy to make them - long strips of paper are curled with a pencil. To enhance the effect, place emerald green moss in a pot with a rose tree. To make topiary with your own hands, you can use improvised materials for the crown - balls, balls and even paper crumpled into a lump.
- The candy tree is a great gift for New Year... Even adults will not be able to remain indifferent, having received such beauty as a gift. Prepare the base, stem, ribbon and about 300 grams of brightly colored hard candy. It is better to choose those that have a delicious smell. Place the rod in a pot. Then cover the ball with red tape. After that, attach candies to it - in pieces of paper or without. But if you stick them after removing the wrapper, you will no longer be able to eat the candy. Place the different colored lollipops in the pot.
Having mastered several types of products in master classes or from a photo, you can independently make wonderful gifts to friends and relatives for any holidays. Few would refuse to receive a lovely love tree or a healthy tangerine tree as a gift. For their manufacture, expensive materials are not even needed, and they bring a lot of joy. All that is required from the manufacturer is imagination and a little labor.
Photos, which can be considered a small advertisement, show how beautiful and perfect the topiary is. A small souvenir tree will complement one interior, the second will transform, the third will make it brighter. And you can do these transformations with your own hands. Numerous photo and video master classes show in detail how to create a new image from the most ordinary things. How to make a topiary yourself, what is needed for this, and what subtleties should be taken into account?
This master class is, let's say, a universal recipe. It is not so important what kind of topiary you are going to do, this master class will describe in detail each stage and its variations.

The first thing that usually begins with work is the search for materials. Craftswomen, who do more than one craft with their own hands, are accustomed to stocks. To make stocks means to purchase not one blank, but five at once. So, do not pass by beautiful chestnuts, rowan twigs, dried flowers. Carry everything home to your handicraft box.
Likewise, with a possible decor - scraps of fabric, beads, buttons, rhinestones, ribbons, threads. All this can become the basis for decorations that you make with your own hands.

Tips for beginners:
- Drop the photos of the topiary you like in a separate folder, save the desired master class, step-by-step instructions.
- Distribute everything in boxes: threads in one, natural materials in another, fabric in a third, etc.
- Go to craft stores. There you can find various blanks that will make your work easier. And they are inexpensive.
If you have already got at least one successful topiary, think about the fact that the process is worth filming. It can be a photo or video, but such material can be useful to you again, and you can post it on special resources and, by the way, sometimes they pay for it.
Fragrant topiary made from dried herbs (MK video)
We make topiary: step by step instructions
So, then you need to do the elements of the topiary directly. They usually start with the basics. The base is what the crown will hold on. And the crown in the case of a souvenir tree is its main part. Therefore, the base ball must be made strong, reliable, and integral. You can buy a ready-made foam part, this blank will fit any tree.

But you can make a ball with your own hands:
- Method one... Newspapers, threads, glue. You need to make a wad of newspaper that is firm and firm. It should be soaked in glue and tied well with threads until you get a ball.
- Second way... Ball, polyurethane foam, knife. Inflate the balloon, but not strongly, slightly less than the size that the base should have. Then you put the ball on the foam balloon, and so you fill it. Foam swells, so refill a little. This can be done at night in order to detect a noticeably enlarged ball in the morning. Next, just remember how you cut the peel from an orange with your own hands. So you need to do this here, too, until you get the base ball you need.
- The third way... Papier mache. You probably remember this step-by-step instruction from childhood. Find an object, the shape of which you are going to repeat, and glue it in several layers with paper or napkins. Then you cut, take out the object, fasten the figure.
The latter method is more often used if the basis for the crown is not a ball, but a heart.
Ball base for do-it-yourself topiary (video)
How to make a topiary with your own hands
Krona has to stand on something. By the tree, this mission is performed by the trunk, and the souvenir tree follows the same path. Various master classes offer different options. Some say that only branches can be a beautiful, natural trunk. Others use both wire and aluminum cable for this purpose.

If you examine in detail any photo master class, you will see that the most unexpected things are used as a barrel. For example, sushi sticks.
To create a trunk, you may need:
- Cardboard rods from paper towel rolls;
- Pencils;
- Drumsticks;
- Wine corks;
- Curly door handles.

Yes, it is the handles that can become the trunk - if you remove all unnecessary from them, leaving only the graceful vertical part, it may well become the trunk for some elegant money tree.
Basically, what serves as the basis for the trunk has to be decorated - painted, wrapped, glued, etc.
Trunk for topiary: decorate correctly (video master class)
How to make a pot with your own hands
The tree is usually in a pot. The easiest way is to buy a new one, which you don't even have to decorate. But it happens that you are looking at a photo, and you want to do everything exactly for this photo.

For example, from a simple penny plastic cup you can make an exquisite pot with your own hands.
The master class is very simple:
- Cover the glass with spray paint the color you need;
- The flowerpot can be textured- sparkles, salt, cereals, all this can change the glass, making it embossed;
- Textile decor is appropriate- it can be a satin ribbon, matching in color or with a pot, or with a crown, as well as braid, lace, twine, twine;
You can attach a small photo to the pot with a decorative clip, for example, where you are with your loved one, or with the one to whom this tree is intended as a gift.
Pot for topiary (video)
Step-by-step instruction: creating shapes
A souvenir tree can have unusual shape... For creating different figures there is more than one trick used. You can do unusual things with your own hands, and few people will guess how you did it at all.
To construct figures you need:
- Use of flexible materials;
- Sketch of the future composition;
- Elegant decor that hides the entire mechanism of the product.

We usually talk about the construction of figures when it comes to making garden sculptures. Such unusual landscaping is captured in numerous photos. For the figures, certain manipulations with knitting or carpentry wire are necessary. You will get topiary sculptures, whole compositions of green figures.
Making them is not so easy, but modern devices have made the process easier. So today, the manufacture of figures is simplified by the acquisition of special curly nets or metal frames. They put on the plant, it, of course, is thus limited in growth. When the shoots make their way through the netting, they need to be pruned.
This way you can get several graceful figures on your site. For beginners, there is an advice - take simpler frames for the first time, do not try to build several figures at once, this requires care and some skill.
DIY topiary: design mistakes (video)
Souvenir tree, tree with crown perfect shape- numerous master classes suggest how to create such beauty yourself. If you live in an apartment, do not have your own plot, then begin to bring the dream closer in steps. First, a figured tree at home, on a table, and then it can be scaled in its natural environment.
Happy plans and their implementation!
DIY topiary examples (photo)


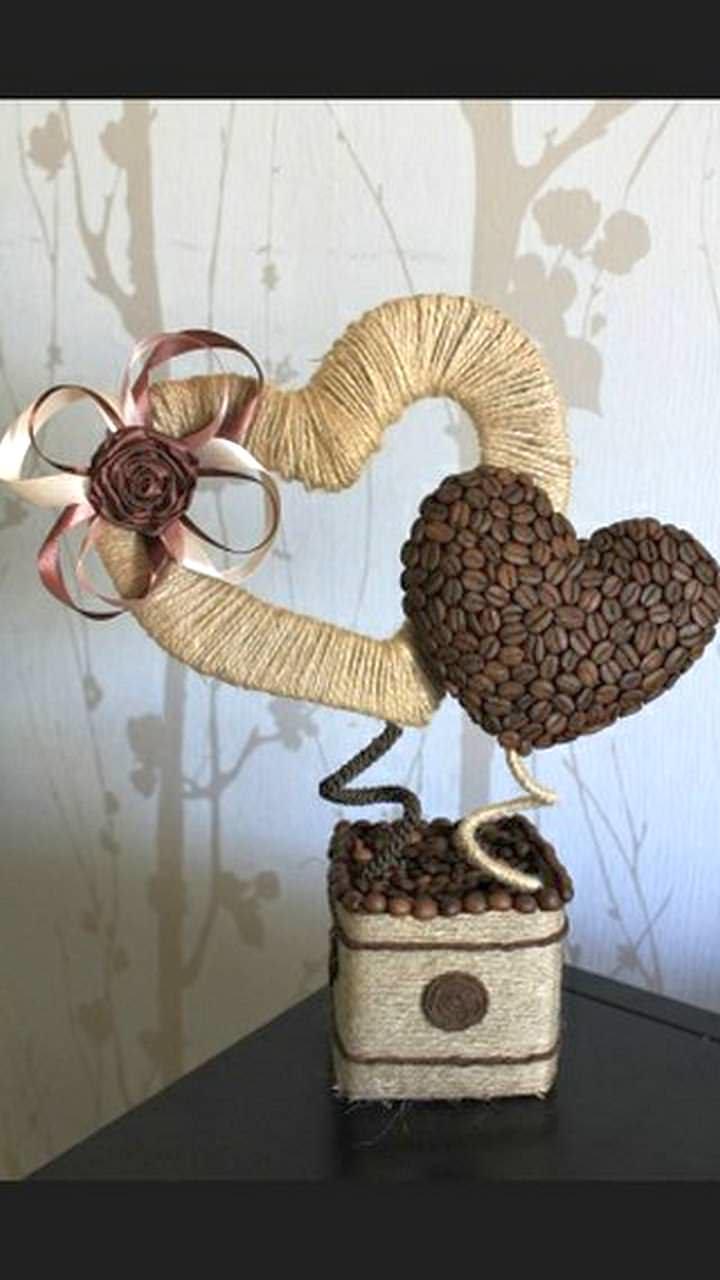

After deciding that there should be flowers on the table, I thought about the question of how to make a topiary with my own hands, because constantly changing flower arrangements in January is expensive.
Topiary came to us from the times of palace luxury. When gardeners pruned the crowns of trees and bushes in the form of balls, figures, birds. In floristry, shaping a bouquet by trimming is also very popular. Well, our hostesses have learned how to create a cozy atmosphere in the apartment with the help of mini trees. They set off the interior if they are made in appropriate colors and look unusual.
Such a tree looks quite unusual, ideal for the kitchen, because it interrupts the smells of food and freshens the air.

We need:
- Any vertical stem base (stick)
- Styrofoam ball
- Pot, planter, cup or flowerpot
- Coffee beans
- Twine
- Ribbons of different widths
- Sackcloth
- Thermal gun
- Construction gypsum
First you need to wrap the twine around the stick. To do this, coat one edge of the stick with a heat gun and glue the end of the twine.

Choose the length of the stick yourself, depending on how high the topiary you want to get.
The end of the string must also be secured with glue.

Let's start decorating the pot. To do this, take our burlap and start wrapping the pot.

We coat the pot with glue, and wrap it with sacking.

The excess at the edges can be cut off.

To avoid white gaps, paint the foam ball black.

Cut a hole in the ball for the barrel. Grease the end of the barrel with glue.

We proceed to pasting the ball with coffee beans. You can do this in different ways.

For example, we put glue on the ball, and then put a handful of coffee beans, pressing it to the surface.

But all the seeds that are not fixed will fly in all directions.
You can do it differently. Glue one grain at a time, which will take longer, but more accurately.
You need to work quickly, because the glue cools quickly.

For the stability of the pot, we will fill it with plaster. To do this, pour water into the gypsum and stir.

After filling the pot with gypsum, you need to insert a tree into it and hold it for a while so that it is fixed.

The plaster will dry in ten hours.
We begin to decorate the finished composition. We make bows from ribbons and glue them to the trunk.

You can use beads, twine bows, dried lemon, cinnamon sticks, and other decorative materials.

You can use skewers instead of a stick for the barrel; they are sold in grocery and hardware stores.
Master class: napkin topiary
Napkins are always at hand. And they have a huge variety of functions, and why not make a topiary decoration out of them? Let's look at a simple method and an effective master class.

We will need:
- Pots
- Round cable channel (stick, skewers)
- Newspaper
- Thermal gun
- Napkins
- Decor
- Alabaster
For the ball, the topiary will use newspapers.

First you need A4 sheets. Crumple the first sheet into a lump.

We wrap the second and subsequent ones around it.

A large ball must be wrapped with threads so that the edges of the newspaper do not protrude.

Now we make a hole in the newspapers with scissors and insert the barrel into it, securing it with hot glue.

A ball of this diameter made of polystyrene will cost you 50 rubles in the store.
We take napkins, fold them in half.

And again in half. And cut along the second fold line.

We fasten it with a stapler in the middle.

We cut each blank in the shape of a circle and fold each layer to the middle, so we form a flower.

We wrap the topiary's trunk with tape, for this we attach one end of the tape to glue and wrap it around the trunk in a spiral.

We glue the flowers onto the ball. To do this, apply hot glue to each flower.

You can decorate with ribbon rings. To do this, we wrap the tape around the finger, you can twice and glue it at the base. You can use a needle to attach the ribbon ring to the topiary.

Put the alabaster in a flower pot, insert the topiary into the middle and wait for it to dry.

Alabaster can be closed with the same flowers from napkins. We wrap the trunk with tape and make a beautiful bow.

In the pot, if there is room left, you can put sweets.
Topiary from satin ribbons step by step
Ribbons allow you to give the topiary a festive look, but they will also work beautiful roses... There are a lot of ways to make flowers from satin ribbons, and this art is called kanzashi. We will consider only one option, but the easiest one.

The Styrofoam ball can be purchased from Chinese online stores, fishing shops, and handicrafts.
- Ribbons
- Glue gun
- Pots
- Pencil, twig for the trunk
- Alabaster

Take a pencil and define the middle in the ball. We make a depression and fix the pencil with glue.

We wrap the topiary trunk with tape. Periodically lubricating the barrel with hot glue.

For ribbon roses we use satin ribbons 5 cm wide and 2 meters long. This length is enough for 4 flowers.
Glue the flowers on hot glue. The gaps between them are filled with ribbons, ribbons of other colors and textures.
We make roses from a satin ribbon
To make roses, we take a ribbon, bend the edge with a corner.

From the end of the tape, fold the tape inward, forming a bud.

Add glue along the bottom so that the rose does not bloom.

After that, we turn the tape under ourselves and a petal is obtained.

So it turns out a rose, often grease the edge with glue. Be careful not to make the flower square.
 Very delicate roses are obtained.
Corrugated paper topiary
Corrugated paper allows you to make flowers of extraordinary beauty. Fold each leaf.
- Foam ball
- Pots
- Glue gun
- Barrel base
- Corrugated paper
- Decor
- Alabaster

As in the previous instructions, you need to wrap the barrel with tape and glue it to the ball.
We make blanks for flowers. Cut out the petals from the corrugated paper and stretch them across to make a nice curve.

We glue the flower to the ball and decorate the structure.

Topiary for beginners from artificial flowers
Topiary can be made from purchased flowers. This is the fastest way to make a tree. The main thing is to choose flowers of the right shades that are combined with each other.

It is very nice to use not the usual trunk, but a crystal candlestick.
- Foam ball
- Pots
- Glue gun
- Candlestick (glass)
- Corrugated paper
- Decor

To do this, simply cut off the buds and insert into the ball.

Izal craftswomen began to use it not so long ago, it is great for decorating topiary, gives an unusual look and style to your tree.

- Sisal
- Artificial flowers
- Barrel (stick)
- Glue gun (thermal gun)
- Newspaper
- Decor

They made a ball out of newspaper, wrapped it with rope. We wind balls of the same size from sisal.

Divide the artificial flowers and cut off the buds, insert them into the ball.

We fix everything with glue. 
You can use any decor to decorate the pot, rhinestones, braid, glue tapes made of rhinestones, various pendants and key chains are perfect.
Topiary ideas
When making topiary, you can combine several decoration options, for example, use purchased artificial flowers and organza.

The coffee topiary can be glued to the candlestick.

Candy topiary can be presented for a holiday to women of all ages!

The main thing is to use expensive and tasty treats.

You can make a tree that is not round and non-standard form... Just using half of the ball.


Organza topiary looks very easy.

Topiary made of polymer clay looks luxurious and very realistic.

This beaded topiary looks very delicate, a great wedding gift.

Video on how to make a topiary with your own hands
Topiary is especially popular today. Fashion trend decorate party halls or home interiors is gaining momentum. Floristry is an actual element of inspiration for such contemporary art. Yes, yes, you heard right. Moreover, it is possible to create a unique composition with your own hands and according to your individual taste. Topiary means "tree of happiness." And happiness made with your own hands doubly brings home comfort and pleases those around you.
The process involves:
- To begin with, you should cut the prepared flowers from the stem so that the tails are no more than one cm long.
- Make a shallow notch in the ball up to 2 cm.
- Start decorating the balloon. With an awl, you should carefully pierce the holes and quickly coat the tails of the flowers with glue to insert into the finished holes. In your head you need to imagine the finished composition and, accordingly, distribute the flowers according to colors... It is not necessary to arrange flowers very tightly to each other. It will be enough to completely cover the sphere without showing through the base.
- The barrel should be glued to the decorated ball and left to dry.
- Prepare gypsum, mix it with water until dense. Pour into a pot. Wait a little and insert the barrel into the middle.
- Hold the tree until the plaster hardens well.
- You can hide the unattractive gypsum with the remnants of small twigs and leaves.
The simplest topiary is made quickly, but financially - more expensive.
The flowers and the ball can be made by yourself, in this case the tree of happiness will be much cheaper.
We make cheap and simple topiary ourselves
Simple topiary is done quickly. For beginners, however, try their hand and learn the technique on simple topiary. The most budgetary way to make a topiary is to make it from scrap materials that are stored at every home.

Several of the most simple ideas are described below.
Topiary from napkins
Quite a simple and cheap type of topiary. You can make flowers from napkins not only white, but also bright colors... This option is pretty cute.
The material on creating a topiary from artificial flowers will also be useful:

A tree of happiness made of cotton pads
At first glance, such a decision may seem irrelevant, but in the end, this composition is not inferior to its other counterparts. Cotton pads are often decorated with purple or pale cream large beads and openwork ribbons. Topiary in this design looks very gentle and romantic.

Such products, in turn, test the performer well for perseverance and diligence.
Simple colored paper flowers can be a simple idea for decorating topiary.
Interesting ideas for topiary: options for beginners
When making a topiary, you do not need to be afraid to experiment. It is possible to apply the most unusual, new and daring ideas. In this case, the tree will be purely individual, unmatched.

Interesting ideas for topiary:
- It is interesting to use a real tree branch in the topiary made of cones. You can decorate it with a small bird.
- Cones or coffee beans can be dyed acrylic paint or steel-colored spray paint will look spectacular. In this case, the tree of happiness will sparkle with completely new colors, both in the literal and figurative sense of the word.
- Small flowers with beads or coffee beans can be used as a jet from topiary "".
- TO new year holidays the tree of happiness can be decorated with a small garland. This topiary can be used as a night light.
- A transparent glass container will serve as an interesting stand for children's topiary. It is interesting to fill these forms with round sweets not large sizes or sweet peanuts. Such a tree will be doubly appetizing.
- A glass or a volumetric transparent vase similar to an aquarium can be used as a stand.
- Topiary looks spectacular in the form of various bizarre shapes, letters or numbers.
- For financial well-being, you can put a coin on the bottom of the stand or attach a banknote in a visible area.
- For grandiose holidays, you can make a large topiary from fruits. The base will be a cone decorated with edible rings of exotic fruits.
- To make a composition luxurious means to decorate it with fresh flowers. Even the most non-romantic person will appreciate such a topiary.
An important feature in the manufacture of topiary is the color scheme. Do not overdo it with bright colors. In this case, the tree of happiness will lose its charm and attractiveness.
Decor elements should be harmoniously combined in the product.
We create a masterpiece: beautiful do-it-yourself topiary

Examples of unusual topiary:
- Flowers from music paper. Such flowers will look very original and unusual. The classic black and white color scheme looks a little strict, but quite interesting.
- From grains. Moreover, these can be completely different grains, from corn to coffee beans. Of course, many will consider such a tree very simple, but the process of making such a topiary will take a lot of time and patience.
- From yarn. Wool threads look very unusual. This product brings coziness and comfort to any home.
- From pasta. Today, pasta producers can pamper us with products of various shapes and colors. Flour products can be left in their original form, or they can be painted with multi-colored paints.
Unusual in topiary can be the base, and the trunk, and the stand. It's important not to be afraid to experiment.
An unusual decor can serve as a thin copper wire in the form of a spiral.
Learning to make creative topiary at home
Creation of creative topiary is typical of creative natures, whose thinking and ideas are limitless.

Some examples of creative topiary:
- From Christmas balls. In this case, it is better to use small balls of plastic or plastic of the same color. In this case, the void can be filled with tinsel.
- Topiary - floating cup... The beverage stream from the inverted cup is the frame.
- From burlap, beads and lace. Such topiary is often used as interior decoration at banquets. Making this tree will take a sufficient amount of time and effort, but the effectiveness will justify all efforts. The tree of happiness in this design is very impressive.
- From umbrellas. Cocktail umbrellas are a fun and easy option for a creative tree.
- Fresh berries. In this case, the base is made in the form of a cone. Decor elements can be strawberries, cherries, cherries. Such a delicious topiary will be relevant at any time of the year and an excellent gift for any occasion.
Trees of happiness in a monochromatic design will look very impressive. Moreover, the emphasis should be on rich bright colors: purple, green, blue, red, turquoise, etc.
Topiary with a photo inside is considered quite creative. The base, in a way, serves as a frame for framing a photo, a person dear and valuable to your life.
We make expensive topiary with our own hands
Expensive topiary immediately implies the use of materials that are quite expensive in financial terms. Such products require special care and caution, because the material is easy to spoil.

Expensive topiary can be products:
- or . In this case, the high cost of the product depends on the individual's well-being. Moreover, the color of the bills can be completely different. This decision will not spoil the overall impression. In fact, such a composition is a real tree of happiness. Often souvenir bills are used as banknotes, which can be purchased at any handicraft store.
- From pearls. Such a topiary will be rich and fashionable decoration for any home. A pearl tree can be presented as a gift for a wedding or other significant event.
The tree stand can be decorated with coins or pictures of Feng Shui signs can be pasted on.
You can make a product from expensive materials yourself, but first, it is better to familiarize yourself with the process, in order to avoid unexpected additional costs.
Eco-style topiary: master class (video)
If you are interested in the process of creating a topiary and you have a great desire to try and not be afraid to bring your ideas to life, then do not rush to buy most of the elements for the creative process in the store. Absolutely all components can be made with your own hands. Moreover, such an activity is no less interesting than decorating one crown. After all, during the process interesting and original ideas appear.
DIY creative topiary (photo examples)


Initially, a beautifully trimmed bush or tree was called topiary. Gradually, the concept began to be applied to decorative, beautifully designed trees that serve to decorate the interior. There is an opinion that the presence of topiary in the house brings joy and good luck, and if it is decorated with coins or banknotes, then also prosperity. Therefore, it is often called the "tree of happiness."
Topiary has gained popularity as a decorative element. Almost every housewife wants to get such a tree for the house. This desire is feasible, and to fulfill it, you do not need to go to the store, since everyone can make a topiary with their own hands.
You can create "trees of happiness" from different materials... Their crowns can be decorated with artificial flowers made of paper, organza or ribbons, coffee beans, pebbles, shells, dried flowers and candies. Topiary can look like a real plant or take on bizarre shapes. Appearance trees will depend only on your tastes and imagination.
Making topiary
The topiary consists of three elements, on the basis of which they are created different types trees - this is the crown, trunk and pot.
Crown
Most often, the crown for the topiary is made round, but it can also be of other shapes, for example, in the form of a heart, a cone and an oval. For its manufacture, you can use different ways, we will introduce you to the most popular:
- Newspaper crown base... You will need a lot of old newspapers. First, take one, unfold and crumple. Then take the second one, wrap the first one with it, crumple it again, then take the third one. Continue doing this until you get a tight ball of the required diameter. Now you need to fix the base. Cover it with a sock, stocking or any other fabric, sew the base, and cut off the excess. You can use another method. Wrap the newspaper tightly with cling film, forming a ball, then wrap the top with threads and cover with PVA.
- Crown base made of polyurethane foam... Using this method, the crown can be given different shapes and sizes, for example, topiary-heart. Squeeze out the required amount of polyurethane foam into a tight bag. Let it dry. Then get rid of the polyethylene. You will end up with a shapeless piece of foam. Taking advantage of stationery knife, start trimming off little by little, giving the base the desired shape. Such a blank is convenient for work, decorative elements will be glued to it, and you can easily stick pins or skewers into it.
- Foam crown base... With such a basis for topiary, as with the previous one, it is convenient to work. You will need a piece of styrofoam of a suitable size to be used to pack the equipment. It is necessary to cut off all unnecessary from it and give it the desired shape.
- Papier-mâché crown base... To create a perfectly round topiary ball, you can use the papier-mâché technique. You need balloon, toilet or other paper and PVA glue. Inflate the balloon to the desired diameter and tie. Pour PVA into any container, then, tearing off pieces of paper (using scissors is not recommended), stick layer by layer onto the ball. To make the base strong, the layer of paper should be about 1 cm. After the glue has dried, you can pierce and pull the balloon through the hole in the base of the crown.
- Other basics... As a basis for the crown, you can use ready-made balls sold in stores, foam or plastic balls and Christmas tree decorations.
Pot
Any container can be used as a pot for topiary. For example, flower pots, cups, small vases, jars and glasses will do. The main thing is that the diameter of the pot is not larger than the diameter of the crown, but its color and decor may be different.
Decorating and assembling topiary
For the topiary to be stable, it is necessary to fill the pot with filler. Alabaster, polyurethane foam, gypsum, cement or liquid silicone are suitable for this. You can use polystyrene, foam rubber, cereals and sand.
To assemble the topiary, fill the pot to the middle with filler, stick the prepared decorated trunk into it and put the crown base on it, securely fixing it with glue. Then you can start decorating the topiary. To attach the elements to the crown, use a special glue gun, if you do not have one, use super glue or PVA. At the final stage, place decorative elements, such as pebbles, beads or shells, in the pot on top of the filler.