Master class: do-it-yourself fabric flowers (photo). How to make fabric flowers Large wire and fabric flowers
Needlewomen who decide to make something unusual should definitely pay attention to the proposed master class. can create even a beginner. Such products will be a wonderful decoration for any outfit or interior.
Roses from the necessary materials and tools
Cotton at hand, probably, is in every home. It can be old pants, skirts, baby overalls and other items of clothing. If you set out to decorate a bag, homemade pillows, or just create an artificial bouquet, you can use old things and try to do it yourself. The master class described below will help you with this.
For work, in addition to the main material, you need to prepare threads, a needle, scissors, wire or barbecue sticks, as well as a floral tape if you plan to make a bouquet.
Blanks for "denim" roses
From denim it is necessary to cut off a strip, the length of which will be 50 cm and a width of 7 cm, fold it in half with the front side inward and put a mark every 6 cm - these are the places for future petals. Next, you need to use scissors, focusing on the marks made, to give the upper edge a waviness. Then the side with the petals and the sides of the strip should be stitched, and then turn it on the face.
Now, along the bottom edge, you need to skip the thread, making long stitches, in order to be able to pull the strip a little. Thanks to this simple operation, do-it-yourself fabric flowers will look much more voluminous. The master class "Rose" for those who wish to decorate any objects with a flower, this actually ends. It remains only to roll the strip into a bud and secure with a needle and thread, preventing unwinding.
There is also an easier way to make a denim rose. You just need to cut a strip of the desired size, fluff the top edge and, pulling the base with a thread, as in the first case, roll it into a bud. Then it can be attached to clothes or any other object.
Making a denim rose for a bouquet
If you plan to make a bouquet, then you need to twist the strip, after placing a wire or a barbecue stick inside it. When the bud is ready, you should fix it with a thread at the base. In addition, to create a bouquet, you will need one more detail, thanks to which do-it-yourself artificial fabric flowers will look more realistic.

The master class also involves the manufacture of sepals. To do this, you need to cut out a rectangle and make one of its long sides serrated, then sew the short sides of the workpiece together from the wrong side. The finished part should be put on the other side of the barbecue stick and, lifting to the base of the rose, wrap the sepal on the face of the flower. At the final stage, you need to wrap the stem with floral tape.
How to make a fabric poppy with your own hands: getting started
Now you already know: to get an original brooch or hair ornament, just make fabric flowers with your own hands. Master class "Poppy" will reveal to you the secret of creating another magnificent flower. To make it, you will need black threads, a needle, PVA glue, scissors, a cotton pad, a piece of cotton wool, a pinch of semolina, fabric, preferably red (for petals) and green (for the core), a candle or a lighter. In addition, if you plan to make a brooch, you will need a pin, and if hair jewelry - a hairpin or hoop.
Now you can start using the information that the master class offers. It will be possible to make fabric flowers with your own hands if all the necessary details are available.

First you need to make the core. To do this, you need to roll a ball from a piece of cotton, and then wrap it with half a cotton pad and tie it with a thread. Next, a circle of the same diameter should be cut out of the green fabric as, wrapping the workpiece with it, again tie it with a thread. After that, using a thread, the resulting ball must be divided into segments and fixed at the base.
Here is the finished core. However, inside the poppy there is not only she, but also stamens. That is what needs to be done in the next step. To create an element, you need to wind the thread with 8-10 turns on three fingers, then remove the skein from your hand and tie it in the middle. The resulting part should be sewn to the core, and then fluff the threads around it, securing it in several places with glue.
Making poppy petals
While the core and stamen dry, you can prepare the petals. After all, without these details it is impossible to create flowers from fabric with your own hands. The master class assumes the presence of 8-9 petals, which must be cut out of red material. The pieces should be rounded at the top and have a straight line at the bottom. For convenience, you can prepare a cardboard template in advance, according to which you can cut out all the elements. When the petals are ready, you need to slightly melt the edges of each of them with a candle or a lighter. During this process, it is recommended to slightly stretch the material, because in this case its lines will be more prominent, and therefore more like a real poppy.
Assembling a poppy from fabric: photo of the finished product
So all the details are ready, it remains only to collect flowers from fabric with your own hands. Master class, photo and detailed instructions creating a finished flower will allow you to make it even more gorgeous than the one you can see below. However, you must first complete the assembly of the poppy. To do this, you need to take the core that has already dried from the glue, cut the stamen threads on it, lightly grease the edges of the latter with glue and dip in semolina.

When the inside of the poppy is completely ready, you will need to alternately sew the petals to its lower part, slightly overlapping them. Ready-made poppy can be used at will, but you can be sure that in any case it will be a real eye-catcher.
Do-it-yourself peony from synthetic fabric: preparation of materials
If you need to decorate the belt of a ball gown, make an elegant brooch or hairpin, then it would be most reasonable to make fabric flowers with your own hands. The Peony master class presented here will help you with this. So, to make such a lush and bright garden flower, like a peony, you will need a fabric with 100% polyester content - satin or chiffon is ideal. In addition, you should prepare a candle, scissors, floss yellow color, double-sided tape and you can begin to study the presented master class.

Do-it-yourself fabric flowers are made as follows. First you need to cut 5 circles of the desired size from the base material. They will determine the volume of the finished product. It is worth noting that only four cut parts should have the same diameter, and the fifth one should be slightly smaller. The contour of the circle can be a little crooked, moreover, thanks to some waviness, do-it-yourself fabric flowers look much more interesting. The master class, photo and instructions for performing the work below, as well as your own imagination, will tell you the right decisions during the creation of a peony.
Formation of peony petals
When all the blanks are at hand, you should light a candle and, rotating the parts over the flame, give them the shape of petals. It is important to remember that synthetic fabrics melt very quickly, so at this stage you need to be extremely careful.

Next, cuts should be made on the melted circles from four perpendicular sides, and then the resulting lines should also be held a little over the candle flame. These will be the flower petals. To give finished product greater splendor, you can cut each of them in two more and melt in the same way.
Master class: peony assembly
A little more, and it will be possible to collect flowers from fabric with your own hands. The master class would be incomplete if information about making the middle of a peony was missed. To create this element, you need to take a floss and wind it around two fingers in 6-8 turns, then, without removing the thread, tie the turns between the fingers. After that, the part must be removed, cut the floss on both sides, bend the material to the center and slightly fluff. You can also use beads or large beads to make the middle of a peony.
Our master class has come to the final stage. more precisely, from the prepared elements, they are created as follows: all circles are attached to each other with glue, double-sided tape or thread with a needle. In this case, the smallest circle should be on top, and in its center should be fixed the middle of floss, beads or beads. So the fabric peony is ready, which can be pinned to clothes with a pin, glued to an elastic band, or also decorated with it. festive table or use for any other purpose.
At times Soviet Union and a comprehensive shortage, a lot of women sewed, knitted, made things with their own hands. Now the situation has changed, you can buy a lot, but, fortunately, needlewomen still remain. Only now they sew and do something not because they cannot buy, but in order to stand out. And it's not just about clothes. For example, craftswomen make fabric flowers with their own hands to decorate a handbag or a gift, or even a wall in an original way.
Today we will try to figure out how difficult it is. In old Burda, there was a master class on making flowers from organza or chiffon.
Simple master class
To get started, let's prepare everything you need:
- desire to make beauty;
- fabric that we like: artificial silk, organza, chiffon or any other, but always with synthetic fibers;
- threads;
- needles;
- pins;
- soap (or chalk) - for marking;
- candle and lighter;
- patience;
- scissors;
- thick paper and pencil;
- decorative elements - beads, sequins.
So, the family is fed, watered, no one distracts us - we can start.
On paper, we draw cinquefoils of different sizes or just individual petals. The form depends only on your own imagination.
We transfer the resulting blanks to the fabric. To do this, attach the templates with pins, circle with chalk and carefully cut out with scissors.
Then we process all the edges with fire, passing smoothly over the flame of a candle. This creates a rounding effect.
When all the details are ready - proceed to the assembly.
We take a thread with a needle, fix it in a small pillow with an eye down, and then we string our workpieces one by one on the sharp end. As if we are collecting a pyramid or a Christmas tree. Starting from large cinquefoils, ending with small petals. The more layers, the more magnificent the flowers will turn out.
Can and should be alternated different colours and additionally decorate with beads or other elements.
With these flowers you can decorate a dress, curtains, yes, in principle, anything!
Fabrics for this master class must be artificial, because natural fabrics will not corny melt and keep their shape.
But this does not mean at all that our choice of fabric for making flowers is somehow limited. Although no. There is still a limitation. The flower must be suitable for its purpose. So, satin rose won't look at leather bag, and a denim flower on a tulle curtain.
Denim flowers
But on the headband for a girl, a denim flower, as in the photo below, will be very appropriate, again, if the outfit is appropriate.
Cut out a few squares from old jeans (6-7). We add a petal from each square, You can even sew it on a living thread, and immediately tighten it with a long fishing line.

We cut out a circle with curly scissors from the same fabric, but about 2 centimeters more than the resulting flower. If there are no curly ones, the usual ones will do, of course.
In addition, we cut out a smaller circle from another fabric, of a similar shade. Decorate with lace or braid.
Hard to imagine wedding ceremony and a celebration without flowers: they are an indispensable component of the bride's bouquet and groom's boutonniere, with their help they decorate cars and a banquet room. But sometimes living plants are not able to endure too hot or cold weather, and temperature changes adversely affect them. appearance. In the article, you will learn what an alternative is, how to make fabric flowers with your own hands so that they look beautiful on your wedding day and remain in memory of a joyful day without losing their original appearance.
Master class on making artificial flowers from organza
Artificial flowers look charming, in the manufacture of which organza was used. This is due to the frequency of use of the material when sewing. wedding dress, which means that the accessory will go well with the bride's outfit. In addition, the fabric is very comfortable and pliable in work, which will facilitate the process of creating a masterpiece, and a variety of color shades makes it possible to choose colors that best suit the decoration of the celebration.

Necessary materials
In order to make organza flowers, you will need:
- Organza. The color of the fabric depends on the preferences of the bride and the theme, style of the wedding. To create an interesting composition, materials of different shades can be used. If it is impossible to find organza, chiffon or satin will do.
- Sewing accessories - needle, thread, wire.
- Beads, beads for decoration.
- Candle, matches.
- Paper needed for drawing patterns and sketches.

Stages of creation
A detailed master class will help you learn how to make fabric flowers with your own hands:
- We are preparing patterns for future buds. To do this, draw several circles of different diameters on paper. To make the circles as even as possible, you should use glasses of different sizes or other objects. round shape. After drawing, cut out the elements and transfer to the fabric. Using ready-made templates, cut out several circles of each diameter from organza - we got petal blanks.

- Light a candle. Bringing each petal, melt the edges a little. In order to determine how far from the fire to keep the fabric, practice on unnecessary segments. Small details should be singeed, holding them with tweezers so as not to burn your hands.

- Let's start assembling. It is better to start from the bottom petals big size, adding gradually the rest. The middle should be decorated with beads or beads, sewn on or strung on a wire. The organza peony is ready.

- To create an organza rose, it is necessary during the first stage to make five shallow cuts on the finished fabric mug. When processing parts with fire, it is important to ensure that all the petals are twisted in one direction, then the bud will look neat and beautiful.

Simple decorative ribbon flowers
On the eve of the wedding, many brides think about how to sew, make fabric flowers so that they look beautiful, complement existing accessories and jewelry, harmoniously combined with them. Often the problem is the lack necessary materials, skills and experience in creative work. But in order to create amazing exclusive flowers from ribbons, you do not need special equipment or great skill. The main thing is a little patience and imagination, and detailed master class will help to realize all this, to create a real masterpiece with your own hands.

Necessary materials
In order to make buds from ribbons, you will need:
- Satin ribbons in two colors (main and for leaves). Particular attention should be paid to the width of the tapes - the wider and longer it is, the larger and more voluminous the product will be.
- Threads, needle.
- Optionally, beads or rhinestones can be used for decoration.

Stages of creation
Consider two options for how to do beautiful flowers from fabric, both are simple, but the result will surely please, and ready-made accessories will serve as an excellent decoration. Master class number 1:
- cut off satin ribbon the required width is 50 cm long. We wrap one edge to make a triangle.

- We fold a small corner and fasten it with a needle and thread.

- We collect the ribbon on a thread, folding it to make a beautiful "accordion". How to do it right, look at the photo.

- Having collected the entire tape, it must be wrapped around the base, forming a beautiful rose. Secure everything with a thread so that the composition does not fall apart.

- To create a leaflet, cut a ribbon 10 centimeters long, fold both ends into the middle, forming a triangle. Sew and tighten the triangle at the base. The leaf is ready. To create a beautiful composition, at least two leaves are required for one flower.

- We connect the flower with the leaves - the masterpiece is ready.

Master class number 2:
- We cut off a satin ribbon 35 centimeters long. We bend the edge away from ourselves and begin to twist the flower. We fix the base with a thread, not reaching the fold line.

- We bend the tape towards ourselves, forming a petal. We continue to twist the rose, wrapping the ribbon towards us.
- We sew the end of the tape from the inside out, fastening all the layers with a thread so that they do not fall apart.

- By analogy, we make the required number of flowers, from which we will make an accessory or decoration. Such textile accessories are perfect for creating a wedding topiary.

Large fabric flowers using kanzashi technique
Fabric flowers made using the kanzashi technique are original and beautiful. Such accessories can be small and can be used to decorate a wedding dress, a bride's hair band or guests' boutonnieres. If desired, in this way you can make a large flower that will decorate the wedding cortege, banquet hall. The advantage of this technique is the ability to make a flower of absolutely any color, size, without spending a lot of effort and money.

Necessary materials
To make a flower using the kanzashi technique, you will need:
- Satin ribbon. A large flower requires a wide ribbon. In order to get a multi-colored masterpiece, it is worth buying material of different shades, the golden elements in the product look good.
- Glue gun, Moment-Crystal glue.
- Thread, needle, scissors.
- For decoration - beads, beads, rhinestones, small decorative ornaments in the form of insects (butterflies, ladybugs).
- Cardboard or ball plastic bag.
Stages of creation
Two methods can be used to create large kanzashi-style flowers, we will consider both so that everyone can choose the most suitable and simple option for themselves. Master class number 1:
- We cut the satin ribbon 7 cm long. Fold it in half and cut it at an angle with a soldering iron.

- On the other hand, we wrap the tape in the opposite direction, singe the edge, due to which the two ends of the tape are connected. We make the required number of blank petals, which depends on the desired size of the flower.

- We take cardboard and draw a circle along which we will glue the petals. The larger the diameter, the larger the accessory will turn out as a result. Glue all the petals around.

The second option for creating kanzashi involves creating a large, round, convex flower:
- The ball is covered with a plastic bag. The size of the finished product depends on the diameter of the ball.
- We make petals that will serve as the basis of the product.
- We connect seven finished petals with a thread and a needle into a circle, fix it. It turns out a small flower, which we attach to our ball in the center.
- Next, glue the petals, placing them between the elements of the previous row.
- We glue one more element to the petals of the first row, and two more on each side to the details of the third.
- By analogy, we glue the remaining petals until we get a flower of the desired size.
- We remove the ball and the plastic bag, our masterpiece is ready.

For decorating clothes, hair and interior.
-Do you like flowers?
-Yes, of course: any woman will answer this question like this.
-What are the special ones?
- Well, of course roses.
- But why only roses?
- Rose is the queen of flowers.
“And the lovely little daisies?” And the graceful lilies? And the favorite flowers in Japan are chrysanthemums?
You can list and list endlessly.
- How would they, our loved ones, like to see, today and always, near. Admire them, remember about the summer, about meetings, about loved ones.
-Is it possible to?
It turns out yes. Make them yourself.
- It's not difficult at all. Although no. Not so simple.
The most difficult thing is (they can only be ordered) and (preferably natural). But the technique of making flowers is really not complicated.
Any flower consists of individual elements that can be drawn on thick paper and then transferred to fabric. The fabric is pre-starched. Next, the tools are taken to work (they are called funny word- bulki). The bulbs are heated and used as small irons, with which you can give our patterns any shape. When all the elements are ready, their assembly begins. We start with stems and stamens. The technique of making stamens is very interesting. They are so different, some we even make from semolina, pre-tinted. And for the stems we use wires of different diameters, which we wrap either with green thin paper or also with a thin cloth. PVA glue helps us in everything. Of course, the first blooms will leave you wishing for the best. But you will save them in order to see how your skill grows in the future. Decorate your home with your favorite outfits. May they always give you good mood and smile.


How to make fabric flowers - the history of artificial flowers.
Now fabric flowers are back in fashion. And when they also showed interest, as today? Flowers are always with us. But of particular interest, when fabric flowers adorned almost every dress, appeared in Russia somewhere after the war, and then an even stronger surge - in the first half of the 70s of the last century. And before?...

The first artificial flowers were known as early as 3000 BC in Egypt. Women even then decorated themselves with artificial flowers. And further from history it is known that the Greek women adopted the art of making flowers and decorating them with themselves and their homes. In 350 BC, artificial flowers were brought to Greece from Egypt. And then, much later, in the Middle Ages, both in Spain and Italy, they also started making flowers. Then they were made in monasteries to decorate temples and religious holidays. And at the same time they became interested in fabric flowers in France. In the 13th century in France, a custom arose for women to wear wreaths of roses. These wreaths are called "chapel". Isn't it similar to the word "hat". Most likely, it was, because the French word "chapeau" (chapeau) is our hat. It can be assumed that from this they began to seriously engage in fabric flowers. Moreover, they became so interested that they even organized manual production in Paris and Lyon. The rose was especially and most loved in France. She was so highly revered that not everyone was allowed to plant these beautiful flowers. The Greek poetess Sappho called the rose the queen of flowers...
And how not to be interested in flowers, when you can hardly find an indifferent person to their beauty. As for women, a woman and flowers are one and the same, especially for poets and lovers who gave and give "... millions - millions of scarlet roses ...". And it is not possible to preserve fresh flowers for a long time, not to mention decorating yourself with them. They tried to preserve the beauty of fresh flowers ...
... And only the aroma of blooming roses -
Flying prisoner, locked in glass -
Reminds me of cold and frost
That summer was on earth.
The flowers have lost their former brilliance,
But they kept the soul of beauty.
W. Shakespeare

Flowers were made not only from fabric, but also from other materials. In the Czech Republic they made "stone" roses. To do this, fresh flowers were lowered into springs rich in mineral salts and kept for some time. And when the flowers were covered with a coating of mineral salts, they were taken out. For a long time could admire them. But to decorate women, their clothes, hats, hairstyles, light, delicate, elegant flowers, lovely boutonnieres were needed.
Embroidery, knitting flowers, beaded flowers, flowers made of metal, leather, paper, porcelain, glass, wax, fabric flowers, flowers, flowers… They have always decorated and adorn our life.
Fabric flowers are firmly in vogue and as decorations for women's clothing, and as an interior. Every woman wanted to decorate with flowers not only herself, but also her own, even a modest, home.
In the 19th century, there was a real cult of hat decorations in Paris, and of course, decorations made from artificial flowers were the most common. Flowers and ribbons adorned the curls of lovely ladies, diadems were made from flowers.
Already at the end of the nineteenth century, almost every hat and sewing workshop made flowers from fabric. Then this art passed to us in Russia.
It seems that artificial flower decorations are firmly in vogue. Yes, in all countries women want to adorn themselves, and flowers are the most accessible and beautiful decoration. But with us, these decorations disappeared for some time after the October Revolution, after all, "a relic of the past."

How and when did this art come back? It is to our officers' wives, our great-grandmothers, grandmothers, who sewed, embroidered, knitted, adopting the art and traditions of our populous country, living in military garrisons, sometimes in the most difficult conditions, we owe the fact that many artistic crafts returned to Russia.
And now, we can learn this noble and worthy art - to make flowers from fabric. You will say why, you can buy or order. Once I even had to hear such a phrase: “What ?! Do it yourself?! Never!". In vain and it is a pity that some people think so. Of course, to whom, what to do and how - depends on the time, circumstances and employment. One thing can be said that any creativity, skill has a beneficial effect on a person, and then, this is a good activity with your children, especially girls. How much they can learn together with you about flowers, about plants in general, you can teach them to cherish all the nature around us. These joint activities with children expand their imagination and horizons, promote mutual understanding and love for each other. Therefore, kids are not a hindrance to such a matter. And I would also like to add that any creative activity to some extent distracts from the negative state of mind, calms. Doctors advise many sick people to embroider, knit, weave lace, make something to the best of their ability. When there are long winter evenings, create beautiful flowers for yourself. Maybe it will become the main occupation for many, many years, maybe it will be your hobby. In any case, when creating beauty, you will often look at flowers in nature, because you want to make your flowers the same as living ones. Of course, much will not work right away, but the main thing is desire and patience. If your first flowers turned out to be unsightly, do not worry. You can hide any defects with the help of colored silk threads or braid, beads or beads.
Do you have a free evening and some scraps of satin, chiffon, linen, jeans or organza? We invite you to learn how to make flowers from fabric with your own hands! Following our master classes, you will master the art of flower making, which will give you the opportunity to:
- Beautifully wrapping gifts;
- Update interior items, say, lampshades, curtains or pillow covers;
- Transform clothes, bags, shoes;
- Make accessories for interior decoration, such as artificial flowers, wreaths, ;
- Making hair ornaments (hairpins, headbands, etc.);
- Making jewelry: brooches, rings, earrings, necklaces;
- Decorate the table setting and decorate any holidays, such as birthdays and even weddings;
- Make presentations for teachers and educators of the child;
- Make exclusive gifts for loved ones;
- Design diaries, covers, albums and notebooks.
In addition to step-by-step instructions for beginners, here you will find a selection of photos for inspiration, as well as helpful videos.
Master class 1. Simple fabric roses in country style
If you like, or rustic, then this master class is for you. Below are examples of work that you can do by mastering the technique of twisting fabric roses.


You will need:
- Textile;
- Scissors;
- Hot glue gun.
How to make a fabric rose:
Step 1. Cut the fabric into ribbons. To create one rose, you will need one strip 50-70 cm long and about 3-5 cm wide. However, you can choose other sizes if you want to make the rose larger or smaller than in this project.

Step 2. Fold your strip in half and put a 1.5 cm line of glue on its tip (see right photo above).
Step 3. Start rolling the strip into a roll in a few turns.

Step 4. When the roll becomes dense and strong enough, proceed to the formation of the first "petals": fold the ribbon obliquely to the outside as shown in the upper photo on the right and wrap the center of the rose.
Step 5. Continue to form the petals in the same order: fold the ribbon on the bias to the outside - wrap the blank - fold the ribbon on the bias to the outside - wrap the blank - etc. There should be approximately 3-5 bends of the tape per row of petals. From time to time, layers of fabric need to be fixed with hot glue. As a result, you should get a rose like in these photos.

Experiment with the number of folds of the flower and the density of the fabric to achieve a more casual or, conversely, neater look for your flower.
Step 6. Once the rose has reached the desired diameter, lower the remaining ribbon tail down and glue it to the base.

In this project, the back side of the craft was covered with the remaining tail of the fabric.
Step 8. Make the number of colors you need in different sizes- small, medium and large.
This video presents a master class on how to make roses from denim with your own hands.
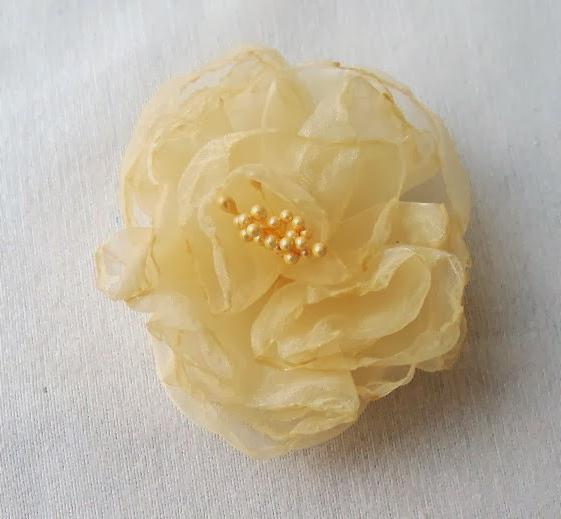
Master class 2. Artificial flowers made of satin fabric or organza
Looking at these flowers made of satin fabric, it seems that they were created by a real master of flower making, but in fact, even a beginner can make the same realistic peonies / roses.


You will need:
- Candle;
- Satin, silk, chiffon or organza in 100% polyester. For the manufacture of peonies, white and pink matter (all shades) is suitable;
- Scissors;
- Yellow floss threads (for stamens);
- Needle.

Instruction:
Step 1. Cut out 5 circles from the fabric: 4 circles with a diameter of 8-10 cm and 1 circle with a diameter of about 5-8 cm. You can cut roughly and by eye, any inaccuracies and irregularities do not matter.

Step 2. Light a candle and start processing the first round blank: carefully bring its edge close to the flame and start rotating around its axis so that all the edges of the circle are melted and twisted. Be careful, keep a glass of water ready, and most importantly - do not bring the workpiece too close to the fire. Keep in mind that if you overdo it, the edges will turn black, which is not always desirable. However, sometimes it is the blackened edges that give homemade flowers realism or originality. Repeat this process with all remaining circles.

Step 3. Now, using scissors, make 4 cuts on each blank as shown in the diagram and photo below. The main thing here is to leave the center of the circle intact.


Step 4. Back to working with the candle again. This time, we melt the sections we just made by pushing the sections apart with both hands. Repeat the procedure with all five petals.

Step 5. Set 2 large and 1 smallest blanks aside. We will return to them, but for now let's take care of the 2 remaining blanks, that is, the middle layers of the peony petals. They need to be cut again according to the following scheme.

As a result, the petals will be twice as many.

Step 6 Scorch new cuts with a candle and set the blanks aside.
Step 7. It's time to make the peony stamens in the form of a small pompom from yellow floss threads. For this:
- Wrap a whole thread of floss tightly around your index and middle fingers folded together. You should have about 8 turns.
- Now tightly tie the middle of the resulting skein with the same yellow thread (between two fingers).
- Cut two loops, straighten the threads and trim the pom-pom if necessary.

Step 8. We proceed to the "assembly" of the flower. Stack two large blanks on top of each other, which have only 4 petals, then put two blanks with 8 petals on top of them and, finally, complete the bud with the smallest blank with 4 petals.

Step 9. Hooray, the flower is almost ready! It remains only to sew a yellow pompom to its center, at the same time sewing all 5 layers of petals together.

If desired, glue/sew to reverse side bud with the necessary accessories, for example, a pin, to make a brooch out of a flower.

By changing the shape, color, size of the petals, their number and the principle of gluing, you can make not only peonies and roses, but also poppies (pictured), ranunculus, lilies and tulips.

And here is an example of flowers made from organza.

Master class 3. A flower from frills in 5 minutes
You do not have hot glue, but do you have a needle and thread? Or did you suddenly need to make fabric flowers as quickly as possible? Then we hasten to introduce you to the technique of making flowers from frills.


You will need:
- Textile;
- Scissors;
- Needle and thread to match the fabric;
- Iron (optional).
Step 1. Cut the fabric into strips about 30 cm long and about 7-8 cm wide. You can choose other sizes to make the flowers smaller or larger.
Step 2. Fold the strip in half lengthwise and iron the fold.

Step 3. Baste the workpiece with wide stitches at the bottom as shown in the photo below.

Step 4 Gather the workpiece into an accordion by slowly pulling the thread. Do not pull the thread too hard to avoid breaking it.

Step 5. Close the circle by connecting the two ends of the tape and making a few stitches (tie a knot on the back).

Step 6. Glue/sew beads, rhinestones or buttons into the center of the flower. Ready!

This method can be changed slightly if you want to make a more layered flower with raw cuts, such as linen or jeans. Cut a wide and long strip of fabric, baste it in the middle from beginning to end, fold it into an accordion, roll one edge of the strip into a roll, and then begin to fold the tape around it. Periodically, layers of fabric need to be fixed with glue or stitches. Below in the photo slider is a master class in pictures on making a flower from flax (scroll the photo to the right).


If you have a large length of fabric, you can make a flower with a large diameter, for example, to decorate a pillow cover. To pick up such a long ribbon, the easiest way is to use a sewing machine.

To make such large flowers, you will need strips of fabric 2.5-3 m long

These potted flowers are made from old cotton t-shirts.
Master class 4. Volumetric pom-pom flower
This master class is good in cases where you need a fabric flower to be voluminous and lush.

You will need:
- Any soft fabric desired color;
- Hot glue gun;
- Scissors;
- Felt.

Instruction:
Step 1. Cut out about 20-30 circles with a diameter of about 4 cm from the fabric. All these circles will become petals in the future. You can cut blanks by eye, the correctness of the shape does not matter.
- To cut several circles at once, simply fold the fabric 3-4 times.
Step 2. Now cut out a circle with a diameter of about 4 cm from the felt. This circle will become the base of your flower.
Step 3 Take one of your petal circles and fold it into a bag like the photo below.

Step 4. Glue your blank with the tip to the center of the felt base.

Step 5. Continue gluing your paper bags one by one to the felt base until it is completely covered with petals. Voila! The flower is ready!

If you wish, you can make the flower not lush, but flat and supplement it with beaded stamens. To do this, the petals need to be folded as follows: we bend the circle in half, then we bend the right and left parts of the resulting semicircle to its center to make a quarter. Next, you just have to glue the petals in a circle on a felt base, and then sew / glue beads into the center.
And a few more ideas that you can implement by following our master class.


And finally, we offer you to watch another video tutorial on how to make fabric flowers with your own hands.