How to make a paper heart on a stick. We make voluminous paper hearts with our own hands. Volumetric heart-pendant made of paper
They will delight the beloved not only on Valentine's Day, but also on March 8. In today's selection you will find simple paper hearts that can be made even with children.
I am the hearts in the picture
I will give it to mom and dad.
Let the valentines tell
How much I love them!
All girlfriends and friends
All their teachers
I really, really love
I give them valentines.
Let the heart in the picture
It burns with a bright flame.
Valentine's Day -
A holiday of happiness and love!
(Lily Brammer)
Read other Valentine's Day greetings.
1. Garland of hearts

Take multi-colored cardboard and cut out different heart shapes.

On the sewing machine sew all the hearts and do not forget to leave a ponytail from which you will hang your garland. Sew one heart, pull thread, sew next, etc.

The garland is ready! On each heart you can write a wish, poems or simply beautiful words love!


 First, prepare two round pom-poms, read how to make them.
When making a pom-pom, there will be two long threads with which you tied the threads on the template.
You need to add one more thread to them, for this take the thread and tie the threads again. 
Cut one end shorter, and leave the other long.
Get out the template.
From three long threads, braid and make a loop.
Now let's give the pom-poms a heart shape,  To do this, take the pom-pom tightly with your fingers and scissors into the desired shape.
Fluff the pompom.
Pom-pom hearts can be decorated with eyes, beads or a ribbon.
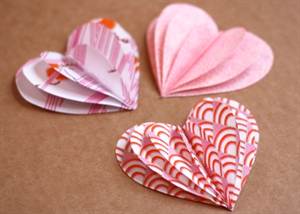
3. Heart pendant

From colored paper cut out ten identical hearts. Bend each in half. Glue the hearts together as shown in the picture.

Do not forget to insert the thread in the middle.


Use a sharpener to make crayon shavings.

Place the resulting sawdust on waxed paper or baking paper.
Cover the shavings with another layer of paper, and on top with newspaper, apply a heated iron for 1 second to melt the shavings.
Cut out the heart template on cardboard.

Place the heart template on waxed paper, trace and cut out.

Make a hole, insert the ribbon, the paper heart is ready!

5. Valentine's card, made using the quilling technique

You will need:
- one album sheet,
- two sheets of pink double-sided colored paper,
- PVA glue,
- scissors,
- wooden stick,
- beads for decoration.
Cut out the heart from the album sheet (or colored cardboard). Now we start making jewelry:
Cut the pink paper along the long side into ribbons 0.5 cm wide. Take a wooden stick and make a 1 cm depression at its end. Insert the edge of the ribbon into the hole on the stick and wind the ribbon. Remove the paper circle from the stick, glue the edge of the ribbon with glue. Shape the mug into a teardrop shape by squeezing it on one side. For one flower, you need five of these droplets.

Now we make the flowers smaller, for this, cut 6 ribbons in half. Make circles and squeeze them on both sides to make boats. Glue two flowers from boats, decorate the middle with beads.
From three long ribbons, cut in half, we make two more flowers. We give the circles the shape of the letter V, for this, squeeze one side of the circle, and bend the other in the middle. Glue three petals together to make two flowers.
Now we make carnations. To do this, take two strips of paper 5 cm thick, fold one strip in half along the long side. Hold the strip by the fold, and on the other side, make cuts without cutting to a fold of 1 cm.Wrap the ribbon on a stick, now remove, glue the edges, and bend the cut edges, fluff the flower.

The most interesting remains! Place the finished flowers on the card and glue them. The antennae will complete the composition, we make them from strips 0.5 cm wide, slightly twisted at the ends.
Decorate the card with beads, sparkles, congratulatory inscriptions!
6. Heart made of paper

Take two long strips and two shorter ones twice. Glue the strips together as shown in the photo.
With your own hands. Decorate the interior of an apartment, office with them, or just give them to loved ones and acquaintances!
In order to make a decorative composition of hearts, you will need:
- sheets of colored paper (not necessarily only red);
- scissors;
- pencil;
- glue.
Stage 1. Draw different sized hearts on a piece of paper. You can use a template to keep the shape of the heart neat and correct. Use scissors to cut out each piece.

Stage 2. Make a small notch at the top of the shape, bend the edges slightly inward. Apply a small amount of PVA glue on the edges.

Stage 3. With your fingers, grab the edges with glue and press well against each other on the back of the heart.

Stage 4. Leave the glued edges on for a couple of minutes.

Stage 5. Repeat steps 2-4 for the rest of the hearts.

Volumetric origami hearts

- For work, you only need scissors and colored double-sided paper.
- Detailed step-by-step instruction displayed in the photos below.
- Fold a square piece of paper in half, then in half again and unfold.

- Bend the corners as shown in the photos.


- The final touch - inflate the heart through the hole at the bottom!


Hearts in the form of boxes (schemes):

Required materials and tools:
- thick paper (for gift wrapping- cardboard);
- scissors;
- ruler.
Stage 1. Print or redraw the template onto the paper.


Stage 2. Cut it out with scissors or a utility knife (X-Acto knife). Fold over the areas to be glued. Use a ruler to help you fold thick paper more easily.

Stage 3. Bend the main part of the heart along the lines using a ruler. Fold the figurine into one piece. Apply a thin layer of glue to the corresponding protrusions, glue the heart.

If you are making a box, then fold the protrusions for gluing into the box, and a tongue can be attached to the "lid" on the side to easily open it.

“Don't talk about love,” Alla Pugacheva warns. But if you can't express feelings in words, maybe make an origami heart out of paper with your own hands? It will tell about emotional impulses and experiences, give the addressee a good mood and become an original addition to a gift or a bouquet of flowers.
There are several varieties of origami hearts, and some of them are not only beautiful, but also functional. They are used as bookmarks, small change boxes and envelopes for love messages.
The simplest model
When you need to quickly make a decoration for a postcard or gift box, better option can not found. An accessory can be made in 5 minutes.
Build Algorithm:
You will need a square of red or pink paper with a side of 15 cm.Place the figure with its top facing you and fold it in half from top to bottom. Open it, rotate it 90 ° and repeat the same procedure. We get a square with two diagonal folds.
Place the workpiece again on the table with the top facing you. Bend the opposite corner to the center line. Close the lower part like an envelope. The vertex closest to us should now be on the top fold line.
We fold the right side to the center line. We do the same with the left. We get the shape of a heart, but the figure is too angular and I want to round it a little. To do this, turn the workpiece over reverse side and gently bend the protruding parts.

This is what the finished product looks like:

Inside you can put a note with congratulations and wishes. There are several similar folding techniques to create the same model. Here's another simple scheme:


Bookmark for real romantics
A cute surprise for Valentine's Day for those who still prefer printed books to newfangled gadgets. The bookmark is very convenient - it is attached to the page, always visible and not lost.

For this model, you need a sheet of double-sided colored paper, you can use kraft or decorative sheets for scrapbooking. The optimal size is 15x15 cm. First, fold the so-called "narrow" origami heart based on the "kite" shape. Description of the process in the video instructions:
We continue to make our bookmark:
- We place the heart in front of us.
- We open it from the inside, turning it into an elongated rhombus. Fold the upper part in half to the midline.
- Close the workpiece again. It now consists of a shorter top piece and a longer bottom piece.
- We work only with a shortened heart. We fold its right side, aligning it with the central line.

- We do the same with the left side.
- We raise upper part blanks and translate the last two folds inside out.
- We iron all the fold lines well.
- We return the top heart to its place. The bookmark is ready. She "works" on the principle of a clothespin, putting on the desired book sheet.

Heart with flower
Very beautiful model popular with lovers. Origami hearts decorated with a flower are often presented at a wedding, folded from banknotes. The model is also used as a seating card holder, since it can be placed in an upright position.
A spectacular souvenir is made up of rectangles measuring 15x6.2 cm or 20x8.3 cm. If the paper is one-sided, you need to start from the wrong side.
- We place the sheet with the long side facing us.
- Fold both lower corners diagonally.
- Expand the workpiece.
- We repeat the same actions with the upper corners.

- Fully straighten the sheet.
- We turn it over to the front side.
- Bend the right edge to the left so that the line goes straight across the crosshairs.
- Expand the workpiece and make the same fold from left to right.

In this case, the accuracy of the folds is very important, only then the origami will turn out to be neat and impressive.
- We spread the workpiece well.
- We turn it over.
- We start the marked side folds inward on both sides.
- We get a shape with double triangles on the sides.

- We "close" the workpiece from right to left and work with it further in this position.
- We bend the corners at the top and bottom.
- Along the line marked in this way, we fold our workpiece and open it, transforming it into a rhombus.
- We continue working only with the top layer. Form an elegant floral pattern. On the left, add the upper and lower corners to the center line. We repeat the operation on the right side.

- Open the formed folds and bend the tops towards the center.
- Smooth the resulting squares.
- Fold the element into the basic kite shape.
- We repeat on all squares.

- We open and smooth each fold of the "kites".
- Thus, we “go through” the entire workpiece.
- We turn it over to the back side.
- And "close" the upper half down.

We bend the side corners and turn the heart with a flower towards us.


Amorous affairs
An origami heart with wings is immediately associated with the mischievous Greek god of love, Cupid. It is as if it was created to convey playful or gentle messages. You can write a note to your soulmate, hide it in such a winged heart and leave it on the table, leaving for work. Good mood the recipient is assured.
You will need a sheet of paper with red on one side and white on the other.
Fold the 15x15 cm square in half in the longitudinal direction. Then in some pepper. We open the blank and place it in front of us with the white side up.

Bend each half of the square in half more to get base form"Wardrobe" (or "doors"). We turn the workpiece over to the back side.

Fold the bottom corners to the center line. In this case, the back half of our figure remains open. Turn the workpiece over again. Bend the top narrow rectangle by 1/3 of the height.

We open the newly folded sections like a "pocket" and smooth them out. In the center, a figurine resembling a bow is obtained. Fold the right corner of the remaining rectangle down at an angle of 90 °. We do the same with the left one.

Fold back the upper outer corners of the heart to make it more round. The model is ready. In the "pocket" in the center, you can insert a note, congratulations or put a small gift like an elegant ring.

Heart-box
In childhood, many had the opportunity to make special "secrets" in which they put small souvenirs for friends or parents. You can turn an origami paper heart into something similar by folding it like a box. It is recommended to use sheets on the sides for crafts. different color, or even better - with a print.
"Valentine" from modules
Immersed in the origami world, it's hard to stop. I would like to create more and more complex models, moving from a plane to a three-dimensional modular technique. The next video master class is intended for beginners - the product turns out to be relatively small and assembled quickly enough. These hearts can be used as key chains, magnets or to decorate postcards.
You will need only 96 modules of them:
- 40 red,
- 56 - white.
The size of the original rectangle is 1/32 of an A4 sheet.
The art of origami is very ancient, China is considered its homeland, and it received its development in Japan. The Japanese believed that handmade paper figures carry a particle of the soul. Origami making is a useful and exciting activity that develops imagination and artistic taste. The heart is a symbol of love, hope, attention. It is not without reason that on Valentine's Day, an origami paper heart is one of the most original and desirable gifts.

Consider how to make a heart out of paper, its types and materials for making. Our master class, we hope, will help you with this. We will need: paper, ruler and good mood.
Origami consists of two directions: classic and modular... In the classic version, a simple paper figure is created. The modular version emphasizes the creation of complex compositions that can be glued together.
Classic options
Scheme of the classic version "Simple Heart":
- Take a square sheet of brightly colored paper;
- We bend it diagonally twice - we get a triangle;
- Unbend the sheet;
- We connect two opposite edges alternately along the fold line;
- We bend the upper edge so that it is aligned with the center of the square;
- Put the lower edge on the middle of the upper part;
- Bend the right side of the heart upwards in the center;
- We do the left part in the same way;
- Bend the upper and lateral sharp corners inward.

We offer another option - "Wicker Heart".

An original little thing for novice craftsmen. It will take two sheets of colored paper, required sizes choose according to your taste. Fold each sheet in half and then fold them again. Now we cut the resulting blanks into narrow rectangles.

Then we round off the sides of the rectangles opposite to the fold. We make cuts of the same length in the sides of the rounding.

We thread the blanks into each other in a checkerboard pattern, decorate with a ribbon on top.

A good mood will be created by another simple and quick job, which is done in 10-20 minutes. This requires a heart-shaped template that you can draw yourself. To neatly cut the workpiece, take stationery knife, make a slit in the paper, and then work with small scissors. Then we outline the template on thick paper. The number and color of hearts depends on your taste. We glue the cut out hearts on top of each other, aligning them in the center.
An interesting solution would be gluing on top of each other heart patterns of different sizes, starting from the largest.
Origami heart with a flower:

You will need white thick paper, measuring 15 by 30 cm, a ruler.
We take paper, bend the lower corners upward, getting a triangle, unbend it. We bend the upper corners down, straighten them. Fold the paper along the fold lines. Bend the upper corners down, the lower ones up.
Bend the edges, straighten, bend to the center. As a result, there are four small squares on the big square. We bend their side corners inward. Next, bend the edges, straighten, bend to the center. We have a flower. Turn the craft over with a flower down, put the upper corner on the lower one. Bend the side edges inward. Bend the bottom corner up to the top point, straighten it.
Then we lift the bottom edge up to the first fold line. The heart with the flower is ready!
More volume
A voluminous heart will be an excellent present, suitable for the interior of the house, it is not difficult to make it.

We need a piece of red paper.
We take paper square shape... We bend the sheet in the middle, open it.

We bend the lower part of the sheet down by 5-7 mm.

Fold the square in half on the other side. There is a fold on top.

Align the bottom edge of the rectangle with the fold. A triangle has formed.

Form a triangle on the other side.

We turn the figure over.

Bend the edges of the triangles from the fold line outward, then unfold. We do this to form creases.


Bend the lower outer corners to the center.


Bend the inner edges outward and then put them in the pockets formed.


Insert a pencil or stick into the upper hole. We blow there and get our cherished heart.

A video on making a voluminous heart can be viewed here.
It is impossible to imagine Valentine's Day without hearts that are found everywhere: in desserts, jewelry and interior decoration. What's the easiest way to create a symbol of love? Make a heart out of paper. A craft like this looks amazing and is suitable for decoration, gifts, postcards and indoor spaces.


In addition to February 14, a paper heart can be used as a decor for other holidays: birthday, romantic evening, Mother's Day, anniversary and even without a reason as a sign of attention and recognition of sincere feelings.
We collected 7 best ideas how to make a heart out of paper - read below!
Found on AliExpress / Valentine's Day Jewelry
 |  |  |  |
 |  |  |  |
Idea number 1 - Heart made of paper in the shape of a snowflake
We advise you to involve children in making these fancy paper hearts - so they can have fun, make beautiful craft and develop imagination.

From such hearts, you can add a charming round dance or create a cute couple in love.
What you will need:
- paper;
- scissors;
- felt-tip pen / paint with a brush.
How to make a paper heart:
- Fold leaf as for an 8-pointed snowflake.

- Cut out heart with legs and handles.


- Uncover and draw each has a funny face.

Idea number 2 - Paper heart on a stick

This method is so simple that even small children can handle it.
Necessary materials:
- white and kraft paper;
- ice cream sticks / barbecue;
- acrylic paint and brush;
- silence;
- twine / ribbon / thread;
- PVA / hot melt glue.

Instructions on how to make a paper heart on a stick:
- On white paper print heart, cut out.
- Using a template, draw on the craft sheet of the heart.
- Color paint, leave to dry.
- Glue 2 hearts, after inserting the stick into the base of the craft. To keep the stick securely attached, generously add PVA or drip with hot melt glue, press down.

- Decorate heart made of paper "fringed" made of silence.

To make the craft individual - write name to whom it is intended, and attach with a thread to the stick.


Idea number 3 - Fascinating 3D paper heart


It looks like magic flower from a fairy tale that can be "grown" in just 30 minutes.
For work prepare:
- 4 squares 15 x 15 cm;
- red paper;
- glue;
- scissors.
How to make a beautiful volumetric paper heart:
- Fold square base 2 times in half to make a small square. Using a template or by hand draw there is a heart on it, cut it out.

- Expand- you get a 4-leaf clover.

- Fold the flower in half, press the middle with your finger, wrap the lower left heart over yourself, bending it in the center.

- Uncover sheet and cut halfway between the top 2 hearts. Further from a colored sheet cut out 3 hearts are slightly smaller.

- Glue colored hearts on 3 "petals", leaving the right one empty near the slot.

- Glue two parts of the craft, get the white half behind the adjacent colored one.

- Make by analogy, 3 more such products and connect all four parts together with glue.

When folded it is a simple paper heart, and when unfolded it is a delightful 3D masterpiece.

In addition to the instructions, we offer a video master class.
Idea number 4 - Penguin with 3D paper heart

Invite the children to make such a cutie - they will be delighted. After all, it is fun, interesting and useful for the development of motor skills, perseverance and attentiveness.
List materials:
- paper: orange, white, pink;
- black cardboard;
- scissors;
- glue;
- felt-tip pen.
Getting started:
- Cut out made of cardboard, the tummy and wings of a penguin. Made of colored paper - a beak, legs and 4 hearts. White - two eyes.

- Collect bird, gluing all the parts.

- 4 hearts fold in half, glue sidewalls - you get a penguin breast.

- The final touch - draw black eyes inside white circles.

Idea number 5 - Bulky paper heart with fringes

For fans of stylish and creative things we offer with a paper fringe.
What tools will be needed:
- papier-mâché heart;
- crepe paper;
- scissors;
Let's analyze step by step how to make a voluminous heart out of paper:
- Cut off 4-5 strips of crepe paper 3 cm wide and 1 tape - 5 cm.
Cover with papier-mâché glue.

- Wrap wide stripe heart. Make fringe on thin ribbons.

- Drip glue on lower part heart, fix edge of the strip, wrap the entire craft.
Double fringed piece close seam on top.

- After the 3D paper heart is dry, attach string to it and “beat” the fringe.

Idea number 6 - Origami: how to fold a paper heart
What technique allows you to create a stunning paper heart - origami, of course.
We have prepared an overview of the 3 best options:
Heart with wings and cache

Consumables materials:
- paper: white on one side, red on the other;
- scissors.

Steps on how to make a heart out of paper using the origami technique:
- Trim sheet to make a square.

- Fold sheet in half, colored side out.

- Expand.

- Fold the leaf to the other side is also red outward.

- Expand- it turned out 4 bends.

- Fold in half the lower part, colored side up.

- Wrap up the top half towards the center.

- Flip over sheet.

- Lower right corner wrap up towards the center, leaving the white "valve" open.

- Likewise fold left corner.

- Flip over under the tree.

Box for romantic letters

If you want to make hearts out of paper with your own hands, in which you can hide notes for your loved one - watch the video:
Delightful volumetric hearts using origami technique
The Japanese art of creating figurines without glue and scissors provides endless possibilities for creativity. One of the examples of how you can create delightfully beautiful volumetric paper hearts is shown in the master class.
Idea number 7 - Heart made of paper using the "Quilling" technique

The art of paper rolling originated in the 14-15th century and is still a favorite hobby of adults and children, because it can be used to create stunning decorative elements, such as hearts.
For quilling prepare:
- cardboard;
- kraft paper;
- glue;
- strips for quilling of 2 types: width 7.5 mm, length - 22 cm and 11 cm;
- ruler template;
- quilling tools;
- rope / tape.
We start to create:
- Make cardboard frame 1-3 cm wide.
