Do-it-yourself rooster from kitchen viscose napkins. Application from napkins "Petushok" for children of the younger group of preschool educational institutions. Master class with step by step photos. Felt roosters

Applique from paper balls for preschoolers. Step-by-step instructions with a photo
Petya the cockerel went out for a walk: to look at others and to show himself. He straightened his tail - let everyone see how beautiful he is.
Only nobody looks at Petya. The tail of the cockerel is simple, not colored. Help Petya the cockerel, line his tail with colorful paper balls. Let everyone admire and praise you.
To complete the application, you need to prepare:
Base paper (base can be printed or redrawn);
Scissors;
Paper napkins in five colors
Step-by-step process of making an applique
1. We print out the template for making the applique.

Can be used as coloring templates with the image of the Rooster (pre-color part of the coloring, and lay out the other with paper balls)
 |
 |
2. Cut out small squares from napkins (about 3-4 cm in size)
.jpg)
3. Form balls from these squares.
.jpg)
.jpg)
4. We begin to glue these balls on the tail of the cock.
We coat with glue.
.jpg)
We begin to glue the blue balls.
.jpg)
We glue it slowly in stages, fill in all the empty spaces.
.jpg)
The first feather of the tail is ready.
.jpg)
.jpg)
5. We pass to the second feather.
We also coat small areas with glue and glue the red balls.
.jpg)
We continue to the end.
.jpg)
The second feather of the tail is ready.
6. Continue in the same way on the third reel, spread it out with pink balls.
.jpg)
.jpg)
.jpg)
Our application is ready.
.jpg)
Side view.
.jpg)
You can choose other colors of napkins, taking into account the wishes of the child.
Fabric appliques can be used to decorate many items - tablecloths, napkins, pillows, potholders. For the New Year, you can make a set with a rooster applique.
How to make a do-it-yourself rooster applique from fabric
To make a fabric applique, we need:
- paper;
- pencil;
- scissors;
- red fabric with white polka dots;
- multi-colored striped fabric;
- light pink or white fabric;
- threads;
- needle.
Operating procedure:
- First, let's draw the cockerel on paper.
- Using this picture, we will make a pattern for the applique of a cockerel.
- Cut out parts of the rooster applique from the fabric. Cut out the torso, beak, comb and beard from the red fabric. Cut out the head, wing and three details of the tail from the striped fabric.
- Cut out a rectangle from light pink or white fabric the right size, for example, 20 x 26 cm.
- We sweep the body, beak, comb and beard to the rectangle.
- Let's fill in sewing machine red thread and set the zigzag seam. Sew red details along the edge - beak, comb, torso and beard.
- Now we will thread the orange threads into the sewing machine and sew along the edge of the cockerel's head. We will pull out the basting.
- Add the wing and tail details.
- Sew them with orange threads with a zigzag stitch, and then pull out the basting.
- We outline the paws with a pencil. Sew along the outlined lines with orange threads, zigzag.
- Embroider the eye with black threads by hand.
- Thread white or pink threads into the machine. Tuck the edges of the rectangle and sew in a zigzag pattern.
- The napkin with the "Cockerel" applique is ready. A set of these napkins will look good on the New Year's table.


New 2017 is the year of the Red (Fiery) Rooster, and its figurine or image will be the most demanded present. The needlewomen of "Cross" have a good tradition: to prepare thoroughly for the New Year's holiday. And this year will be no exception. Many of us will make or are already making a rooster with our own hands, or even not one, but several at once! After all, you must definitely please your family and friends with a needlework symbol of the year, and yourself with the fascinating process of creating this very symbol in various techniques hand-made.
The creation of a kind of MASTER CLASS GUIDE from the Internet is also a tradition of our handmade site, which was born a year ago. For you, dear craftswomen, we have selected on the network a lot of only the best master classes. Admire, look closely, discuss and choose the most colorful rooster! And then sew / knit / draw / blind / weave it. So, in what technique can you work on the eve of the New Year's holiday?
If you don’t have time to work, it’s not a problem. The article contains links to craftswomen who sell finished works.
Cockerels made of paper and on paper
We make postcards with the kids
If you are not a professional cardmaker, then before you start creating cards, be sure to read our article "Learning to make DIY New Year cards using the Scrapbooking technique." In it you will find not only a lot of ideas, but also get acquainted with the basic rules for creating postcards.
Any cockerel your child draws can be placed on a postcard. If the kid himself finds it difficult to figure out how to draw a rooster with his own hands, then show him this step-by-step instruction:

And then, it's a matter of technology. Cut out the cock and make it the centerpiece of the composition. For example, your postcard can be so simple but cute. In your work, use new year paper and a bright red ribbon, add snowflakes, twigs and other festive paraphernalia. Once you have a basic idea, the process of creating a postcard becomes much easier!

Photo from the site http://itsapatchworklife.blogspot.ru
If your child likes to color in black and white pictures, give him this opportunity. Print a card template with a cockerel on heavy cardboard and let your little one get to work. Further, by cutting out a blank ball, you can complement the postcard voluminous snowflakes, adhesive semi-beads imitating christmas balls etc., etc. Unleash your imagination with the baby))

YOU WILL FIND OUT
8 more templates for coloring, as well as 2 step by step instructions on drawing more realistic roosters you will find in the archive, which you can download quickly and for free!
Take note of the idea with a cockerel on a stick, like on Elena Yurchenko's postcard. Her cockerels are cut out of felt, or you can cut them out of paper.

Roosters from colored paper
Colored paper applique can also be placed on greeting card... But such an application itself can act as a postcard. To draw and carefully cut out all the details, children will need the help of their parents, but they can glue them themselves.

Olga-15 offers to make funny paper cockerels in her master class.
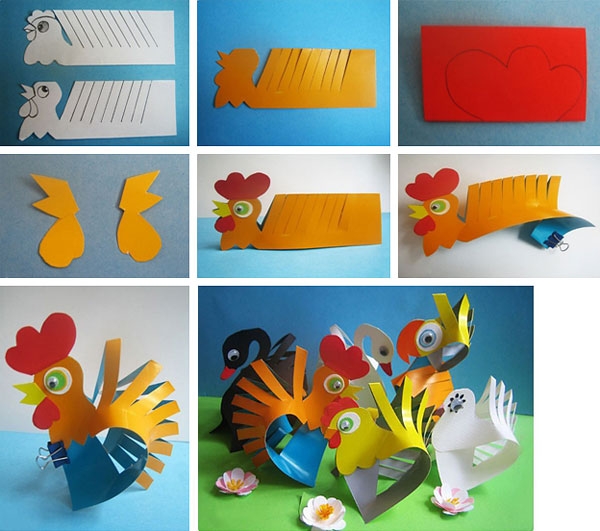
A Rooster blank is a rectangular sheet of flexible paper or thin cardboard folded in half lengthwise. Its size is 13.5 × 10 cm. We make 7-10 inclined slots along the fold line (approximately every 1 cm). Their angle of inclination is 50-70 degrees, and their depth is ¾ of the height of the folded sheet.
Ekaterina Ivanova in her video tutorial shows how to make a red rooster using the Origami technique:
Roosters using the Quilling technique
A very interesting idea is to lay out only a luxurious rooster tail out of quilling paper. It's not as confusing as spreading a whole cockerel, and it can turn out very effectively! Here is a rooster without a tail as a base (how it looked in the original, see the photo below).

Print it on a color printer, and then fantasize over the tail. As an example - one such work (although the tail is modest here, but you will try, right?))

And if you are not afraid to make a whole rooster using the Quilling technique, then you can take this ready-made postcard as a basis:

Or this pattern:

A cheat sheet on the main elements of Quilling to help you:

Button applique
And here are absolutely stunning handsome roosters, laid out of multi-colored buttons, half-beads, rhinestones and beads! As a basis, you can take the contours of the cockerels from our archive (link just above).


Crochet cockerels
Many needlewomen with a crochet hook on "you" and will be happy to knit a cockerel from multi-colored threads. And "Cross" will help you to decide on the model and will offer several master classes on this type of needlework.

You can also buy knitted cockerels from Svetlana.


Felt roosters
Fastest and not complex options creation of the symbol of 2017 - felt roosters. The material is easy to process, keeps the shape of the toy well, does not require processing of seams. Vice versa, hand seams products on the face give it a special flavor and charm.


Photo from the site https://madeheart.com


Photo from the site http://ktototam.ru/
The figurine of a rooster, neatly cut out of thick felt, will Christmas tree toy, and suspension.

Photo from the site http://ktototam.ru
And if you decorate the felt cockerels with embroidery, flowers and other decorative elements, it will turn out incredibly beautiful in general!

Photo from the site http://mmmcrafts.blogspot.ru

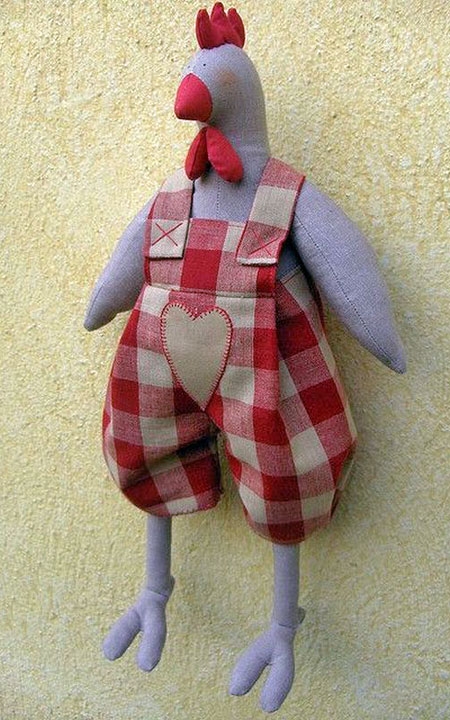
Roosters in Tilda style
Well, how can we do now in our life without the tilde-Rooster? On the ToySew website there is a master class on sewing this popular toy.

The Vetic master posted on her blog the patterns of the Rooster and the Hen of the Goroshkins based on the tilde pattern. An interesting couple will turn out if you put in the effort and patience!

And for inspiration:

Cockerel Yurik from Orange Toys
A funny video clip about her tilde-roosters was shot by Maria Fedorova (the link to the patterns is in the description of the video!):
Coffee toys-cockerels
Aromatic, or coffee, toys compete with tildes in popularity. There are roosters in this technique.

The coffee cock can be like this:

Photo from the site http://zabavochka.com
You can easily sew it yourself using one of the patterns suggested above. "Cross" talked about all the intricacies of creating coffee toys in this master class.
If you think that you cannot cope with such work yourself, contact the master. Yulia Charikova has made enough branded toys with the scent of coffee and put them up for sale at this address.

Interior toys made of fur
Oksana Svyatkovskaya will show her vision of a rooster and show how to sew it correctly according to ready-made patterns... Her Rooster is sewn from faux fur, but who's to say that it doesn't work that way or is he not good?)


In the workshop Everything for creativity (dljatvorchestva) there are a lot of blanks for both painting and decoupage. Choose and be creative!

This is the kind of beauty you can get:


If you don't want to make a souvenir in the shape of a rooster, you can decorate any wooden surface with a picture of a rooster. Here the scope for creativity is simply endless !!! Here are just a few examples for inspiration:


Felted wool roosters
Other craftswomen make wool toys like real ones! We admire and get inspired! And if you really want to buy one of these beauties, then look for them at the Fair of Masters (there is a link on each photo).


Elenia gathered in one place many different felted wool Roosters and proposed to MK to create one of them. It turns out very cute!
Roosters embroidered with a cross, beads and ribbons
Perhaps you love embroidery more than other types of needlework. Then you can put the symbol of the year on a pillowcase, decorate it in the form of a panel, a picture in a frame or a brooch. The main thing is that the image of the Rooster warms your soul. And if you donate your work, find out the preferences of the gifted.
More than 50 different schemes for embroidery of roosters and cockerels you will find in a special album
Hello, dear visitors of the site of the Research Institute "Eureka"! How nice it is to know that you can create beautiful things from the simplest and most inexpensive materials! Today we will tell you how to make crafts from napkins with your own hands with your children.
In our selection there are descriptions of simple and elegant products for the smallest children from 3 years old, as well as step-by-step instructions for creating spectacular and voluminous crafts, which are the result of hard work. From napkins you can make a bouquet of flowers, a butterfly, embossed appliques, bizarre animal figures and even an elegant ballerina. Do not hesitate, children will be delighted with both the process and the result of the lesson.
Butterflies for the little ones
This is a very simple but effective craft that even kids 3-4 years old can handle. It is necessary to collect the napkin in the middle and use adhesive tape to glue it to the cardboard. The scotch tape not only attaches the butterfly's wings, but also serves as its body.
Then, with a felt-tip pen, you need to draw the antennae and legs of the butterfly, and also decorate its wings with patterns. You can also decorate the cardboard base with flowers. The colorful card is ready.
Mosaic
All babies love to rip paper that is soft to the touch. You can entrust them with this task, and also ask them to roll as many small balls as possible from the pieces of napkin. Have your child make some colorful piles of round pieces. Then these balls must be glued to the cardboard base in the form of an applique, having previously marked the contours of the drawing with a pencil. The result will be a very colorful and voluminous work.
You can attach paper balls not only to a flat base, but also to plasticine figures. Thus, you can create animals, snowmen, houses and cars. This activity will be very interesting for kids 5-6 years old.
Facing technique
This way of creating crafts is suitable for younger students and older children. Products made from napkins using the trimming technique require perseverance and patience. It is difficult for a child to do this work in one session, so be prepared to break it down into several stages.
First, you need to cut the napkin into squares with a side length of 1–2 cm. Draw a pencil drawing on the cardboard, and then apply PVA glue or a thick layer of plasticine to small areas of the base. We wind paper parts on a thin stick, turning them into tubes. Then we glue them onto the cardboard. The branches of lilac and chrysanthemum, made using the facing technique, look especially good. Leaves and stems of branches can be made from plain green paper.
Application "cockerel"
This applique is interesting in that before performing it, we need to circle the child's palm and fingers with a pencil, and then cut out the outline. Such parts need to be made from 10 to 20 pieces, after which you can assemble the body and tail of a rooster from them. Cut out the legs and head from colored paper and glue them onto cardboard. A rooster made from bright do-it-yourself napkins is ready.
Rosettes
Napkin roses look like real ones, and it's easy to make them. To create them, we will need pink, white or yellow napkins, threads and scissors.
- We cut each napkin into 4 pieces along the fold line. For one flower, we need at least 2 squares.
- We fold the parts in the form of a rectangle, not reaching the upper edge of the napkin to the lower one by about 5 cm. We make a fold on each workpiece.
- Form the edges of the petals. We twist the napkin in the form of a tube, first in the middle, and then along the edges. Semicircular blanks are obtained.
- We also obtain the core of the flower by twisting, only its edge should not be semicircular, but straight.
- We collect the core in a tight spiral. Then we wrap the petals around the central blank, moving them relative to each other and straightening the edges.
- We form the base of the flower with a thread. Lower part we shorten the roses if necessary.
Carnation
Napkin carnations are very lush and tender. We make a flower as follows:
- We cut the napkin into 4 parts along the folds.
- We roll up 2 blanks 8 times and place them on top of each other.
- We fasten in the middle with a stapler to get a "+" sign.
- Give the details a circle shape.
- Raise the napkin layers up in turn, pressing them with your fingers and forming the petals.
New year ballerina
 You can decorate a room or a Christmas tree for the New Year with the help of airy ballerinas made from napkins, wire and glue. We also need threads, ribbons, pliers, scissors and a thin needle. Then we act according to the instructions:
- Help your child make a skeleton of a dancer out of wire. Her arms and legs can be bent into graceful dance steps.
- Divide the patterned napkins into layers. Cut the white seamy layer into strips up to 2 cm wide or tear it by hand. Then we wind them on a wire frame, greasing the figure with glue. When the skeleton turns into something like a mummy, we give the workpiece time to dry.
- Fold the napkin into a triangle, then fold the blank 2 more times. This process is like folding a snowflake. We cut the wide edge of the workpiece so that we get a circle.
- Cut off the sharp edge of the part a little.
- We twist the folded blank clockwise and in the opposite direction to form a beautiful dress hem.
- We make the top layer of the outfit in the same way. In it, in addition to the cutout for the head, you need to make holes on the sides for the hands.
- Then we dress up our young lady, putting on first a petticoat, and then an upper one. We make a belt from threads and a ribbon, forming a waist.
- We attach a thread or ribbon to the ballerina's head and hook it in a conspicuous place.
Creativity from napkins - for the benefit of any child
As you can see, creating beautiful products from napkins is within the power of a kid of any age and temperament. By doing these crafts together, you can:
- Enjoy communication and joint creativity.
- Develop fine motor skills, fantasy, perseverance and hard work of the child.
- Decorate your home with colorful, voluminous items.
Well, we wish you and your baby an easy realization of the most creative ideas! See you soon!
Coming New Year 2017 will be held under the symbol of a noble stately bird - Fire Rooster! But at the same time, the cockerel is a cheerful, cocky mischievous person with a loud and beautiful voice.
On the eve of the New Year holidays, it is customary to give symbolic gifts, and it is best if they are done by hand. Such a present for the new year 2017 will remind you of warm relationships, friendship, affection.
For such a craft, you can use:
- Plasticine;
- Cloth;
- Colored paper;
- Plastic bottles;
- Threads, etc.
How to make a cockerel 2017 with your own hands?
Even without specialized knowledge, you can do any craft with your own hands, all you need is a little imagination and follow the step-by-step instructions exactly.
Using simple improvised means, almost everyone who has imagination and a little skill can do a cockerel with his own hands for the new year 2017.
Photo: Cardboard Cockerel 2017: DIY craftEveryone will surely have a piece of cardboard in their apartment, from which you can make a cheerful and bright New Year's cockerel. In addition to cardboard, you must prepare in advance:
- Colored sheet paper;
- Scissors;
Manufacturing instruction:
- Roll up the sheet cardboard with a cone, fix the ends with a drop of glue or paper clips.
- Glue the base for the craft with colored paper - this will be the body of the cockerel.
- Next, according to the template (or from memory), cut out the colored cockerel feathers, its beak, legs and comb from the sheets.
- The legs of the cockerel will be original, made of colored paper, bent accordion.
- All received, cut and bent parts are glued in the appropriate places to the pre-made cone.
A funny, playful craft is ready!
 Photo: Craft: Do-it-yourself napkin cockerel
 The napkins with which the hostesses serve the table are quite versatile material that will become an excellent basis for New Year's crafts.
To complete the Cockerel for the new year 2017, you must:
- Viscose napkins in different shades;
- Sintepon (any other soft filler);
- Knitting threads (preferably "Mouline thread");
- Needle;
- Scissors;
- A simple pencil.
Getting started with the stylish and original Rooster, you will need:
- First you need to copy the silt and draw a cockerel in detail (every detail, part).
- Transfer the resulting detailing (templates) to viscose napkins.
- Use scissors to cut out all the outlined details of the cockerel.
- Having decided on the basis for the craft, you need to sew all the cut out parts to it with a thin needle and thread.
- Details must be filled with padding polyester as it is done.
- Cut out the comb, legs and beak of the cock, preferably from a scarlet napkin, so that the cock is as realistic as possible.
- The shapes and sizes of all parts must match.
- Sweep the edges of the beard and comb with red thread (or white for contrast).
- Making out color range You can improvise the cockerel and make certain details more original.
- The final stage will be the process of sewing on the eyelet, for this you can use small buttons.
Video.
A rooster from paper trays for eggs is a cool craft.
For making crafts for the new year 2017 with children, to new year holidays, you can take used paper egg trays as a basis.
- Moment glue;
- PVA glue";
- Egg trays;
- Beads or rhinestones;
- Dry mix for primer;
- Acrylic paints;
- Balloon;
- Newspapers or magazines;
- Scissors;
- 2 buttons.
A step-by-step guide to performing the Cockerel:
- Only two cones will need to be cut from the entire tray.
- One side of each cone must be carefully cut to the base and cut downward.
- So, one large element with 4 open petals should come out.
- For the manufacture of the cockerel's neck and head, it is necessary to connect 5 cones cut from the tray according to the same principle. By connecting the incision downwards, the upper part "opens" and becomes larger.
- For the scallop and goatee of this magnificent bird, you can use the side of the chute.
- The beak is best cut from the lid of the tray, so that the final piece consists of two glued parts.
- Feathers are also made from cones, then attached to the base with glue. For a more realistic cockerel, the length of one wing should be at least 10-12 cm, according to the same principle, the tail of the bird is performed.
And voila! The cockerel for the new year 2017 is ready!
The cockerel is a magnet with his own hands.

In every home, an integral decoration of the refrigerator is magnets-gifts brought from different cities, countries, donated by foreign colleagues, etc.
Surely a gift in the form of a rooster magnet will delight relatives and friends, and you can make such a cute gift with your own hands, from improvised means.
So, for a cockerel made from coffee beans, the following are also useful:
- Rhinestones or sequins, sparkles, stones (optional);
- Red felt;
- Magnetic base;
- Paper (thick cardboard is better);
- Threads;
- Moment glue;
- Crochet hook.
Making a magnet:
- The first step is to make a foundation, for example, download a drawing or draw a cockerel yourself on cardboard.
- Cut out the drawings: the torso and legs will be templates for the next steps.
- Paint the cardboard body with paint (gouache, artistic watercolors) brown.
- Next, fasten the legs to the body on the cardboard with threads.
- From a small burlap klaptik, make a cockerel a wing and glue it to the body.
- Glue a handful of coffee beans prepared in advance on the body and legs.
- Red felt is essential for the bird's comb and earrings.
- Make a beautiful fluffy tail for the bird from the threads.
- Thoroughly grease the base of the magnet with glue and glue it to the finished body of the cockerel.
- Sequins or beads prepared earlier are perfect for decorating a scallop, you can also make eyes from them and decorate a ponytail.
Video.
Craft: Picture of a Rooster from buttons.
 Photo: Picture of a Button Rooster
 Craft-rooster for the new year 2017 can be hung not only on the refrigerator in the form of a magnet. With a little imagination, you can proudly hang your own painting-Cockerel on the wall.
An original picture of buttons made with your own hands will be a worthy gift, for sure every conscientious housewife has in her stash a handful of old unpaired buttons that are idle. So, their "finest hour" has come!
To make such a hand-made gift you will need:
- Picture frame;
- Thick cardboard;
- Background (fabric or colored paper);
- Moment glue;
- Buttons ( different colors and sizes);
- Rhinestones, sequins, sequins.
1. Having taken in the house all the buttons that were found, you must first select a beautiful, stylish color scheme, a truly majestic plumage on a table or a piece of paper.
- On the prepared cardboard, according to the size of the picture frame, glue the background (a piece of fabric or cut colored paper).
- On the background, according to the pattern of the cockerel, apply adhesives, on which, subsequently, lay out the buttons in the selected order.
- It is good to press down on the buttons and wait until they stick tightly.
- Place rhinestones, beads and sequins in the gaps that have formed between the buttons so that the picture is complete and complete.
- Place the finished painting in a frame and hang it on the wall.
 Photo: DIY colored paper basket
 A rooster basket is not just a piece of art that will simply gather dust on a shelf with souvenirs, such a present is very versatile. The basket can be used for its intended purpose, for example, putting eggs in it, storing cookies or berries, etc.
To make such a multifunctional Cockerel with your own hands, you will need to prepare the necessary materials in advance:
- Colored thick paper (yellow or brown);
- Colored paper (red);
- Scissors.
How to do:
- Fold a square sheet of colored paper (one side should be 20 cm) in half, unfold.
- The resulting even fold is the midline for further manipulation.
- Bend the sides of the sheet to the center.
- Turn the colored paper over and fold to the middle upper part, while not touching the lower part.
- We turn the workpiece over again and press the lower and upper parts to the middle line, then unfold it.
- Again we change the working side and bend the upper and lower sides to the intended middle line.
- We open the resulting pocket so that you can bend the craft from all sides.
- We fold the figure along the outlined, bent lines, lower the corners of the bottom, and, on the contrary, bend the top.
- You need to work very carefully and slowly so as not to spoil the workpiece.
- After that, unscrew the side parts and raise both corners, bend the strip from below.
- By the same principle, do all the work on the other side of the sheet.
- Open the resulting bottom of the box and bend the side corners inward, which will hold the product.
- Cut out a commensurate scallop, beak and beard from red colored paper. Glue everything to the appropriate places.
- On the side of the box, glue the wings, cut out in advance, the tail.
- The pen is made of paper folded several times for density.
Cockerel - DIY antistress
It is completely easy to make an Antistress Rooster, he will gladly show off on a coffee table, nightstand, shelf, and in the right moment will surely get rid of negative emotions and bad mood.
For a stress bag, you need to prepare:
- Fabric (size at choice);
- Threads;
- Cotton wool, sand (filler material);
- Red and yellow fabric (small valves).
It is better to choose fabric in bright, unusual colors, because the Rooster is a colorful bird. A cage, polka dots, flower texture, etc. are perfect for an anti-stress bag.
- Cut a square out of the fabric, according to the size of the future bag;
- Cut out the cock's comb and beak from the red flaps of the fabric.
- Sew the edges, in the process sew in one side the comb and beak of the future bird;
- Having reached the end, fill the bird with cotton wool or any other chosen filler, sew the bag to the end.
- The result should be a pyramid-shaped Cockerel.
If you have the time and desire, you can make a Cockerel's paws from red threads, and thereby add more realism to the anti-stress bag. There is an opportunity, as a gift, to make with your own hands a whole family of such bags that raise the spirits: a chicken, and a few fluffy chickens.
Kinder surprise from Cockerel.

Who among the children does not like the Kinder surprise, and many parents like to pamper themselves with chocolate with figurines or constructors. But do not throw away the yellow boxes from the kinders, and you can easily make a wonderful gift with your own hands - a cute, cute Rooster for the new year 2017.
For a stylish gift you will need:
- Plasticine;
- Yellow kinder box;
- Plasticine knife.
Step by step guide:
- The first step will be the execution of the cockerel's eye. To do this, you need to roll two tiny balls of plasticine and two black balls, a little smaller.
- After that, put the black "peas" on the white ones and flatten, also attach the plasticine eyes to the body of the craft, i.e. kinder box.
- The bird's beak should be made of red plasticine, having rolled up a small tourniquet, folded in half and glued to the appropriate places.
- In order to make a scallop, you need to roll three identical red balls, which are attached to the top of the head, flattening them.
- In order for the Cockerel to gain wings, you will need to roll up balls of any bright plasticine, flatten them, and cut out the wings with a plasticine knife.
- Flatten both wings with your fingers to the yellow kinder.
- By the same principle, make a tail for the Cockerel.
- Paws can be made in the same way, from plasticine yellow color... Using a plasticine cutting knife, carefully cut the fingers on the foot.
Little cute Cockerel is ready!
This is just a small list of options for making a do-it-yourself gift Rooster, in addition to this, such a mischievous bird can be done using the technique:
- Origami
- Quilling
and also having cut the Rooster out of paper, decorate the festive window, put it on the table, etc.