Origami paper Christmas tree step by step assembly. Christmas tree made from origami modules. DIY origami paper Christmas tree: assembly diagram
Next competitive master class will introduce you to another version of the main character of the upcoming holiday - a New Year tree made of paper modules, i.e. in technology modular origami. The relative simplicity of making the model and the accessibility of the equipment itself will allow even children to create lovely holiday symbols. The main thing is to understand the intricacies of paper modules. And the author of the work will help you do this Anna Susmetova.
Christmas tree using modular origami technique
Hello! My name is Susmetova Anna Vyacheslavovna. I work as the Head of the technical creativity circle in the House of Culture of the village. Youth Simferopol district, Republic of Crimea.
With my students we study various creative techniques: sand animation technique, trimming technique, paper twisting technique (quilling), as well as a technique of folding figures from triangular simple modules (modular origami).
Today I would like to present to you one of my favorite works, made using the modular origami technique - “ New Year's tree" This craft can be a great decoration for your New Year's interior or a gift for a loved one.
To make it we need following materials:
- green and red paper;
- PVA glue;
- beads for decoration.
The Christmas tree consists of six parts, assembled from triangular modules Green colour, - only 450 modules. Another 50 red modules will be required to make a star.
We divide the A4 sheet into 25 rectangles and cut them. We make triangular modules from ready-made rectangles. After all the modules have been assembled, we proceed to assembling the “New Year’s Tree” figure according to the following diagram.
1. The first part of the Christmas tree. The first 2 rows consist of 8 modules each.


2. Second part: 1st row - 10, 2nd row - 10, 3rd row - 10, 4th row - 5 modules.

3. The third part: 1st row - 12, 2nd row - 12, 3rd row - 12, 4th row - 12, 5th row - 6 modules.

4. Fourth part: 1st row - 14, 2nd row - 14, 3rd row - 14, 4th row - 7 modules.

Now we assemble 5 more modules as follows: 4th row - 2, 5th row - 2, 6th row - 1 module.

We attach a part of 5 modules to the fourth part between the formed beams.

We make and add 6 more such details. The fourth part of the Christmas tree is ready.

5. Fifth part: 1st row - 16, 2nd row - 16, 3rd row - 16, 4th row - 16, 5th row - 8 modules.

We assemble 7 more modules in this way: 5th row - 2, 6th row - 2, 7th row - 2, 8th row - 1 module.

We connect the resulting part with the fifth part between the formed rays.

Add 7 more of the same details. The fifth part of the Christmas tree is ready.

Sixth part: 1st row - 18, 2nd row - 18, 3rd row - 18, 4th row - 18, 5th row - 18, 6th row - 9 modules.
We assemble 9 more parts from 9 modules in this way: 6th row - 2, 7th row - 2, 8th row - 2, 9th row - 1 modules.
We attach the parts between the beams of the workpiece. The sixth part of the Christmas tree is ready.

7. The top of the paper Christmas tree is decorated with a red star.
The star consists of 50 red triangular modules. We assemble it according to the scheme: 1st row - 10, 2nd row - 10 modules (put on with the long side out (dsn)).

3rd row - 10 modules (put on with the short side out (ksn)).
4th row - 10 modules (ksn). There is a division into five beams - the modules are put on in one pocket, and the second outer one remains empty.
5th row - 5 modules (ksn). The module fits onto two inner pockets of each beam.

8. When all the parts are ready, we begin assembling the Christmas tree.

8. Decorate the product with mother-of-pearl beads.
Our “New Year Tree” is ready!

All competition entries
A beautiful TREE, quickly and inexpensively.

The tree has lowered its branches, White frost showered her... Why is it so close to me, so sweet? Are you my dear tree? Turning green with silent greetings, You come like dear friend, And hope and joyful light The distance lights up in front of me...
The long-awaited one is approaching New Year 2015, the frost is getting stronger outside the window, children are playing in the yard. Students take the winter session. There is some kind of bustle all around, everyone is running somewhere, apparently afraid of not making it in time, but where? Stop, look around, take a closer look and perhaps you will be able to see our mortal world differently. Look how the frost plays and shimmers with silvery light on the green paws of the fluffy spruce trees. Bullfinches, heated, pour on the branches sun rays day sun. The crimson sunset foreshadows the morning frost. After everything you’ve seen, when you come home, sit in a chair, cover yourself with a warm blanket and, in a great mood, start making a beautiful fluffy Christmas tree
Did I manage to cheer you up? Great! Then let's begin...
For the Christmas tree you will need 630 modules 1/16 in size, of which: 528 green, 102 light green modules and PVA glue. The entire structure consists of 8 parts and a crown.
Collect beautiful Christmas tree A video tutorial will help you.
How to cut paper the right size You can find out here, and how to make the module itself - here.


You can watch how to assemble a Christmas tree in literally 2 minutes in the video tutorial at the top of this master class.

Friends! Don't forget my words. Be happy and love your loved ones(they love you - I know it)!
A modular Christmas tree consists of individual branches, so you can make Christmas trees of a wide variety of shapes and sizes. In addition, from such branches you can make New Year's compositions with toys, snowflakes and stars. The height of the Christmas tree according to this master class is approximately 23-24 cm. For the Christmas tree, you can take modules of one or two colors or different shades of green. Modules made of rectangles measuring 38x60 mm were used here. But there may be other sizes. You can also make modules in several colors. This will give greater realism and volume to the Christmas tree. The modules are placed on a skewer. A skewer is a thin wooden stick for barbecue (for one-time use). They are sold in packs in supermarkets, in the departments of household items. There are 20 cm or more. We used a 20 cm long skewer. For this Christmas tree we needed 637 modules (391 dark green, 246 light green).

We fold the triangular modules according to the diagram.
There is another way to assemble a beautiful Christmas tree from modules

For this Christmas tree you will need 353 green Chinese modules. We collect:
or this diagram:

It is difficult to imagine that once in Rus' a green fluffy Christmas tree was just a tree. After the decree of Peter the Great, everyone, young and old, associates her with the most happy holiday New Year. If we make stars and snowflakes out of paper, then making a Christmas tree using the origami technique for the holiday is a must.


Christmas tree on Christmas tree
This little green Christmas tree can be made by your child to his and your great pleasure. And then tie a thread to the top of the head and hang it on the New Year's green real beauty.
- Take a square sheet of green paper and mark all the axes and diagonals on it, folding and unfolding the workpiece.

- Fold it as shown in the photo.

- Mark a fold line by bending and straightening each of the four wings.

- Make pockets out of them, aligning the center with the center.

- Fold the corners right side first.

- And then tuck them inside. We have already created a small smooth Christmas tree with 8 edges.

- Let's make her spruce paws. To do this, cut each of the 8 edges by 0.5-1 cm in 2-4 places. To make the Christmas tree symmetrical, you can cut it by folding two or three edges together.

- The most difficult operation. Bend the cuts as shown in the photo, marking the lines for the next operation.

- Tuck in the segments that you just folded back.

- Make a leg out of a smaller square of brown paper. The assembly diagram is the same. Then sew the top of the head with thread. The Christmas tree toy is ready.

Each modular origami, including the Christmas tree, begins with the production of many identical small modules from paper. Following the scheme, you need to collect 5 snowflakes of different sizes.
The smallest consists of 16 modules and has 8 beams (position 2). The second five-pointed star starts with 10 modules in a circle (position 3). The third snowflake consists of six rays (position 4) and starts with 12 modules. The fourth snowflake (positions 5-8) has 14 modules and 7 rays. And the largest modular snowflake has 8 rays (position 9-12) and additional inserts (position 10).
When all tiers are made, the moment of assembly begins. Place all the green snowflakes on one axle and secure the star to the top of your head.

A modest origami Christmas tree is made from a one-sided sheet of colored paper. Since this Christmas tree does not shine with anything special, give it grace and shine with beautiful material.
- Take a square sheet of the most elegant paper and fold it diagonally, outlining the lines.
- Select the main corner of the square, which will later become the top of the holiday tree, and mark two more lines from it, folding the corners adjacent to it towards the middle.
- We fold the accordion, bending the workpiece twice. The first step starts from the horizontal axis that you outlined in the first point.
- Turn the workpiece over.
- We outline the fold lines. The first two folds are made uphill.
- The second two folds are on the contrary inward, “valley”.
- Now move the sides of the workpiece so that the paper itself wants to fold. Fold the sagging corners up.
- Fold in the lowest corner, aligning the tree horizontally.
- Turn the Christmas tree over to face you.
- Give it volume by slightly bending it along the vertical axis.
- This Christmas tree can be placed on festive table, stick it on a card or just give it to your mom.
Fluffy beauty (video)
Although the origami technique has recently appeared in our country, all children adore it. After all, from ordinary square sheets of paper you can easily and effortlessly create beautiful volumetric crafts: animals, flowers, houses, equipment and much more.
Children enjoy making funny figures together with their parents, repeating their actions. On the eve of the New Year, you really want to decorate your home beautifully. Therefore, I suggest stocking up on origami paper and making cute origami Christmas trees out of paper... Well, and of course, don’t forget to call on little helpers for help, that’s all, and they can fold paper perfectly. Below we will show you step by step how to fold it.
Necessary materials:
- A5 size origami paper
- scissors
Origami Christmas tree made of paper - do it yourself step by step:
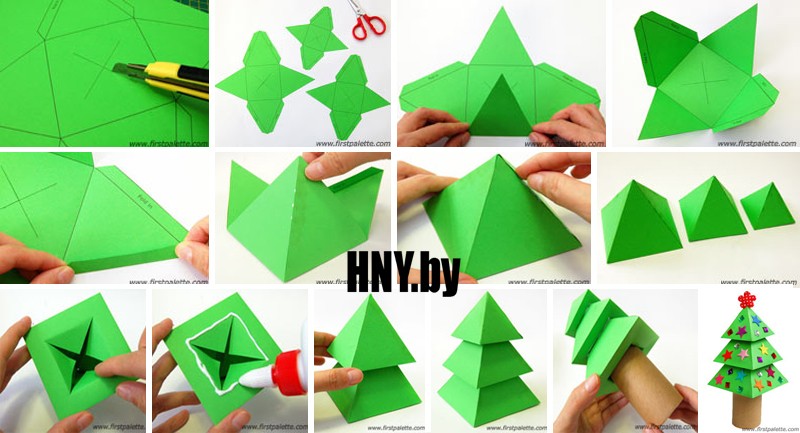
To make a Christmas tree using the origami technique, we need to take colored double-sided paper square shape or take a regular A4 sheet and fold it into a square, cutting off the excess part.
We fold a sheet of paper for origami crafts in half diagonally, then unfold it back and fold it again diagonally, but on the other side. 


Unfold the sheet again and fold it in half crosswise. We unfold it again and bend it in half again. 

Now fold the sheet diagonally into a triangle. 
On the right side we bend a small triangle inward as shown in the photo below. 
We perform the same action on the opposite side. – we get a figure in the shape of a square, only unfolded. 
Inside, this design looks like this. 
We bend the right side to the center line into a triangle, on the left side we bend the same triangle towards the center. 

Turn the figure over to the other side and perform the action described above. As a result, we get a rhombus like this. 

Next, bend one side and carefully bend it inward. We do the same with the other three sides and get this three-dimensional figure. 


Using scissors, we cut off the lower triangular part - we get a Christmas tree shape with eight sides. 

We make small cuts on both sides of the future Christmas tree, not reaching the center line. 
We begin to bend the corners of the origami Christmas tree downwards, starting from the lowest tier. 
We bend all the corners except the top one, leaving it unchanged. 

We need to bend the corners on all eight sides of the tree - we should get a paper design like this. 
Now we straighten all sides of the Christmas tree evenly in a circle. The result was a beautiful origami paper Christmas tree with fluffy branches. Creating with your own hands is great! Be sure to make your own Christmas tree following this step-by-step description with photo. 

Hello dear masters and craftswomen. I present to your attention a master class on making such an origami swan, and I called it “Swan in Pink”. How to make an origami swan? We will make a pink drawing, highlight the swan pink modules around the perimeter and place it on a round stand, and also glue small eyes. Please watch this video on making an origami swan. IN […]
Hello dear masters and craftswomen! Today I bring to your attention a master class on making a tricolor Swan from triangular modules. It would seem that what else can you come up with, what other options are there for making Swans using the modular origami technique. But it turns out there are still options and this is not the last thing in my arsenal. The tricolor swan is so simple […]
Hello dear masters and craftswomen! I present to your attention new master class for making a Swan in black from 3D modules. In the last lesson we made a Swan in red, but now I decided to change the style a little and make a Swan in black. The scheme is not complicated and will suit anyone, even a beginner in modular origami. Specially […]
Hello dear masters and craftswomen! I bring to your attention a new master class on making a Swan in red shades. On the Internet you can find a huge number various schemes and master classes on making Swans using the modular origami technique. I'm sure you've never seen a swan like this before. This scheme is quite simple and even [...]
Swan in blue. Video tutorials and diagram. Part 3. In the third part of the master class, I offer you two video lessons and detailed diagram origami how to make a swan. The first video shows how to make a swan's neck and how to make a small stand. The second video talks about how to glue a swan better and faster. Lesson 6 (neck and […]
Swan in blue. Video tutorials and diagram. Part 2. In the second part of the “Swans in Blue” tutorial we finish making the body. I have prepared for you two video tutorials and a detailed diagram of an origami swan from modules. To assemble a swan you will need 1438 modules of 1/16 size, of which: 317 - purple modules 471 - blue modules 552 - blue […]
Swan in blue. Video tutorials and diagram. Part 1. I bring to your attention a new master class on making an origami swan from paper from 3D origami modules. The design is quite unusual and the appearance of the wing is not quite classic. In the photo you can see small through holes and a mesh pattern. I'll be honest - the scheme is quite complicated! Especially for this scheme I […]
“Rainbow Swan” diagram and video tutorials (part 3). The third part of the “Rainbow Swan” master class consists of three video tutorials on assembling the stand. And I also decided that a video tutorial on gluing the “Rainbow Swan” would be very useful for you. Lesson 5 (stand part 1) Lesson 6 (stand part 2) Lesson 7 (stand part 3) […]
The New Year tree is, of course, the main attribute of the most important winter holiday. You won’t be able to do without the forest beauty, the atmosphere is not the same, and where will the kind grandfather put the gifts? It just so happened that in the house New Year's holidays They decorate the Christmas tree: some put up a live one, some prefer an artificial one, and some prefer a paper one.
A paper Christmas tree can not only replace a needle tree, but can also be used as a Christmas tree Christmas decorations, a unique gift for your loved ones, or simply decorate your office desk, reminding you of the upcoming weekend!
We have collected for you the most interesting options for paper Christmas trees that you can make with your own hands.


See more paper crafts:

Time runs inexorably forward and now white flies are flying outside the window, slowly falling to the ground and covering everything around with a snow-white fluffy blanket. However, despite the cold, my soul is warm and joyful. And all because suddenly appearing snowflakes herald the coming of the New Year. Most main holiday The year is already very close, which means it’s time to think […]
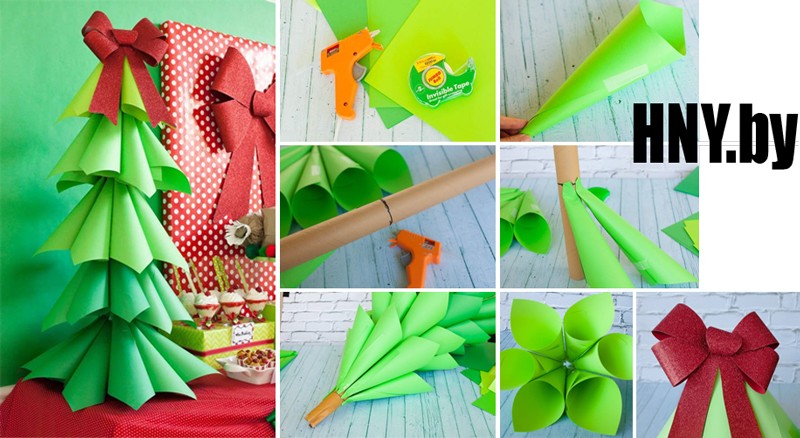
#6 Christmas tree made from wrapping paper


#8 Simple Christmas tree made of colored paper


#13 Cute Christmas tree that will decorate your desktop


You might be interested in:

Of all the variety of bright, colorful and soulful holidays, perhaps the most beloved and long-awaited is considered New Year. Thanks to this holiday, the whole family can get together, relax and have fun. But it's not only that. The New Year is shrouded in a special atmosphere created by holiday decorations in the interior. You can start planning your preparations for the New Year in advance. For this […]
#16 Paper Christmas tree for patient needlewomen: master class


#26 Christmas tree made of paper with snow effect

#27 Christmas tree made of paper using Japanese technique

#28 Christmas tree made of paper pyramids
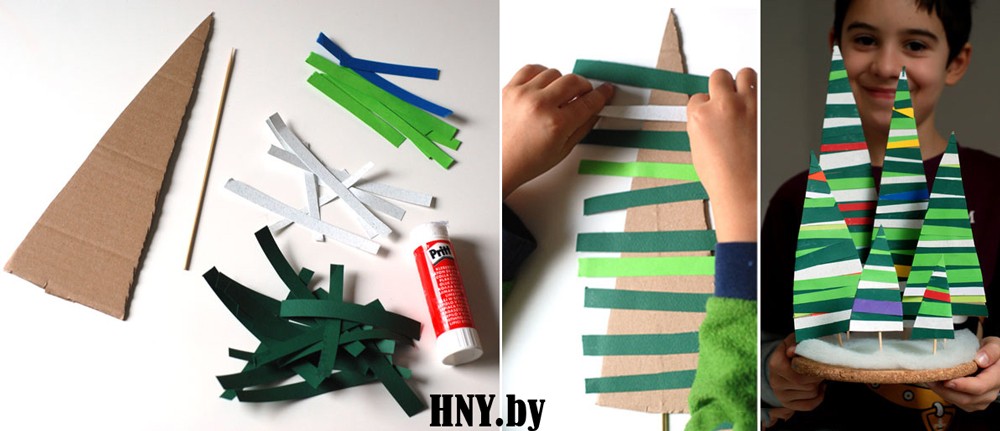
#29 A simple paper Christmas tree that even kids can make
New Year is the most favorite holiday of the youngest residents of the house. Don't deprive them of joy and do everything together beautiful decor. For such a Christmas tree you will need thick paper for the base, a lot of colored paper circles, and glue.

And here is another paper forest beauty that children can handle making. Well, joint creativity with parents - what could be better for little fidgets!

Star Pattern
#32 Christmas 3D Christmas tree made of paper: making a Christmas tree with children

#33 Fluffy Christmas tree made of crepe paper

#34 How to make a New Year's origami tree with your own hands
#35 Christmas tree made of paper using origami technique
#36 Simple origami Christmas tree
Help us improve: if you notice an error, select a fragment and click Ctrl+Enter.