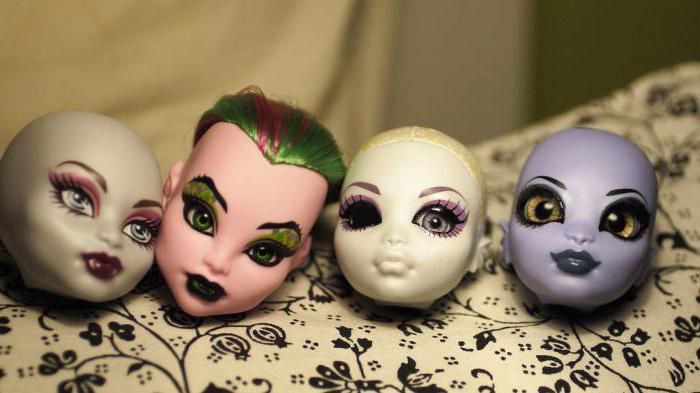
Than paint ooak. Demoness ooak from an old doll. How to make ooak hair
I would like to say that each ooaker has his own methods and tricks, his favorite ways of drawing, so I do not pretend to be perfect in the performance of the work, but only show how I do.
Before drawing on dolls, I advise you to practice on paper so as not to spoil them inadvertently.
Next, you need to purchase high-quality material for work, because this guarantees 50% of a successful result. By the way, everything you need (paints, brushes, pastels, clear, varnishes), you can purchase in the sales group from Catherine at reasonable price in Group .
Don't forget your protective equipment! Varnishes, paints - all this affects the human body in different ways, and in order to prevent negative effects, buy a mask or respirator, gloves.
Drawing on dolls is a very painstaking and small work, be sure to be patient, and sit down for them only in good mood... Much depends on this too.
Well, it looks like the preface is over, let's get started.
Viperin is the object of my redrawing for today, the image will correspond to the wishes of the customer.
To avoid getting paint / pastels on other parts of the body, I wrap the doll with cling film (you can use paper napkins) so that only the face area remains open (it is important that the film covers the hair roots, but does not get over the face).
 Let's start removing the factory make-up. I am using acetone-free nail polish remover. You need to wash in a well-ventilated area while wearing a mask, because it is quite toxic. Gently erase all the paint with cotton swabs, if the face is dusty / dirty, it can still be washed under water.


 Now we need a base for drawing - cover the face of the doll with a layer of clear. I do this on the balcony, wearing gloves, I hold the jar at a distance of 30 cm from the doll, the layer should be uniform and can shine at first. We leave the pupa to dry for 15-20 minutes.
To make the face look more spectacular, you can highlight some parts with a shade of pastel. We rub the pastel with a knife into small crumbs, take a medium-sized brush, and blush our doll. You can also add depth by applying pastels on the forehead, at the bridge of the nose, on the chin. But don't overdo it, the color shouldn't be flashy.

 Next, a watercolor pencil comes into play - we draw an approximate contour of the desired eyes, I specifically choose the color of the pencil not too dark so that the errors can later be imperceptibly covered.
 Let's start with the shadows. We rub the pastels of the color we need (in my case, black) and apply with a smaller brush to the corners of the eyes. To make the color appear darker in the corners, it is from there that you should start applying. At this stage, you can shade the lips with pastel. And now, for the second time, we apply a layer of clear so that all our pastels do not smudge in the process.
 Draw a new one on top of the previous eye contour, now the color becomes noticeably darker. I try to draw as close as possible to the structure of the human eye (do not be too lazy to study it). If the color of the shadows seems desaturated to you, you can go through the pastels again at this stage.
 With a watercolor pencil, draw an approximate bend of the eyebrows, the color matches the hair, but you can take the one you see fit. There are various forms of eyebrows in the world, if nothing comes to your mind, then again do not be lazy - in the search engines you can find everything and choose the option you like.
 At this point I have covered upper lip with another layer of pastel, painted fangs with white acrylic paint and drew the white of the eye (dim).
 We return to the eyebrows. We use acrylic paint. Apply strokes with a brush at an angle, as if forming hairs. I start with a light tone
gradually darkening. This completes the work with the eyebrows.
 We work on the lower eyelid. We start with a red / peach / pink color, forming a lacrimal lake. To make it seem voluminous, we sum up in white. It is important to remember about the location of light and shadow, with their help the drawing turns out to be alive. We darken the corners of the eyes with brown paint, work on the lacrimal lake. Around inner corner we will go over the eyes with white paint (dim) - this will also add volume. At this stage, I remembered the lips, and ran a pink pencil along the top edge.


 So we got to the most difficult thing for me personally - drawing the iris of the eye and the pupil, it is very easy to screw up and bevel here. I start with a dark color, and I use paints (some are more comfortable with a pencil, some with pastels) and uniformly outline the entire area, excluding the pupil. We remember our task - to come to a lively look. Mix white with pink, achieving a shade slightly lighter than the base, apply strokes around the pupil. Use the next layer lighter, and continue this way until we get to white, each time reducing the drawing area. Draw the pupil with black, watch the symmetry about the second eye. Note that the farther from the pupil, the darker the iris area - mix pink with black, and paint with similar strokes.


 We finish the work with highlights - white dots.

We outline the eye in black along the finished contour.
Honestly, I still find it difficult to draw eyelashes - it doesn't work out the way I want, that's all x). It's easier for me to do lower eyelashes that's why I start with them. If you brush your eyelid a little, don't worry, you can cover it up with white paint later. Do you already notice that with every step of life there is more and more in the doll?
Select the upper eyelid with a black strip.

It is more convenient for me to draw the upper eyelashes by turning the doll upside down, well, you’ll get the hang of it yourself.
For some reason I didn't like the pastel lip color, and I decided to paint them on top with a darker shade, but this is a matter of taste.  Actually, we just have to cover our face with clear, and our doll is ready. Of course, you can still glue on fake eyelashes or varnish your lips, but again, this is again a matter of your taste:
It seems to me that the difference between factory makeup and manual makeup is huge. I hope that I managed to instill life in the doll and reveal to you the little secrets of ooak'erstvo.
 I want to say that perfect drawing I have not been able to achieve so far, and I wish you not to be upset at the first failures! Every ooak’er started somewhere. As they say, perseverance and work will grind everything.
I could express myself inaccurately or make mistakes, so if you have any questions, I am ready to answer them. I wish you creative success!
2011 2018,. All rights reserved.
Hello dear readers!)
I am glad to present to all site visitors a master class on redrawing Kitty Cheshire. I tried to explain in detail the procedure, and if you, dear readers, are not in a hurry, then you will succeed no worse, or even better than mine)
Before drawing on a doll, I advise you to practice on paper. Choose the shape of the eyebrows, the direction of the gaze.
Prepare the materials you need.
We need:
- Watercolor pencils (I used Koh-i-noor)
- Artistic pencils "Soft black", "Soft sanguine" and "Sepia light" (sold in any art store, can be replaced with watercolors, although art is softer)
- Fine brush 00 synthetic
- 2 soft fluffy brushes (smaller and larger)
- Watercolor crayon or dry pastel (for blush)
- Mr. Super Clear (sold as a group :)
- Cotton swabs (for correcting mistakes while drawing)
- Plus, you can use a makeup correction marker to remove factory paint from "hard-to-reach" places (or you can do without))
- Medical mask (when working with clear, it is important to use a mask!)
- White and black acrylic paints
I must say right away that I paint with watercolors like paints. This requires a sheet of watercolor paper. On it we "grease" (that is, we draw it several times in the same place) with a pencil and dilute it all with a drop of water from a brush
Cooking a doll.
We remove the entire outfit
We protect the hair of the doll (you can wrap it with a napkin, cloth, film
We erase makeup with acetone and cotton swabs(cotton pads)
Editor's note: For a more gentle makeup removal, use a makeup remover artificial nails, acetone can damage the rubber on the face and it will become sticky.
We cover the head with clear.
Editor's note: It is necessary to say a few words about the use of clear - it is imperative to work with clear in a dry, well-ventilated room. Make sure there are no animals in the room. Also, take care of protective equipment - put on rubber gloves on your hands, and a mask on your face, as mentioned above, or better with an aerosol respirator.
It is necessary to apply clear from a distance of 20-30 cm. Do not pour too much - there will be drips. Clear dries for 5-10 minutes. Then you can move on to drawing.
Now let's get down to the drawing itself.
Apply a blush with a brush and pastel / chalk (first make a powder from pastel / chalk)
Using the "Sanguine" pencil we sketch the future make-up
We start drawing the eyes. Colors you need:
We draw arrows in light lilac (pictured No. 3710/12)
We outline with a thin contour of lilac color (in the photo No. 3710/13)
We outline the iris with a light blue color (in the photo No. 3710/15)
With white acrylic diluted with water (a drop of acrylic + 2 drops of water, use a palette / leaf / lid) we make the whites of the eyes
While the acrylic dries, let's take care of the lips. Required colors:
Draw the upper lip in pink (in the photo No. 3710/131), the lower lip in red (in the photo No. 3710/170)
We draw teeth with acrylic in the same way as eyes
We draw eyebrows. Colors:
We make the base in the lightest color (in the photo No. 3710/30), then paint on top with a slightly darker color (in the photo No. 3710/31)
Let's go back to the eyes. Draw the pupils in blue (pictured # 3710/16)
We outline the iris in mint color (in the photo No. 3710/24), draw the pupil and outline the contour in emerald color (in the photo No. 3710/21)
We detail the iris of the eye with a dark blue color (in the photo No. 3710/18)
Draw the lips in bright red (pictured No. 3710/7)
With a black soft or black watercolor pencil, outline the cilia
We circle the eyes in black, make the highest cilia
We outline the pupils
We take black acrylic and thoroughly proceed with the eyelashes, draw them of different lengths.
Finishing the eyebrows: draw the beginning of the eyebrow in dark brown (pictured no. 3710/33).
On the palette, we dilute a little white acrylic to a "barely alive" state. We draw white eyelashes: they will revive the eyes.
We make highlights.
Editor's note: After the make-up is painted, another layer of clear should be applied to set the paint in place. After the fixing layer of clear, a transparent layer can be applied to lips and eyes. glossy varnish, then the eyes and lips will shine like real
Thank you for attention!)
The OOAK technique is to remake an old doll. From English, the abbreviation OOAK is translated as "one of a kind" - "One Of A Kind".
Materials:
To create a lady vampire or demoness, you will need:
- An unnecessary doll.
- Wide and narrow satin ribbons - 5 m each. Lighter.
- Lots of beads, bugles and beads.
- Thick wire.
- Double sided tape.
- Needle for beads and thread. Scissors.
- Paints and brushes.
- Fixing varnish and acetone.
- Acrylic threads.
- Polymer clay
New life for a doll: preparation and repainting
The transformation of a doll is a simple process, but very time consuming, so you should get ready for a number of evenings that you will have to spend with the craft.
To begin with, they remove the old doll hair - they cut it off and pull it out.
You need to wipe off all the factory paint from your face.
Repaint all parts of the doll in the desired color. White paint works for the vampire lady. It is worth repainting after adding all the necessary fantastic details.

Paint the body and face. The doll's eyes are black with vertical silver-white pupils. Dot painting on the face makes the image unearthly. Secure the finished parts with varnish.

Hair is cut from acrylic threads. Strands can be decorated with beads. The process will be time-consuming: thread each strand into a needle and insert into the head - two "curls" are obtained from one thread. The hairstyle turns out to be unusual if the strands are wound around the horns.


Fantastic details
The details make the fantasy doll: horns, elven ears, tail and wings.
Ears: made of white polymer clay ears are formed. The doll's head is soft and it will be difficult to glue them, so it is better to make holes for sewing on. Cooked ears - bake too long.


Horns: formed from 6 strips of polymer clay, pressed together in the middle. Then a relief and holes for sewing are applied with a sharp object. If there is no black polymer clay, the part is boiled and then painted.


Tail: The tip of the tail is made from polymer clay.

A tail of the required length is formed with a thick wire, to give volume, the part is wrapped with thread, pieces of double-sided tape are glued along the entire length and twisted with a thin tape over the sticky surface.


It is better to burn the edges of the tape with a lighter so that the fiber does not unravel. The detail is decorated with beads. Leave a piece of wire on the tail to secure it.
Wings: made of wire and satin ribbons... V mirror image two frames are twisted from the wire and wrapped with a thick thread for volume.

Pieces of double-sided tape are point-attached to the thread, a narrow satin ribbon is neatly wound over it.

The webbing between the wings is made from sections of wide ribbons: they are fastened with tape into a canvas.


Scotch tape is used for temporary fixation and for stiffening. To make the details neat, a diagram is drawn along the wing frame. The edges of the tapes are fired. Then the membranes are sewn to the frame - this is possible thanks to the tape winding.


All irregularities are decorated with beads or bugles, both from the outside and from the inside.


Finishing touches
The wings and tail are attached to the body by the remnants of the wire.


The word OOAK, which has become popular among our teenagers, is just an abbreviation of the English phrase “One Of A Kind”, which translates as “one of a kind”. Who doesn’t want to be the one and only, especially in youth. Today we will try to make our own hands ooak for a monster high doll, a kind of master class on a new image.


In 2010, adorable monsters conquered the puppet world. We, of course, will not be able to compete with the manufacturers of these dolls with original figures and tiny hinges. But we can conduct a master class to give ooak status to one of the dolls.

Draw a face
For this we need:
- acrylic paints;
- very thin brushes;
- transparent nail polish;
- solvent;
- cotton swabs and discs;
- and, of course, the face itself.

- The biggest and only problem is the presence of the face and the doll itself. You can take old Barbies, Kenes and Cindy. You can use an existing Monster High doll, but then you will have to say goodbye to its real appearance.
- We erase faces. Dip a cotton pad in the solvent and wipe the doll's face.
- Take a photo of all the Monsters and decide which face you want to reproduce.
- Apply the paint gently to the eye area. Draw first a white eyeball, then a brown or blue (preferably multi-colored) iris and a black pupil in the center. Place shadow and color on your eyelashes. Don't forget to draw your eyebrows and lips. You can add two flirty fangs. Apply on top colorless varnish for nails.
- Don't stop at Monster High's face. Now you can make her ooak, injecting any tattoo, drawing moles and scars.

Original hairstyles
Any woman changes beyond recognition:
- makeup;
- clothes;
- hairstyles.
I will share my own bitter experience and give advice: never cut a doll's hair. Her hair doesn't grow back!
So, let's start a lesson in hairdressing (doing hair).


- Take strands of hair from your temples and braid two long braids.
- Secure them with a thin elastic band at the end.
- Tie the braids at the back of your head with an elastic band.
- Unbraid the ends and braid again with one common braid.
- Wrap it at the back of your head in a "cookie" hairstyle and secure with a safety pin.
- If you want to make your hairstyle with curls for Monster High, and you do not have curlers of this size, do not be discouraged. Braid several braids tightly, tying at the ends of the elastic. Then dip your hair in warm water with the addition of hairspray (literally 2-3 puffs). Dry, untwist, comb and get a "lamb" hairstyle.

Making doll shoes

The final ooak, as we have already decided above, should be done by clothes. No matter what class the girl goes to, she can do dresses, skirts and blouses for her Monster High. Difficulties always begin when you have to make shoes.

The manufacture of shoes begins with the preparation of raw materials: PVA glue, napkins, an eraser, scissors, thick threads or thin braid.

- Cover the doll's leg with wet pieces of napkin in 2 layers. Let dry. After lubricating PVA, stick another 3-4 layers of napkin. Examples of papier-mâché techniques can be found on the Internet.
- Let dry again, carefully cut near the heel and remove.
- For the original ooak, you need shoes on high heels... Cut out the heel along with the rubber sole.
- Now you need to do the main work - connect the parts. We glue them, threading the braid, and paint them with acrylics.

The master class on ooak creation is over.
Custom Fashion Dolls is a trend with a long history. Even the ancient Egyptians enjoyed painting makeup on their statues. The Greeks took over the baton, then the Romans. The Japanese on the other side of the world began to make karakuri ninge. Now they customize the dolls, make them outfit and re-paint to make OOAK. How to make such a doll - this article will tell you.
Choosing a doll
Most often, fashion dolls of the "Monster High" series are chosen. They have wide heads that are easy to paint. And, unlike Barbie, they do not have the same Hollywood smile that spoils the whole image. But if you wish, you can make both the OOAK doll "Monster High", and the reincarnated Soviet bobblehead.
The next contender is Roberta Tonner. They are original, beautiful, each model has its own facial features, the shape of the eyes, lips, the size of the cheekbones. But there is a significant drawback - their cost. If Claudine Wolfe can be bought for 1,500 rubles, then the most modest Tonner Doll will cost at least 7 thousand.
The golden mean between Tonner and Monster High are MiniFee dolls. These are magical creatures made of vinyl with big sad eyes and ears of wood elves. The prototype is the characters of the Japanese anime. Lovers of the world of fairies customize them for fairy-tale characters.

Modification start
After the selection and acquisition of "Monster High", Barbie, "Minifie" begins their transformation. The first step is changing the hairstyle. Factory hair is reluctant to style. They usually prefer to pucker up in the most inappropriate way. It's useless to fight them, so the puppet makers cut them off.
Before removal, the head must be separated from the body. In order not to damage it when removing, hold the toy in boiling water for several minutes until the plastic becomes elastic. When the head is removed, it is cut top part wig.
The hair roots remaining inside are gently removed with tweezers. But Monster High has difficulties with this. To completely remove the hair, you will have to make a small hole in the head, which is then sealed. When the doll is completely bald, it is ready for the next stage.

Removing makeup
From the face, sometimes from the scalp, you need to completely remove the paint. For this you will need:
- Acetone or liquid remover acrylic paint... Doll cosmetics cannot be overcome with ordinary nail polish remover.
- Cotton pads and sticks with which paint is removed.
- Mr. Super Clear. The people simply call him "clear." This is a special spray that is treated at the very end. It acts on the principle of a primer, gives a matte shade, prevents the paint from sticking into the rubber. A budget substitute for clear is PVA glue or hairspray.
After the complete removal of the puppet make-up, the birth of OOAK begins. How to make a unique image and what is needed for this is described further.
Face painting
Facial features, eye expression, lip shape will make the image unique. But before embodying ideas with paints immediately on the doll, it is better to sketch several sketches. Without them, you can make both an OOAK beauty and a funny misunderstanding, especially for beginners.
When all the details are thought out, painting begins, for which you need:
- watercolor pencils;
- acrylic paints;
- eye shadow;
- brushes.
It is better to choose paints on a water basis. On oil, they run the risk of cracking over time. Brushes should be synthetic and as thin as possible. For convenience, excess hairs are clipped. First, all the contours, whites of the eyes and lips are drawn with pencils, opened with "Clear". Only when it is dry is acrylic used.
Redrawing or re-painting is a place for a flight of imagination. Eyebrows, eyelashes, tattoos, horrible scars and charming moles. Master puppeteers are happy to share their unusual solutions, tell in detail how to make OOAK "Monster High", Barbie or for "Minifi" make-up.
When the make-up is complete, a final coat of Clear spray is applied. It will give a glossy shine to the lips, pupils, will not let the paint wash off and fade, and will protect it from ultraviolet radiation. The next step is to create a hairstyle.
How to make OOAK hair
Among fans of customization, changing a hairstyle is called a flashing or re-rooting. There are two options to implement it: one is slow and painstaking, but of better quality. The second one is much faster, but it is not always possible for beginners.
- Rurut OOAK: how to do it with a needle.
You will need a wide-eye embroidery needle, pliers, hair and time, approximately two days. When everything is ready, you can start the execution. String a strand of 1-2 mm wide on a needle and pierce the doll's head. It sounds creepy, but it turns out beautifully. Pull out the tip from the inside with pliers, remove the strand and tie a knot on it.
So gradually sew the entire head. Start at the edges from the temporal region, go to the back of the head, make a parting. Then fill in the remaining space with hair.
2. Express flashing.
The tool for the second method will be an awl or the blade is preliminarily taken out of it and replaced with an eye upward. Prying each strand with an awl, insert it into the doll's head. No need to tie knots. When all the hair is inserted, pour the Moment glue inside and massage. This will prevent the hair from falling out.
Hair can be made for OOAK dolls on your own, or you can buy tresses. Home production is much cheaper. Acrylic threads of all kinds of colors and shades are suitable. They are silky and easy to iron.

This completes the creative process. All that remains is to dress the doll and come up with a suitable entourage: chairs, houses, sofas. The creation of OOAK is not only an art, but also a lucrative hobby. Fashion dolls are successfully sold at auctions and shops. Their approximate price is $ 100-200. Therefore, doing puppetry is useful not only for the soul, but also for the budget.