How to make Chinese paper lanterns. DIY paper lanterns. New Year's lanterns: scheme. Chinese sky lantern: manufacturing technique
In China, paper lanterns perform a special function - they protect the home from an evil spirit. We use them for decoration during new year holidays. We offer you to learn how to make paper lanterns with your own hands on New Year. The following article provides a few step by step photo tutorials and videos on which you can make such beauty!
Traditional lanterns for beginners
A fairly simple and spectacular decoration that you can make with your own hands with your children. Such paper lanterns can decorate an office, a class at school, a group in a kindergarten and a room in a house.

Let's look at how to make paper lanterns step by step with a photo for beginner craftsmen. Below is a detailed tutorial.
Such creativity will be interesting for children, so you can involve them in this simple and interesting work. The joint activity of children and adults creates a special festive atmosphere.
We will need:
- colored paper any shades;
- scissors;
- PVA glue or ordinary stationery for paper;
Let's start creating:
- A sheet of paper must be folded in half lengthwise and cut from the side of the fold every 1 - 1.5 centimeters.
- We unfold the paper and fold it across into a circle, glue the joint at the top and bottom.
- Cut out a strip from a colored sheet of paper and glue the pen. The flashlight is ready, but a variation is possible here.
You can leave the flashlight like this for the New Year 2018, or glue a cylinder from another sheet of colored paper (you can use the same shade or take a different one) and insert it inside, gluing the cut sheet around this cylinder.

Paper lantern diagram
Make a few of these simple and bright paper products and hang them on a thread, depicting a garland, or decorate a Christmas tree with them.


Flashlights in the form of a ball 2 options
The first option is a ball of stripes. To implement it, we need:
- Any colored paper or cardboard. You can use old postcards.
- Rivets or thread with a needle and a pair of beads.
- Rope for loop.
- Scissors.
- Awl.

PHOTO: Round Christmas paper lanterns
We do this:
- We cut strips, the width of which is 1.5 centimeters, and the length is 15 - 18 centimeters, if desired.
- We put the strips in a pile together and make a hole on both sides with an awl.
- We insert rivets or a bead strung on a thread with a needle into the hole.
- We spread the stripes around the circumference.
- Attach a loop on one side.

step by step
The toy is ready.
With such stylish lanterns you can decorate Christmas tree or a room.
Another round shape
For the second version of paper lanterns in the shape of a ball, which you can make yourself for the New Year, a diagram describing the manufacturing process is given.

round flashlight
Let's prepare everything you need:
- thick colored paper, cardboard or all the same old postcards.
- hooks or unfolded paper clips for the loop. You can also use a textile loop from thin tapes, jute rope, braid.
- satin ribbon.
- glue.

step by step photos
Such toys are made simply:
- Cut out circles of the same diameter from colored cardboard or paper. For one flashlight you need 10 such circles.
- Fold each circle in half with the colored side inward.
- We glue together all the circles, leaving the last 2 sides not glued.
- We glue the hook or loop from the braid, glue the remaining sides.
- Decorating a toy beautiful bow from a ribbon or attach to it any other decor to your liking.
But this is not all the options for this interesting and familiar to us since childhood New Year's toy. Let's take a look at a few more ideas.
See how to make lanterns for the New Year 2018 with your own hands according to photos and diagrams:
Figured paper lanterns
You can make curly paper lanterns for the New Year with your own hands, a description of which with a diagram is given below. The process of creating such New Year's miracle very similar to the previous description.

curly

How to make them step by step
First, let's prepare everything that is useful in the work:
Thick paper, cardboard or old postcards that we love.
- glue;
- double sided tape;
- scissors;
- needle and thread;
- tape, 0.5 cm wide;
- decorative elements: berries, beads.
And now we start, in the process of work you need to be careful and attentive. It is important to do everything according to the sequence and not to miss the details:
- We make a curly stencil of one side of the flashlight and cut out several identical parts. For one decoration, make 10 - 20 pieces as desired.
- Fold the blanks exactly in half.
- Now the most crucial moment - gluing. It is necessary to do this according to the picture at the right points. First in those marked with "1", then in those marked with "2".
- Now connect the edges of the ovals, sew with a thread. Can be glued with double sided tape.
- Now unfold the flashlight and fasten its edges.
- Attach a loop of ribbon and decorations on top.
Step-by-step photos of the New Year's product:
Make several of these lanterns, they will create an amazing festive mood. They can decorate Christmas tree, room, any room. And if you take laminated paper or thin plastic, then lanterns can also decorate a street tree.


Tissue paper lanterns
This type of flashlight is unusual, not the one we are all used to from childhood. But it is more reminiscent of Chinese lanterns, traditional for celebrating the New Year in this exotic country. Lanterns made of fine tissue paper are made very simply.

They add brightness to the holiday. Can be used for them corrugated paper. Let's get ready for the process:
- thin paper. One flashlight needs 2 sheets;
- needle with thread;
- Double-sided tape;
- braid or jute rope for a loop.
That's all that might come in handy, now let's get started:
- We connect 2 sheets and bend in half lengthwise.
- We fold them with an accordion, carefully stroking the folds with the palm of our hand.
- Unfold sheets. We connect one edge along the folds, sew with a thread.
- Now, in the same way, we sew the second edge with a thread.
- We connect the junction with double-sided tape.
- Now we hang the flashlight on the ribbon.
You can make several lanterns of the same color, or choose beautiful shades for a bright multi-colored holiday.
Master class of imitation of a real lantern made of thick paper with decor
And now let's see how to make an interesting flashlight - an imitation of a real street lamp. We will make it out of paper and decorate it beautifully decorative twigs and Christmas decorations.

For work you will need:
- thick colored paper or cardboard. The paper must be double-sided, that is, colored on both sides;
- ruler;
- scissors;
- pencil;
- a sheet of paper for the template;
- glue and brush;
- new year decor.

This decorative toy is made very simply, you just need to be careful when making a pattern and cutting out details, and the effect is amazing. It is quite possible to make such a flashlight with children.
Here are such beautiful paper lanterns you can make with your own hands for the New Year 2018! Follow the steps in the video and you will get an amazing decorative item that will add style and zest to your holiday!
Chinese lanterns do-it-yourself paper: diagrams with video in photos.
This article will talk about making Chinese lanterns with your own hands, which you can do yourself or involve children in creativity. Such lanterns are perfect for decorating a room, a garden, decorating a Christmas tree or a corner of dreams. They can easily turn your evening into the most unusual fairy tale. Indeed, in them we very often read about the hall, which is decorated with thousands of multi-colored lights, about a mysterious person who helps to light the way for the main character. So arm yourself with everything you need and let's start creating.

Option for children
In this article, we propose to view the most popular schemes for making Chinese lanterns. And here is the first of them - a children's flashlight.

A strip must be cut off from any edge of the leaf, in the future it will be a handle. Its width should be about two cm. We bend the remaining paper in half and draw a line on it, which is four cm from the edge. It is up to this strip that we will cut the flashlight.
Then, along the entire remaining length of the paper, we mark lines, about one to one and a half cm wide. We begin to make cuts along the indicated lines with scissors. We do this from the place of the fold, and stop near the marked line.

We open the paper and look, if there are traces, then we erase them with an eraser. Now we fasten the edges with glue or paper clips. On one side we attach a handle for a flashlight. Now you can decorate the flashlight with sparkles, tinsel, threads. You can also use plain paper instead of colored paper. white color, in the future it can be decorated at will.
According to all traditions
The process of making the next Chinese paper lantern can be traced on the example of a master class.

Find and print a template on the Internet, apply it to cardboard and cut out the entire blank.

We glue the first and last parts together. The next step is to connect all the sides. Next, take a thread with a needle and make a small hole in the upper part of our flashlight. In the same way, we collect lower part flashlight. We make a small brush for the bottom of the decoration. Via silver paint draw a variety of patterns. They can be pre-made on stencils. We apply such a stencil to a flashlight and spray paint. Let it dry and the flashlight is ready.
sky lattern
On the next step by step instructions you can consider making a sky flying lantern.

We put pieces of tissue paper on top of each other and cut out rectangles. Then tightly fasten the edges together with glue. Then we make a small lining for the straws and fold them in the shape of a square. We twist the wire around the candle and attach it to the straws along the edges. We kindle a candle and let it warm up a little.
Decor for products
Well, the next point that we want to make out is one of the ways to decorate sky lanterns.

About seventy holes need to be punched on decorated paper with a hole punch.


Then we unfold the already prepared base ball, or take the one that we did in the last master class. We begin to glue it with these circles according to the husk principle.


Chinese paper lanterns came into our culture not so long ago, but quickly won our love - they can be different forms, sizes, colors, for almost every taste. Traditional Chinese lantern for the New Year - in the form of a ball, red and gold colors.
Making Chinese paper lanterns is not difficult at all - once you try it, you can decorate your home and surprise your friends by delighting them with this gift. Children can and should be involved in the creation process - it is interesting and informative.
So, let's try to make Chinese lanterns with our own hands, photos and detailed instructions help us with this!
To work you need:
- Sheet of red paper
- Pair of sheets of golden paper
- Ruler and pencil
- Scissors are ordinary and with a curly edge (if not, it's okay)
- Scotch
- stapler
Now that we've got everything ready necessary materials, let's start creating a Chinese paper lantern!
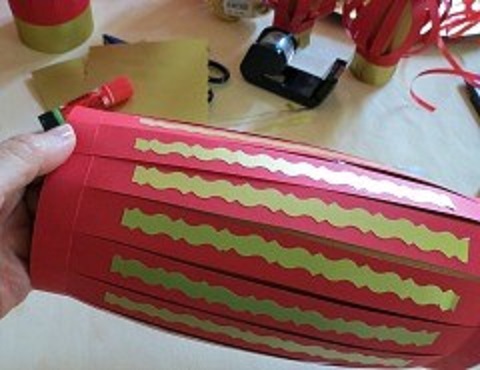
- Using a pencil and a ruler, mark a sheet of red paper across, fold the edges one and a half centimeters, then cut the paper along the marked lines with scissors, a little short of the fold.

- Glue tape along the edge of the paper, across the cuts - this is necessary so that the edges do not tear. Using curly scissors, cut out strips of gold-colored paper - they should be about two times narrower than the strips into which we cut the red paper. Lubricate the gold strips with glue and carefully glue them onto the red sheet. It looks something like this:

- While the strips are drying, let's do the second sheet of gold paper. The length of this sheet should be slightly less than red. Spread glue along the short edge and twist into a tube - like this. You can use a paperclip to secure the edge until the glue dries.
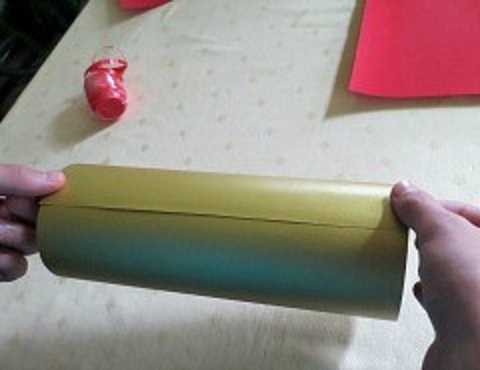
- With the red piece of paper we do the same - making sure the glue is dry and the gold strips are holding up well. We connect the edges and get this blank:
- You need to be careful, since our workpiece is rather fragile, despite the adhesive tape with which we prudently glued the edges. Now the fun begins - it's time to connect the parts of our future flashlight. We carefully put a blank of red paper on a golden cylinder - very carefully so as not to accidentally break the strips. Here's what the process looks like:
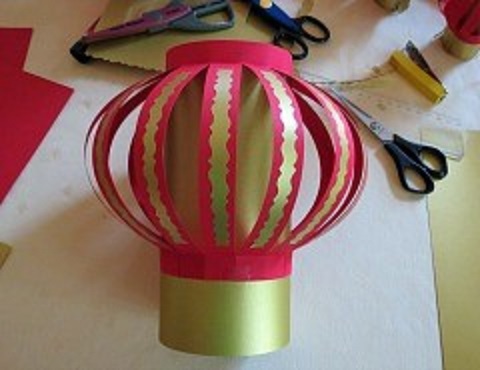
- The top edge of the red blank should be about half a centimeter lower than the golden edge. After that, we cut out two strips of gold paper a couple of centimeters wide and stick them on the joints of the blanks - the photo clearly shows how this happens:

- Our Chinese paper lantern is almost ready! There are finishing touches left. With scissors we cut the visible part of the golden cylinder into a fringe - literally a couple of millimeters wide, so the flashlight will look much more interesting. And, of course, you need a loop - after all, a hanging flashlight! We will cut out the strip for the loop from the same golden paper with curly scissors, but we will attach it to the flashlight with a stapler - this will be more reliable.

As you can see, making a Chinese paper lantern with your own hands is not difficult - you just need a little time and colored paper. But the result exceeds all expectations - especially if you involve a child in the process.
It is very easy to find all the necessary materials and photos on how to make Chinese New Year lanterns, there are also a lot of videos on this topic.
Give free rein to your imagination, do not be afraid to experiment - play with colors, invent with your children! We hope you found our tutorial on how to make a Chinese paper lantern for the New Year helpful!
 Cast iron floor standing gas boilers
Sky lantern is also called Chinese lantern. It is a flying structure made of paper, which is stretched over a bamboo frame. Sky lanterns have become popular relatively recently. But interest in them is gaining momentum. And those who dare to launch this flashlight at least once into the evening sky become its lover forever.
The first launch of the Chinese lantern took place about two thousand years ago. It was invented by the famous commander Zhuge Liang in those days. According to historical facts, the shape of the lantern was made in the shape of Liang's hat. The first sky lantern was made from oily rice paper stretched over a bamboo frame. In the middle was a small candle, which allowed the flashlight to rise into the sky due to hot air.
The Chinese believe that by launching a flashlight into the sky, they seem to pay tribute to nature and higher beings. And nature rewards them with the return of spring and light to their land every year.
 Making a Chinese lantern with your own hands is not difficult. But you still have to try a little. The first flashlight may not be entirely successful, but with a little effort and staying calm, you will achieve the expected result.
To begin with, let's analyze what elements the Chinese lantern consists of, these are:
- dome
- frame
- burner
What the flashlight consists of, we figured out. Now let's make the flashlight itself, and analyze each of the elements separately.
Dome
 The ideal dome for a sky lantern would of course be rice paper. But this paper is not cheap materials. Therefore, an alternative would be a regular garbage bag. You need to choose a package, the thickness of which will be minimal.
For the dome, two bags with a volume of at least thirty liters will be enough, if possible, it is better to take more. We cut off the bottom of one package and glue them with tape. The dome is ready. You can move on to the next step.
Read only on the website Mirrors within
frame
 The frame is the second main element of the Chinese lantern. It is a ring, with the diameter of the neck of the package. It can be made from any thin wire, with an approximate diameter of 1 mm. The ring can also be attached with tape. Then we attach two wires to the ring with a cross. The intersection point must be exactly in the middle of the ring.
Burner
 Ordinary foil is suitable for the burner, since its weight is minimal and it is not susceptible to fire. We make a small cup, and fasten it to the intersection point, on the cross. There is one small problem left. What will burn in the middle of the cup? There are quite a few options here. A piece of cloth soaked in alcohol works well. Or a quarter tablet of dry alcohol.
The flashlight is ready. That's basically all the work. The last point remains, for the sake of which they started all this work. This is the long awaited flashlight launch.
Launching an air lantern
First, let's straighten our flashlight and fill it with air. We hold it in a vertical position. We put the ignited dry combustible into the burner. We make sure that the dome of the flashlight is as straightened as possible and the burner is exactly in the center.
 We put it carefully on the ground and wait until the hot air fills the flashlight. You don't need to take off. Just be patient. You yourself will feel that the flashlight is asking for a way. We let go and enjoy its flight in the night, starry sky.
14 254

A garland of Chinese lanterns will be wonderful holiday decoration, and most importantly, the neighbor will not have one (exactly the same). You have already understood the main component of the future Chinese lantern garland. How to make a Chinese lantern, I'll tell you now.
We will need:
- Thick paper with a pattern, or just colored paper.
- Printer, if you are planning to print a template.
- Glue.
- Needle and thread.
- Pencil, template.
If you are unable to print a template for a Chinese lantern, draw one. (PDF file) We will need a rectangular sheet with an aspect ratio of 1:2.
We divide the sheet into six segments, with vertical lines, along the long side.
Then we divide these segments with vertical lines into two more equal parts.

At the point of intersection of the central lines of the segments with the side vertical lines, draw circles with a diameter of two centimeters, the point of intersection of the lines is the center of the circle. Next, we connect in pairs with the help of a pattern the intersection point of the center line and the border of the segment with the center point of the corresponding circle. We add a small tongue to the extreme segment.
It doesn’t matter if you printed the template or drew it, cut the template along the contour, do not cut the segments in the middle so that they turn out to be a single whole.

We fold the thread on one side several times, tie a knot.
We cut the ends of the thread on one side to form a brush.
We form the bottom of the Chinese lantern. With the help of a needle, we thread the thread in the center of the circle, from the outside.
Then we sequentially pass the thread through all the circles one after the other.

We thread the thread inside the flashlight and tighten it, the bottom is formed.
We thread the thread through the circles from the opposite side, but we do it from the inside out.
We tighten the thread, thereby finally forming a lantern and tying a knot. The knot can be formed using a pencil: we tie the thread around the pencil, move the pencil to where the knot should be. We take out the pencil and tie another knot.
The main thing is to understand how to make a Chinese lantern, it will not be difficult to assemble lanterns into a garland