DIY bookmarks from floss. Original ideas for creating bookmarks for books with your own hands. Mustache and more
Bookmarks are very useful when reading a book, especially if it is a large book. After all, you often come across places that you want to re-read again. And only by the bookmark you can quickly find the desired page, if you do not remember its number by heart. Therefore, let's in fact it is not only useful, but also interesting.
 |
For example, on www. pustunchik.ua you will find detailed master- classes for making bookmarks for books in the form of a funny bear cub made of foam paper, as well as very cute and easy-to-make bookmarks made of ordinary cardboard.
Another option, too made of cardboard and paper no less cute bookmarks 
You will need:
Cuts of cardboard and one-sided colored paper;
knitting thread "Iris"
In addition to the usual tools, a hole punch and nail tweezers.
1. Fold in half, along the long side, a piece of cardboard or thick paper, marking out the fold line, and cut it off. Then we glue the blanks with the remains of colored paper.
2. Fold in half along the length, with the main color inward, that piece of colored paper that will be the front side of the bookmark, then in half again.
3. We unfold one fold, draw a line below and cut thin strips obliquely to it, then the beautiful weaving pattern will not go beyond the edges of the bookmark. Then we will open the blank, put a cardboard strip in it and glue the lapels.
4. Paper "check marks" through one we throw on top of each other, lifting the corner with a ruler or tweezers and gluing with a piece of paper.
5. At the ends of the bookmark, punch a hole for the thread for the brush with a hole punch, thread it from the face and bring it out onto the face, fastening it with a knot.
6. In order to make brushes, wind twenty turns of thread around four fingers of the hand and cut it off. Cut the thread ring in one place and, throwing it over the knot (or the knot and the upper thread), tie it with a double knot. We trim the brush with sharp scissors, holding its tip between the index and middle fingers.
Beautiful bookmarks made of bird feathers
Materials and tools:
Feathers of various birds
watercolor paints
gelatin
thick white paper or thin white cardboard
greeting card
small scissors with sharp tips
tweezers
thin brush for painting
fine-tip markers
 |
 |
 |
These bookmarks are easiest to make with images of different colors.
You will need small colored feathers.
Choose a drawing from the suggested ones or come up with your own. Draw the outline of the drawing on paper (cardboard). Match feathers by color and shape, trimming them in the right places, from time to time apply to the pattern applied to the base of the bookmark to check if your work is going right.
Plant leaves and flower leaves are made from feathers in different ways. In accordance with the shape of the leaves, in one case, the feathers are cut with scissors, in the other, they are simply smoothed to the rod. Having prepared all the details of the drawing, lay them out on the base, check everything again and start gluing with diluted gelatin. When applying feathers one on top of another, grease with gelatin very carefully so that it does not spread over the lower feathers and make them rough and tough. You need to spread the feathers with tweezers after styling, but before pressing firmly against the base.
Antennae of a butterfly, a thin stalk of a blade of grass, stamens of a flower and other small details, draw with felt-tip pens or watercolors.
The edges of the bookmark can be cut out and lightly tinted with watercolors or ground powder from a rounded pencil shaft.
Polycolored bookmarks
Amazing pencil-leads "Politsvet" can draw with all their sides. They don't have a wooden "suit". The magic of pencils is that when heated, they melt and turn into "paints". This property forms the basis of all works of the section. Small shavings "Polotsvet" are obtained by sharpening a pencil. It is collected in boxes by color. A thin layer of shavings is applied to the surface, covered with newspaper and ironed with a hot iron for 30 seconds. The shavings melt, penetrate into the fibers of fabric or paper, and solidify when cooled.
In this way, you can arrange various products, including bookmarks for books.
You will need:
set of shavings "Politsvet";
landscape sheet of paper;
newsprint sheet of paper;
wooden plank;
iron;
PVA glue.
1. Fold a bookmark from half of the album sheet. Glue it together.
2. Choose a pattern or create one yourself.
 |
 |
 |
 |
3. Put the bookmark on the board. Lay out the pattern with shavings.
The thinner the layer of shavings, the neater and more beautiful it will turn out.
4. Close the job newspaper sheet... Turn on the iron at full power and place it on the newspaper. Hold for 20-30 seconds. Remove the iron, place it on the stand and unplug it. Remove the newspaper from the product.
Remove the newspaper sheet from work neatly and quickly.
When writing the text, the material of the publications was used:
I. V. Chernysh - Funny crafts for the holidays - 2007;
Tsamutalina E.E. - 100 handicrafts from unnecessary things (skillful hands) 1999;
Magic paper for girls (ROSMEN)
Ecumenical choice gift ideas for any occasion and occasion. Surprise your friends and loved ones! ;)
Hello dear guest readers! Do you use bookmarks for books? If so, then today's post will definitely come in handy. Feel free to take it to your bookmarks, because here we will talk about how to make a bookmark with your own hands for books and magazines.
To be honest, I rarely use bookmarks. By chance, all the materials on which I have to prepare for couples are in my in electronic format and yes fiction(which, to my shame, I read in Lately extremely rare) is also present in the ephemeral virtual space.
But at the same time, I am very inspired by the idea of creating bookmarks for books, because there is such a great variety of possible uses of all kinds of materials ... "Wow" just)) Without missing the bookmark challenge to my hamster nature, I will show you a whole sea of interpretations of this beautiful accessory: 3
Some of the ways to create bookmarks, by the way, were described in the article about hearts with your own hands (by the way, there is a master class on creating a bookmark from a paper clip).
How to bookmark a book: cute cat
First of all, I would like to present to your attention the adorable Kitten Bookman, who will help you or your child read any work with pleasure. The bookmark is quite simple, it can even be done with children.
For a cat you will need:
- thick synthetic felt
- threads in felt color or contrasting
- rhinestones
- ribbon, lace
- glue for rhinestones
- patterns
- pencil to transfer patterns to fabric
- for eyes: light acrylic paint (in my case, silver) and two black half-beads
Cat patterns (on the pattern, you can also mark all the future elements of the cat: rhinestones, bow, etc.):
 Cut out two parts from felt, mark a muzzle on one of them with a pencil.


After stitching, the cat should look something like this:

Via acrylic paints draw a Book muzzle. The under-eye circles should be slightly larger than the half-bead eyes.

While the painted parts are drying, give the cat a bow. To do this, fold the lace and ribbon as shown in the photo.

Fold the structure in half and sew in the center.

Pull off the center to give the bow an elegant look. You can glue or sew on the center of the bead.

Now glue the half-bead eyes for the cat. On each of them, you can put a small flare for naturalism. Also outline the places where the rhinestones will be glued.

Here's what I ended up with:

With the help of such a pattern (by slightly modifying it), you can make a dog, a mouse, and many others.

How to make a paper bookmark
All master classes are clickable, so feel free to click on them to enlarge.
Monster
An unusual bookmark - a monster can be made from a regular sheet of paper.
The creation process is simple:
- Take a square, fold it in half diagonally.
- Bend the smaller corners towards the top.
- Fold back the edge so that the corner touches the middle of the original fold.
- Fold back the narrow corners and fold the protruding sides inward.
- Now the bookmark can be decorated according to your wishes: it can be a monster, a smiley or something else.
The monster bookmark can be given, by the way, to the same boys on February 23 - interesting, useful and not expensive.

Mustache and more
A bookmark - a corner can be created much easier: for this, cut out a square and a triangle from a sheet of paper with a small margin for gluing. Also cut out the mustache using the photo below.
Spread the triangle around the edges with glue and attach to the square. Stick the mustache on top. Again, instead of a mustache, there can be eyes, a bow, just beautiful patterns or something else.

Pom-pom bookmark
A very simple, but no less effective than the previous ones, option. Take a skein of knitting thread for him, tie it with thread, cut the edges and straighten the threads. Glue the pompom to the paper base.
And again cats
The idea is quite simple: cut out the outlines of the cats (or other animals) and slightly dampen the paper. And then draw all the patterns that come to mind. Example in the photo
Tip: so that the bookmarks do not lose their original appearance in the future, seal them on both sides with tape or adhesive film sold in stationery stores.

Multifunctional bunnies
In this case, it turns out interesting way using the same accessory as a bookmark and a spool of thread.
Animals cut from thick paper or cardboard will look beautiful. The most important thing is to make incisions at the location of the front legs.

We print on a printer
This stylish set of three bookmarks showed up on Wikihau. It needs to be printed on a color printer. You just need to cut out all the bookmarks, and make an incision in the pig along the white line.
 Animal theme
Three unusual forest friends will also make great reading companions when cut out of thick cardboard or paper.

The following options are somewhat easier to cut. Plus, they can even be cut from fabric using designs as sewing patterns.

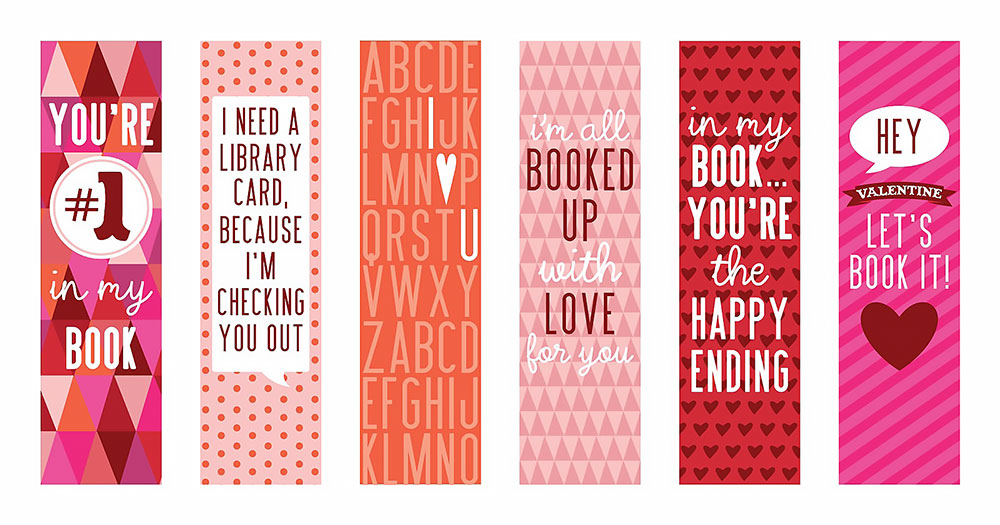
For lovers
The most best recognition in love - valentine. Why not make it a little more functional by giving it the form of a bookmark for books? This is exactly what the two series of valentine designs will allow you to do.
The first one depicts beautiful prints with all sorts of declarations of love.
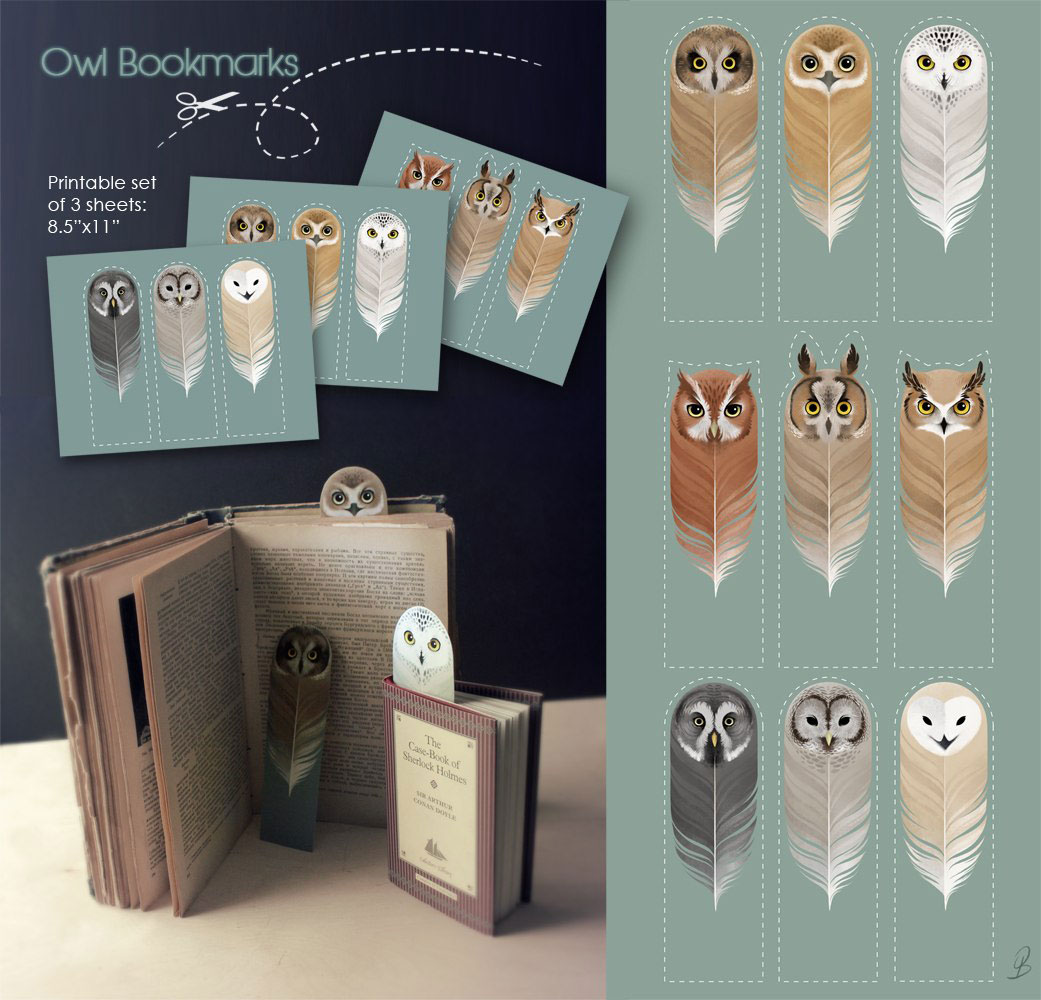
 And on the second - owls with appropriate wishes. Very popular animals today.

Speaking of owls ...
I found the nicest selection of owl skins from as many as 9 pieces. Feel free to take them to your reading assistants.
Do you like My Little Pony?
If yes, then here are as many as 8 images that you can use to memorize the desired page with the characters of the main characters.

Totoro
These two images of bookmarks will look wonderful when sawn and burned out of wood, but they will turn out well on a paper basis: 3 In addition, sketches can be printed even on a black-and-white printer, because their colors are very close.

Cloth bookmark: back to felt and paper clips
Bow
To bring this wonderful bookmark to life, prepare a paper clip, a piece of colorful cotton cloth, glue and scissors.
Take a piece of fabric and fold it as shown in the photo. Sew the structure in the center and attach to a paper clip with another piece of fabric.
Scary cute Cheshire
Use purple, raspberry, pink, and white felt to create one of two wonderful variations. You can cut out parts using a photo. Beads will become the eyes and pads on the legs, and various ornate patterns can be created using embroidery with threads.

Double-sided bookmarks
Or even two-ended. The convenience of these lies in the fact that the bookmark is visible from both sides, and it has much less chance of falling out than the usual one. This can be made from felt and dense braid.

And then he turned to the romantic theme - hearts.

Mushrooms
"I raised mushrooms ..." - a song from a very peculiar OST to "Barvikha" pops up in my head. Remember this series? I didn't really see him at all, but the song impressed me and sat firmly in my head.
I also suggest you grow mushrooms, or rather their homemade felt interpretation. To do this, take felt of your favorite color and cut out the appropriate parts, and then sew. In the head area, you can put a little padding polyester for volume.
 Friends of the Bookman
All of them were not made by me, but they are very similar to the first purple cat. In the first case, it is a mouse and a hamster. The principle of creation is the same as for the Bookman.

This cheerful trinity is also created in a similar way. But the faces here are separate and stuffed with padding polyester.


More recently, I wrote about unusual laces and how to tie them. What am I doing? Just laces as a bookmark will do very well.
By the way, good bookmarks come from good materials... From such a set you will definitely get interesting and unusual models even when using the simplest master classes.
Best regards, Anastasia Skoreeva
8 178 411
When reading a book, it is important to remember and fix the page on which you stopped, in this case a bookmark will help. It is not at all necessary to go to a stationery store to purchase this simple accessory, we recommend making bookmarks for books with your own hands. Trust me, it's very simple! We offer you to make several original bookmarks for books from colored paper, felt, threads and paper clips. Take note of the ideas below.
So, first, let's look at a few simple ways and make a bookmark for the book with our own hands, using the materials at hand.
From paper
Bright and very beautiful crafts from paper can be made with children. Implement unusual ideas in life.Option number 1 - Worm
You will need:- Sample;
- Strips of colored paper;
- Colored cardboard sheet;
- Glue stick;
- Scissors;
- Ribbon;
- Hole puncher.

Option number 2 - Heart
If you are looking for unusual ways creating bookmarks for books from colored paper, then this option is just for you. You will need a minimum of time to work.You will need:
- Sample;
- Scissors;
- Glue stick;
- A sheet of colored paper.


Option number 3 - origami hedgehog
Let's start creating origami from paper, we get wonderful bookmarks for books. So, let's begin.You will need:
- A sheet of brown and light brown origami paper;
- White paper;
- Black marker;
- Scissors;
- Glue.
- Fold the light brown paper diagonally in both directions.
- Bend the sheet to form a triangle, upper part fold the sheet in half.
- Now fold the right side of the triangle in the middle and then the left side.
- Next, we unbend the edges, the left side of the triangle must be folded parallel to the central vertical line of the figure.
- Repeat the same for the second side.
- After that, you need to bend both ends into the pockets formed.
- Insert a sheet of dark brown paper into the corner of the bookmark, draw thorns on the brown sheet with a regular pencil, cut and glue.
- Make eyes, draw a nose. This completes the creation of origami bookmarks for your books.
Option number 4 - Origami Christmas tree
See a few more cool ideas that will come in handy when creating bookmarks for a book, check out the proposed master class. You will definitely delight children with such origami bookmarks for books.
You will need:
- Green origami paper;
- Brown paper;
- Glue;
- Scissors;
- Sequins.

Option number 5 - Bookmark with weaving "tie"

You will need:
- 4 strips of paper in two colors;
- Scissors;
- Double-sided adhesive tape.

Option number 6 - Bookmark - mouse

You will need:
- Simple pencil;
- Colored paper;
- Lace;
- Scissors;
- Stationery glue.

From felt
Quite interesting are not only paper bookmarks, but also felt. Let's try to make them together.Owl

You will need:
- Sample;
- Pieces of felt purple, pink and white;
- Threads;
- Needle;
- Glue gun.

The dress
You will need:
Execution technique:

- Transfer the outline of the pattern to the fabric and piece of felt.
- Cut out these parts, glue them together, then you need to sew everything along the contours.
- Glue the dress to the elastic and you're done. Such a bookmark self made will be a real decoration for your book.
From threads
Make an original thread bookmark using simple scheme manufacturing. It’s very simple.Pompon
You will need:- Knitting;
- Scissors.
- Wind the threads around your fingers as shown in the photo.
- Tie the resulting thread in the middle, leaving a hanging edge.
- Then cut the tied skein at the sides to make a pom-pom.
- Shape the pompom into a ball using scissors. You can make such tabs from threads of various colors according to your own taste.
From paper clips
Even ordinary paper clips can be the basis for a unique bookmark. It is enough to decorate this stationery with a bow, buttons or thread and you will get a funny bookmark. Another idea is to straighten a paper clip, bend it in the form of a heart, an asterisk, or a musical key. Isn't it original?
Try to make an exclusive bookmark yourself, it's very easy. Imagine and admire the results of your own work!


Use different cool ideas scrapbooking, experiment and get creative.


A few more interesting ideas and master classes

We have done large selection a variety of ideas, where you will find the most that are very easy to do with your own hands. In this collection, every student will find something interesting for himself and will become even more fun.
We offer you a selection of amazing bookmarks for books that everyone can use for their own pleasure. With such original bookmarks you will want to open the book even more often. It remains only to choose the one that you like the most and start creating such an interesting one. In addition, September 1 is almost on the nose and reading of books will definitely increase. So why not make the process even more fun?
25 DIY bookmarks
The simplest version of a bookmark, which is very easy to make with your own hands, is a flat cardboard bookmark with protrusions to cling to the page. Choose who will hold the book page, cut out a lead, and start reading your favorite book.

Bookmarks for books on rubber bands are a very convenient option, because both inside the book and from the outside of it nothing will look out and, accordingly, will not get wrinkled.


And if you sew a small pocket to the elastic band, you get a kind of one in which you can store pens or pencils, or stickers to mark important points... This bookmark is suitable for textbooks or lecture notes.

Bookmarks-corners attract book lovers because, firstly, they are very easy to make, and secondly, such bookmarks can be very different: with eyes, teeth, overhead elements, or with interesting phrases... These bookmarks for books will especially appeal to your liking.


Knitted or crocheted bookmarks will immediately show that this book belongs to a real needlewoman. Such a bookmark can be a great gift, because knitted sweaters and scarves are so commonplace.

The herbarium produces not only beautiful applications and, but also very delicate bookmarks for romantic natures who love to dream and admire nature. - read the link.

Even ordinary paper clips can be turned into bookmarks for books. Attach a yarn tassel or cardboard cutout to the top of each paperclip - and voila! - your bookmark is ready.

Bookmarks for books are also possible. The easiest way is to paint the stick with paints. A more difficult option is to glue a figure or attach a letter to a string. The choice is yours!


A braided knitting thread and a beautiful button - this is a new bookmark for your favorite book, which is very easy to make with your own hands. Attach a button at one end and loop at the other to "close" the bookmark.

A paper bookmark in the form of a pen and a favorite quote or an inspirational phrase - what can inspire you even more for new feats and conquest of new heights?

Yarn tassels are suitable not only for, but also for original bookmarks. All you need is cardboard and some yarn. Make a bookmark of the required shape from cardboard, and turn the yarn into a beautiful tassel.

Or, simply braid the threads and tie them on the cardboard, so the flat cardboard part of the bookmark will be inside the book, and the tassel will hang down and point to the place where you stopped reading.

If you have some beads from a broken bracelet or pendant, use them to bookmark in your favorite book. String the beads on a thick thread or leather cord according to the principle.

Another convenient option for bookmarks is to use fabric or felt and ribbon. For each new book, you can make a different bookmark with the main characters or the most memorable subject from the book. Imagine!

Now you have a whole collection of amazing bookmarks that are easy to make with your own hands. And if in, you are on the first side, then a beautiful bookmark will become a real gift for your paper friend.
Master Class. Bookmark for a book
Master class on making bookmarks using the isothread technique with step by step photo
Shmykova Svetlana Nikolaevna, teacher of MBDOU - Kindergarten supervision and rehabilitation No. 90 of Yekaterinburg, Sverdlovsk region.
Purpose: Gift or souvenir for family, friends and acquaintances.
Description: The master class is intended for people aged 6 to 99 years: children, parents, educators, teachers, counselors and just people who want to do needlework.
Target: Making a gift for summer birthday people.
Tasks:
- to intensify the activities of children in making gifts with their own hands, to provide an opportunity for choice;
- develop abstract thinking, imagination;
- train the ability to concentrate attention, fine motor skills hands, eye, the ability to control their movements;
- to consolidate the skills of using an awl and a needle;
- to cultivate perseverance, accuracy and patience, the desire to bring the matter to the end.
There is nothing better than making a gift with your own hands! During production, we put into it all the feelings that we have for the person to whom it is intended. Therefore, always from a gift made with your own hands, it breathes with warmth and love.
The gift should be memorable, that is, looking at it, they will remember you.
I suggest making a bookmark as a gift. A bookmark is always needed - in the book you are reading, in a notebook, in a diary, in a recipe book.

To make a bookmark, we use the isothread technique.
Isothread (image with a thread) - nitkography is a method of tensioning threads in a certain order on a solid basis (cardboard, velvet paper).
Isothread first appeared as an art form in England. English weavers came up with a way of weaving threads on nails driven into the boards - they got lace openwork products.
So, let's choose the one to whom we want to do something nice, be patient and get started.
We need:

- colored cardboard of any kind (or velvet paper);
- ruler;
- scissors;
- awl;
- a needle with an enlarged eye;
- threads "Iris";
- stationery clip;
- pen.
Manufacturing procedure:
Cut out a rectangle from cardboard with sides of 12 cm and 20 cm. Divide the sides with a length of 12 cm in half, connect the middle, pushing along a ruler with the tips of scissors so that the cardboard folds evenly and easily.
Sewing the corners.
Cut out a template from paper to the size of the bookmark. Let's draw a right angle (in the future, when composing a composition, the angle can be any, and the sides are of different lengths), divide its sides into an equal number of segments.

(It is better to divide the sides by eye: first in half, then each of the 2 parts in half, then each of the 4 parts in half. The minimum distance between the marks is 2 mm.
If the sides are not equal, then the division must be started with the smaller one.)
Attach the stencil to the inside of the bookmark
(Remember that the front side will be mirrored.)
and pierce the holes in the cardboard with an awl.
We put the thread into the needle and make a knot.
(Threads can be used and thinner - the image is softer and more transparent)
In the diagram, the arrows show the direction of the stitch advance,

Those. on one side of the corner we move from edge to corner, and on the other - from corner to edge. From the seamy side, we stick the needle into the adjacent hole on the same side of the corner, so we get short stitches, and from the front side into the next hole on the other side, so the stitches are long.


Mirror holes (turn the stencil) for the opposite corner and stitch.

Sew the bottom corners in a different way. We draw a diagram on the template,

apply to the bookmark and poke holes.
First we sew one corner.

Then we sew the corner on the other side - the holes on the bottom side coincide.

(You can take the same color if you wish.)
Sewing a circle
In the center of the bookmark, draw a circle and divide it into 16 equal parts in the manner described above. (The number of parts may vary depending on the size of the circle.)

The arrows indicate the direction of movement of the stitches.
First, we fill the circle completely, for this, from the front side, we stick a needle into the hole opposite.


(The stitches on the seamy side are short and outline a circle.)
Now fill only a part of the circle with threads of a different shade.

We make a stitch from the front side through 4 holes.

(The shorter the stitch (from the front side), the less filled the circle becomes.)
Sew the arc with triangles
Draw an arc from the side to the circle.

We drive a needle from the seamy side to point 1 on the arc, then to point 2 from the front, to point 3 from the purl and to point 1 from the front - we get a triangle. Go to point 5 and continue sewing the triangles.


Arcs can be filled different ways, one color or different.

Sew the oval
Draw ovals above and below the circle (draw an oval stencil, divide the oval into parts, pierce holes).

We make a stitch through 6 holes

(The longer the stitch, the more of the oval will be filled.)
and move in the direction of the arrows.


Glue the inner sides of the bookmark.
The gift is ready. Imagine how surprised your friends will be!

By making this bookmark, you have mastered the basic techniques of sewing stitches in nitro printing. Now you can move on to independent creativity, come up with a composition or ornament yourself, using elements (corner, circle, arc, oval).
If you are not yet sure of yourself, I suggest more options for bookmark design.


Sailboat tab

Draw a picture using different shapes. We divide into elements and make punctures. We are stitching.
Alexandrite bookmark


Sew the corners and contour.

Snowflake Tab


Flower tab


Sew the petals: