Flowers from cotton pads step by step guide. Crafts from cotton pads. DIY crafts from cotton pads: snowball
Most people do not even think that such a personal hygiene item as a cotton pad can be an excellent material for needlework. With the help of this simple, at first glance, thing, you can effortlessly make crafts that will become original decoration interior or as a gift for family and friends.
The best part is that in this case, the person will not be required to have any special skills, most importantly, show a little diligence and patience. And if, in addition to all this, you still turn on your imagination, then in the shortest possible time you will be able to admire the most realistic flower bouquets from cotton pads.
Callas from cotton pads: a master class

Callas from cotton pads

Master class on making flowers
I would like to say right away that, although in the master class, posted a little higher, it is recommended to put a ready-made calla bud on a cocktail tube, you can not do this if you wish.
If in the future you plan to use them to create an appliqué, you can paint the ear stick green with paints or glue it with plasticine.
- Prepare cotton pads, ear buds, glue, scissors and a yellow marker
- First of all, we begin to make the stamens of our future flowers
- To do this, we take and paint over one line as carefully as possible. ear stick marker
- Next, take one cotton pad and put a pre-made stamen on it (it should lie exactly in the center)
- Lubricate lower part cotton pad with glue and glue the bud, trying to give it a characteristic shape
- We wait until the glue dries and put a cocktail tube on the protruding part of the stamen
Yes, and remember, if after connecting the opposite parts of the cotton pad you did not manage to immediately give the bud the desired shape, then wait until the glue dries, and then, as it were, turn the blank out. This will help make it a little rounder. upper part flower.
How to make a rose from cotton pads?

If you want your rose to be as similar as possible to a living flower, then you will have to work hard. The first thing you will need to do is painting the future petals. Since cotton wool is very difficult to paint over evenly, the use of a brush in this case is undesirable. Therefore, it would be better if you dilute gouache or acrylic paint in water and soak cotton pads in the resulting solution.
After they are saturated with paint, they will need to be laid out on a flat surface and wait for complete drying. If you still want to use a brush to paint the petals, then first starch the cotton pads and only then start painting them.
- Prepare the disks as we taught you a little higher
- Then take one disk and twist it into a tight tube
- After that, wrap it with a second disk, but not so tightly
- Adjust the disk so that it visually resembles a rose petal
- Repeat the manipulation until you get a lush bud
- Next, take a needle and carefully sew all the parts of your flower
- If desired, decorate the core of your craft with a pink bead.
Snowdrops from cotton pads: photo


Idea for creativity No. 1

Idea for creativity No. 2
In principle, with such crafts as a snowdrop made of cotton pads, even Small child. Since in this case you will need to make an application, all you need to prepare is glue, scissors, colored paper and a green marker.
So:
- First draw a snowdrop template
- It is advisable to do this on cardboard (this will make it easier to transfer the contour to a cotton pad)
- Next, attach the template to the disk and circle it with a marker
- Cut out the snowdrop along the lines, being careful not to leave marker marks on the finished flower.
- Make snowdrop stems and leaves from colored paper
- Take the cardboard of the desired color and use glue to fix all the components of the application on it.
Chamomile from cotton pads: photo

Chamomile from cotton pads

Figure #1

Figure #2
In order to make chamomile from cotton pads, you will need the following materials:
- PVA glue
- Thick green and yellow paper
- cotton pads
- bamboo sticks
So:
- First, cut out two perfect circles from cardboard.
- Set aside yellow, and make a cone-shaped blank from green
- Then grease it with glue and start laying cotton pads on it
- Lay them in such a way that each next element overlaps the previous one with one side (Fig. No. 1)
- After the entire bottom of your flower is filled with decorative material, put a yellow circle on top of it
- Wait for the glue to dry and stick the bud on the bamboo stick
If you do not want to make a cone, then you can glue cotton pads to the circle, slightly bending their bottom. How to do this correctly can be seen in Figure 2. Yes, and in this case it is best to starch cotton pads in advance. This must be done so that the finished chamomile does not lose its shape after some time.
Lilies from cotton pads

Lilies from cotton pads
Lilies, as well as other crafts of this kind, can be made quite simply. It is necessary to start making a flower by preparing templates for the petals. You can make them in a completely standard way. So, take cardboard, draw a petal of the desired size on it (be sure to keep in mind that you will be applying it to a very small piece of material), and then carefully cut it out.
If you are not very friendly with drawing, but at the same time strive to achieve maximum realism, then just find a suitable template on the Internet. When it is ready, it will be possible to proceed directly to the manufacture of lilies.
- Cut out the base of your future craft
- Roll a small ball out of plasticine and attach it to the base
- Using the template, cut out the desired number of petals.
- Attach each petal individually to a match.
- Insert the resulting blanks into a plasticine ball
- When the flower is ready, attach a stem to it.
If you want the lilies to be as beautiful as possible, then try to make them in several stages. First, attach the largest petals to the ball, and then the smaller ones, and at the very end, close the middle of the craft with the smallest ones. If you do everything right, then visually your flower will look like a water lily.
Cotton pad daffodils: photo

Cotton pad daffodils: photo

Flower elements carved from a dyed and starched cotton pad
In principle, a daffodil can be made in several ways, but whichever one you choose, remember that this flower has a rather peculiar core. Therefore, if you want to make the most realistic craft, then do it not from a yellow cardboard mug, but from pieces of corrugated paper.
In order to make the core, you will need to take a strip 5 millimeters wide and cut it into small pieces. And when your daffodil is ready, you will need to put a little glue in its center, and then carefully place shredded paper on it. As a result, you should get an airy and fluffy core.
First way:
- Make a template and cut out the petals
- Next, glue the thick paper with a tinted base.
- We spread three petals on the base and connect them with glue
- In the gaps formed between the petals, lay out three blanks again
- Cut out the leaves and stem of the narcissus from colored paper and glue them under the flower
Second way:
- Cut out the desired number of petals according to the cardboard template
- From thick paper we make a cardboard base
- Using glue, attach the petals to it
- We wait until everything dries up and fix everything on a paper or wooden stick
Tulips from cotton pads

Template for making a flower

Blanks for a bud
As for the tulip, it is best to do it according to the same principle as the snowdrop. That is, first make a template, cut out blanks imitating a tulip bud, and then use them to create an original picture. If, as a result of your work, you want to get a flower that can be used to create a bouquet or topiary, then make it a little differently. Cut out not only a bud from cotton pads, but also a stem and tulip leaves and reinforce the resulting blanks with cardboard.
Glue two tulips together by first inserting a bamboo stick or cocktail tube between them. Yes, and remember that in this case, cotton pads are best painted over even before you start doing something with them. If you try to paint them after the tulip is ready, then with a high probability you can say that the paint will go unevenly. How to properly paint discs, we told at the very beginning of our article.
Cotton pad dandelions

Cotton pad dandelions
Although such a craft seems very simple at first glance, there are still some nuances in its manufacture. Firstly, in this case it is best not to use standard colored paper to make the stem and leaves. If you want your dandelions to visually look like real ones, then this part of the craft is best cut out of corrugated paper.
Secondly, when fixing a cotton pad on a cardboard base, you must ensure that it is slightly wet. If it turns out that it is heavily saturated with glue, then you will not be able to fluff it even after it is completely dry. Therefore, it will be better if you apply glue to the disc pointwise.
So:
- Cut out the bottom of a dandelion from paper.
- Carefully glue it onto the cardboard base
- Apply glue to the disk and fix it on paper too
- Let it dry a little and then remove the top of the disc
- Lightly fluff the dandelion with your fingers
Lilies of the valley from cotton pads

Application of lilies of the valley
If you want to make a lily of the valley out of cotton pads, then first of all stock up on a stapler and a thin but strong wire. First you will need to make a kind of triangle out of decorative material, and then fix it with a stapler. After the blanks imitating a lily of the valley bud are ready, string them on a wire (you can also use a thread).
If you want to achieve more realism, then take small scissors and cut out characteristic teeth on the blanks. After such a kind of garland is ready, you just have to attach a stem to it and decorate it with green leaves. They can also be cut according to the drawn template. Also, lilies of the valley can be made using the application. How to do it right you can see in the figure, located a little higher.
Mimosa from cotton pads

The first way to make mimosa from disks
The first way to make mimosa from discs:
- Prepare a dense base, on which you will later stick a mimosa sprig
- Color the cotton pads in yellow and dry them well.
- Cut out the leaves and stem of the mimosa according to the template and glue them onto the cardboard base.
- Cut cotton pads into small pieces (preferably triangular)
- In between the leaves of the future mimosa, apply a thick layer of glue and sprinkle it with yellow cotton pieces

The second way to make mimosa from cotton pads
The second way to make mimosa from cotton pads:
- Cut off a thin strip of paper
- Leave one part of it whole, and cut the other into strips
- Lubricate the whole part with glue and wind everything on a bamboo stick
- Make a couple more leaves in this way
- Fold the cotton pad into a triangle and cut off the sharpest part of the resulting workpiece
- Fluff it with your hands and string it on a wire
- Wrap the stick with the resulting garland and fix the finished leaves on it
Carnations from cotton pads

Carnations from cotton pads
If you are not very persevering, but at the same time want to surprise your family with skill, then make a carnation fast way. To make such a craft, you will need cotton pads, scarlet corrugated paper, wire and a large dark-colored bead. So, take corrugated paper and cut out a round blank from it, the size of which exactly matches the disk.
In the next step, take the scissors and cut sharp teeth on all the elements. Next, you just have to string them on a wire, alternating cotton pads with corrugated paper. Decorate the top of the finished craft with a bead. Such a flower can easily be fixed on a wooden or steel stick, or you can stick it on a canvas and create a very beautiful panel with it.
Sakura from cotton pads

Sakura from cotton pads
If you think that it is very difficult to make a sakura flower from cotton pads, then you are deeply mistaken. All that will be required of you in this case is to achieve a visual resemblance to a living flower. The same corrugated paper will help you do this, but this time you will have to find a decorative material of a delicate pink color.
From it you will need to cut a small circle (it should be about three times smaller than the cotton pad itself), fold it into a cone and fix everything with a stapler. In the same way it will be necessary to do with disks. In the next step, you will need to gently fluff the top of all the blanks, and you can insert the pink center into the top of the sakura bud.
If you do everything right, then you will get a craft similar to the one that can be seen in the picture posted a little higher. Yes, it is not necessary to glue it on cardboard. You can quite easily find a beautiful twig from any fruit tree and fix the finished buds on it.
Willow from cotton pads

Sakura from cotton pads

Willow from cotton pads
In order to achieve a visual similarity of cotton pads with willow, you will have to chop it into small oval pieces. It is this material that will be used as the main element of the finished craft. As for how and where to mount it, there may be options. If you want to make an applique or a panel, then you will need to glue a piece of rope on the paper canvas Brown or just draw a twig with ordinary paints.
Next, you just have to correctly glue the cotton blanks onto the application. How to do it correctly is described in the picture. If you want to make a more realistic willow with your own hands, then you will have to put each piece of a cotton pad on a wire, and then fix everything well on a branch.
Topiary from cotton pads

Topiary from cotton pads
If you want to surprise your household for real, then make a very beautiful and delicate topiary out of cotton pads.
So:
- First of all, prepare a creamy mixture from water and dry gypsum and pour it into a container in which you plan to install the lower part of the topiary
- When the gypsum grabs a little, insert a stick into the very center of the container, on which you will subsequently fix the decorated ball
- Take a styrofoam ball and cover it with cotton flowers (roses are best for this)
- You can put them on glue or on sewing pins.
- When the top is ready, carefully put it on a stick in a container of plaster
- If desired, you can additionally decorate the topiary with beads and satin ribbons.
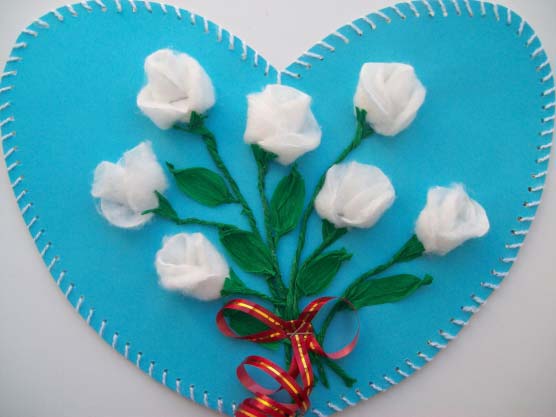
Bouquets of flowers as a gift to mom from cotton pads: photo
As you probably already understood, cotton pads are an excellent material for needlework and, if desired, even a small child can use them to make a good present for mom.
Below we bring to your attention a few beautiful pictures that will inspire you and your child to experiment further with this malleable material.
Idea for creativity No. 4
Video: Bouquet of daisies from cotton pads
From cotton pads, using additional materials, you can make your own hands very beautiful flowers: callas, snowdrops, roses, daisies. Such a composition can be a wonderful gift, for example, on March 8th. And also with these flowers you can decorate a group in kindergarten for some kind of celebration. Yes, and it can just be a craft for an exhibition or competition.
Do-it-yourself flowers from cotton pads
Data step by step master classes intended for children of the senior preschool and younger school age, their parents, as well as educators kindergarten, teachers primary school and teachers of additional education.
Let's first consider, how to make a bouquet beautiful white callas.
Callas from cotton pads
This is a beautiful and very unusual tropical flower. People call it a white sail because it really looks like a sail. And it is also called female happiness. It is believed that if you give a lady such flowers, she will certainly be lucky in her personal life and long-awaited changes for the better.
For to make a bouquet of callas with our own hands, we will need the following materials and tools:

A step by step guide to making a bouquet
- We start the work with take cotton pads and fold them in half.
- Now we draw buds on them, such as these flowers should have (if you don’t know how they look, you can find photos on the Internet).
- We take scissors and, according to the drawing, we cut out our calla buds from the disks.
- Next to us need cotton swabs. Of these, we will make the core of the flowers.
- Remove the cotton from one end of each stick.
- The other end, on which the cotton wool remains, is dipped in yellow gouache.
Our blanks for the future bouquet of discs are ready.
Now let's take the preparation, made with your own hands from a cotton pad and wrap it around a cotton swab that acts as a stalk. We smear the edges of the disk with glue and connect with each other.
Wrap a cotton swab in plasticine Green colour.
Our bud is ready.
Now let's make leaves for flowers.
To do this, we need to arm ourselves with a stroke and black cardboard.
We draw calla leaves on cardboard with a stroke. Next, using green plasticine, color them. First, we take plasticine in our hands and warm it up. When it has become softer and more pliable, we smear the plasticine inside the contour of the sheet. It is best to start such manipulations from the edge of the leaf, so it will be more convenient to gradually stretch the plasticine towards the middle part.
Using a stack, we make veins on the leaves.
We take a stroke and draw on cardboard under the flowers pot. Color the soil with brown plasticine. Now we attach the buds already prepared before this to the foliage. If your stems turned out to be short, then you can lengthen them with green plasticine.
It remains to make a pot. For this we need white plasticine. We smear it over the silhouette of our pot. Now, as a decor, we fasten the beans.
Our craft is ready.
Now the final touch remains - to arrange the work in a frame.
Bouquet of snowdrops
You can make flowers from cotton pads with your own hands, which are the very first to bloom in spring - this is gentle and cute snowdrops. The principle of operation is similar to that described in the previous section.
Materials and tools

Getting started on the craft, you need first of all make a template, on which we will cut buds from cotton pads. To make them neat, you can find drawings or photos of snowdrops, print, cut and circle.
Flowers are ready. Now to us need to make stems. Just as in the case of callas, we make them from cotton buds, but our actions will be slightly different. At one end, the cotton wool should be removed. On the second - lift a little up. We wrap the stick itself with green plasticine.
We cut each bud in the middle part. In these cuts you need to insert the stems. To make our snowdrop strong, we glue green plasticine over the junction of the bud with the stem. That is, in other words, we make a pedicel.
The heart of a snowdrop should be blue. We decorate it with plasticine of the appropriate shade. Now we attach the leaves.
Next, we make a vase for the bouquet with our own hands. A round jar of cream is ideal for her role. Decorate the vase with a bow. To do this, glue a small ribbon around its circumference. We leave the ends free and tie a neat bow out of them. We attach a bead to it.
Glue plasticine to the bottom of our vase. We will insert our snowdrops into it.
When everything is ready, it remains only to put cotton wool in a vase under the flowers. So the impression of a snowdrift will be created snow through which our spring flowers break through. Now you can send our craft to the exhibition or give it as a gift.
Do-it-yourself daisies from cotton pads
Another wonderful flowers that you can make with your own hands from cotton pads are chamomile. such crafts can be presented, for example, on the Day of Family, Love and Fidelity, the symbol of which are these field beauties.
Materials and tools
 To make a charming card with daisies from cotton pads, we need:
- Plasticine.
- Colored paper.
- Cotton discs.
- PVA glue.
- Simple pencil.
- Scissors.
- Colored cardboard.
Making daisies
Take half a sheet of cardboard. Draw an oval on it with a pencil. Then we cut out what we drew.
Now we will make stems and leaves. For this we need green paper. Leaves are better to make voluminous. To do this, you just need to bend them in half, then unbend and leave in a half-bent state.
We take a sheet of cardboard and glue our stems and leaves to it.
If you are afraid that you will not succeed neatly or you will cut off something superfluous, then draw ballpoint pen on the disks of the line, along which it will be convenient to cut the flowers.
As you know, daisies have a yellow center. So that our flowers also have this, we sculpt from yellow plasticine balls. We glue them to our buds.
At the end of the work, we attach the petals to the stems.
Our craft is ready.
To make daisies look more impressive, decorate them with a frame that can be made from anything - plasticine, beans, origami, in general, which is enough for imagination.
roses
A little more difficult work for you if you want. make your own roses. They have a bud, the manufacture of which will have to work harder. These do-it-yourself flowers made from cotton pads will look like living ones and will definitely please the gifted lady.
Materials and tools
For making roses you will need:
- Scissors.
- Cotton discs.
- Corrugated green paper.
- Gouache.
- Skewers.
- Foam sponge.
- PVA glue.
rose making
 We start the product with, which we glue to several (depending on how many flowers you plan to include in your bouquet) cotton skewers. An approximate photo of how to do this can be found on needlework sites.
Now spread a little glue on the edges of the disks and connect these edges. We will get a button similar to calla, but more closed.
Now take another cotton pad and glue it to the one attached to the skewer. As a result, we should have 6-7 cotton pads glued on top of each other in a checkerboard pattern.
To make the craft look like real roses, need to make sepals. This work is easy. We take corrugated green paper and cut out a figure resembling a fence from it.
Then we spread it with glue and wrap it around the bottom of our bud.
Next to us need to make a stem for a rose. To do this, take corrugated paper and cut a strip out of it. The strip should be narrow. We coat it with glue and wind it in a spiral onto a skewer. We also fix the tip with glue.
From the same corrugated paper cut out the leaves for our flowers. Cut them out and glue them to the stems.
The craft is ready.
Now you know how to make flowers from cotton pads easily and at no extra cost.
Cotton pad fakes


It seems that needlewomen will stop at nothing on the way to new discoveries. So, today they use cotton pads to create hand-made crafts. Yes, ordinary discs that we are used to using for cosmetic purposes. And how beautiful do-it-yourself flowers from cotton pads turn out! Try it, and maybe you will discover a talent in yourself.
Improvised materials in applied art
What modern needlewomen do not do from cotton pads! It would seem that waste and absolutely nondescript material - what can be done from it? But looking at such a craft, it seems to us that this is some kind of magic, since ordinary cotton wool discs suddenly turned into an elegant bouquet or an original topiary.
Perhaps the simplest creative solutions are applications from cotton pads, because it is enough just to fix them with glue on paper. Such crafts are very fond of school children.
If you are still in a creative search and do not know what hobby you will like, try making crafts from cotton pads. Every hostess has everything that is necessary for modeling real masterpieces, so you can avoid additional financial costs for purchasing accessories.
Cotton pad topiary looks great. Firstly, they are simply modeled and change their shape, secondly, they are easy to attach, and thirdly, the discs can be painted or coated with a fixing varnish. The disadvantage of such crafts is only that over time they will lose their former whiteness and become gray.
Today we will learn how to design original crafts from this waste material. But before proceeding directly to creativity, let's study a few basic aspects of the work:
- You can purchase absolutely any cotton pads in texture. As a rule, these products are always bilateral.
- If you are modeling flowers from cotton pads, then you can fix the petals with glue, a stapler and threads.
- If you plan to seriously engage in this type of applied art, get a special glue gun. So it will be much more convenient for you to fix the flower petals on the frame.
- Bouquets are based on special floristic sticks or they are made independently from wire and satin ribbon.
- Ribbons, beads, beads, rhinestones, etc. are used to decorate bouquets of cotton pads.
- The base of the topiary can be made from foam or you can purchase a ready-made plastic ball.
- If your composition will "grow" in a pot, the earth can be replaced with coffee beans or nutshells.
- To prevent cotton pads from getting dirty so quickly, sprinkle them with regular hairspray.
- It is better to work with gloves, so as not to contaminate the material during the modeling process.
- Any pots can be used. Many housewives take as a basis an ordinary glass container, which is decorated with decoupage drawings.
Using cotton pads: a non-standard solution
Today we will try to make flowers from cotton pads with our own hands. The master class will clearly show you the creative process in stages. Such original bouquet of flowers can become a decoration of your interior. It can also be used to decorate wedding celebrations or give it to a loved one, because things created in the hand-made style are always appreciated.
This tutorial uses a satin ribbon to create the petals. But you can replace it with corrugated paper. Shall we start?

Necessary materials:
- 50-60 pcs. cotton pads;
- green satin ribbon;
- beads;
- needle;
- threads;
- pins;
- glue;
- the capacity is small;
- atlas beige colour;
- assembly foam.
Step by step description of the creative process:
- So let's get everything ready. necessary materials. Now we can start creating our first author's masterpiece.
- We take two cotton pads, a needle with a white or beige thread, one large bead.

- We turn the first disk in the shape of a tube.

- Now we take the second cotton pad and wrap it tightly around the made roller.

- We should get a kind of bud.

- There is no need to tie a knot as it can simply slip through the loose texture of the disc.
- We turn the bud towards us in order to clearly see the bottom hole. Insert a needle and thread into it.

- Gently pull the thread through the entire bud and bring it out in the center at the top.
- Now we string a bead on the needle and pull the needle down, fixing the center of the flower.

- We bend the bead with a thread at least once, but we do it so that it is not visible after attaching to the flower.
- Now wrap the thread several times around the base of the bud, tie and cut.
- It's time to green up our topiary. We take a green satin ribbon 50 mm wide. We measure 10 cm and cut several strips.

- We bend the upper corners of the rectangle evenly to the center.

- Holding the resulting triangle with your fingers, we make a seam along the bottom line.
- We do not tie the thread into a knot, leave a small margin.

- Pull the thread carefully. We should get such an original leaflet.

- Now it remains only to collect our bouquet. We take a container and fill it with foam for installation work.
- As soon as the filler dries, carefully cut off the protruding edge, making it as even as possible.

- To make our pot look original, we wrap it satin ribbon beige colour. You can also color it acrylic paints or cover with paper.
- Using needles with tips, we fix the petals around the entire circumference of the pot. If desired, they can be attached with hot glue.

- Now fill the pot with flowers. Be sure to fix them with hot glue.

- Alternately glue the layers of flowers to make the craft voluminous.
- Don't forget to add some leaves on the surface.

- Now we decorate the pot with a thin satin or lace ribbon and leave the craft to dry completely.


The flowering time for most flowers, alas, is short. But this is no reason to be upset. You can capture the natural beauty of daisies, roses, peonies, and other flowers by creating their artificial counterparts. This article "Cross" will teach you how to create flowers with your own hands from improvised materials.
Flowers from cotton pads
Many do not even suspect that cotton pads can be used not only as a means of hygiene, but also as a universal material for creating all kinds of inflorescences.
The surface of cotton pads can be smooth, or maybe with a printed pattern. Depending on the type of flower, choose the one that suits you best.
Even a child can make a spring card with primrose using cotton pads, scissors, glue, colored paper, paint or simple felt-tip pens.

If the cotton pads are a little “fluffy” around the edges, then you will get such airy roses. Looks very gentle and original!
From cotton pads, a cotton swab and a straw for drinks, you can create an elegant calla.

Cotton pads and a stationery stapler will help to make an original chamomile) If desired, instead of clerical brackets, you can use glue, and paint the chamomile with gouache or acrylic paint.

Cotton pads are very often used in the manufacture of a very popular flower - roses. Pearls will decorate roses, which will give nobility to the resulting flower arrangement.

The secrets of creating flowers from cotton pads with your own hands will be revealed by SunduchOK113 in a video master class:
From a large number roses can be created such a festive Christmas. To do this, you need a round blank, glue, cotton pads and various elements for decoration (ribbons, beads, rhinestones, sequins, etc.)


Flowers from cotton buds
Cotton buds are also an affordable and wonderful material for creating beautiful flowers.
Using cotton swabs, plasticine and colored paper, you can create cute daisies.

Willow twigs from the tips of cotton buds look very natural on an Easter card)

Using the tips of cotton swabs, paints and colored paper, you can make bright and fluffy dandelions.

You can make creative ones from colored cotton swabs and a round foam blank. For example, such a mischievous chamomile.


When making flowers from cotton buds with your own hands, you can choose any paint (gouache, watercolor, acrylic):

From the colored tips of cotton swabs, you can make mini flower beds with carnations.

Flowers from egg trays
Egg trays are one of waste materials for needlework. Usually egg containers are thrown into the trash, not knowing what beauty can be created from them! DIY flowers from egg trays will decorate the interior of the house, photo frames, wreaths, mirrors, etc.
To make these flowers you will need:
- egg trays (cardboard and plastic can be used);
- brush and paint (gouache, acrylic);
- scissors;
- glue;
- wire.
We cut the egg tray into separate sections, after which we form each section with scissors. The height of such blanks may be different. The resulting petals are painted with paint, preferably in two layers. Further, depending on the type of flower you are making, one blank can be inserted into another, forming a bud. We fix the elements of the resulting flower with glue.

The materials and the process of creating flowers from egg trays are discussed in detail in the MK Masterpieces of Needlework:
We bring to your attention the most common types of flowers from egg trays. But remember that you can come up with the shape of a flower yourself!


The frame of the summer wreath is also made of egg trays. This can be decorated with chamomile, cornflowers or pansies.

From plastic egg trays, you can even make a small masterpiece of floristry!

For example, snow-white roses from plastic containers, combined with pearls and decorative gypsophila, form such a delicate bouquet.

Decorative moss or ferns, as well as red ribbons and beads, will add brightness and festivity to a Christmas wreath of plastic roses.

A personalized flower on the table will please a colleague or your loved ones:

Let's see how you can make an exclusive photo frame out of a simple one:

A simple mirror decorated with flowers from the trays will look more interesting and sophisticated.


Gorgeous mirror decorated with lush peonies

Flowers from disposable spoons
Disposable plastic spoons can also be used to create flowers.
From simple white spoons you can make this

Spoons can be used not only white, but also bright colors, especially when creating .

When creating flowers from, you can use spoons different sizes and colors:

To create these decorative water lilies, part of the spoons were painted with gold spray paint. White and gold water lilies side by side look very stylish!

In addition to all kinds of paints, you can decorate spoons with decorative sparkles and glue:

DIY Gifts and Crafts Ideas offers MK for creating a bright spring from disposable spoons:
From white spoons, drinking tubes, plasticine and colored paper, you can create a spring flower bed. Petals (white spoons) and stems (tubes for drinks) of snowdrops are interconnected using ordinary green plasticine. Cut out snowdrop leaves from colored paper. We make yellow ones from plasticine.

With the help of thermal treatment (lighter flame, candles), spoons can be melted and deformed into a petal of the desired shape. Then paint the petals suitable color and collect . It is convenient to use spray paint. Such flowers can be used even in the manufacture.

Using the same principle, you can make this. You can learn all the secrets of its manufacture in the master class.

wire flowers
There are different technologies for creating flowers from wire with your own hands.
Flowers made of wire and nylon
For example, from unnecessary nylon tights and wire, you can make nylon flowers.

The technique for making nylon flowers is quite simple, but you can create real floral masterpieces. For example, -phalaenopsis, which is not immediately possible to distinguish from the real one!) A wonderful element of decor for both home and office!


Wire flowers and nail polish
Another handy tool for creating wire flowers is regular nail polish.

It is better to use a fresh varnish of a more liquid consistency so that it flows from the brush.
The varnish is applied to the edges of the petals formed from the wire. After the first drying of the varnish, additional layers of the same color can be applied or, for example, topped with glitter varnish.
To prevent the varnish from dripping onto one side of the flower, secure the stem vertically in a dishwashing sponge.
Olga Lazarchuk reveals in her master class the features of making flowers in this way:
And ladybug sure to bring good luck!

If you do not have time to take care of ordinary flowers, then your window sill can decorate this one.

A comb with delicate flowers will be a worthy decoration for your hair:


Flowers made of wire and floss
Ganutel - a technique for making flowers from wire and.

To create such a flower you will need:
- wire
- floss in different colors
- scissors (nippers)
- pliers.
We make a spring out of wire: we wind a thin wire on a long rounded object, for example, a pen rod or a simple knitting needle.
From the resulting spring we form the petals and leaves of the flower. Next, on the resulting flower frame, we begin to wind floss threads in a certain order. We connect the resulting flower details!
More clearly, this process of creating flowers can be seen in the DIANA Bilohorka master class:
From hard wire and soft threads, you can even create such airy beauty!

Burlap flowers
Anyone can create flowers from an unusual material - burlap. This is a very popular pastime that is born for!

Beginners can start with the simplest, make a rose from burlap.

To do this, you will need the material itself - burlap, matching threads and a needle.
If you can use it carefully, then the needle and thread can be replaced with hot glue.
We cut off the burlap 4-5 cm wide, about 1 m long. Fold the resulting strip in half along the entire length and begin to twist the rosette.
YOU WILL USE
See the step-by-step process of folding a rose in this way in the master classes "Cross":
Burlap roses look very stylish! They can decorate various things in your home, for example, make such designer lamps ...

... or make such a wreath-decoration for the door:


There is a universal technique for creating flowers from burlap. In this case, the burlap is glued onto the finished frame of wire petals.

First, the burlap is coated with PVA glue.
After drying, the fabric will become firmer and more comfortable to take on any shape.
From the wire we prepare the frame of the petals for the flowers, we wrap the wire with colored adhesive tape.

The resulting petals are superimposed on the glued pieces of fabric and are again treated with glue from above.

The workpiece must be allowed to dry in this form for 1 day. Next, cut out the resulting petals along the contour of the wire so that the edges are perfectly even. We bend the cut elements of the flower in the right direction and form a flower.
Thread flowers
Flowers from pom-poms
Thread pom-poms are a great element for creating flowers! With their help, you can create a spring mimosa:

Or a bouquet of summer dandelions.

MASTER CLASS ON THE TOPIC

Anyone can make flowers from threads with their own hands - and even without a crochet hook and knitting needles!

It is clearly shown how and from what materials such flowers can be made in the master class by Natalya Melnik:
Master class on creating a solar dandelion
To make a dandelion, you will need threads of two colors.

We wind yellow threads on any hollow frame. Next, we sew the middle of the wound threads with the same threads and coat with PVA glue. We remove the frame, and tightly wind the threads on the middle of the workpiece, stitched and smeared with glue.


After the glue dries, cut the workpiece in half. We cut the yellow threads and straighten the resulting dandelion.


We make sepals from green threads.


We make the stem from wire wrapped in green threads.

A dandelion leaf can be crocheted.

Thread flowers can be made using the Tenerife loom (flower loom). Flowers are created by winding threads in a certain order on circle skewers. This process is very addictive and captivates not only adults, but also children. The resulting flowers can decorate clothes, hats, scarves and bags.


In work, you can use twine or jute of natural color, dyed or bleached.

Twine flowers…

...and jute
The process of weaving flowers can be seen in detail in the Povyazuli master class:
You can buy a Tenerife machine at a needlework store.

Or do the same with your own hands. The easiest option is to cut it out of cardboard

There is another option for a homemade machine. To create it, you will need cardboard, needles, compasses, glue and a large needle.

Cut out two circles from cardboard and glue them together.

The resulting circle is divided into equal parts. According to the lines we stick needles or pins:


We form the core of the flower according to:


After the "birth" of the flower, remove the cardboard base:

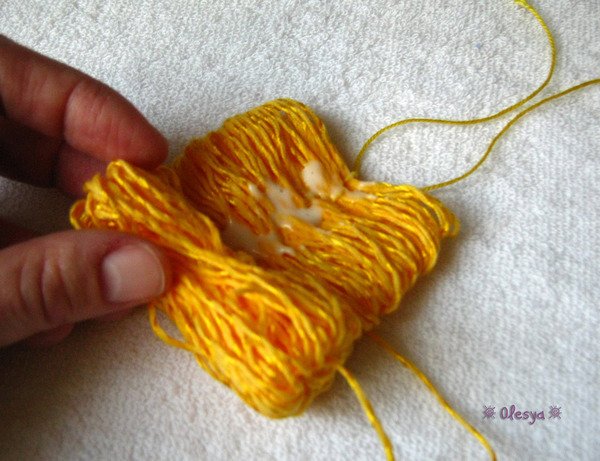
Good day to all. Since you are now reading my article, it means that you like to make various beautiful things with your own hands and you have come here for inspiration and new ideas. Well, what are we going to do? Today we will make roses from cotton pads.
For this we need:
- Cotton pads.
- Aluminum wire.
- Glue.
- Scissors.
- Green gouache.
- Brush.
- Hairspray.
Take the wire of the desired length and cotton pads. The length of the wire depends on how high you need the stem of the future flower. Cotton pads will need to be slightly torn, as shown in the photo. And wrap them around the wire. For reliability, we fix the ends of the cotton wool with glue. The stem is ready. If the stem turned out to be uneven in thickness, then there is nothing to worry about, because real flowers have irregular stems.

Let's put our stems aside for now. We take more cotton pads and cut leaves out of them. In fact, you can cut out the shape of the leaf at your discretion, I decided to cut out the simplest shape.


Now we paint the stems and leaves on both sides with green gouache. It is better to paint on a newspaper in order not to stain the table.

We leave to dry. As long as we have free time. You can make rosebuds. The flower can be collected on the stem, or separately, as it suits you. We take again cotton pads and glue. We roll the first disk with a tube and fix it with glue.

We take the second disk and glue it on top of the tube, without gluing the edges of the disk on top, then we will correct (straighten) them as needed. So we glue other disks until the rose reaches the desired size.


The bud is ready, you can stick it to the stem (if, of course, it is dry).

Then glue the leaves. You can glue the leaves along the entire trunk, but I wanted to glue them only at the bottom of the bud.

When the glue has dried well and all the details of the flower hold well, the flower is ready. From these roses you can create a beautiful flower arrangement that will decorate a room in your home.


As you can see, you can make flowers not only white. Using gouache, you can make flowers of any color. Yes, I almost forgot, I advise you to apply hair styling varnish to the painted places on the flower, thereby they will not be painted and the varnish will give them a little shine. Goodbye, see you again.