New Year's textile decorations: a clock and a ringing Christmas tree. DIY Christmas toys How to make small DIY Christmas decorations
What do you need
- ruler;
- pencil;
- a sheet of cardboard;
- scissors;
- thread or thin rope;
- wrapping;
- thin decorative ribbon.
How to do
Using a ruler and a pencil, draw a grid of identical squares on a sheet of cardboard. The length of the sides can be any, it all depends on the desired size of the future Christmas decoration.
Cut out cardboard squares. Glue them into cubes. Before gluing the last segment, fasten a loop inside the cube. Let it dry and then attach the lid of the box.
Wrap the blank with paper and tie a ribbon on top.
2. Salt dough toys
What do you need
- 1 glass of flour;
- ¹⁄₂ glass of water;
- ¹⁄₂ cup of salt;
- baking paper;
- cookie cutters or paper templates and a blade;
- tube for a cocktail;
- stamps or toothpicks;
- baking sheet;
- acrylic paints or gouache;
- thin brush;
- rope or thread.
How to do
Mix flour with water and salt and knead the dough. Divide it into several pieces and roll each one out on baking paper. Using cutters or templates and a blade, cut out the shapes you want.
Use a straw to make holes in the corners of the toys. You can stamp the pattern with stamps or a toothpick.
Put the blanks on a baking sheet and place in the oven. Bake for 10 minutes at 130°C.
Color the finished decorations to your taste. With green needles, red and white are best combined.
When the paint dries, you can make loops.
rainforestislandsferry.comWhat do you need
- a sheet of cardboard;
- a set of push pins (at least 200 pieces);
- multi-colored nail polish;
- foam blanks in the form of eggs;
- Super glue;
- fasteners from unnecessary earrings or paper clips;
- ribbon or thread for a loop.
How to do
Put cardboard on the table, stick push pins in rows and cover them with nail polish. Leave to dry overnight.
In the morning, you can decorate eggs from foam. Carefully stick the buttons into the workpiece. It is important that one row slightly covers the other.
Use superglue to attach a fastener or paperclip to the top of the toy. Stick on it decorative tape or thread.
4. Thread stars
What do you need
- star template;
- a sheet of cardboard;
- pencil;
- scissors;
- Super glue;
- beads;
- any yarn.
How to do
Attach the template to a sheet of cardboard and circle with a pencil. Cut out the star along the outline. Glue a bead to the tip of each beam.
Secure the tip of the yarn in any convenient place with superglue. Wrap the star with yarn. Tie the end of the thread with a loop to hang the toy.
5. Button Christmas trees
What do you need
- multi-colored buttons;
- wire;
- wire cutters;
- thread.
How to do
Sort buttons by color scheme. Line up each set by size. Bend the wire in half. Step back from the bend and throw one end of the wire over the other so that you get a loop. At the end, you can fasten a thread on it to hang a toy.
String on the smallest button. Add buttons one at a time bigger size. Important: push the wire through the two buttonholes each time. For buttons with four holes, use the holes diagonally. Then add a few dark buttons of the same small size: this will be the trunk of the tree.
Twist the wire again and cut off the rest. Tie a thread to the loop.
 makeit-loveit.com
 What do you need
- cones;
- Super glue;
- a skein of thin rope;
- colored tape.
How to do
Glue a string loop to the base of each cone. Tie as many bows as you need. Attach them to the cones with glue.
7. Snowmen from socks
What do you need
- children's white socks;
- foam balls-blanks of different sizes;
- scissors;
- white thread;
- wide red ribbon;
- thin red ribbon
- a piece of colored felt;
- pins;
- black buttons.
How to do
Put two Styrofoam balls in a baby sock so that the bottom is large and the top is smaller. Drag the sock between the two balls with a white thread. 
Tie a wide red ribbon on top and cut its edges.

Tie a thread over the top segment of the snowman. Turn the rest of the sock inside out. Cut out a rectangular piece of felt and wrap it around the snowman's head to make a hat. Secure it with pins and fold in the brim.

Now tie a thin red ribbon around the top of the snowman's hat. Make a loop from the long ends of the ribbon.

Pin two black buttons to the snowman's bottom ball. Using small pins with multi-colored heads, make a nose and eyes for the snowman.

8. Rope balls
What do you need
- Balloons;
- a bowl;
- PVA glue;
- a skein of jute rope;
- glue gun or superglue;
- can of paint optional.
How to do
Inflate small balloon. Pour PVA into a bowl and soak the rope in it. Tie the end of the rope around the tail of the ball and randomly wrap the future toy. As an option: you can first wrap the ball, and then dip it into a container with glue.
Let the toy dry. Then pierce the balloon and pull it out of the frozen toy frame. Don't forget the loop to hang the decoration.
Make several toys of different sizes according to this principle. Such rope balls look spectacular on a Christmas tree or under the ceiling. Especially if they are painted.
 sugarbeecrafts.com
 What do you need
- Super glue;
- broken light bulbs;
- a skein of thread or ribbon;
- gouache or glitter paints.
How to do
Glue loops of thread or tape to the bulbs. Dip the bulbs one by one in the colored paint. Let the toys dry.
10. Dried oranges
What do you need
- oranges, lemons or limes;
- sharp knife;
- baking sheet;
- baking paper;
- thick needle;
- wire or thread.
How to do
Carefully cut the citruses into thin circles. Lay them out on a baking sheet lined with baking paper. Bake for two to three hours at 100°C.
Make a hole in the future toy with a needle. Pass a thread or plastic wire and fasten to make a pendant.
Do you love needlework? Then you'll enjoy doing Christmas decorations with your own hands! This is a pleasant and exciting activity for the whole family that will not leave anyone indifferent - you will spend several evenings with pleasure making toys for the Christmas tree with your own hands.
What do we use for the material
What do you need to make DIY Christmas decorations? You can use almost anything that comes your way. If you want, you can buy special consumables (sold in art stores), or you can use what is in any home. So what to prepare:- plain paper (suitable for making patterns);
- pencils and markers;
- ordinary, white and colored cardboard (velvet can be used);
- sharp scissors and a dummy knife;
- glue (PVA or glue gun with rods);
- threads and needles;
- yarn of different shades;
- various decorative materials - it can be sparkles, sequins, confetti, multi-colored foil, stickers and much more.
Simple crafts from improvised materials
Of course, you have probably seen how Christmas balls are made from threads and glue with your own hands, but why not expand the range? We make different Christmas decorations with your own hands.From yarn
This is a simple and at the same time spectacular Christmas decoration that can decorate any Christmas tree.
For manufacturing you will need:
- yarn;
- tailor's pins;
- plate or bowl;
- porous material (for example, a disposable tray);
- cutting paper;
- marker.

The template needs to be attached with pins (or ordinary toothpicks) to the porous material, and lay out the pattern you need on top - first the contour is laid out, then the interior decor. Do not cross the threads too often, the toy should be fairly flat. After you are done, dry the product and remove it from the pins, and tie a loop in the eye. If desired, you can decorate with sparkles or rain.

From wire
How to make Christmas toys with your own hands in just a couple of minutes? Use wire!
To make toys you will need:
- two types of wire - thick and thin (thin can be replaced bright threads, for example, floss. Pure white strong threads look very nice);
- beads, beads;
- colored tape;
- pliers.
The ends of the thick wire must be twisted. You need to string beads and beads mixed on a thin wire, tie the end of a thin wire to a future Christmas tree decoration, and wrap it randomly.

When the toy is evenly wrapped, you need to wrap the free tail of the wire around the toy, and tie a ribbon in the shape of a bow - your toy is ready.
Another original idea:

Ribbon and beads
Who said that do-it-yourself New Year's toys must be done for a long time and painstakingly? Not at all. Literally in five minutes you can, which will decorate and Christmas tree, and the interior.
You will need:
- beads;
- narrow tape;
- yellow, gold or silver cardboard;
- glue "Second";
- needle with thread.

The interior decor made in this way looks very attractive.
From cardboard - in a couple of minutes
Some Christmas toys made of paper or cardboard take a lot of time to make, but not in this case - here you really need a couple of minutes to make an elegant hand-made Christmas decoration.So, you will need:
- ordinary cardboard;
- some twine or thick yarn;
- glue;
- paints and brushes;
- napkin or cloth;
- varied decor.

We wrap the tree in different directions with a free tail of twine. After some pattern of threads appears on the Christmas tree, you can start gluing it with a napkin. You can tear the napkin into pieces, coat the Christmas tree well with glue, and glue it tightly with a napkin. This will give a nice texture to the future toy.

After the toy has dried, you can start painting - paint the Christmas tree in green color.

After the paint layer dries, shade the texture of the toy with a dry hard brush and white paint, and then decorate as you like.

From bright patches
Here you will need sewing machine, but with a special desire, you can cope without it. This is The best way make Christmas toys from cotton wool and fabric - just choose a fabric with a Christmas ornament, or use the one you have on hand.
Prepare some paper patterns - for example, deer, stars, gingerbread men, cubs, letters and hearts. Cut the blanks out of the fabric with your own hands, sew them in pairs, leaving a small gap (for stuffing), and through this small hole, tightly stuff the toys with cotton wool or padding polyester. It is most convenient to fill with a pencil.
Patterns can be downloaded here:


By the way, do not forget - we sew on a typewriter from the inside, but if you decide to make toys made of dense fabric with the kids, then it is better to sew decorative seam over the edge - a do-it-yourself toy will look simply charming and suitable even for a home Christmas tree, even for kindergarten- usually for kindergarten trees, children make decorations themselves.
From twine and cardboard
Christmas toys from paper and cardboard will be much more interesting if you add a couple more to them simple materials. To make such a toy, you will need ordinary cardboard, simple paper or natural twine, a little felt or any other fabric, as well as plain paper, a pencil and a ruler, a drop of glue.
The star pattern can be downloaded here:

First make a pattern on plain paper and then transfer it to cardboard. Do not forget that the star must be double. Do not make the star too thin, it is better to make it from a centimeter or more. The tail of the twine is glued to the cardboard, then you need to gradually wrap the entire workpiece.

Lay the thread as tightly as possible so that there are no gaps. In order to decorate the star, make a couple of leaves and berries out of fabric and decorate one of the rays. Your decoration is ready.

From yarn and cardboard
Do you want to make original and at the same time charming Christmas decorations with your own hands? Then it's time to make small gift hats with your own hands from improvised materials. It's wonderful new year gift which looks cute and will keep you warm all winter!
To make Christmas tree decorations in the form of hats, you will need:
- a couple of toilet paper bushings (you can just glue cardboard rings together);
- remnants of colored yarn;
- beads and sequins for decoration.

The threads need to be cut into segments of approximately 20-22 centimeters. We fold each piece in half, draw the loop through the cardboard ring, and stretch the free edges of the threads through the loop. It is necessary that the thread is firmly fixed on the cardboard base. So you need to repeat until the cardboard base is hidden under the threads.

All thread tails need to be pulled through the ring so that our hat has a “lapel”.

And now we drag the free ponytails tightly with a thread and cut them in the shape of a pompom - the hat is ready! It remains only to make a loop and decorate your Christmas tree toy with sequins and sparkles.

From beads
Making a New Year's toy in the style of minimalism is easy and simple - you will need wire, beads and beads, a ribbon and a coin (you can replace it with a small candy, but it looks much more spectacular with a coin). Try to make this Christmas tree toy with your own hands, a very simple master class.
Make a loop on the wire and string green beads mixed with large beads on it - they will play the role of New Year's balls on our Christmas tree. After the wire is filled, give it the shape of a Christmas tree, folding in a spiral.
Once your tree is in shape, fold the loose end into a loop.

We cut off a piece of ribbon, form a loop for hanging from it and stretch it through the Christmas tree, and decorate the free tail with a coin (the easiest way is to stick it on double-sided tape). We tie a decorative bow on the loop for hanging - your decor is ready!

Christmas balls
How to do christmas ball from threads? As easy as shelling pears, watch our master class about spectacular lace balls on the Christmas tree.Would need:
- several balloons;
- cotton threads;
- PVA, water and sugar;
- scissors;
- polymer glue;
- spray paint;
- decor.

First you need to inflate the balloon - not completely, but according to the size of the future decoration. Mix two tablespoons of water, two teaspoons of sugar and PVA glue (50 ml), and soak the thread in this mixture so that the thread is saturated. Then you need to wrap the ball with a thread randomly. The balls need to be dried for several hours. After the glue is completely dry, you need to blow off the ball and take it out, and gently paint the thread ball with spray paint and decorate with sequins and sparkles.
Do-it-yourself thread Christmas balls will turn out to be very, very spectacular if you make them in different tones - for example, red, silver and gold. Try to make your own Christmas balls in different technique- you can sew or knit balls, make them from cotton wool with your own hands or, for example, sew them from felt - there are never too many such toys.
From paper
Christmas decorations made of paper are very popular with both big and small fans. New Year's miracle- try to make paper Christmas balls with your own hands.
Do-it-yourself New Year's paper toy is done like this: 
Decorating such a toy is not additionally required, it is already expressive.

Another version of the ball:

Or you can make such a ball according to the master class:


From felt
Do-it-yourself Christmas toys made of felt look very warm and cozy, and making them is very, very simple. To make your own charming Christmas toys made of felt, you will need:- red, white and green felt;
- threads of red, white and green;
- glue Crystal;
- scissors and needles;
- cardboard;
- some satin ribbon;
- soft filler (cotton wool, holofiber, synthetic winterizer).

First make sketches for your future toys. It can be anything. After the patterns are ready, transfer them to the felt and cut them out. What is good about this material is that it does not crumble, you will not need to additionally process the edge of each workpiece.
Make the same decorative elements - for example, holly branches (by the way, did you know that this is a symbol of joy and Christmas reconciliation?). Berries need to be glued to the leaf with glue, and then make a decorative knot - this will add volume to the berries.
We sew each blank in pairs. By the way, it is best to sew with contrasting threads, it will be fun and elegant. And how to make Christmas decorations voluminous? Stuff them with holofiber before sewing them up completely! Spread the product well, so the Christmas tree toy will be stuffed more evenly. For stuffing, you can use the back of the pencil.
Sew on decorative elements and your Christmas toy is ready!


Try sewing felt decorations not only for the Christmas tree, but also for the home - for example, a Christmas wreath decorated with felt toys looks very stylish. Look at a selection of DIY Christmas decorations photo workshops - and you will understand how much interesting things can be done from ordinary felt of two or three colors.

Master class on how to make a Christmas garland with your own hands from felt:

Below you can download templates and patterns different Christmas trees for crafts from felt.
Materials and tools:
- cotton fabric (white),
- sewing threads (white)
- pattern paper,
- scissors,
- needle,
- sewing machine,
- pins,
- lace or ribbon, bumps (can be replaced with any pendant)
- acrylic paints,
- glue gun.
Execution sequence:
Photo 1. We make a pattern on a piece of paper required size. Cut out. Fold the fabric in half. We pin the pattern with pins and trace along the contour with a simple pencil. We cut out the details, not forgetting to add seam allowances - 5mm. We sew parts by hand or on sewing machine leaving a hole for stuffing. We cut the seam allowances with scissors so that the turned-out product does not seem “broken”, and turn it inside out.

Photo 2-3. We stuff the toy with synthetic winterizer using a knitting needle. We sew a hole for stuffing with a hidden seam. To form a roof, we sew upper part hours in small stitches.
Photo 4-5. We prime the surface of the white toy acrylic paint from two sides. We dry. Let's start painting. With a simple pencil, we outline the main details of the picture (dial). Next, we work with acrylic paints. We use white and blue colors, we perform elements of the "Gzhel" painting. We dry. Using a sponge, silver the sides of the toy.


Photo 6. Cones are tinted with blue paint and also silver. We dry.

Photo 7-8. We take a ready-made lace or weave it ourselves (macrame), you can use ribbons. We glue the cones to the lace with a glue gun.

Photo 9. Sew (or glue) the lace with bumps to the bottom of the watch. Attach a loop on top.

Photo 10. Decoration for Christmas tree ready!
Master class: Christmas decoration "Ringing Christmas Tree"
Materials and tools:
- cotton fabric (white),
- sewing threads (white)
- pattern paper,
- scissors,
- needle,
- sewing machine,
- pins,
- synthetic winterizer and knitting needle for stuffing,
- satin ribbon, bells or bells (ringing)
- acrylic paints,
- brushes, water cup, palette,
- patterned paper napkin,
- PVA glue,
- file,
- glue gun.
Execution sequence:
Photo 1. We cut out the details from white cotton fabric, add seam allowances - 5mm. We sew the parts with our hands or on a sewing machine, leaving a hole for stuffing. We cut the seam allowances with scissors so that the turned-out product does not seem “broken”, and turn it inside out.

We stuff the Christmas tree with synthetic winterizer using a knitting needle. We sew a hole for stuffing with a hidden seam.
Photo 2. We prime the surface of the toy with white acrylic paint on both sides. We dry.
Photo 3-5. From paper napkin cut out the desired fragment of the picture. Separate the top color layer. PVA glue is slightly diluted with water. We coat with glue that part of the tree where the drawing will be located. We spread the napkin on the file face down, moisten it with water, straighten the folds and apply it to the right place. Remove the file carefully. We smooth out the wrinkles with a brush or fingers, smearing the entire surface of the napkin with glue. We dry.


Photo 6. Blue acrylic red tint the edges of the Christmas tree with a brush. With a foam sponge, we make a smooth transition from the edges to the napkin. We dry. Paint the back of the tree blue.

Photo 7-9. We tint the edges of the toy with white paint. We dry. On the reverse side We write congratulations "Happy New Year!".


Photo 10. With help. Sponges apply silver paint to the Christmas tree. We dry.

Photo 11. We form a loop with a bow from a satin ribbon and glue it on the top of the Christmas tree with a glue gun.
Photo 12. Decorate the bells with bows and glue with a glue gun at the bottom of the Christmas tree.

Photo 13. Christmas decoration ready!

Like the product and want to order the same from the author? Write to us.
More interesting:
See also.


Do-it-yourself outdoor Christmas toys
If the area of \u200b\u200byour house allows, you can make a variety of floor New Year's toys with your own hands. For example, make a snowman out of plastic cups, as shown in the photo, and put an LED garland inside. If there are kids in the house, finding sweets in the cavity of the cups will bring them real surprise.
You can also design cone-shaped outdoor Christmas toys with your own hands. It is necessary to make a base-cone from thick cardboard, and then arrange it in the form of a Christmas tree, a gnome, Santa Claus and other figures. Use colored paper. Cut decorations out of it and glue them to the base. You can also use foamiran, felt and other materials. You can make a cone-shaped frame from a bending strong wire, wrap it with green thread, and strengthen the LED garland in the middle - you get a Christmas tree.


Making Christmas toys with your own hands in large and small sizes
Making New Year's toys with your own hands using the most ordinary materials allows you to create the most unusual products that sometimes amaze not only with originality, but also with their size.
DIY mini Christmas toys
To decorate a small Christmas tree or a bouquet of spruce branches, we advise you to make mini Christmas toys with your own hands. The easiest way to make such decorations is from salt dough. Take 250 g of water, a glass of salt and 2 glasses of flour, knead the dough and start modeling. You can form voluminous figures or flat ones by rolling out the dough in a thin layer. Sculpt whatever.
It can be snowflakes, Christmas trees, balls, snowmen. It will not be superfluous to make a small puppy - a symbol of the coming year. All these "semi-finished products" must be dried in the oven (5 - 6 hours on low heat) or 2 - 3 days on fresh air. Such New Year's toys with your own hands can be decorated, sprinkled with sparkles, pasted over with tinsel and other decorative elements.

Huge DIY Christmas toys
For the decoration of a private house, spectacular decorations are often used, which differ in their scale. It can be overall garlands and huge New Year's toys with your own hands: New Year's creatures, balls, bells. Such decorations can also be found at city celebrations and fairs. A large do-it-yourself Christmas ball toy can be made from an ordinary gymnastic ball, you just have to decorate it and decorate the loop beautifully, disguising the handle with a satin ribbon with a bow.
A huge do-it-yourself New Year's toy "clock" can decorate not only the exterior of the house, but also the interior of a spacious room, if you install a flat design against the wall. They can be a great element of the corner for a photo shoot, and the arrows will remind you of the upcoming holiday. Such a clock can be made from plywood, and the mechanism may not be available at all, or you can get it along with an old clock at a flea market. Like all DIY Christmas toys, the clock should also be decorated. This can be done with multi-colored tinsel, the image of Santa Claus on the dial, artificial snow.


How to make Christmas toys with your own hands in different stylistic directions
The design has become quite fashionable New Year's interior in compliance with one or another stylistic orientation, on which the design of New Year's toys with their own hands largely depends. Let's consider some options.
Do-it-yourself New Year's toys in Provence style
Provence is the style of an old French village, characterized by comfort, warmth, natural materials, textiles and floral print. To make New Year's toys in the Provence style with your own hands, take old ball toys, wrap them in a bag of natural patterned fabric, make lace bows on top and decorate with beads. A variety of toys made of felt or decorated with decoupage technique with images of small flowers will also be an excellent solution.


New Year's eco toys with their own hands
Eco style has become more and more popular over the years, as humanity has appreciated the priority of natural materials. Do-it-yourself New Year's eco toys can be made from wood, cones, branches and other things natural material. For example, having collected acorn caps in an oak grove, you can paste over a simple New Year's ball with them. To make such a toy look spectacular, treat each hat with varnish, dip it in golden sparkles and glue it on. The addition will be a loop of gold braid.

Do-it-yourself vintage Christmas toys in retro style
You can make interesting New Year's toys with your own hands if you decorate them antique. To decorate the decor of New Year's toys with your own hands in antique style, you can use the decoupage technique. Paint the ball initially not white, but light brown paint to get the effect of antiquity. You can choose napkins with the image of angels, since the decoration of the Christmas tree was previously considered a purely Christian tradition. Apply it with PVA glue and, after drying, open it with varnish. The toy can be decorated with a satin ribbon bow, beads or pebbles can be glued on.
Do-it-yourself vintage Christmas toys can be made from salt dough according to the recipe that we reviewed earlier in the article. When decorating them, you should not use bright unnatural colors, but it is better to choose muted ones. Scuffs on toys will be an ideal addition.


DIY Christmas toys in modern minimalism
The minimalist direction in its purest form implies the absence of unnecessary non-functional decorations, but in new year holidays some exception can be made. When decorating New Year's toys with your own hands in this style, you should choose one or two primary colors that will be present in the interior. It can be white with blue or yellow with red, etc.


The forms of toys should also not be full of variety. Make out satin ribbons neat bows, paint the balls in one color and hang it all on the Christmas tree in a checkerboard pattern. You will be convinced that even such a seemingly modest design will have a rather spectacular look.
Exist a large number of a variety of ways to make New Year's toys with your own hands, and in our article we tried to present some ideas for their design, and it's up to you to decide which technique to use. In any case, you will get an exclusive and original decoration.
Good afternoon! I hasten to please new year ideas toys, and those who have not yet made gifts for New Year, I recommend not to delay this for a long time and choose them in this
Tell me, what do you prefer to give for the New Year? What about receiving? Probably everyone really likes to receive toys for the Christmas tree, and just all sorts of things. Agree, I remember when I published a post about crafts for the upcoming holidays, so a lot of people sent me wishes and congratulations, so I also want to congratulate everyone on the upcoming!
Having written a previous note about New Year crafts, letters came to my mail with a request that I publish more options for what can be made from plasticine, I share with you my best practices.
Here she is a beauty!

Do you like to sculpt Christmas trees and snowmen? Then use this step by step instructions with photo:


Where without Santa Claus, the kids just love to see him at the holiday, and even more so to sculpt crafts.

These are the compositions you can get.

If you want, you can even sculpt Peppa Pig and her brother George from a cartoon.

You can make a dog lying near the Christmas tree, let it bring warmth to your home and become a talisman.
Such an affectionate and sad puppy girl.

Or playful Tuzik, what do you choose?

I remember once upon a time I had to work in a kindergarten, you yourself understand that kindergartens are almost not funded, so at that time we made and decorated our group from what we could, in general from all sorts of things. It was ordinary foam or they took cheap ceiling tiles and this is what happened:

Agree, there seems to be nothing difficult, but it also looks original, with a twist.

A little more difficult, and time-consuming, are toys made from salt dough.


Beautiful felt toys for the Christmas tree
Now, as for felt, well, a lot of ideas can be created and found on the Internet.


Their patterns and patterns are quite simple, you can easily draw yourself.
Funny deer.

The Christmas tree is a forest beauty.

If you are interested in this Christmas tree, or such a bookmark for books in the form of a dog, then write to me below, I will send you templates and a diagram.


Snow Maiden from felt.

And how do you like such wonderful creatures, if you decorate a Christmas tree with them, there are diagrams in an enlarged form, they will soon appear in another note, or write to send.

By the way, I was so hooked on the topic of felt that I will soon write a separate article on this topic, so expect fans, add my blog to bookmarks and rejoice with me))). By the way, if you need crochet toys, then feel free to go here, there is a whole
Master class of paper crafts in the form of balls and lanterns
Who doesn't love Christmas tree balls? Probably everyone just loves them, let's make a simple option.
You will need colored or multi-colored paper, scissors and glue. You will need to cut out 20 circles of the same size from it. And then act according to this scheme, roll up as shown in these pictures.


Then, as shown, glue with good glue, it is better to take an erikrauzer or PVA.

There is another version of such a paper Christmas tree ball.

And I also give you the most popular type of balloon decorations, in this video everything is shown in great detail and clearly, you just have to repeat the necessary steps after the presenter:
And here is another super idea that you definitely haven’t seen before:
For school and kindergarten, I can offer such interesting flashlights that everyone probably knows and remembers.


And another masterpiece in the form of a garland, it's not that unimaginably beautiful. Watch this video from YouTube channel:
Paper toys for the New Year
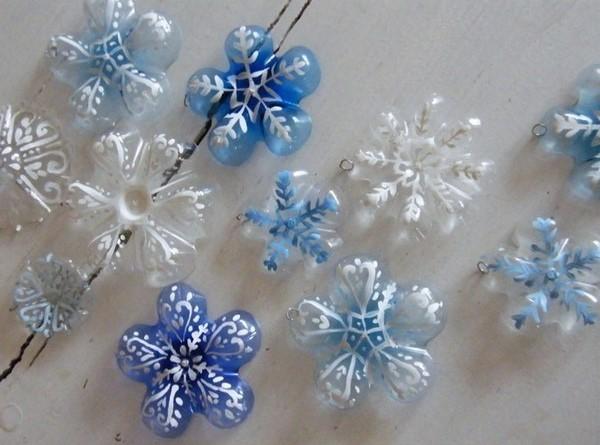
The first place can rightfully be given to snowflakes. different kind and origami style bulk options who needs all sorts of ideas and patterns, see snowflake schemes here


It is also easy to fold various figures from paper stripes.


We make Christmas decorations for the Christmas tree with our own hands from plastic bottles and light bulbs
A fairly common craft, a souvenir, and someone will even give such a treasure as a gift, I recommend doing it yourself at home. Just be careful if you are making crafts from a light bulb, after all, this is not for children's hands.


From plastic bottles will be safer and more durable.