Candy cake wrapped in cardboard. Candy cake: a step by step recipe. DIY candy cake
To receive such a gift is real happiness! The higher and more beautiful, the better! Let us also try to arrange a few simple cakes together, so that there is always an idea unusual gift... Believe me, the hour will surely come when all ideas will be exhausted.
General design principles
You do not need to have experience in this business to make a cake from sweets. Even a beginner can cope with such a task. It is enough just to have all the necessary components of the cake, time and desire.
Necessarily need a box that creates the appearance of a biscuit. Candy is glued to it. These boxes are then placed on cake pads or styrofoam. To make it beautiful, candies in this form are tied with ribbons. If desired, several more "cake" floors are installed on top. The top is decorated to taste.
Candy cake for any occasion
Required ingredients: 1 cookie box, hot melt glue, candy, cloth, 1 Raffaello box, foil, cake candles, beads, styrofoam, ribbons, double-sided tape, corrugated paper, scissors.
How to assemble:
- Cut out the base from the foam, on which the whole cake will stand. It should be thicker than a cookie and coconut box and larger in diameter.
- Wrap the cookie box with a cloth, seal it with tape.
- Wrap the side of the box with tape from corrugated paper, stick it on the scotch tape too.
- Glue one type of candy to the paper. It will be good if you can find sticks like Twix or Kinder.
- For styrofoam, also cut the tape of the required thickness and glue it.
- Use hot glue to glue the beads, then use scotch tape and other types of sweets.
- Wrap the box with Rafaello with a cloth, glue it over with corrugated paper.
- Attach candy sticks on top.
- Tie all three bases with ribbons, forming bows.
- Cut the petals from the foil, set them aside.
- Attach toothpicks to the candles, wrap with tape.
- Glue over with petals to make flowers, and in the middle of each candle.
- Chop the base of the foam cake with the resulting flowers.
- Fasten all three cake bases together, decorate the top to taste.
Tip: you can pour a slide of sweets or fresh flowers on top.
How to make a cake for a man

Required components: a box (like a biscuit for a cake), two kinds of candy, a glue gun, ribbons, colored paper.
How to assemble:
- The box must be pasted over with paper of the desired color, attaching it with glue.
- Glue candy sticks on the side and wrap everything with tape.
- Put the rest of the candies on top and you can, if you wish, supplement everything with alcohol in small bottles (Jack Daniels, Finlandia, Jim Beam, etc.).
Tip: you can complement the cake with fruits or berries in color.
DIY candy basket

Required components: 1 big box from under sweets or cookies, a handle for a basket, glue, scotch tape, wide satin ribbons, several artificial flowers, a piece of fabric 60x60 cm, sweets and, if desired, fruit, candy sticks.
How to assemble:
- Open the box, no lid is needed.
- Wrap it in a cloth, which is pre-greased with glue.
- Allow to dry a little, correctly forming all the bends and edges.
- Put a strip of tape around the edge of the box, glue candy sticks on it.
- Tie them with ribbon and make a bow.
- Place the handle for the future basket inside the box, having previously greased it in the right places with glue. Let dry.
- If you took fruit, then they must be washed and dried.
- Stir in the candies and pour inside the box.
- Cover the handle with glue, wrap it in a satin ribbon too.
- Spread artificial flowers over the surface, and you're done.
Tip: To make the basket even more beautiful, you can tie another bow on the handle.
Juice and Candy Cake

Required components: about 10-20 packs of small juice (0.2-0.25 l each), disposable rubber bands, several satin ribbons, some snickers, twix, bounty and some Barney biscuits, different diameters of cake bases, three round boxes from cookies of different diameters, double-sided tape.
How to assemble:
- Grease round boxes with glue from below, place them evenly on substrates of the appropriate size.
- Arrange juice packs around the largest box.
- Put on rubber bands so that the juices do not move and the cake does not crumble.
- Next, tie with ribbons over the elastic bands so that they are not visible.
- Lay the second box on top, already with a substrate, secure.
- Glue the entire box around with tape, attach the bars to it, alternating them with each other.
- Tie with ribbon again to make it look nicer.
- Attach the third backing with the box, which is already covered with tape.
- Glue on Barney's biscuits, wrap with tape, but lightly so as not to crush the sweets.
- Upstairs, decorate the cake to your liking.
Tip: To keep the substrates bright, they can be pasted over with cloth or corrugated paper.
Gift for newlyweds

Required ingredients: candy different types(including sticks like Twix), backing, corrugated paper in the desired color, double-sided tape, satin ribbons, round box.
How to assemble:
- First, the round box must be glued to the backing. Double-sided tape will help with this.
- Next, wrap the top and sides of the box with corrugated paper, again using adhesive tape.
- Glue candy sticks around, and on top some ordinary ones (to taste).
- Tie the candies that are glued to the side with tape, and the cake is ready!
Tip: To give the cake special meaning, you can use themed add-ons. For example, a figurine of a bride and groom, two doves or a yin and yang sign.
If your task is to make a cake from sweets, then you can use not only them. You can also add waffles, chewing gum, chocolates, bars, sweets like M & M's.
Use additives to make the cake original. These can be whole nuts, small or light fruits, flowers, alcohol (unless the cake is for children), twigs of cotton or spruce / pine. Cars or small dolls can be added for children.
A cake as a gift is not enough just to collect. It definitely needs to be turned into something unusual! The minimum you can do is wrap it in transparent plastic (often used in bouquets) and tie it with a ribbon on top. Don't forget to make a bow!
To really please an adult with such a cake, instead of a round box (inner base), you can use a bottle of some kind of alcohol. For example, champagne, wine, cognac, liqueur or something else that the birthday boy loves.
For those who do not have a round cookie or candy box, you can also use a tin can. It sounds, of course, not very good, but if you wrap it in paper or cloth, no one would guess. Or try cutting out a cardboard box yourself.
You can stick not only ordinary candles into a children's cake, but also fireworks. Imagine how delighted the smallest guests will be. Give them a real holiday! For this purpose, by the way, it is better to use not a substrate, but polystyrene or small pieces / oasis layer (floral sponge). Fireworks will fit better in them, and you don't have to tape them or stick them.
If you're going to theme party, be sure to check her dress code. If you need a certain color, then this is not a problem either. Just pick up the candy required color and play with shades. It will turn out unusual, because most often such cakes are multi-colored.
A candy cake is the perfect gift for any event. Be sure to save yourself our "recipes" and recommendations for their preparation. They are done quite simply, so there definitely shouldn't be any difficulties! Good luck!
A handmade chocolate cake will delight the sweet tooth not only with the taste of your favorite chocolate, but also with its original design. Such a dessert can be a creative gift for solemn event... All you need is to choose your favorite chocolate, prepare the accompanying materials: scotch tape, glue, ribbons, and show your own imagination while "making" the cake.
How to make a cake from sweets with your own hands?
Is a real work of art. Dessert doesn't require any culinary skills. You just need to translate your idea into reality, prepare a frame the right size and attach sweets to it. Have no ideas for decorating a cake? Use our option.
To make a cake from sweets with your own hands, you will need the following "ingredients":
- Frame. Give preference to hard material. A good option is sturdy cardboard or a foam bottom.
- Additional decor accessories. Corrugated paper, satin fabric, ribbons, beads, all kinds of bows and ribbons.
- PVA glue and double-sided tape.
- Favorite confectionery.

Expert opinion
Anastasia Titova
Cut out the frame round shape and cover it with corrugated paper, and "put" on the glue. Start filling the frame with sweets, gluing each base to the frame.
The side of the candy can also be secured with tape. This will help create the most accurate shape possible. You can spread sweets in any form. For each layer of cake can be used different colours chocolate wrappers. At the exit, and you get a really colorful treat.
Having created the required number of layers, and firmly fixing them with tape, proceed to the design of the top. An excellent way to decorate "classic cakes" can be the following design.
On a white satin fabric, apply a couple of drops of PVA glue and fix the red bow. Additionally, you can decorate the canvas with beads. Place the canvas on top of the cake, and fix it with glue. Tie a ribbon over the shape of the treat, tying it to a bow. A gift of chocolates is ready!
Chocolate cake for women
It seems that 99% of women have a sweet tooth. This means that the fairer sex will be delighted with the chocolate cake. You just need to decide on the type of dessert and the shape of the cake. Required condition- the treat should be in a wrapper.
For an original dessert, you need the following ingredients:
- "Cake" of any shape (round, square, triangular, heart-shaped).
- Corrugated paper.
- PVA glue.
- Double-sided tape.
- Choice of confectionery.
Expert opinion
Anastasia Titova
Confectioner
Newbie tip: Opt for the "long" chocolates. This will help you create the "correct" cake shape.
Let's move on to the "preparation" of the dessert. Cut the frame of the required shape from the foam. Its diameter must be at least 25 centimeters. If there is no foam on hand, then a cookie box can serve as a filling form.
Apply PVA glue to the outer side of the frame with a brush. We attach a strip of corrugated paper to the frame and firmly fix the material. Place the workpiece in a warm place for an hour so that the glue adheres well.
We take the scotch tape and fix it on the outside of our frame. Let's start fixing sweets. Glue the treat so that there are no gaps. Top of the cake can be decorated with any decor: bows, crown, other types of sweets - give free rein to your fantasies.
DIY creative candy tree
A tree made of candies is an ideal gift for a gala event. It will take no more than an hour to create a chocolate composition, but what emotions will you give a person by handing an original dessert.
To work, you need the following ingredients:
- Chocolate candies. It is better to take several options for dessert in bright candy wrappers.
- Newspaper or magazine.
- Wooden stick or any other base.
- Natki.
- Cup.
- Glue and foil.
- Choice of decor.
Let's get to work? From newspapers or any paper, make a ball of the desired diameter. The "ball" will serve as the root of the tree. Wrap it tightly with threads to keep it in shape. Stick the root into a glass or vase, "planting" it on glue. If it does not adhere well to the bottom of the glass, fill it with any elements. For instance, sea pebbles.

Place a similar ball on the other end of the "tree". It is advisable to make it out of foil. The foil ball will serve as the trunk of our chocolate tree.
Proceed with attaching the chocolate treats. You can "plant" them on a tree with a glue gun. Decorate the trunk of the candy tree with the chosen decor elements. This can be ribbon, stones, or coffee beans. The tree should be very colorful!
The nuances of making a cake from sweets with your own hands
A candy cake can be stored for a very long time without losing its taste. Today, there are many options for creating such a dessert. And the most remarkable thing is that such a gift will be appropriate for presentation to women, men and children.
When creating a chocolate cake with your own hands, it is important to use environmentally friendly materials. Since each element of the cake will come into contact with the delicacy, it should not transfer the smell to the sweets and distort their taste.
Expert opinion
Anastasia Titova
Confectioner
Boxed candies - not the best way to create a dessert. Use only wrapped candy. This will add color and hygiene to the delicacy. When choosing sweets, one should take into account the preferences of those to whom the present will be given.
Varieties of candy desserts
With the help of chocolates and regular candies, you can create a real culinary masterpiece. The following types of desserts are especially popular:
- Chocolate egg cake.
- Multi-tiered cakes.
- Candy and cookie cakes.
- Cakes from M & M's.
- Chocolate trees, flowers and hearts.
If you are bored with ordinary cakes or an unoriginal form of serving sweets, come up with your own way of decoration. For example, design a candy cake yourself. You have to work hard, but the results are worth the effort.
Request related announcements
General design principles
To create a treat with your own hands for the birthday of a child, spouse or other special occasion, you need essentially the same materials. Prepare the base for the cake first. For these purposes, they often choose a round cardboard box (more than one will be needed if the structure is created in two or more floors). And for the base, take a cut sheet of styrofoam.
In addition to sweets, a cake made from chocolates, juice or other products is decorated with other objects. For decorative purposes, satin ribbons will come off, natural materials, printouts, artificial flowers and whatever the imagination is enough for.
The main charm of candy cake recipes is that even an inexperienced master can handle the preparation. You just need to have time, creativity and that's it. necessary materials... In fact, it is possible to create almost any composition, but to make it easier, we have compiled a list creative ideas... A step by step photo for beginners will help to understand the technology of making cakes from chocolates and sweets.
Recipes for adults

You need: a large cookie box made of cardboard, hot melt glue, light cloth, candy wrapped in tight wrappers, a box of Rafaello's chocolates. You will also need at least 2 meters of tape, scissors, corrugated paper, and a foam frame. Grab cake candles if you want to light them, and try to choose materials in the same color scheme.
- Create a foam base. It should be at least 3 centimeters wider than the box of chocolates and the cookie box;
- Wrap the cookie box with a cloth, fix it with hot glue;
- Cover the side of the box with corrugated paper. Glue it, and cover it with sweets on top. Elongated like chocolate bars are best;
- Place a strip of corrugated paper over the edge of the styrofoam. Glue the beaded border there;
- Then decorate the surface of the cake with the remaining candies. Cover the box with Rafaello with a cloth and cover the top with sweets;
- Tie all three bases with ribbons and make lush bows. Fasten the frames together in correct order... Decorate your versatile cake with chocolates, artificial flowers. Place candles in the center according to the number of years of the birthday person.

Take: three boxes different sizes and polystyrene that will become a biscuit, two kinds of candy (round and candy bars), hot glue, colored paper, small bottles of alcohol in the spirit of Jim Beam or Jack Daniels.
- It is really possible to assemble such a cake in less than 60 minutes, because the master class is as simple as possible. First, cover each base with colored paper of the same tone, attaching it with glue;
- Form a cake frame with boxes and styrofoam;
- Glue stretched candy wrapped in wrappers on the sides. Wrap everything with a wide satin ribbon in the color of the bottles;
- Spread the remaining sweets on top in the depression. Supplement the treat with matching berries or fruits, which are perfect as a snack. Place inside a bottle of alcohol. Be careful when transporting the cake, this is not the most reliable design.
You need: thick rectangular chocolates or candies, foam 2 centimeters thick, shiny paper, a printed image of the desktop, glue and ordinary tape. Also use thick wire, a paper knife, scissors, and a ballpoint pen.
- Such a handmade gift is suitable for programmers or game lovers, social networks... Lay out the candy into a shape like a foam frame. Outline with a pen;
- Cut out a couple of rectangles from the foam, they will become the frame of the future gadget. Cover them with shiny paper, and over one of them paste the image of the monitor;
- On both sides of the picture, stick elongated sweets on hot melt glue. Glue other sweets to the second blank so that they imitate a keyboard;
- Cover the outside of the laptop and the sides with sweets. In one of the sides, trying not to damage the candy, stick the wire and bend it at an angle of 90 degrees. Insert the free end of the wire into the other half of the laptop.

Take: candies of at least four types, a rounded box, a foam backing, fabric stripes for decoration, double-sided tape, and corrugated paper of the main color.
- Use adhesive tape to secure the round box to the backing;
- Glue the structure with corrugated paper, and glue elongated candies around in the spirit of Twix;
- Lay out and glue sweets on top. Try to choose so that the composition looks holistic and harmonious. Decorate the cake with holiday-themed additions. Small figurines of newlyweds made of mastic, flowers, large wedding rings or white doves will do.

You need: flat-bottomed sweets, hot melt glue, thick cardboard, pencil, dark gouache or other paint, and scissors.
- Such a cake, decorated with sweets, will become an atypical present for an avid driver. First cut with scissors either stationery knife cardboard base for the future steering wheel. Do not be afraid to use templates from the network, improvised means like plates and compasses;
- Paint the cardboard base with black paint;
- Glue the steering wheel with small flat-base sweets;
- Decorate the top of the candy cake with thin elongated chocolates and a car brand. You can just cut it out of cardboard. But if you want, find a figurine or craft with mastic.
Baby candy cake

Take: about five dozen sweets, differing from each other in shape, unnecessary newspapers, a thick wooden stick for the trunk, threads and a vase. Also useful are a glue gun, plasticine, foil, scissors and decorative items, thin satin ribbons.
- A candy tree is given to both an adult and a child. Therefore, the recipe is considered universal. Start by making a small ball of their newsprint. For added strength, tie it around. You can also use better materials: a foam ball from a craft store or something like that;
- Stick a wooden base into the ball. Place the ball on a stick in a vase or small pot. The role of soil can be played by a dense material in the spirit of plasticine, liquid gypsum, but you can use your own idea. Keep in mind that you will have to spend more time working with gypsum, but the tree will come out stronger in the end;
- When you are satisfied that your structure is well balanced, start securing the sweets. It is better to use candies with a flat bottom for these purposes. So the one who received the present will be able to unfold the treats right on the tree.

You need: thick cardboard for creating tiers, scissors, hot glue, thin lace, White paper, thin scarlet ribbon and Kinder brand sweets.
- This children's recipe will allow you to treat a large company, so it is often made for celebrations in kindergarten... The cake will appeal to both the little birthday boy and his friends. First, shape the cardboard base. Two or three tiers are enough;
- Decorate the resulting frame with light paper, and process the joints with red tape;
- Glue candies to the sides of the product. Large, elongated bars will do. Think over their number, because there should be enough for all children and educators;
- Decorate the top with a lace ribbon (you can use a regular one), and fix the sides of the chocolates themselves with it. Connect all the tiers together. You can put on top soft toy or a dozen chocolate eggs.

Take: thick cardboard, scissors, hot glue gun. Two types of corrugated paper (white and red are traditionally used), decorative elements of your choice and, of course, chocolate will also come in handy. Experienced candy cake makers recommend taking Raffaello and Kinder Bars, but you can show your signature self too.
- The beauty of this recipe is that it is suitable not only for children's party but also on Valentine's Day. First, draw two hearts on the cardboard. Two centimeters from the edge, glue a cardboard strip equal in width to Kinder's height;
- Cover the box with corrugated paper on all sides. White should go inside, and on the outside use a light one;
- Use a glue gun to glue the bars onto the side of the heart box. Fix the lid from above with adhesive tape;
- Try to make it less conspicuous. Place Raffaello in the middle of the candy cake. Decorate the top of the cake as you wish. You can make a new layer of baby chocolate, or place a small stuffed toy on top of your heart.

You need: round candies in candy wrappers, bending wire, scotch tape, decorative elements (artificial leaves, ladybugs or tape), scissors.
- Attach a piece of wire to the sweets;
- Then put together 5-6 candies, hold them together and form small pieces. You can strengthen the adhesion with tape, for this cut out neat strips;
- Make at least 7 of these bunches. Then fasten them together with a denser wire. When the whole bunch of grapes is ready, tie the leaves to it and glue the insect figurines. Tie tight tape around where the vine and leaves meet. This method of presentation will appeal to both kids and parents.

Take: 10-20 small cartons juice, disposable rubber bands and a pair of satin ribbons great friend from a friend of flowers, several bars, Barney biscuits, Styrofoam cake toppers (the amount depends on the number of tiers, so prepare at least two), two round boxes of cookies of more than one size. Prepare double-sided tape.
- This recipe is suitable for a large children's company. Glue the round boxes together, use foam substrates;
- Place a row of juice around the perimeter of the largest cookie box. Tie it with tape, and pass the elastic along the bottom so that the structure does not fall apart;
- Cover the top box with tape and fix the chocolate bars on it. If you are using more than one type, alternate them;
- Place the Barney Bars on top of the backing. Remember to wrap the ribbons around the cake again, and decorate the top to your liking. It will not be reliable despite its solid base, so take care of it when transporting it to the garden or to the venue.
- When making a candy cake, don't be afraid to experiment with materials. In addition to chocolates, Barney and alcohol, use gum, truffle candies, waffles, marshmallows, cookies and even jelly beans. The recipe for such decorative cakes depends solely on the preferences of the birthday person or guests;
- If you're making a cake for kids, try more than just round or rectangular tins. Try to collect an animal figurine, car, tree, or whatever your child loves;
- Go to the store with a ruler. The fact is that if you incorrectly estimate the amount of sweets or the size of the frames, you will have to change plans and look for ways out. And this will affect the aesthetics. appearance cake;
- A cake as a gift is not enough just to collect. Wrap in a thin film or translucent bag, and then tie everything with a ribbon. Be careful when transporting or carrying the cake. Despite the use of hot glue, the cardboard base will probably fail;
- Remember that instead of hot glue, it is allowed to use liquid nails without compromising the quality of the product;
- Due to the fragility of the frame, which we have already talked about, some suggest using metal cookie boxes. This is a nice option, but it will weigh down the treat and increase decorating difficulties.
- You can stick not only candles into a children's cake, but even fireworks. If you take into account the conditions of use from the packaging, the kids will be delighted. But in this case, do not use flammable foam, but pieces of a floral sponge;
- If you're hosting a themed party, keep the theme in mind when choosing your cake colors. Play with shades to add sweetness to the atmosphere. As you can see, the candy cake is a wonderful present for every event. And these recipes will help to surprise friends and acquaintances with an atypical approach to decorating a celebration and creativity.
DIY gifts are becoming very popular. Especially if this gift can be eaten with great pleasure. In this article we will analyze all the nuances of cooking cake of chocolates and sweets.
First, you need to choose a variety of chocolates that will be included in the composition. After all, each candy is wrapped in a colored wrapper, so it is important to choose a certain color of the packaging material so that the cake is visually attractive.
Preparing such a gift is a creative process that requires the expression of imagination and creativity. And in order to get tremendous pleasure from the process and feel like a brilliant master-artist, you need to deal with all the stages of preparation.
- Prepare the frame on which the sweets will be attached. For this, it is best to use foam, since you can easily build the desired shape from it, be it a circle, oval or square. Also, cardboard is suitable as a material for making the base. It is not as practical as polystyrene, but it will make simple shapes just as easy.

- The prepared frame must be decorated with whatever material you have on hand. It can be satin fabric, corrugated paper, or just colored paper. This must be done so that the hero of the occasion, after eating the sweets, will have a beautiful box and pleasant memories, and this will also make the original gift ideal.


- In order for the sweets to firmly adhere to the frame and keep the given shape, they must be attached. To do this, you can use double-sided tape, it will easily hold the chocolate on the frame, and it will be quite easy to tear it off. Scotch tape is a practical and affordable material. You can also use glue, but this method has its drawbacks - if glue gets on the candy, you can't eat it anymore. Therefore, when using it, be very careful.
- For a beautiful cake, use the same shape of chocolates for each tier of the cake. The first (lower) tier is best made from cylindrical chocolates. This will make the tier higher. Also consider the color of the wrapper.

- Decorating a cake also requires a little creativity. For this, candles, and beads, and small toys, and any confectionery figurines, in general, anything that suits the theme of the holiday, will suit you.
Chocolate cake decorations
As sweets for such original gift anything will do. The main thing that you need to know is the taste preferences of the person who is preparing this cake.
For the preparation of children's sweet cake, they are most often used:
- Kinder chocolate
- Kinder Surprise
- barney bars
- small juice packs
For older children, they also use Chupachups, MMDems, chewing gums and much more.

For adults, recipients of a sweet gift consider their preference for milk or dark chocolate. And already knowing this, they choose the right sweets.
Making a chocolate cake
A spectacular chocolate cake decoration is the key to success. This stage of preparing an original gift should be approached with special interest and imagination. Here are some options for decorating a cake for a children's party:
- Having prepared the frame-base of the desired shape, give it color using corrugated paper. Cut out a strip 4 cm wider than the width of the base.
- We glue it with glue, smooth the joint well.
- We wait a bit for the glue to set, and gently stretch the side sticking out at the top (our 4 cm). This will create a wavy side of the bottom tier of the cake, which can be filled with small multi-colored candies or other decorations.

- You can also glue the pockets for each bar along the rim of the frame, or glue the sweets with the same corrugated paper as the entire frame.

- Having attached chocolates, bars or juice to the body, you can tie them with a beautiful satin ribbon.

- You can make beautiful flowers from corrugated paper. To do this, cut out 5 or more petals in the form of a droplet and wind them on a toothpick, breaking it in half.
- With the sharp end, stick the flower into the cake, forming a beautiful composition.
- The middle can be made of candy in a beautiful wrapper by gluing it with double-sided tape.

- If the cake is intended for a birthday person, candles are placed on top, either a large number or small candles. They can also be wrapped in the shape of a flower, only it is better to use wrapping foil for this.

Photo of chocolate cakes for a children's party


Chocolate cakes for adults
- When decorating a cake for a woman, the main thing that is used is corrugated paper bouquets with a sweet center, of various shapes beads, ribbons. Here are some options for jewelry compositions. creative gift for woman:


In order to learn how to make flowers of unique beauty for decoration and giving such a gift just a stunning look, watch the video master class.
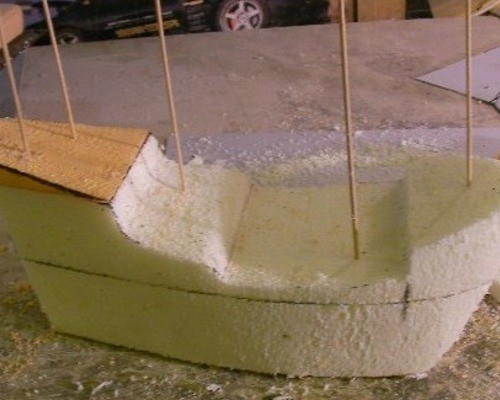
A man's cake is often decorated in darker colors and different models of cars are used, cakes are made in the form of emblems of car brands, in the form of a ship or an airplane, it all depends on the skillful preparation of the frame.
Here are several cake options for congratulating men:


No one can forget a gift of such beauty. It will delight not only little sweet lovers, but also charm adults with its beauty. Creative, and most importantly, handmade, chocolate cake decorated with sweets and other decorative elements is a real gift from the bottom of the heart. After all, this great work done will require tremendous patience and investment of your whole soul in it.