Dough pencil holder. Salted dough stationery stand. Dachshund made of salted dough is ready
Master class with step by step photo pencil holder "Strawberry aroma" in the technique of modeling from colored custard salt dough.
The master class is intended for teachers of technology, teachers of additional education, for those who want to master the technique of working with colored custard salt dough.
Purpose: pencil holder, pencil holder.
Target: making a pencil holder using the technique of modeling from colored chouxed salt dough.
Tasks:
Educational: master the technique of making a pencil holder using the technique of modeling from colored chouxed salt dough;
Developing: develop accuracy in working with color dough, artistic thinking;
Educational: instill a love of modeling;
Required material:

Extra salt, Flour of the highest grade, citric acid, vegetable oil, plastic glass, paper napkin, stack, rolling pin, brush, pencil, toothpick, cutting down "five-leaf", "Flower", food colorings, round jar, diameter 12 cm, PVA glue.
Recipe for colored salty choux pastry.
In a bowl, combine 1 cup flour and 0.5 cups of salt, stir until smooth. Make a hole and pour the food coloring of the color you want into it. Pour 1 cup of water into a small saucepan. Add 0.5 tablespoon to the water vegetable oil and 0.5 tablespoon citric acid... Put on fire. Once the water has boiled, immediately pour it into a bowl of flour. The dough will be brewed and rolled into a large lump. The dough will cool down a little, start kneading it for 5-7 minutes to make a lump of the same color. Give ready-made dough cool completely under a cloth, and then put it in plastic bag.
Using the same recipe, knead the colors you need for the pencil holder. Store each dough color in a separate bag. If you don't have a brown food coloring, replace it with cocoa. The dough will turn out to be a beautiful chocolate color.
To make a white dough, simply do not add food coloring while kneading.
Progress:

We glue all the elements of the choux pastry with PVA glue.
Roll out the green dough with a rolling pin. With a round jar, cut out a circle with a diameter of 12 cm. This will be a stand for the pencil holder. Stand thickness 5-6 cm.

Spread the stand with PVA glue in the place where the glass will be, leaving 1 cm to the edge. Place the glass and press it slightly into the stand. You will have about 1 cm behind the glass.

Take a lump of brown dough and shape the belly of the bear. Spread glue under a glass and put the bear there. Use a simple pencil to push the dimples in the center of the abdomen.

Insert a toothpick into the abdomen. We will put our head on it so that it would hold on more firmly.

Form a head from a small lump of brown color and put it on a toothpick.

Lightly smear the head with glue and glue the small ears.

From a small lump white form an oval cake and glue on the muzzle.

Use a pencil to push through the eyes. Glue on a small spout.

Form the legs and glue the teddy bear.

From the lumps, form a little smaller handles and glue them in the same way. The bear is ready.

Now our task is to fill the entire base with strawberries. Blind two identical red dough strawberries and glue them on both sides behind the bear. Thus, we fill the empty space between the bear and the glass. Stack the strawberries into small, grain-like notches. Stick more strawberries and glue around the glass.

On the other hand, glue the strawberries in the same way.

Roll out the green dough 2-3mm thick with a rolling pin. Cut out the leaves by cutting the five leaves and glue the tails to the strawberries.

Roll out the white dough and cut out the flowers. Glue some flowers directly onto the strawberries. Glue a yellow center in the center of each flower.
We glued all the elements and now the pencil holder needs to be well dried. This is best done on a sunny windowsill. It will take 10 days to dry. After the dough is dry, cover it with a glossy varnish. The pencil case will become brighter. Ready.
I wish you creative success!
You can make a huge number of crafts from salted dough, for example: flowers, animals, various figures, inscriptions, numbers, toys, paintings and whatever you want! Salt dough modeling is called bioceramics. The advantage of salted dough is that it is convenient to work with, this material is absolutely harmless and crafts made from it will delight you for several years. In this article, we will look at how to make crafts from salt dough with your own hands.
You will need: a glass of wheat flour, a glass of extra salt, half a glass of cold water, a bowl.
Recipe

The prepared salted dough should not stick to your hands or crumble. It should be cool and easy to sculpt. I recommend watching the video master class!
There are two most common methods for drying salt dough. The first way: the finished craft will dry itself. The main thing is that no straight lines fall on it. Sun rays otherwise it will crack. You can put the craft on a flat surface and wait a few days. Second method: dry the finished craft in the oven for 3 to 6 hours (depending on the size of the craft). Drying occurs in approaches with breaks. One approach is 1-2 hours. For quick drying in one go, set 75-100 degrees in the oven, and then, the craft will dry in an hour. At a temperature of 120 degrees, the craft will dry in 30 minutes, but it is better to dry it naturally.
There are two most common ways to color salt dough. The first method: after drying, the finished craft is painted with acrylics or gouache using a brush. Second method: food colors are diluted in water, then added during the preparation of the dough. When the craft is completely painted and dried, it must be covered with 2-3 layers of transparent manicure or furniture varnish. Each layer must dry before applying the next. In this way, the craft will last for a long time.
You will need: painted salt dough, stack, transparent nail polish, toothpick.
Master Class

The salty dough star is ready!
Salted dough caterpillar
You will need: painted dough, knife, pva glue, toothpick, pendant, transparent manicure varnish.
Master Class
- Roll out the sausage.
- Cut it into 6 equal pieces.
- Roll up the balls.
- Glue 5 balls together.
- Glue the head.
- Blind the nose and eyes, then glue them.
- Use a toothpick to poke the suspension.
- Dry the craft.
- Attach the pendant.
The salted dough caterpillar is ready!
Salted dough apple
You will need:
Master Class
- Blind the half of the apple, make the inner part flat, pressing it against a flat surface.
- Blind a thin, flat center and glue to the body.
- Roll 6 seeds and a stick, then glue to the apple.
- Blind the leaves, then glue them.
- Dry the craft.
- Cover with varnish and wait until dry.
The salted dough apple is ready!
Salted dough elephant
You will need: painted salt dough, pva glue, transparent manicure varnish.
Master Class
- Blind the body of the elephant by rolling an elongated ball.
- Blind 4 legs in the shape of plump sausages.
- Blind the proboscis.
- Blind the ears of the elephant in this way: roll 2 flat cakes, glue cakes of the same shape in a smaller size in a different color to them.
- Blind a small ponytail.
- Blind your eyes.
- Assemble the elephant in the following sequence: glue the legs to the body, then glue the proboscis, then the ears, eyes and tail.
- Dry the craft.
- Cover with varnish and wait until dry.
Salted dough elephant is ready!
You will need: salty dough, foil, candy vase or similar plastic container, gouache, brush, clear nail polish, modeling board, knife or stack.
Master Class

You will need: salt dough, nail scissors, pva glue, acrylic paints or gouache, nail polish brush.
Master Class
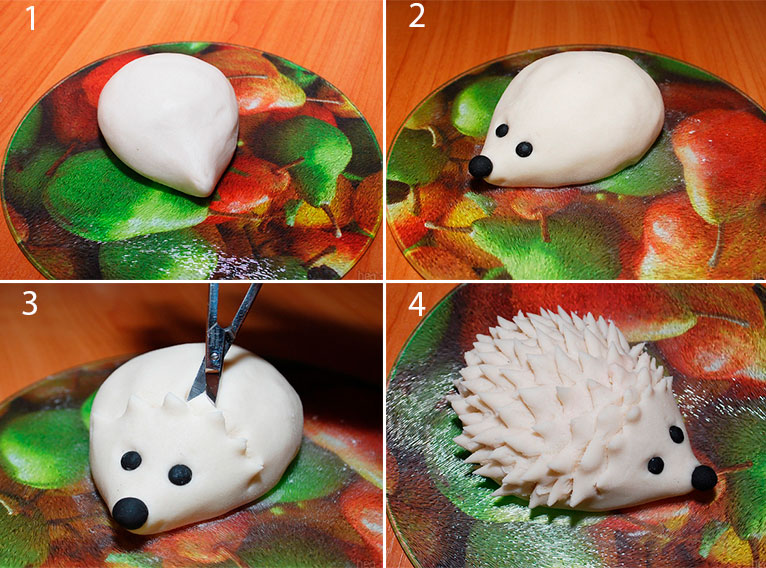
Salted dough hedgehog is ready!
Owl (eagle owl) from salt dough
You will need: salt dough, PVA glue, nail file, nail scissors, acrylic paints or gouache, paintbrush, wooden plank with pendant, transparent manicure varnish.
Master Class

Salted dough owl is ready!
You will need: salty dough, the base on which the craft will be attached, for example, a plate or plate, a stack or a knife, a sheet of paper, a simple pencil, a garlic crusher, a rolling pin, PVA glue, acrylic paints or gouache, a brush, transparent nail polish, cloves.
Master Class

Salted dough fruit basket is ready! I recommend watching the video master class!
You will need: salt dough, a knife, a rolling pin, a simple pencil, a sheet of paper, sandpaper, acrylic paints or gouache, a brush, a transparent nail polish, a glue gun or PVA, a base for crafts, for example: a board with a frame, transparent nail polish.
Master Class
- Draw a cat or print a template.

- Roll out the dough into a thin layer.
- Attach a template and cut out the cat.

- Dry the craft.
- Sand the craft with sandpaper, removing any irregularities.
- Using a simple pencil, transfer the desired drawing onto the cat's body.
- Paint with paints and wait until it dries completely.

- Glue the cat to the base with the frame.
Salt dough pencil
You will need: water, flour, extra salt, a cardboard jar for the frame, PVA glue, scissors, a piece of decorative cord or corrugated paper, gouache, tassel, button, stacks, acrylic lacquer for crafts, toothbrush.
Master Class
- Knead the salted dough in this way: pour a glass of flour, a glass of salt, add water, then knead until the desired consistency of molding. Separate a portion of the dough, add beige gouache, then knead.
- Roll out a flat cake 10-15 mm thick.

- Apply PVA glue to the outer rim of the jar and wrap with dough. Cut off the excess with a stack, and smooth out the joints with a damp brush.
- Create a small dotted texture with a toothbrush on the surface of the dough.
- Knead the brown dough, roll it into a flat cake 10-15mm thick.

- Cut a 5 cm wide strip of brown dough and glue to the bottom of the jar.
- Form 2 large owl eye bases with white dough, then glue them.
- Form a brown dough beak and glue it down.
- Blind the eyes from the turquoise dough and glue them.
- Roll 8 strips of pink dough, twist 4 flagella from them and mold a bow, then leave it to dry for 2 hours.
- Blind the owl's wings into brown dough droplets, then glue them.

- Weave beige dough into strands and glue the jar to the neck.
- Roll a sausage from white dough, draw the texture of lace with a stack and glue it as a collar under the beak.
- Put the craft in a warm place for a day.
- Paint lower part and the wings in brown gouache and decorate with white dots.

- Paint the pupils and eyelashes with black gouache, wait for the paint to dry, then paint white highlights on the eyes.
- Glue the pink bow above the wing.
- glue a button with a bow from a corrugated strip to the lace.
- Cover the craft with varnish and wait until it dries completely.
The salt dough pencil is ready!
Salted dough dachshund
You will need: salt dough, a simple pencil, scissors, cardboard, paints, brush, rope, toothpick, foam sponge, clear nail polish, PVA glue.
Master Class
- Draw a dachshund on the cardboard as shown in the image.
- Cut out the template.

- Roll out the dough to a thickness of 5 mm and cut the dachshund to the template.
- Roll up the oblong eyes, then glue them.
- Blind eyelids and glue over eyes.
- Use a toothpick to sketch out the paws, nose, mouth, ear and body outline.

- Roll an oval, then glue it over your ear and smooth the joint with a wet finger. Add volume to the back of the dachshund and tail in the same way.
- Mark stripes in different directions around the perimeter of the entire dachshund, in such a way that the stripes resemble wool.
- Dry the figurine.

- Glue a piece of rope to the back of the craft for further hanging.
Dachshund made of salted dough is ready!
Salted dough boletus mushroom
You will need: salt dough, light bulb, paints, brush, foil, cardboard, masking tape, superglue, PVA glue, paper napkins, transparent varnish, stack.
Master Class
- Cover the light bulb with tape, then stick it with dough and dry the piece.
- Cut a ring out of cardboard and place it over a light bulb as a base for a hat.
- Form a hat out of crumpled napkins, then secure with tape.

- Wrap foil around the hat.
- Roll out the dough to a thickness of 5 mm and stick around the cap.
- Remove the cap from the leg, stick the dough over the bottom and make the strips stack.
- Glue the cap onto the leg.

- Blind the handle, legs and nose to the fungus, then glue them on the PVA.
- Blind the caterpillar and glue to the hat.
- Dry the figurine.

- Color in the figurine, then leave to dry.
- Cover the craft with varnish and wait until it dries.
The boletus mushroom from salted dough is ready! I recommend watching this video!
Funny pigs made from salt dough
You will need: salt dough, paints, brush, foam sponge, stack, thin string, toothpick, black helium pen, PVA glue.
Master Class
- Roll 2 balls for the patch and poke through the nostrils with a toothpick.
- Blind the muzzle, glue the patch and the eyes above it.
- Blind the triangular ears, glue them, then mark the stripes with a stack at the junction of the ears and head.

- Blind the heart and glue it on the bottom side.
- Make indentations around the edge of the entire circle.
- Use a toothpick to make 2 holes at the top for attaching the rope and 2 holes at the bottom for the legs.

- Roll up the handles and glue them in such a way that they hold the heart.
- Blind the hooves and poke holes in them for the rope.
- Dry the workpieces.
- Paint the blanks with black paint and let them dry.
- Rinse off the paint from the convex parts of the workpiece under running water with a sponge and wait until it dries.

- Prime the figures with a white sponge.
- Color the piglets.
- Draw small details with a black helium pen.
- Cover the craft with varnish and wait until it dries.

- Glue the woolen strings as hair.
- Make a pendant from the rope.
The funny salt dough pigs are ready! I recommend watching this video!
Oksana Gritsaeva
Goals:
Develop fine motor skills and synchronization of movements of both hands;
To acquaint children with a new way of sculpting from salt dough;
Arouse children's interest in working with dough;
Learn to sculpt beautiful and useful things.
Material:
- salty dough;
Plastic glass;
Plastic knife (stack);
Oilcloth;
Modeling board;
Brush;
Gouache or watercolor;
Recipe salt dough:
2 cups of flour;
1 glass of salt;
3/4 cup water.
1. Stir flour and salt, add water, knead well dough.

2. Dough roll into a ball and cover with cellophane.


3. Roll out test long flagella and ball. Flatten the ball with your palm.

4. Turn the glass upside down on the board, put a cake from test... Lay the flagella in the form of rings one after the other around the glass, starting from the bottom. Glue the edges of the flagella with a damp brush.


5. Let's make a decoration for our pencil holders... Let's roll out carrot dough and flagellum, carrots with a flattened finger to make the leaves. Moisten the leaves and flagellum (stem) with a damp brush and glue them on the glass along the edge of the bottom. Let's make a flower from a ball, flatten it and make cuts. We glue it to the stem in the same way. We can diversify jewelry with the help of molds (butterflies, hearts, etc.).


6. Make another cake out of the ball and glue it to the bottom of the glass. Set aside the craft to dry in a warm place.


7. Carefully turn the craft over and color it as you wish. You can also decorate it with beads.
You most likely often saw on the Internet on specialized resources photos of homemade pencil holders. And at first glance it is difficult to make them, it will take a lot of nerves, attention, manual dexterity and accuracy. But everything is much simpler than it might seem.
In this article, you will learn about many ways and about best ideas how to make a pencil holder with your own hands from scrap materials that can be found in everyone's house.

What can be used to make pencil holders? As it turned out, people make them from almost everything: from paper, cardboard, salt dough, cans, books, pencils, clay, papier-mâché, and even from simple logs and twigs!

Sleeve pencil
Instructions for making a comfortable do-it-yourself pencil holder:
We take them in the amount of 5-6 pieces. You can choose any size. Next, we measure its length and circumference in order to choose colored paper according to the required parameters, which we do after the measurement.


Then, to make your composition look holistic, you can cut out a kind of cloud, or an ordinary circle or square, whichever you prefer.


We glue the multi-colored coasters on the pallet and decorate them as and what you want. You can glue small flowers, you can simply decorate with felt-tip pens or paints, everything is at your discretion.

Salted dough pencils
Material for preparing the dough itself and the pencil holder itself: flour, water, salt, PVA glue, a cardboard box for the frame, scissors, a button, gouache, a brush, acrylic varnish, a piece of decorative cord or corrugated paper and a toothbrush.

And now the master class itself on creating a pencil holder with your own hands.

First thing you need to do is knead the salted dough. This is done very easily. We pour a glass of flour and a glass of salt, add some water and knead it all to the desired consistency of modeling. Then, so that our dough becomes beautiful color, separate part from it, add beige paint and mix again.

Next, roll out the cake about 10-15 millimeters thick. We put PVA glue on the outside of the jar and wrap it with a ready-made dough. Cut off the excess, and smooth out the joints with a wet brush.

After that, create a point texture with a brush. That is, we take a toothbrush and make small and barely noticeable dots across the entire surface of the craft.

Next, we knead the brown dough and, as with the main one, roll it into a cake 10-15 millimeters thick. We cut out a strip 5 centimeters wide from it and glue it to the bottom of the can.

Next, we make a base for the eyes: we sculpt two circles out of white dough and glue them to the craft, respectively, where, at your discretion, the owl's eyes should be. Then we sculpt the beak from brown dough and glue it a little lower between the eyes. We sculpt the eyes from turquoise and glue them to the white base for the eyes.

And now we need to make a bow so that by the end of everything we do, it has time to dry out. To do this, we roll 8 strips of pink dough, twist 4 thin flagella from them and connect everything in a bow. We put it on a flat surface for about two hours and continue with the main parts of the craft.

Note! 
More precisely, from brown dough we sculpt the wings in the form of droplets for our owl and attach them to the structure on the sides.

Now, to make the craft look more beautiful, we make a beige flagellum and glue it on the neck of the can. This will make the transition look less dramatic and more accurate.


We put the craft in a warm and dry place for a day. And the next day we are already doing the finishing touches. We paint the lower part and wings in Brown color and add some white specks.

We draw the pupils and eyelashes, of course, with black gouache, wait for the details to dry completely, and add white highlights in front of our eyes.

We glue the already dried bow over the owl's wing. We glue a button with a bow from a strip of corrugated paper of any color to the lace.
Note!


And the final touch, we cover our owlet with varnish and wait until it is completely dry. The salt dough pencil is ready!

Small and cute apple-shaped pencil holder
For it, you need an oval small plastic bottle, red acrylic paint, gold cords, sheet, plate, nail file and glue gun.
Manufacturing instruction:
Pour acrylic into the bottle and shake it so that the entire inner side turns red. Then we drain the leftovers, put the bottle on a plate and wait for it to dry completely.

If necessary, remove excess paint, file the edges of the neck with a nail file. And the last stage: we wrap the neck with a golden cord and glue the leaf. And the pencil holder - the apple is ready!

Note! 
Do-it-yourself photo of pencil holders


How to make a pencil holder from salt dough with your own hands
Master class on making a pencil holder from salted dough "Mignon".
Author: Demidova Ekaterina Nikolaevna, educator, MBDOU " Kindergarten combined type No. 62 "Silver hoof", Kurgan.The master class is designed for educators and specialists preschool institutions, teachers of additional education, parents and older children preschool age, and all creative people.
Purpose: stand for pencils, pens, gift.
From childhood, everyone is familiar with the lines from a children's song:
Here it is, in front of you, a box of pencils,
Anything can fit into it quite freely.
Mountains and oceans in a pencil box
Gnomes and giants, a cat with a big mustache ...
M. Gladkov
Probably, there is not a single child in the world who would not like to draw. Drawing plays important role in the formation of his personality. Engaging in this type of creativity affects the development of thinking, fine motor skills, attention and memory. Drawing will teach the kid not only to think, but also to analyze, compare, measure, imagine and compose. To make the process of creativity even more exciting, it is necessary to make a bright, funny pencil case, it should cheer up.
We will make our pencil holder out of salted dough in the shape of a funny yellow man Minion - a yellow cylindrical creature of small stature with one or two wide open eyes. Minions are simple-minded, impulsive babies about the same size and shape, but they also have unique distinguishing features, such as height, number of eyes, shape of roundness. There are also secondary distinguishing features such as hairstyle, pupil size, clothing.
The choice of material - salt dough is determined by the following criteria:
availability;
cheap materials;
simplicity of cooking techniques.
Target: making a pencil holder for the development of children's creative abilities through testoplasty and visual activity.
Tasks:
to acquaint with the technology of making a pencil holder from salted dough;
develop Creative skills children;
develop fine motor skills;
to promote the development of thinking, memory, imagination, the ability to analyze;
to form an interest in arts and crafts;
develop skills in organizing practical activities.

Materials and tools:
wheat flour of the highest grade;
finely ground table salt;
water is cold;
wallpaper glue;
tin can from under baby food;
scissors;
knife (if the child is doing the work, replace the knife with a stack);
rolling pin;
cellophane and dense bags;
textured fabric;
thin black wire;
cap from a 1.5 liter bottle;
stack;
gouache;
brush;
false eyelashes.
Before starting work, let's recall the basic safety rules when working with scissors and a knife.
Safety when working with a scissor mi:
Pay close attention to the cutting direction when working.
Do not work with blunt scissors or loose pivot points.
Do not hold the scissors with the blade up.
Do not leave scissors with open blades.
Do not use scissors while walking.
Safety when working with a knife ohm:
Do not work with a knife towards your body;
Hold the knife handle firmly;
Use only well-sharpened knives and tools;
Make sure that the hands and knife handle are dry;
Do not leave the knife in the position with the cutting edge up;
Do not try to catch a falling knife;
Wash the knife after each use.
The technology of making a pencil holder from salt dough "Mignon".
The first stage of work is the preparation of salted dough.
Recipe:
1.5 cups flour;
1.5 cups of salt;
1 tablespoon of wallpaper glue;
1.5 cups cold water
First mix all dry ingredients together, then add water. You need to knead the dough until the moment when it does not stick to your hands and does not crumble

The dough should look like a dumplings - dense and elastic.

If you are making large crafts, then use only flour, salt and water. If you need to make more delicate, carved work, then add PVA glue or wallpaper glue to the mixture, you can use sunflower oil - for plasticity.
Divide the dough in half. Put half of the dough in a plastic bag. Hide the salted dough every time you get leftovers so it doesn't dry out. Roll it out with a rolling pin 0.5 centimeters thick.

Place the jar near the edge of the rolled dough.

Take the edge of the bag, press the dough against the jar and start wrapping. Do not remove the bag until you have completely covered the surface of the jar with the salted dough.

WITH back side If your dough does not occupy the entire area of the jar, take the excess dough from the edges and fill the space. Make sure that the thickness is about the same everywhere. If it overlaps, draw a line with a knife and remove excess salt dough.

Wrap the entire pencil holder in a bag and roll it over the table surface - all irregularities will be smoothed out.

Use a knife to cut off the excess dough from the top and bottom.

Take a black thin wire (for example, from a charger or from old headphones) and cut it into pieces about 5 - 6 centimeters long.

Shape the hairs - stick the wires in upper part pencil holders.

Divide the remaining dough into about three portions. Roll out 2/3 of the salted dough with a rolling pin. Use a knife to cut out the base of the overalls. You can use a ruler to make the lines smoother.

Remove excess dough in a plastic bag.

Put the fabric on the dough and roll it lightly with a rolling pin - you get an interesting texture.

Attach the jumpsuit to the base of the pencil holder, after slightly moistening it.


Use a knife to mark the side seams and pocket lines. Use the tip of your knife to apply decorative stitching.


Use a knife to mark a line for the straps.

Roll out the dough 0.5 centimeters thick. Cut two strips about 1 centimeter wide. Remove excess dough in a plastic bag.

Attach the straps to the pencil holder, after slightly moistening it. The straps should extend over the front by about 1 centimeter. From the back, cut off the excess with a knife along the line of the overalls.


Use the tip of your knife to apply decorative stitching along the edge of the shoulder straps.

Attach small buttons to the shoulder straps by pressing them lightly with the tip of a knife.

Roll out the dough 1 centimeter thick and cut two holes with a cork.


Mark the outer part of the glasses with a stack, the circles should overlap each other.


Use a knife to cut out the glasses along the outer edge.

Remove excess dough. Remove excess dough in a plastic bag.

Attach the glasses to the pencil holder, after slightly moistening it.

Roll out the dough 1 centimeter thick and cut a 1 centimeter wide strip with a knife.

Attach the strip to the pencil holder, after slightly moistening it.

Use a knife to make a recess along the entire strip.

Roll up two small sausages - glasses jumpers.

Attach the jumpers to the goggles.

Make longitudinal and transverse grooves with a knife.

Roll out the dough 0.5 centimeters thick and cut a pocket out with a knife. Apply the texture with a cloth.

Attach the pocket to the jumpsuit. Apply decorative topstitching with the tip of your knife.

Our Mignon pencil holder is ready.


We paint pencil holders with gouache and glue false eyelashes.
This pencil holder will be a wonderful gift for a girl.

For the boy, we carry out the pencil case "Mignon" in another colors- the jumpsuit is blue and of course without false eyelashes.
We sign the initials of the child on the pocket.