Booties from children's novelty. Booties for beginners with a step-by-step crochet description. How to crochet seamless sock booties
Preparing for the birth of a child for a mother often becomes a period of creativity and the discovery of hidden talents. Someone begins to get involved in sewing future clothes for the baby, and someone knits wonderful children's things. Booties are one of the cutest and most touching items in a baby's wardrobe.
Types of baby booties for boys and girls
The first shoes of newborn boys and girls can be classified based on their similarity to adult shoes. Among them are:

But this is not the whole list of possible types of booties. There can be many criteria for their separation:
- by color (pink for girls, blue for boys and universal colors);
- according to the seasons (dense for cold weather, openwork for the summer season, etc.);
- on appearance("bunnies", "berries", "flowers", "dogs", "sheep").
Which of the options for the performance of baby booties will be chosen depends on the desire, mood and creativity craftswomen.
Baby booties knitting guide
Any creative work requires some preparation. It is very important that everything you need is at hand, and that all the initial data is obtained.
For knitting small children's shoes - booties you will need:
- knitting needles, which must correspond to the thickness of the selected yarn;
- yarn for knitting required colors and the right amount
- a needle with a large eye, with which parts of the product will be sewn together;
- decorative elements (beads, satin ribbons, buttons, ribbons, etc.);
- knitting markers for some types of booties.
 Also, it is very important to decide on the size of future booties. To do this, you first need to decide in what period of time, in what season and in what weather conditions they will be used.
Based on this, the age of the baby and the size of his legs will be clear. This is very important, because in the first year of life, children grow very quickly. Booties knitted exclusively for a newborn may no longer fit in size at 3 or 4 months of age.
You can, of course, knit booties with some margin in size. However, it is much more pleasant if they sit on a tiny leg like a glove.
It is difficult when the knitting process itself takes place when the child is still in the mother's tummy, or the booties are made as a gift. For such situations, there are average sizes:
- for a newborn, the size of the legs is about 7-9 centimeters;
- from three months to six months - about 9-10 centimeters;
- six to eight months use data - 11 cm;
- from eight months to ten - 12 cm;
- ten months until the baby reaches one year old- 13 cm.
This data should help determine required size booties and the correct calculation of the loops.
Step-by-step instructions for knitting booties for beginners with diagrams and photos
How to knit booties with knitting needles? Do not despair if you have little knitting skills and experience. For every skill level, you can find the model of booties that is sure to turn out great.
Knitted shoes with complex patterns or an original design solution can also be born from beginners. But it’s better, after all, to start with, to try to connect a simpler option, for example, this one.

Consider a description of the process step by step with a photo. Knitting begins with the sole according to the proposed pattern in garter stitch.

Then, we take 4 knitting needles and we collect loops on them from the foot in this way:
- booties on the toe - 10 pcs.;
- on the sides - 20 pcs.;
- on the heel - 7 pcs.
It is necessary to knit eight rows on 5 knitting needles with a “front surface” pattern.
Now we begin to make decreases: we connect two loops together at the meeting points of the “toe” and side knitting needles. For 2 rows, only 4 loops are reduced.
After, we use only the knitting needle for the toe of our booties and make decreases: we take 1 side loop and 1 toe loop and knit together. Knitting is turned over and repeated. Decrease should be done until the following number of loops:
- toe - 10 pcs.;
- sidewalls - 7 and 8 pieces;
- heel - 7 pcs.
At the end, we use the “single gum” pattern and knit it on five knitting needles for 20 rows. Then we close the loops, break the thread.
According to the proposed scheme, we knit dog ears and sew to the main product. We make the dog's nose and eyes.
By this principle, you can knit rabbits, and kittens, and other unknown animals. If you try, you can collect a whole collection of animals.
The simplest method of knitting booties without a seam with knitting needles - description and photo
Unusual booties can be created with knitting needles without a single seam. They turn out to be very beautiful and cozy, since nothing from the inside will create discomfort for the baby’s leg. Seamless knitted shoes In this case, it is perfect for children who are just starting to walk. Therefore, this lesson will consider knitting booties for a child from 10 to 12 months old.

In order to make booties in a seamless technique, you will need:
- five knitting needles, the size of which must correspond to the thickness of the selected threads;
- yarn (preferably acrylic) - 50 gr.
So, how easy is it to knit booties without a seam with knitting needles? Knitting begins with the cuff of the booties. So, we initially collect 37 loops on the knitting needles. Then we distribute them in the same amount on four knitting needles.
Thus, you should get a neat little square. We knit the very first of the rows with facial loops to connect everything in a circle. To do this, you need to knit two extreme loops together.
Next, 12 rows need to be knitted with a single elastic band. To make our booties look beautiful, you can try to knit peculiar holes, into which a ribbon, ribbon or decorative lace is then inserted.
To make them, a rapport is knitted (a repeating part of a pattern, a pattern): two facial loops are knitted together and a single crochet. After that, we go around the cuff in two rows of the front surface in the following order to distribute the loops on the knitting needles as follows:
- the first - 11 loops (the junction in a circle);
- the second - 7 loops;
- the third - 11 loops;
- fourth - 7 pieces.

Let's move on to the toe booties. We will need a third knitting needle with 11 loops. Without affecting the other three knitting needles, we knit 18 reverse rows using the "garter stitch" technique.

We are transgressing to the birth of the "side". For this, the edge loops of the toe will be used and the previously left section will be put into operation. We collect one loop on the hem and knit ten rows using the “garter” knitting technique.

The next part is the sole of the booties, which connects to the "side". It is knitted in stockinette stitch. This process looks like this: we knit 11 loops in the middle; the extreme is knitted together with the "side" by means of two loops together. When there are no more loops left on the side needles, knitting in this way ends.


When all loops have been thrown over, knitting must be "closed" by knitting three loops together. We make a closure: the first loop will be closing, we take the second from the first knitting needle, and the third from the second.

In the very last loop we stretch and tighten the thread, hiding it in a convenient way.

You can decorate ready-made booties with a contrasting ribbon with a bow for a girl, or with a bright decorative lace on a symbolic knot for a boy.
An easy way to knit openwork booties with knitting needles (photo attached)
Openwork booties look very impressive. Perfect for warm weather. In them, the baby's leg will "breathe" due to the free circulation of air through the "holes" in the openwork pattern.
Initially, it may seem that they are difficult to knit. However, this is not the case at all. These cute booties for a baby from birth to three months can be created in one free evening without much work and effort. It is worth believing that this is a very interesting and exciting activity that can drag on for a long time.
Let's try to knit such cute openwork shoes.

We start knitting with the soles of the booties. We make a set of loops on the knitting needles in the amount of 31 pcs. Carefully knit garter stitch for 15 rows. Do not forget to make an increase for the soles of future booties. They will be in the odd rows of our knitting.
Increases should be placed one loop at the beginning and at the end of the row. And also, on both sides of the 16th loop in the row. We do such additions of loops until 63 loops are located on the knitting needle. After that, we continue to knit 7 rows with the same garter stitch, but there is no need to add loops.
Knitting starts from the next row openwork pattern according to principle
- first row - all facial loops;
- second row - all purl;
- third row - 2 front loops together + yarn over;
- fourth row - purl loops.
The first row of openwork stripes looks like this:
- on the front side of the product you need to knit 36 facial loops;
- loops that are 37 and 38 must be knitted together;
- we turn the work;
- 10 loops knit purl;
- We knit the 11th and 12th loop together with the wrong side;
- the next row is directly openwork strips (nakid and 2 loops together).
You need to be very careful not to get lost because of the crochets. It is worth remembering that 10 loops must be located in the center. We knit the 11th and 12th together. Openwork stripes should be repeated through three rows in the fourth.
We knit in this pattern until 14 loops remain on both sides. After that, we knit side loops (14 pcs.) And middle ones (10 pcs.). You should get 24 rows of openwork stripes looking up. We close the loops.
The next step is the assembly of the product. Need to sew upper part, back and outsole.
Following this simple scheme, you get beautiful “openwork boots” booties - fashionable and stylish. Using different colors and their combinations, each new pair of these booties will look completely different than the previous one.
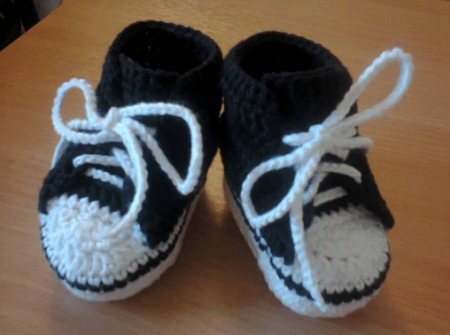
Stylish booties-sneakers for a newborn: a master class with a photo
From birth, the baby should be instilled with a sense of beauty. This applies to the choice of clothes and shoes too. small knitted needles booties in the form of sports sneakers will make your child visible and bright during a walk in the fresh air.
Link such stylish shoes It's not that hard for a little one. The main thing is to choose and distribute the colors of the yarn correctly so that you get a pattern that resembles adult sneakers.

To knit such booties-sneakers for the age from 0 to 3 months (for a newborn), you will need the following:
- White, red and blue yarn in the amount of 100 gr.;
- Five knitting needles No. 3.5;
- sewing needle;
- Hook;
- Knitting marker.
It is very convenient that the entire product will be knitted with a garter stitch.
So, we collect 38 loops on the knitting needles and we knit the very first row only with facial loops. Take a knitting marker and set it in the middle of knitting.
We begin to add loops: 2 loops on each side of knitting in every 2nd row. In addition, the increase must be done in the middle according to the scheme:
- edge loop;
- one crochet;
- 17 facial loops;
- again one crochet;
- we knit two facial;
- again one crochet;
- 17 facial loops;
- one crochet;
- edge loop.
In the next row we knit 19 loops, in the next 21 and so on. As a result, you need to reach 54 loops (we count together with the edge loops). The result should be the bottom of the sole of chic booties.

We turn to knitting the lateral part of the sole. It is necessary to knit the front row with purl loops and vice versa. This technique is necessary to give the booties a shape. As for the height, her needlewoman chooses it according to her desire.
We continue to knit to the established marker with facial loops. Next, we move on to the formation of the sock. To do this, you need to knit in short rows - two loops before the marker and the same number after it. Then we begin to add at the end of each row one loop. You need to reach 12 loops.

We knit like this without adding (increase). We connect the 12th loop with the side. In this technique, we knit 6 rows of white (light) yarn, and the other three with blue.

We continue to knit with blue threads to the required length, and then the part needs to be tied.

Let's get to our sides knitted sneakers. We knit all the loops and make an increase in the amount of 4 loops towards the toe of the product in each row.
So, 38 loops should remain. We knit four rows that visually look like two. We begin to gently reduce. This must be done every time in the second row at the very beginning and at the end.
In the same place, it is necessary to make decorative holes for the laces. To make them beautiful, it is worth knitting them like this: tie two loops together and make one crochet. We hem the sole of the resulting sneakers, and tie the side part.
You can crochet a small lace or buy a ready-made one. Insert it into the holes prepared in advance and tighten it nicely.
Such simple sneakers-booties can be knitted even by a beginner. Everything is quite simple and clear.
Baby booties on 2 knitting needles for beginners
Can be knitted on two needles a large number of the most incredible design booties. At the end, they can be decorated with various decorative elements:
- pom-poms;
- beads;
- Ribbons;
- Braid;
- Buttons;
- Embroidery, etc.

To work, you will need 2 knitting needles and 50 grams of yarn of your choice of color, a needle for stitching parts.
Consider in detail how to knit baby booties on 2 knitting needles. We collect 39 loops on 2 knitting needles the classic way. We take out one knitting needle and start knitting. You can choose the pattern "gum". With him, booties will fit the baby's leg well. As an option - garter knitting. This pattern looks great too.
We begin to knit the cuffs of future booties of the required height. The path will be, in our case, 18 rows and we make holes for a lace or ribbon so that the booties do not fall off the legs and hold firmly with the active movements of the crumbs. We knit the purl row.

Now you need to divide the resulting knitting into 3 equal parts of 13 loops and knit the first of them, and then set aside. Now we take the middle 13 loops and knit the part to the desired length, which depends on the chosen size, for example, 14 rows for a leg size of 8 cm.

Without tearing off the thread in the process of knitting, we begin to raise the loops on the right with the knitting needle on which the pending loops are located. So, we knit the middle loops with the same knitting needle and raise exactly the same number of loops as on the right side. We knit them all and still pending loops.

We begin to knit the side of the booties. To do this, use all the loops.

We pass to the sole of our product. Again, you have to share. We take knitting and divide it like this: 13 middle loops, 13 more loops along with those that were raised on the sides of the middle part (details). You should get 21 loops (right and left). We knit 21 loops on the left (wrong side row) and set aside.
We knit the loops of our sole like this: at the end of each row, we need to knit together the last loop, taken from the middle ones, and the first of the postponed ones. So it is necessary to continue until 6 pending loops remain on the first and second knitting needles.

The needle is put into work. With its help, remove the remaining loops and fasten them.

Now the product must be sewn at the back and turned inside out. Decorate with decorative elements.

In the work, you can use different patterns in combination or use only one.
In order for the result of the finished booties to please the eye, and for them to retain their cute original appearance for a longer time, a few tips should be given:
- It is worth choosing the exact size of booties. To do this, you need to measure the baby's foot from the heel to the big toe. Based on this, correctly calculate the set of loops on the knitting needles.
- Do not choose too thick threads. The product will look rough. But if this was intended in advance, then from bulk yarn You can also try to make beautiful booties.
- Knitting needles must be selected according to the thickness of the yarn. Usually, recommendations for their size are indicated on the labels for the hanks.
- It is not recommended to use poorly sewn small details on booties. The kid can easily tear them off and swallow them.
- Don't be in a hurry. Handmade things look good when they are made slowly, with love and due diligence.
- You can use a crochet hook to add extra lace details and details to the booties.
Knitting booties on knitting needles is quite simple. Choose the version of children's shoes that you like best and knit for your pleasure. Maybe, thanks to your imagination, you will come up with new versions of baby booties!
The next video shows another option for knitting booties.
Not everyone can crochet booties. It takes patience and a little basic knitting knowledge. Therefore, if you decide to please the “little miracle” with a new thing made by yourself, we will teach you how to crochet booties beautifully and correctly. Booties for beginners - this will be the first part of a large lesson, then we will move on to more complex models.
Crochet lessons for beginners (diagrams with step by step description)
This part of the article can be called "learning for dummies or how to quickly and easily crochet booties." For beginners, this is a real find, as a large number of photos, videos and step-by-step instruction will help you to understand this difficult matter. So, the master class "how to learn to knit the simplest booties."
The simplest baby booties (a lesson for beginner needlewomen)
If you learn how to knit the simplest patterns, you can fantasize and turn them into funny animals (monkeys, bunnies, lambs, bears), interesting fruits (strawberries, apples). You can also just beautifully tie the edge or decorate socks that will be beautifully combined, for example, with a bandage on your head and, voila, a chic set is ready.
Light models for the summer or for the home can be made on felt soles.

Popular articles:
For this model (sole size 10 cm) you need soft yarn (100% acrylic, 50 g / 200 m) in 2 colors.
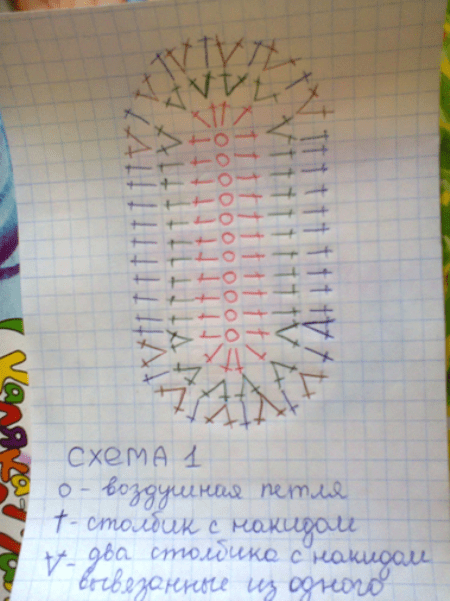
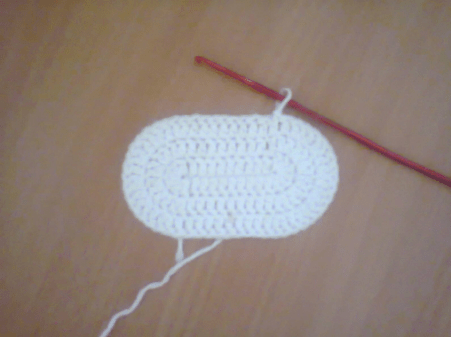
We dial 12 ch + 3 ch (total 15 ch), insert the hook into the 4th loop of the chain from the hook and knit 3 rows according to this pattern.

Having knitted three rows, we pass to another color.

4th row - in each column (back) we knit a loop without a crochet. The result should be 56 loops.

We knit the 5th in the same way. The result is two rows knitted with white thread.

Let's switch to blue. We start by knitting a “bump” (2 air loops, after 2 unfinished columns, then one air loop).

We skip one loop and again make a “bump”.


So knit a whole row and close. We knit the 7th as well as the 6th.

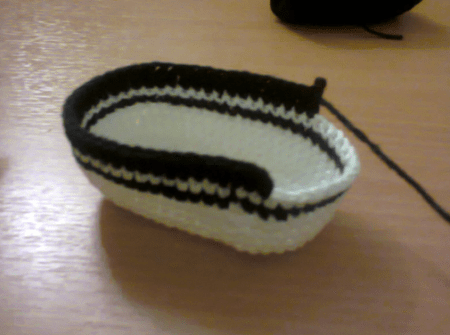
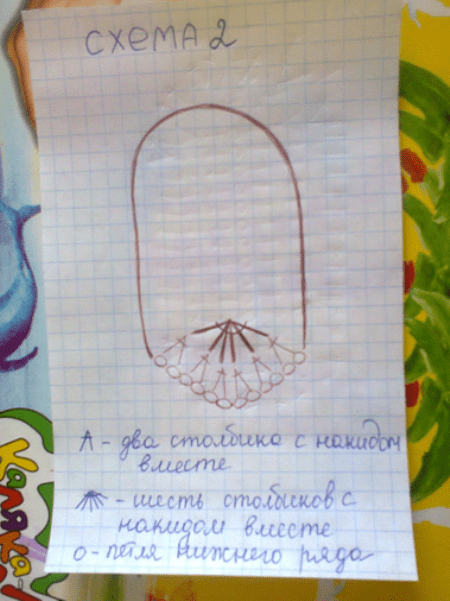
We close the row and break the thread. Having marked the middle, we begin to knit a cape with a white thread.

We introduce the hook into the back wall of the loop and knit a white "bob" from two unfinished loops.


We turn over and also knit "bumps".

You should get 7 pieces, after which you need to connect them.


Finish the row in the same way.

2 more rows and go back to blue.

We decorate the edge by knitting three air loops for each column.

Master class with a detailed full description (step by step photo)
Step by step, you learn the basics that help you move on to more interesting models. When starting from scratch, all the little useful secrets help you move forward quickly, so I suggest moving on to more complex crochet booties for beginners with step by step description.
Knitted sneakers for children
Adidas sneakers made by hand will be appreciated by true gentlemen.
For this "masterpiece" you will need thin white cotton yarn (100% cotton, 50g / 150m), hook number 2 and 3 hours of free time.
We start with the sole. The sole is knitted according to this scheme.


The sock is knitted from the front 30 loops. 1 row - single crochets, 2 - double crochets (3 loops and with one top). There should be 10 loops left.

We connect all 10 columns, transfer the thread to the beginning of the row and knit 2 rows of single crochets.

7 rows - double crochets.

The tongue ends with three rows of white thread. After that, you can tie the product around the perimeter.

We embroider a logo, we put in a lace. Ready!

Do-it-yourself summer sandals for a child
If you love children's knitted sandals for the summer, learning how to knit a sole, you can come up with a lot of ideas and create a large number of interesting models.


Fold the sole in half and find the center at the toe. The middle should be 5 columns. Tie a thread with a regular knot and tie 13 air loops, then with a half-column without a crochet (pst.b.n.) attach to the opposite side of the spout (distance 5 st.b.n.). Next, knit according to scheme 2 (only what is indicated in blue and dark red). The nose should look like in fig. 3. Do not break the thread. In the last row, you clung to the sole with 2 half-columns b.n.
Further:
1 row: ch 3, attach them to pst.b.n. to the strap (skip 3 dc). Tie 34 st. n. and also attach pst. b. n. to the strap.
2nd row: ch 1 and the whole row of st. b.s. = 35 st.b.n.
3 row: Again ch 3 and 34 st. With. n., 4 vp, 3 tbsp. s.n. in the middle of the strap, ch 4
Next is a row of arches for the tape. 5 v.p., st.s.n. through 1st.s.n. the previous row. St. s.n., 1 v.p., st.s. n. repeat the entire row in a circle.
Start the next row with pst. b.s. in an arch, 4 ch, st.s.n., 1 c. p., st.s.n. again in the arch. And so the whole series.

Baby shoes for girls (crochet)
Christening gowns or fishnet cap Will look chic with crocheted shoes with beads. Make them in the form of ballet flats or moccasins. The most important thing is that the yarn is soft and pleasant for the child's feet.
Crochet booties for beginners with a step-by-step description (crochet).

You can take any cotton threads you like and hook No. 2.5. We start with the sole (look at the diagram below).

If you find it difficult to navigate the scheme, I suggest that you dwell on this stage in more detail.
We collect 17 air loops (we start knitting from the 3rd).
1 row: 7 single crochet, 7 single crochet, 7 double crochet in the last stitch (and continue on the other side of our chain), 7 double crochet, 7 single crochet, 4 single crochet in the last stitch, connecting stitch .

2 row: 3 air loops, double crochet in the same base. 14 double crochets, (2 double crochets from one loop) - 5 times, 16 double crochets, 3 double crochets from one loop, 4 double crochets from one loop, 3 double crochets from one loop, connecting column.

3 row: 3 air loops, 15 double crochets, (2 double crochets from one loop, double crochet) - 2 times, (3 double crochets from one loop) - 2 times, (double crochet, 2 double crochets double crochet from one loop) - 2 times, 16 double crochet, (2 double crochet from one loop, double crochet) - 2 times, (3 double crochet from one loop) - 2 times, (double crochet, 2 double crochet from one loop) - 2 times, connecting column.
4 row: air loop, we tie the entire row with single crochets, finish with a connecting post.

5 row: 3 air loops, we knit the entire row with single crochets for the back half loop of our sole, we finish the row with a connecting post.
6 row: 3 air loops, we knit the whole row with double crochets, we finish with a connecting column.

We pass to the white thread.
7 row: 3 air loops, 15 double crochets, (we knit 2 double crochets together with a common top) - 10 times, knit a row with double crochets, finish with a connecting column.


8 row: 3 air loops, 14 double crochets, (we knit 2 double crochets together with a common top) - 6 times, knit a row with double crochets, finish with a connecting column.

We make 5 connecting loops. We unfold our bootie and knit from the inside.
9 row: 3 air loops, 27 double crochets.

For the strap we collect 20 air loops. 10 row: we knit a double crochet in the fourth loop from the hook, 2 air loops, skip 2 columns of the previous row and knit 2 double crochets, knit 2 air loops again - skip 2 loops of the previous row and knit to the end of the row with double crochets.

Almost ready, so I suggest tying the product with single crochets.

Sew on a bow, buttons and beads.
Video tutorials - knit booties for newborns
So the most interesting ideas for a fashionable baby.
Beautiful booties-shoes "Crocodiles" in one evening
Such models fit very quickly and easily despite the scales.
Warm boots (ugg boots)
High boots or boots wool yarn(weeds can be) we will create for a colder time. On a baby who is only a couple of months old, they will look very cute.
Princess ballerinas
MK - Sneakers for a boy
Unusual white openwork "Raphael" for mom's doll
Cozy slippers "Minions" for kids
Stylish "Marshmallows"
New Year's ideas "Santa Claus"
Clothing for children should be as comfortable and safe as possible. Unfortunately, purchased items do not always fulfill these requirements 100%. Particular attention should be paid to the choice of clothes for newborn babies. Everything is important here - style, material, workmanship. In this article, we will take a step-by-step look at how to knit the first shoes for a child - booties. When choosing yarn for work, give preference to natural threads with a natural color. It is better to knit booties for beginner craftswomen, starting with simple models. Be sure to tie the sample, wet and dry it. After washing, things knitted from natural yarn "sit down", decreasing in size. Therefore, it is better to calculate the knitting density on a dried sample. Or there is a second option - to tie the shoes obviously bigger size, taking into account future shrinkage. Approximate measurements of the baby's foot - see below.
There are many knitting options - on two, five knitting needles, crochet, a combined option - knitting needles and a hook. Let's start with the simplest model - booties - shoes.
Slippers - unisex
These simple booties are suitable for both girls and boys. Designed for a 10-12 month old baby.  We will need:
- yarn of one color - 50g;
- some yarn of a different color for the lace;
- set of socks No. 3;
- hook for knitting a lace.
Patterns used:
- elastic band 1 person x 1 out;
- front surface - with straight knitting, odd rows - faces., Even - out. P.;
- shawl pattern - with straight knitting, all rows are faces. P.
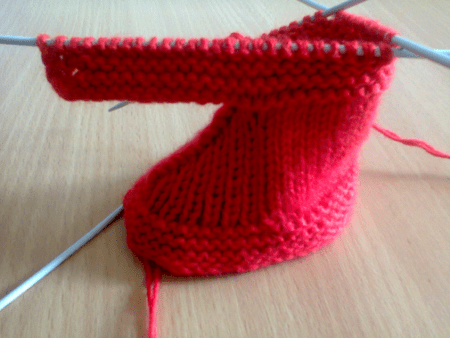
Description and master class
We will work on 5 knitting needles, in two threads. We collect 37 loops and go to circular knitting, placing 9p each. on each sp. At the same time, we knit the first and last sts with one. Continue with an elastic band 12 p. Then we make a row with holes for pulling the lace. To do this, alternate 2p. together in 1 person., 1 yarn. Let's move on to faces. stitch and knit 2 p. At the same time, we redistribute the loops on the knitting needles: 11, 7, 11, 7 loops.
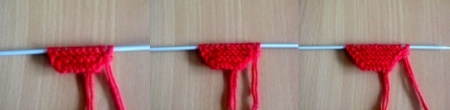
Further work will be shown in stages - see the master class and photo.
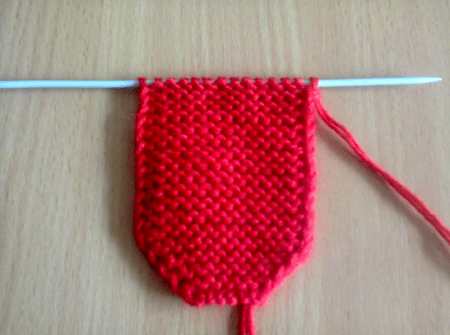
toe
Knitted on 11p. one needle. 18 p. we perform a scarf pattern.
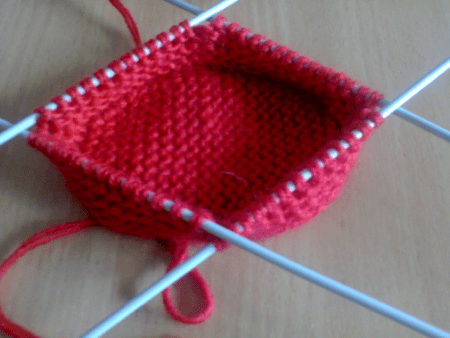
 Side parts
It is knitted on 25 delayed loops, plus on the sides of the toe we collect 9 loops on each side. We do 10 r. scarf pattern. 
Sole
Knitted on 11 central loops of the toe of the faces. satin stitch. At the same time, we knit each of the extreme side loops together with the loops of the side part. Continue until the side sts are finished.  Loops from two sp. transfer to one, evenly alternating. We close all the points, knitting them in three.
  Cut the thread, fasten, neatly thread the end.
  Now let's decorate our children's shoes. To do this, tie a cord and thread it through the holes in the shoe. We tie beautiful bows. Shoes are ready!
White booties with a pattern: video master class
https://youtu.be/wzB_VKyHCnw
"Caramels"
This master class will help you knit the most original and comfortable shoes for a little princess.  The sizes are calculated on the foot of a one-year-old child.
For work you will need:
- yarn of two colors - only about 50g;
- set sp. No. 3;
- beads and flowers for decoration.
Patterns used:
- garter stitch - all p. persons .;
- two-color elastic band, knitting in a circle:
1r.: * 1 person., 1 out. * - to the end of the river;
2p.: * Remove 1 p., 1 yarn over, 1 out. * - the whole p.;
3r.: * Knit the removed loop together with the crochet., 1 out. * - the whole p.
Description and master class
For “Caramelka” booties, the sole is first knitted. The rest of the shoe is tied to her. Our detailed master class with photos and descriptions - at your service!
Sole
We collect 8p. in the first color (in our case, white) and knit with a scarf pattern, making increments - see diagram in the photo. One cell corresponds to 1 p. and 1 p.
 Side parts
We raise the loops along the edges of the sole and distribute them in three joint ventures: 21p each. on the sides and 18p. on the toe - only 60p.  We pass to the second color, in our case - pink and we will connect a number of faces. loops.
  From the second row - knit 14 p. two-color gum.
  16r .: white yarn - 15 persons., 2 persons. – 1 persons. - 15 decreases, 15 persons. We have 45p.
from the 17th to the 21st - shawl pattern with alternating colors.  Cast off all sts except 20 sts. on the heel.
On these 20 sts, knit 2p. persons.p.
Cast on 20 more sts. for the strap. On 40p. knit 8 p. Don't forget to make a hole for the button. Close loops. Cut the thread and carefully tuck in the end. The second shoe is mirrored. You can decorate “Caramels” as you wish - with beads, flowers. 
Summer booties: video master class
https://youtu.be/LVOvYG4iBCk
Ugg boots
We suggest you knit booties with an original ornament - ugg boots. 
The model is calculated on the size of the foot 11 cm - see the master class.
We will need:
- yarn white color- 50g;
- a few threads of two shades of brown;
- set sp. No. 2;
- hook number 2.5;
- needle with a large eye.
Patterns used:
- persons. smooth surface: with straight knitting - odd rows - faces. p., even - out.; when knitting in a circle - all p. - persons .;
- pattern “rice”: alternate 1 person. from 1 out., in the next row we shift the pattern by one loop.
Description and master class
We start knitting from the sole. For these boots, it will be double, so that knitted ugg boots are warmer and more comfortable. We crochet with a white thread 18VP plus 3VP for lifting - see diagram in the photo. 
We knit three rows according to the scheme, in the 4th we knit 72 columns of s / n without additions. We do not cut the thread. Similarly, we will make the sole of dark brown yarn.
Ugg top
We collect 72p along the edge of the white sole. and do 5p. persons. ch. We plan for the toe of the boot 21p. Next we will knit in a circle. The loops of the side parts and the back are simply facial, and the toe loops are according to the scheme:
6r.: * 2p. in 1 person., 1 person. * - 7 repetitions. Total - 14p .;
7r.: according to the drawing;
8p.: 7 times for 2p. in 1 person;
From the 9th p. scheme changes:
Knit the loops of the side parts and the back, without knitting 1p. to the toe, knit it together with its extreme loop, 5 persons., 2p. in 1 person. 10th p. -similarly. Knit a reverse p., turning the work.
11r.: 1 p. remove, 5 out .., 2p. in 1 out. (grab 1 p. from the side p.) Turn the work.
12p.: 1p. remove, 5 persons., 2p. in 1 person. U-turn.
From the 13th p. repeat the 11th and 12th p.
Ugg tongue
We knit it on 7p. toe, typing additionally on both sides of 1p. It turns out 9p. We knit with a pattern “rice” 8 cm and close the p.
Shaft
We knit on the side loops of the faces. satin stitch 32r. In the 33rd and 34th p. to decorate the rounding, close on both sides twice in 2p. At 35r. close all loops.
Decorate ugg boots with embroidery - see diagram. 
Assembly
Crochet RLS to tie the tongue and sides of the shaft -2 rows. On the shaft, make 4 loops for lacing: 4VP on 1p. grounds. Tie the top with a crustacean step. Weave a lace - a pigtail of 4 threads. Sew on the second sole, leaving the embossed edging of the white sole visible. Tuck in the string and tie a bow.
Dog booties on two knitting needles: video master class
Booties - sneakers
We suggest you knit the simplest, but very original children's sneakers. 
For work you will need:
- yarn of three colors - white, blue and carrot - about 50 g each;
- set sp. No. 3;
- hook number 2.5.
Pattern used:
- garter stitch: with straight knitting, all loops are faces.
Description
Dial 6 p. in two white threads and knit 7 p., In each even adding 1 p. at both sides. In total we get 12p. We continue 34r. with an even canvas, then we make a decrease of 6p. - mirror increase.
Raise along the edge loops 58p. Knit in a circle 2p. garter stitch. Then from the middle of the back to one side 23p. knit in blue, in the other -23p. carrot, sock - 12p. - white. In places of transition to a different color, cross the threads so that there are no holes. You need to knit 10r. To decorate the toe, we decrease 5 times in the white area, 1p. from each side. Close 13p. on blue, 2p. on white, 13p. in carrot patches. On the remaining loops of the blue and carrot sections (10p each, total - 20p.) Knit in white handkerchief pattern two r. Close loops.
Assembly
Crochet two cords of white thread - 140VP. Thread them, tie bows. Knit decorative balls for decoration - two blue, two - carrot. To do this, crochet a chain of 6VP, connect it into a ring. Knit 15 columns of s / n in the middle. Tie the outer edge next to RLS. Sew on the balls, focusing on the photo. Kediki are ready!
Mouse booties on two knitting needles: video master class
As you can see, knitting booties for beginner knitters is a very real and very exciting task.
Booties are a kind of shoe-socks sewn from fabric, leather or knitted from yarn, which are intended for children under the age of one year.
The main purpose of such shoes is to keep children's feet warm, and, of course, in beauty.
Booties always have a soft sole - it does not cause discomfort to a child whose feet are not yet strong. They become the first shoes for newborn babies - they are not yet shoes, but they are no longer socks.
With the help of booties, the baby, who has already begun to crawl and sit, gradually gets used to walking and wearing shoes.
How to choose the right yarn for baby booties?
When choosing yarn for booties, you should pay attention to those varieties that were originally designed for knitting children's products.
Such yarn is hypoallergenic, undergoes stricter safety and quality control during production, and is also marked with a special sign by the manufacturer.
How to understand that the yarn is intended for children? Most often, this is indicated by the name: “Baby”, “Baby”, “Fidget”, in foreign brands in the name of the yarn you can see the word “baby”.

Basic requirements for baby yarn
If it was not possible to find such threads, yarn for booties should be selected according to the following criteria:
naturalness
Threads should predominantly consist of natural fibers, such as wool or cotton. In extreme cases, you can take acrylic. Remember that synthetic yarns can block air circulation and become electrified.
Booties, knitted from natural threads, will easily absorb moisture and allow children's legs to breathe.
However, when working with natural yarn please note that after the first wash, the knitted product will decrease slightly in size, so baby booties should be a little big on the leg.
Color
Do not choose yarn that is too bright, poisonous shades. When wearing such shoes, there will be a risk that particles of the dyes used will stand out, rendering negative impact on delicate baby skin.

However, there is no need to go from one extreme to another, dressing the child exclusively in white knitted socks.
Modern stores offer a huge selection of pastel-colored yarn, and psychologists recommend paying attention to shades of yellow, green or orange, since these are the colors that young children love the most.
Thread thickness
The thickness of the yarn should be selected based on the season of wearing booties. However, even in winter, you should not choose too coarse and thick threads that can damage sensitive skin baby.
How to determine the size of future booties?
In order to take measurements from the baby's legs, you should take a sheet of paper. Stepping back from one of the edges of the sheet two or three centimeters, it is necessary to draw a straight line.
You need to attach a child's heel to the resulting line and mark on the sheet with a line the place where the baby's thumb ends. In order for the measurement to be complete, it is also necessary to note the widest place of the foot.
To the resulting width and length, so that the booties fit freely, add 1.5 centimeters.
On average, in a newborn child up to three months, the length of the foot is 9 centimeters, in crumbs from three to six months - 10 centimeters, and in a baby from six months to nine - 11.5 centimeters.

For knitting, you will need from 55 to 75 meters of yarn and knitting needles number 2-4.5 (we select them depending on the thickness of the yarn, the thicker the threads, the thicker the knitting needles).
We knit simple booties on 2 knitting needles: instructions for beginners
Knitting booties with knitting needles is not difficult at all. We offer the simplest master class for beginners in the manufacture of warm lapel shoes, which, if desired, can be decorated under ugg boots or even under children's sneakers.
For knitting you will need to prepare:
- half-woolen, woolen or acrylic yarn;
- two knitting needles number 2 (or number 3).

Knitting begins with the sole. The initial number of loops that will be cast on depends on the size of the baby's foot.
Thus, if you decide to knit shoes for a newborn or for a two-three-month-old baby, you need to dial thirty-five loops on the knitting needles, two of which will be hem. (If your child is older, the initial number of loops will need to be increased).
The further scheme of work is as follows:
- The first row is knitted completely facial. The first loop is removed, and the last is knitted with the front.
- Second row: the 1st edge loop is simply removed and yarn over. 15 loops knit facial, yarn over, three facial and yarn over, fifteen facial and yarn over, after which the hem is knitted. There should be thirty-nine loops in total.
- 3rd row is knitted.
- Fourth row: the first edge loop is removed, after which the yarn over is made and 16 loops are knitted, then the yarn over and 5 loops are facial, again the yarn and 16 loops are knit, the yarn over. The row ends with an edge loop. There should be 43 loops in total.
- In the fifth row, all loops are knitted.
- Sixth row: the first loop is removed and yarn over. Next, 17 loops are knitted with facial loops, a crochet is made. Then knit seven and yarn over, knit seventeen and yarn over again. The row ends with an edge loop. Upon completion, you should get 47 loops.
- In the seventh row, all loops are knitted.
- Eighth: edge, then yarn over and knit 18, yarn over and knit nine, yarn over and edge. The result should be fifty-one loops.
- The ninth row begins with the removal of the edge loop. Twenty-five are knitted, yarn over is made and 26 more are knitted. A wedge is tied for rounding.

- Next, we knit the rise from the tenth to the twentieth row, it must be knitted with facial ones. The edging is knitted as usual (see point 1).
- To tie the upper part, it is necessary to divide all available parts into three parts: along the 21st loop on the sides and ten in the center.

- The twenty-first row is knitted from the edge loop, followed by 29 front, then two are knitted together with the front. After that, the knitting is turned over.

- The twenty-second row begins with the removal of the first loop behind the back wall, then 8 are knitted on the wrong side, and then two together - together on the wrong side. Turn.

- The 23rd row begins with removing the loop behind the front wall, then eight front ones go, two loops are knitted together with the front. The item is rotated again.
- The 24th row begins with removing the loop behind the back wall, eight purl, after which two purl are knitted together. To knit the 25th - 36th row, it is necessary to alternate the 23rd and 24th rows in shifts.

- The 37th row begins with the removal of the first loop for the front wall, then nine are knitted, the next twelve are again facial and at the end edge. In total, after knitting 37 rows, 36 loops should remain.

- Next, an elastic band is knitted. The 38th row is knitted with the front ones (except for the hem ones), and from the 39th to the 58th row an elastic band is knitted: the front and back 1 * 1 alternate.
- The final stage is the closing of the loops.

- Then, along the back wall, the resulting bootie is sewn together, and the elastic is tucked out.

- The second bootie is knitted according to the same pattern.
Warm shoes for a newborn baby are ready!

How, based on the above master class, you can knit impromptu sneakers, the following video will tell in detail:
Marshmallow booties: a step-by-step master class
Marshmallow booties can be called one of the most attractive varieties of knitted children's shoes. They owe their name to the well-known sweets - marshmallows, which they look very similar to.

In order to knit "marshmallows" you will need yarn of 2 colors and two knitting needles with a diameter of 2.5 mm.
We perform the following steps step by step:
- On the knitting needles, you need to dial twenty-five loops from the yarn of the main color (our main color will be blue).

- Next method garter stitch a fabric 15 centimeters long is knitted, after which ten loops are closed.

- Then you need to take the threads of an additional (in our case, yellow) color and knit four rows in stocking stitch (1-3 rows - facial, 2-4 rows - purl).

- Next, with blue yarn, you need to knit two rows of facial loops, one row of purl and one facial.
- Thus, it is necessary to knit eight strips yellow color and seven blue.

- Then the loops are closed, and the resulting striped "accordion" is sewn to the beginning of the knitted track.

- In order to sew the sole, you need to sew the blue part at the bottom with a thread, then lower part Gather the “accordions” on a thread and pull them off completely, and pull off the top one not to the end, so that the remaining opening is visually sufficient for the baby’s legs.

- Similarly, we knit the second "marshmallow". Then, if desired, we decorate the resulting booties: we knit and sew on a bow, flower or other decoration.

In more detail, a master class on making marshmallows can be viewed in the following video:
The simplest booties for a newborn
We bring to your attention another simple step by step wizard class on knitting booties-socks for a newborn.

The booties knitting pattern described below is designed for a baby's leg aged 3 months, six months and a year - the numbers for the last two ages will be given in brackets.
For work, you will need 55 (65-75) meters of yarn, the thickness of which is 150 meters per 100 grams, and two knitting needles numbered 4.5.
So, let's start knitting.
- We collect 27 (35-43) facial loops on the knitting needles.
- The first and each subsequent odd row is knitted.
- 2nd row starts with knit 1, yarn over, 12 loops (16-20) are knitted, 1 loop is added, knit 1, yarn over again, 12 (16-20) loops knit, knit again and one knit. 31 sts (39-47) should remain in the row.
- Row 4 starts with knit 1, yarn over, knit 14 (18-22), yarn over, knit 1, yarn over, then knit 14 (18-22), yarn over, knit 1. At the end of the row, 35 loops should remain (43-51).
- Row 6 starts with knit, then yarn over, knit 16 (20-24), yarn over again, knit one, yarn over, knit 16 (20-24), yarn over, knit last. At the end, 39 loops remain.
- Then eleven rows are knitted using the garter stitch method.
- In order to reduce the toe on two knitting needles, it is necessary to knit:
1 row: knit 15 (19-23), then knit 2 together, knit five, slip one, knit the next one stitch through the slip, slip off. The knitting turns.
2nd row: two front loops are knitted together, five front ones, 1 loop is removed, 1 front loop is pulled through the thrown one, the thread is in front of work, 1 is thrown off like a wrong one. Knitting is turned over.
3: two loops are knitted together, five loops are knitted, one loop is discarded, the next one is knitted with the front one through the removed one, the loop with the thread is removed again before work. The product is rotated.
4: knit as the second row.
5: two loops are knitted together with the front, five are knitted, the loop is thrown off, one front is pulled through the removed one, last loop removed. Turn.
6 - 8: knit in the same way as knitted 4 - 5 rows.
9: knit two loops together, knit five loops, one loop is removed, knit one loop, stretched through the dropped loop. Further, until the end of the row, facial loops are knitted.
The second sock is knitted in the same way.
Now you can buy anything your heart desires for a newborn. But not a single thing bought will convey your warmth and love to the baby, as if it were made by yourself. Such clothes as booties will fit any crumb, especially since their knitting does not take much time and will not be difficult even for beginner knitters. As a result, you will get an elegant exclusive item.
Popular crochet and knitting patterns for baby booties
Looking on the Internet, you will find many different models booties. And not every couple can be mastered beginner knitter. I chose the descriptions of the simplest, but at the same time interesting and beautiful , in my opinion, booties with knitting needles and crochet, which even a beginner can handle.
- The simplest marshmallows for beginners

You will need by 50g of yarn of medium thickness in two colors . Type 28 loops on straight knitting needles with the first color. Knit garter stitches 52 rows (by the way, the number of knitted rows you can adjust the size of the shoe). Then close on the right side at a time 8 pieces . The number of remaining loops has become 20. Next, we continue knitting in a different color: first, perform 4 rows with knit, then 4 with purl. Repeat this 7 times and finish with facial loops . Close everything at once.
After that, connect, more precisely, sew the piece with the edge facing each other to get vicious circle. Then sew the main part of the workpiece, and along the rest of the part (tied with stripes), lay a basting seam and pull it to the center.
Decorate the top of your baby's shoes knitted applique , beads or any other decorations according to your taste and imagination. Turn off the protruding edges.
- Another the simplest option one-color booties with knitting needles. Thickness of threads from medium and above

The size of the product can be increased or decreased due to the length of the connected toe.
Dial 37 loops and spread them over 4 knitting needles - 9 pieces for each . Connect the knitting in a circle, knitting the last two loops together. Then knit 12 rows in a circle with a 1 on 1 elastic pattern. Do not forget to make a series of holes where you insert the braid or lacing. It is done like this : knit 2 with one, 1 yarn over, knit 1 (alternate to the end of the row). After that, knit two rows with facial loops, after which they need to be distributed as follows: 11 loops - on the first knitting needle (try to make the place where the knitting connected in a circle be in the middle), 7 loops on the other, 11 loops on the third and seven on the fourth .
Now let's move on to knitting the toe . We knit it on 11 loops of the third knitting needle with a garter pattern, reverse rows. The rest of the loops are not touched yet. We knit 18 rows of toes . Next, we knit the sides. Why from each edge loop on the sides we collect one loop and add all the pending loops to the work. The sides are also knitted with garter loops - 10 rows.
Well, then we continue the sole from the top of the toe with facial loops, evenly grabbing and knitting together sole loops with side loops. Continue knitting until there are no more stitches on the side needles. When all the loops are locked, the seam on the heel is sewn together.
- "Shoes" crochet

We collect 13 loops, knit a single crochet into the second loop from the hook and knit according to the scheme.

Having knitted seven rows, we will get the finished sole of the shoe. We knit further from 8 to 11 row just single crochet - no additions or subtractions.
Having knitted everything to the end according to the scheme, we get an almost finished slipper. Then knit along the top edge three rows with single crochets a, fasten and break the thread.
To complete the fastener, we collect a chain of 21 loops and knit a single crochet into the second loop from the hook, then we knit according to the pattern.
Sew on the buckle and fasten it with a pretty button.
Master class on knitting booties with your own hands
I propose to try your hand and knit a charming pair of shoes, your choice of knitting or crocheting, and an accessible description and detailed photographs will help you with this.
- Crochet booties

For these booties, I took the remnants of the Turkish yarn "Lanoso" Egyptian cotton for children with a thickness of 50g / 105m.

materials
Let's start knitting from the sole - we collect 11 air loops. Add two to lift.

Step 1. We collect 11 air loops
And we knit according to the scheme.
Schematic drawing
In the extreme loops of the chain in the first row we knit 6 columns with a crochet (CCH), in the second in each of these six, two CCH - it turns out 12.
In the third row, we alternate 2 CCH - 1 CCH.
Step 2. In the third row, alternate 2 CCH - 1 CCH
The sole is ready.
We tie it with columns without a crochet (RLS). We knit three rows in total. The resulting part is folded and a kind of "boat" is obtained.

Step 3. Fold the base and get a "boat"
We take black yarn and knit one row with single crochets. After the black row, we knit another row of RLS with white threads.

Step 4. One row of black single crochet and another row of sc with white threads
Fasten the thread and cut. We knit the second same workpiece.

Step 5. Knit the second Kedik
In the resulting blanks, remove all protruding ends of the threads so that they do not interfere with your work in the future.
We begin to knit the side parts of the "sneakers". We count 12 loops on the toe - we leave them for the tongue, with a black thread we knit a row of CCHs over all the other columns.
Step 6. With black thread we knit a row of CCH
Then we unfold the workpiece and knit another row in the opposite direction.

Step 7. We knit another row in the opposite direction
From the third row, we begin to knit eyelets for laces. To do this, at the beginning of the row we knit 3 air loops, count two columns from the edge and knit CCH in the third. We continue to do CCH until there are two columns left to the end. We collect three air loops and fasten them to the edge of the row.
We unfold knitting. In a chain of three loops, we knit three half-columns without a crochet. Let's move on to the fourth row. We also knit three air loops, skip two columns and in the third we again knit a double crochet.
We continue knitting similarly to the third row. There should be three rows with holes in total.

Step 8. We make 3 air loops, count two columns from the edge and knit CCH in the third
We knit the sixth row simply with CCH, cut the thread and fasten it.
The main part of the "sneakers" is ready.

Step 9. We knit the sixth row simply with CCH
We begin to perform the tongue according to the scheme.
Tongue pattern for kedik
Along the edge of the twelve remaining loops, we knit columns of six double CCHs with one vertex. We unfold the knitting and knit into the resulting six double crochets together. The thread is cut and fastened.

Step 10. We knit columns six double crochets and in the other direction six columns with a crochet
From the edge of the tongue we start knitting with a white thread - 10 RLS, unfold the knitting and knit another row. We change the thread to black and perform 6 rows of CCH. We fasten the thread and cut it off.

Step 11. From the edge of the tongue we start knitting with a white thread, and then change to black
We do the second one in the same way.
For laces we knit with white yarn two chains of air loops 40 cm long.

Step 12. We knit the tongue on the second sneaker and knit the lace chains
We tuck the laces into ready-made "sneakers". So that they do not lose their shape, I advise you to put a synthetic winterizer or cotton wool inside.
Step 13. Cord and it's time to try on
Your crochet sneakers are ready. This description is for babies from 0 to 6 months. The size of the sole is 8-9 cm. It is easy to knit a larger shoe if you dial more loops at the beginning, instead of eleven.
- Knitted booties

For this pattern I used Baby Wool Alize 50gr/175m in two strands. According to my description, the size of the sole turned out to be 8-9 cm, that is, also for a baby aged 0-6 months.

materials
We start knitting from the sole. We collect 8 loops on the knitting needles.

Step 2. Garter stitch
In total, we get 14 loops. We continue knitting with a garter stitch for 34 rows.
Step 3. Knit 34 rows in garter stitch
In the 35th row, we decrease one loop from each edge.
We repeat the decrease in the 37th and 39th row. There are 8 stitches left on the needles.

Step 4. From the 35th, 37th and 39th rows, we decrease one loop from each edge
We close all the loops until one remains. And we start along the edge of the sole a set of loops on four knitting needles.

Step 5. We close all the loops until one remains and we collect loops on four knitting needles
We should get 60 loops.
We knit 6 rows with a scarf pattern.
Step 6. We knit 6 rows with a scarf pattern
We divide the work into two parts - the heel and the toe. We perform the sock with an elastic band 1 on 1, and the heel with the front surface. In the first row on the toe exactly in the middle (between 15 and 16 loops) we add one loop. We knit four more rows according to the pattern.

Step 7. We perform the toe with an elastic band 1 by 1, and the heel with the front
Then on half of the sock in each row in the middle we knit three loops together.
Continue like this until seven loops remain on the toe, while knitting the heel with the front pattern.

Step 8. Continue like this until there are seven loops on the toe
We close these seven loops, and to the number of loops on the remaining knitting needles we collect 16 more loops.

Step 9. Close seven loops, and to the remaining loops we collect 16 more loops
We knit with a garter pattern 6 rows. Do not forget to make a hole for the button in the third row (two front together, one yarn over).
Step 10. We knit 6 rows with a scarf pattern and make a hole
We close all the loops, cut the thread, fasten. We remove protruding ends.
We knit the second in the same way.

Step 11. Knit the second bootie
Sew on buttons. The shoes are ready.

Step 12. Booties for the little princess are ready.
- When choosing yarn for knitting children's products, it is better to give preference to thread marked "baby" . This yarn is soft and hypoallergenic , so the baby will wear products from it with pleasure, and it will not cause him any inconvenience or harm. For one pair of booties, one skein weighing 100g is enough. All other necessary information can be read on the label.
- When choosing a model, it is better to focus on options that have