Textile dolls. The most beautiful textile dolls. Patterns. Video: "How to make a life-size puppet with a human face?"
The doll can become not only a decoration for the house, but also a favorite toy for your child. This article tells the secrets of sewing this product and offers patterns.
For a long time the doll was not only a toy, but also a talisman for a child. The doll was not brought from the store, but did it yourself. It was believed that a thing made by one's own hands was conspired to achieve a certain result: to make a person happy, healthy, to help him find his own path in life or love.
What dolls - protectors of children, has long been forgotten and lost its meaning. Modern toys are made from different materials : plastic, wood, textiles, porcelain. Appearance modern dolls sometimes not only surprising, but even shocking: monster dolls, Barbie doll, Winx and even zombie dolls.
For those who wish to please the child at any age, to instill in him a love of toys, a love of beauty and give him a “faithful companion” for all his childhood, will come in handy patterns and tips for self-creation of a textile doll.
For work, you can absolutely come in handy any textile material from what is available at home or purchased in a store: linen, cotton, synthetics, felt, lace and ribbons for decoration. The doll's hair is made from woolen threads, and to create facial features, you can use buttons and embroidery.
In this craft, you can express all your creativity. You can make a doll realistic or create a famous fairy tale character. It was previously believed that the doll (in order to become a protector) should repeat the features of your child: the same eye color, hair, favorite clothes, smile and so on.
IMPORTANT: A simple and understandable pattern will help you plan your work correctly so that you get a neat product.
Patterns for a homemade textile doll, step-by-step creation
Finished goods, textile dolls:
 Unusual doll "nanny"
 Realistic gardener doll
 Little teenage doll
 Fleece dolls
  Textile fairy dolls
 DIY doll
 Motanka doll - a talisman for a child
  Popular Rag Doll Style Doll
  boy doll
 Textile doll in a lace dress
 Fidelina doll
 Waldorf doll
 Video: "Master class" We sew a textile doll "review"
How to sew a beautiful fabric doll: instructions for beginners
Recently, they have become increasingly popular dolls made of combined materials. To create the face and limbs, modern needlewomen began to use flesh-colored capron. This material easily fits the base, the doll acquires the “correct” color, and with the help of sewing secrets, she can give the necessary shape(even make facial features).
On the other hand, if you are not very experienced in this needlework, you can use a simple pattern and create detailed features using acrylic paints(quick dry, water resistant). You can sew doll patterns using sewing machine - it's fast and high quality. If you don't have one (or just don't know how to use it) All work can be done manually.
Pattern for a textile doll:
 simple pattern
 Step work. First stage:
- Print the pattern on the printer or accurately copy the shapes.
- Cut out a pattern from paper and attach to the fabric
- Choose the fabric of nude and beige colour to make your doll look natural and aesthetically pleasing.
- Attach the patterns to the fabric, fix them, circle them with a pencil and cut out the figures, leaving room with a margin around the edges.

 Paper cutting
 Cutting patterns from fabric
 Step work. Second phase:
- Fold the cut fabric patterns together
- Each pattern should be stitched, leaving one side intact (for filling the doll).
- To turn out the arms and legs, which are too thin, as well as stuff them, use a pencil.
- All details turn inside out
- All details must be ironed

 Sewing fabric patterns
  Turning to the front
 Ironing details
 Step work. Third stage:
- It is necessary to stuff the doll from the head
- You can stuff the doll with padding polyester, cotton wool and scraps of fabric.
- We stuff the head very tightly and sew it with a thread
- A body pattern should be put on the head and stretched down.
- We sew the body to the head from the wrong side and only then stuff it.
- After that, the arms and legs are stuffed, sewn neatly to the body.
- The doll's face is painted with acrylics. You can sew or glue blanks from the store: eyes and sponges.
- Knitting threads are folded in bunches and sewn to the head.
- From the remnants of multi-colored fabric, sew a dress or any other clothes for the doll, decorate with decorative elements: lace, ribbons, beads.

 Step by step creation dolls
 How to sew a doll face?
The easiest way to "make" a doll a face is paint it with acrylics. As already mentioned, they are resistant to water and moisture, dry quickly, leave a rubberized film on the fabric surface, have a large number of color schemes and they are pleasant to work with.
Painting a puppet face with acrylic paints:

 Doll's facial features painted with acrylic paints
  Drawing a doll's face with a marker and acrylic paints
 Another way to create features on the face is to tighten with a needle and thread. To do this, you first need decide on the filling of the doll: cotton wool, holofiber, synthetic winterizer.
The head of the doll is made of white fabric, the pattern is stuffed. The head is again covered with flesh-colored nylon. By compressing the folds, the needle is threaded through the material, the thread is pulled together and fixed.
How to make a doll face step by step:

 How to make a doll face?
 Painstaking and detailed work to create the doll's facial features
 Video: “Face tightening and creation of doll facial expressions”
How to sew a soft toy doll: pattern, photo
A doll made for a child with their own hands from textiles may well become his favorite soft toy, which he will take with him to sleep, travel, Kindergarten, to the walk. A doll will be able to please a child when it conveys some pleasant emotions or suggests associations.
For example, you can dress up a doll in a dress made from your personal wardrobe item: a bathrobe, an old dress, a blouse. Another option is to sew dresses from the same fabric for the child and the doll.
IMPORTANT: Ask in advance which dolls your baby likes: tall, small, with long legs or baby dolls, fairies, sorceresses, angels, and only then start looking for a suitable pattern.

 Pattern soft toys: angel doll
 Ready product: angel doll
 How to sew a textile toy doll: pattern
Any needlewoman can sew a textile doll. To do this, it is absolutely not necessary to buy a large amount of materials. You can use the ones you have at home. You can get a neat and beautiful product only with the help of a similar pattern.
Patterns for textile dolls:

 Pattern for a textile doll, option number 1
  Pattern for a textile doll, option number 2
 Pattern for a textile doll, option number 3
 How to sew a Russian folk doll: pattern
Folk dolls are very simple to perform. They have very simple patterns, but quite complex detailed costumes. You will need to pay attention to any little thing: braids with ribbons, scarves, ruffles on skirts, lace, buttons and bows on suits.
IMPORTANT: If you have the opportunity, choose materials for sewing clothes for dolls that are as similar as possible to folk costumes: floral and vegetable prints, Khokhloma, polka dots.
Patterns for sewing folk dolls:

 A simple pattern for sewing a folk doll No. 1
 A simple pattern for sewing a folk doll No. 2
  Motanka doll, patterns
 Finished goods, folk dolls:

 Proskovia doll
 Simple folk dolls without a painted face
  Motanka doll
 How to sew a large life size puppet: pattern
Large life-size puppet, as a rule, is used for performances for children. The limbs of the doll can be attached to the hands and feet of a person, as a result of which the doll literally “comes to life”.
You can sew a growth doll according to the patterns of an ordinary toy, but increased several times. You can give the doll any appearance and features of a fairy-tale character. Such a doll must have tightly stuffed head and torso and the arms and legs should be thin and light enough to be easy to move.

 Big puppet
 Video: "How to make a life-size puppet with a human face?"
How to sew a Snow Maiden doll: pattern
The Snow Maiden doll will become a favorite toy in new year holidays. She will evoke pleasant associations in the child, she will be able to decorate the house. You can also put the Snow Maiden under the Christmas tree. Doll Snow Maiden with kokoshnik Doll Tilda in romantic way
Doll Tilda blonde and doll Tilda brunette
Video: “Sewing a Tilda doll”

For me, textile dolls were opened by our website, FF, namely Olga (Olga Krym) - thank you very much! And also many thanks to Irina Khochin oh - a wonderful puppet maker and her website "Make Fun" for the opportunity to be inspired by her work! And also many thanks to such puppet sites as “Decorate Your World”, “Toy School”, “Collection of Puppet Fantasy” and, of course, “Masters Fair” for the great variety various master doll-making classes - that's where I studied.
And yet, before starting, I want to make a reservation - what I will write below is by no means the only correct option, it may not be entirely correct))), but this is how I do it, I like it so much - and I want to tell you how I do it))
1. Pattern
There are a lot of different patterns of dolls on the net, but this one - shared by Irina Khochina on her website - suits me perfectly! The only change that I made to it was to slightly reduce the ears after sewing the first dolls, otherwise my godfather somehow made a remark to me “It hurts, the ears are too big!”)))
2. Fabric preparation
I sewed different dolls from three types of fabric: white cotton with elastane, an old Soviet cotton sheet, and white calico. I also think that shirting fabric is also suitable - there are leftovers, I will try. I dye the fabric either with a decoction of tea or coffee, or both) I boil the pieces of fabric in a decoction (10-15 minutes) in a wide saucepan so that the fabric bends less, because. the folds are unevenly stained. And if the fabric is dyed unevenly - it's okay, usually these spots are not visible on the other side, and you can cut it there) After dyeing, rinse the fabric in cold water, dry and iron.
3. Dolly details
We cut the paired parts in the same way - either along the lobar or across (otherwise it may turn out that when stuffing one limb “stretches” more than the other)) The head can also be cut along the oblique, then the face will turn out to be more elongated. The doll in this MK had a head cut along the share. I sew the cut parts with milk-colored threads. Darts on the head are made both in front and behind. Leave open for stuffing: the top of the head between the darts, the opening of the neck, the back shoulder of the handles and the back of the thigh of the legs. After notching all the strategic places, we turn the parts out. Be sure to notch the allowance between the palm and thumb! I fill the dolls with either synthetic winterizer (I buy by the footage), or silicone (I dissolve the pillows)). I like silicone better - it is more elastic, the details turn out to be “more magnificent”. But it is more difficult for me to get it, therefore, if possible, I fill my head with silicone, and everything else with padding polyester.
3.1 Head
First, we fill the ears a little and sew a line on a typewriter, separating the ear from the head, and after that we fill the whole head, but not yet very tight. And debug to the side)
3.2 Torso
We fill it very, very, very tightly (I use scissors), after inserting the “frame” into the body - a thick wire rounded on both sides. I agree, it’s hard to push the synthetic winterizer through a small neck hole, in which the wire also sticks out, but you have to try!)) And you still have to try to fill the body evenly, tamping the filler equally on both sides so that it doesn’t warp!
3.3 Head-torso
And now, when the body is already tightly stuffed, we take the head and carefully make a cruciform incision with nail scissors about 1 cm from the seam of the chin. We insert the neck into this incision and carefully sew it with the same milky threads. And after that we fill the head very, very, very tightly, forming a chin, making the face more convex. After we sew up the hole at the top of the head (between the darts).

3.4 Legs
We fill the arms and legs very tightly, while it is already possible immediately, planning the right and left arms and legs, to make the necessary bend of the limb. Leave blank in handles upper part shoulder, and in the legs - the upper thigh.
So we have prepared all the details for the next step -
4. Assembly
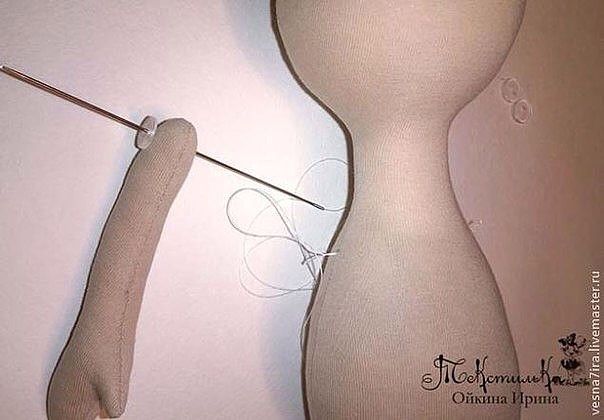
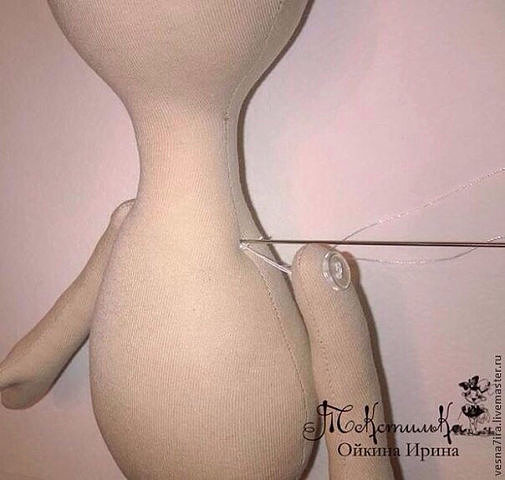
I fasten the legs and arms with buttons (the smallest, most unnecessary)).
We take a thick and long needle, very strong threads and buttons, and proceed. As you can see in the photo, we string everything in this order: the first button, the first handle / leg (from the inside of the part, approximately in the middle of an imaginary circle created by the bend of the shoulder / thigh) (I hope I wrote clearly)), torso, second handle / leg (we make the entrance outside the part, again in the middle of the circle, and make sure that both hands are sewn at the same level, and the legs, respectively), the second button. Way of the needle back - we wrap the buttons in another hole and everything in the reverse order. At the same time, I stick the needle into the body on the way back and forth on both sides of the side seam somewhere 3-4 mm apart (not into the seam - so as not to break the seam thread!).

And then we pull the thread at both ends, tightly pulling the arms with the shoulders, and the legs with bottom torso, we tie - firmly and reliably!). Now you can fill the filler shoulders and hips to failure)) and sew up the holes!
"Pig" is ready! Hooray! The most boring and tedious work is over! (well, that's how it is for me)

5. Face and toe tightening
Draw the face of the doll with a simple pencil. At the same time, I observe the following parameters: the line of the lips lies on the same line with the earlobes, from the line of the lips upwards by 1-1.5 cm I set aside points inner corners eyes (between them about 1-1.5 cm), the length of the eye is also about 1.5 cm. 
There are many different schemes for tightening the face, I once tried this one, I found it, I don’t remember on which site, and I liked it. I just do not drag out points 3 and 4 - I don’t like the “holes” on the nose)) And I also drag out a point under the lip line (lower lip), and two points above the line ( upper lip). And, of course, from the degree of bending of the lip line, we will get a different degree of “smiling”))

I pull my face with strong white threads. I tried somehow monofilament - I was not impressed)) Cons - it is inconvenient to sew, it confuses, pluses - it is not visible. But after all, we will paint over the white thread later))
And this beauty is obtained after tightening:
(girls, I'm sorry, but a photo with a painted face, and with a pulled one is different dolls- so it happened ...)

I already love the chrysalis at this stage of manufacture. And although my son calls them "voodoo dolls")), but they already have a character, they are already different, and this difference literally depends on millimeters to the right and left)) - I agree with Irina Khochina on this, she wrote about this on your site.
We try to pull through lower part heads (there is “thinner”), and this is how the back of my head looks after tightening:

We pull the fingers with threads of milky color, while I hide the beginning and end of the thread (without knots) in the body of the handle.
(pulled handles will be lower - I messed up a little with the chronological sequence when photographing))
6. Hair
I use cotton threads for hair, they do not tangle. I think everything is clear in the photo:

I fix the threads with strips of adhesive tape so that they do not fall apart after cutting. Then I sew it into tress - with a small seam on a typewriter (back and forth 3-4 times) with threads of the most approximate shade. To make the tress long enough, you need to make a winding 2-2.5 books long)) I sew the tress to the head from ear to ear, but it can also be done in a spiral, the main thing is that the first two rows from the forehead should be closer to each other, so that the head didn’t “shine”) If the length of the tress is not enough to the neck, then I sew the threads of the last row to the head, again, so that there are no bald patches) When planning the tress, one should take into account - or long hair, but less often, or shorter, but thicker) (this is when only one skein of threads is available). And finally, we trim the hair, if necessary!
7. Toning of the face and fingers
Various face toning MKs offer the use of oil paints. But, alas, I’m not friends with them ... I don’t know how ... Therefore, I tint with blush (I don’t use them, but there are several samplers available). In my work I use my cosmetic brushes. With a beige blush I tint (very gently, a little bit!) Under the eyebrows, around the eyes, nostrils, lip line (especially at the ends, in the dimples), ears and fingers. I tint the cheeks with a beige-pink blush (a little stronger) and then lightly - the forehead, nose, chin, the whole face along the outer oval.

And finally, the promised fingers)):

8. Face painting
The face is painted with acrylic paints for fabric. I use DECOLA paints, they are wonderfully diluted with water.
I strongly advise you to look for a good, detailed MK on drawing a face on the sites I indicated at the beginning. I will try to explain how I draw, but I am still learning how to do it).
We do not use pure black paint in our work! At one MK, I read that dolls then look more vulgar, and I agree with this. And one more thing - I do not use pure colors, as they are proposed by the manufacturer, in the palette. They are so very bright, and we need natural colors, right? To achieve any color, I mix several paints.
Protein - draw with white paint, but slightly with the addition of blueness, do not paint over the upper eyelid. It can then be, if desired, toned with shades of beige or blue.

Iris - draw it so that it is slightly covered by the upper eyelid, that is, it is not round, but cut off from above. I get cyan and blue by mixing blue, white, cyan and black. Brown - black, yellow, white, red. Green - green, blue, yellow. Something like this)) Along the edges and under the upper eyelid, the iris is darker than in the middle. And you can also draw radial stripes on top that are slightly different from the main color of the iris.

Pupil - draw in the center of the iris, that is, it tends to the upper eyelid. I mix blue and a little black paint.

Eyebrows - draw brown shades, very gently, semi-dry brush. We circle the eyelash growth line with brown paint, the upper one is stronger, the lower one is thinner.

Eyelashes - very, very carefully, with a thin brush, well, try very hard not to smear! (the silicone fibers that come out after tightening may interfere - we carefully pull them out with tweezers).

Highlights - draw with a slightly damp brush, white paint. You can one, two, three highlights, but be sure - symmetrically on both eyes!

Mouth - I confess honestly, I don’t know how to draw it ... I dream of learning how to draw natural sponges, the way Irina Khochina draws them ... Therefore, I can only say that I mix red, white, brown, yellow paints. And somehow I draw))

9. Clothes
Girls, since you are here, I have nothing to teach you in terms of sewing clothes)) Turn on your imagination, take out claps, balls, ribbons, ribbons, various beautiful things and ... CREATE!
I'll show you pantaloons, I sew them for all the dolls, well, how can I do without them))

Oh yes! Socks - we draw them with paints, before the slippers are knitted / sewn.
OK it's all over Now! I hope I helped those craftswomen who are already interested in the topic of textile dolls, and interested those who got here by accident!))
Sorry for possible errors and inaccuracies, if you find - show, please.
I understand that I could not cover everything and not take into account something, so if you have any questions - ask, I will be happy to answer!

Today author's toys self made are gaining more and more popularity: they can be given to friends and children, used as interior decorations, and theatrical puppets will help to distract even the most capricious child. Puppetry professionals can independently invent and draw diagrams of various characters, and for beginners we will give the simplest master class of such products.
We sew a doll with our own hands: patterns
Let's make a simple author's baby doll, the process of cutting and sewing of which will be clear even to an inexperienced puppet master. To do this, print on big sheet paper, for example A3, the diagram shown in the following photo:

- head - 2 pieces;
- hands - 4 pcs.;
- body - 2 pcs.
Stepping back from the lines one centimeter, cut out fabric blanks.
Note! If it is supposed to sew an interior doll, then the fabric can be any, but dense. For children's toys, it is better to take natural dense materials: linen, cotton, etc.
We sew a doll with our own hands: a step-by-step instruction
- Sew on a typewriter or by hand with small stitches, two halves of each part (head, body and handles), leaving the small area marked in the previous figure unsewn. in gray. It will be needed in order to turn the part on the front side.
- Handles need to be stitched completely, and small holes should be cut on the side (marked in gray, needed for the same purposes).
- Unscrew the blanks through these holes and fill them tightly with cotton wool, holofiber or other suitable material.
- Sew up the holes and sew the head and arms to the body.
The basis of the textile doll is ready, now you need to paint her face. Suitable for this acrylic paints, felt-tip pens, markers. But if it is supposed to wash such a toy in the future, then the eyes, nose and mouth can be made of beads, buttons, or simply stitched with colored thread, as in the photo.

To make the doll's hair, you can take the same lengths of yarn and tie them in the middle, glue or sew to the doll's head.

It remains only to pick up clothes. To do this, you can use any pattern of dresses, skirts, jackets and other clothes. Let's suggest one of them:

Do-it-yourself doll: patterns
There are many ways to make a doll for home theater, we will consider the simplest one. To do this, you need a household fabric glove. big size. The character's handles will be controlled by the thumb and middle fingers, and at the end, the character's head will need to be fixed to the index finger. The ring finger and little finger must be turned inside the glove and carefully sewn up so that they do not interfere with the process.
Now you need to sew the head of the acting person. To do this, you can take any schematic illustration from the Internet, both baby dolls and animals, fairy-tale characters, etc. are suitable. The head is sewn according to the same principle as described in the first part of the article. We show a pattern of the doll's head:

You can sew both the head and the body yourself. We offer a scheme for sewing Parsley:

Textile articulated doll: pattern
This is the name of the characters who, due to the special connection of the limbs, can take a variety of poses. Of course, making such a toy is more difficult, but the result of such work exceeds all expectations.
Such a doll is created identically to the first option described, but special patterns are needed for its tailoring. Here is one of them:


Having cut out, stuffed with padding polyester and combined all the components together, you can start decorating a rag girl: paint her face, make hair, sew clothes. This handmade textile articulated toy can be a wonderful interior addition or your daughter's favorite friend.
Dolls are addicted not only to children, but also to adults. They can be bought not only in the store, but today handmade dolls are widespread and they are even more popular than store ones. You can make them from various improvised materials, and special ready-made kits are sold for sewing dolls. In general, it is very interesting and interesting activity create a doll with your own hands. Such dolls will be interesting both for children's games and for decorating the interior, and there are also special connoisseurs of puppetry - these are doll collectors. Therefore, dolls can be created for different categories of people and for different purposes, and all of them will be in great demand.
Do-it-yourself dolls can be made from nylon, textiles, felt, felt and other fabrics and materials. Today we will look at master classes of fabric dolls from textiles.
See material for making dolls here - http://ali.pub/3jp0hs
this seller is relatively inexpensive and has a lot of positive reviews.
Also see master classes with patterns of felt dolls
I have been dreaming of a handmade textile doll for a long time and therefore I want to collect understandable and detailed wizard classes for your piggy bank, so that when the time and opportunity arises to create a doll with your own hands, and all the necessary patterns, templates, step by step lessons and various manufacturing secrets were always at hand for easy searching.
I had to wander through the back streets of the Internet to find understandable master classes. I don’t have links to the masters, but the author can be recognized from the photo, many are signed.
Patterns with a doll pattern. DIY tilde dolls, step by step wizard classes.
The template can be saved to your computer and resized in any editor as you wish. You can print the template or attach a white or translucent sheet of paper to the computer screen and lightly transfer all parts of the doll onto the sheet with a pencil, then cut out the details of the doll.

We transfer all the details to the fabric in the right amount, do not forget about the seam allowances, calculate the size of the details in advance.

All details are cut out very carefully and also carefully stitched so that all the bends are even and look beautiful from the outside.

A small hole is left on all the details so that they can be turned out. You can turn it out using any thin and long object.

After turning out, fill the parts tightly with any suitable filler.

The remaining hole is sewn up with a blind stitch.

On the sole of the foot we find the middle, mark it and fit it to the seams on the lower leg.

We cut off the legs of the lower sole with the shin with pins

We flash


Turn out and fill with filler.

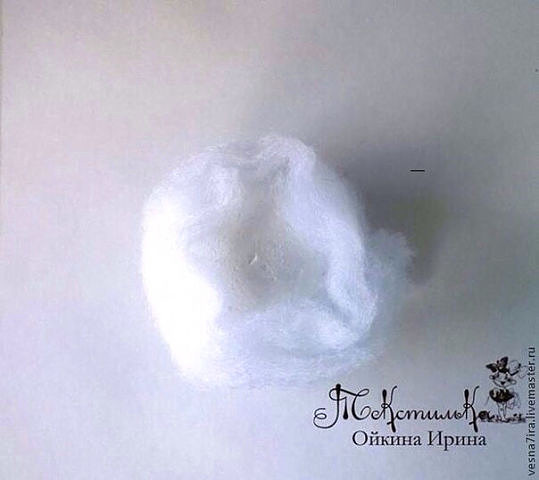
The next part of the work is the head, for its manufacture you will need a foam ball, they are sold in needlework stores of different diameters. As well as a rectangular piece of synthetic winterizer or other filler.

We wrap the ball with synthetic winterizer
And we put the resulting ball into the cut-out part of the head with the body, we sew the head on top.


For static for the body, we wind the filler onto a wooden toothpick smeared with glue.

We tuck the pattern of the body and insert the wound filler inside the body

All details are ready

On both sides, it is necessary to mark the same distance where the hands will be sewn.

In order to sew the details to the body, we need small buttons.

The legs are sewn in a similar way

Gift to a first grader? How about a hand-sewn textile doll? Such a gift will become symbolic not only for a girl going to first grade, but also for a graduate.
For sewing the body, a piece of thick knitwear measuring approximately 50 x 40 cm was used. We print the proposed pattern on a printer or redraw it by attaching a sheet of paper to a computer monitor.


We transfer all the details to the knitwear, except for the wedges. They are cut out of white calico or chintz in the amount of 6 pieces. We sew them together, leaving a small hole in the center. We sew on a typewriter along the contour. We leave small holes (1-1.5 cm each), through which we will turn the blanks and stuff them with filler in the future.


You can turn out the details with a sushi stick. It is also convenient for her to fill the details with holofiber or padding polyester.


On a ball sewn from wedges and tightly stuffed with a filler, we put on a close-fitting, tighten the top.


On the opposite side, we make a recess in the filler, where we push the knitted "process".


Insert the neck into this hole. To fix it, you can drop a little Moment glue on it or fix it with a thread, connecting it to the top of the head. We connect the joint of the neck with the head with a hidden seam.

We fix the legs to the body with pins, make sure that they are attached at the same level. Then we sew them through the body through the buttons. This fastening allows the finished doll to plant, turn her legs and arms.


We sew tights from an adult sock. To do this, we cut off the toe part of the product, cut it in half, grind the sections.


Next, sew for the doll school uniform. Since the future “first-grader” will still not be playful, but mostly interior, then her dress will be non-removable. Only four parts are needed - two sleeves, a bodice and a hem.

We first draw an approximate pattern of the bodice on paper, apply it to the body, adjust it in circumference and height. For the hem, we cut out a strip of about 6 x 30 cm in size from the fabric, trim the top cut.

We apply the handles to the fabric, draw around the contour, so we get blanks for the manufacture of sleeves.

We connect the bodice and hem, process the sections, you can immediately sew a lace collar in the neck area.

On the back we sew a vertical cut. We also sew lace on the sleeves, put them on the handles.

Now you can fix them on the body. With a long needle with a double thread we pass through the body, we grab the handles only through their inner part.


We sew a white apron using lace, braid or plain white chintz.

At the next stage, we create a hairstyle on the head of the pupa. In this master class, tresses were used with artificial hair one meter long. Instead, you can use wool for felting, thread for knitting, satin ribbon, foamiran, etc.
Sewing on wefts starts from the bottom of the head and is performed along its entire circumference.


First, you can fix the hairs on the Moment glue, and sew them on for reliability. From the remaining piece of tresses 8-10 cm long, we form a bundle, insert it into a small hole at the crown.
