Christmas tree made of cones on the wall. Christmas tree made of fir cones with their own hands. How to dry orange slices for home decor
New Year. This holiday is wonderful because it does not fly by in an instant, and we are preparing for its meeting long before the celebration itself. It is truly felt when we are waiting for it, preparing for it. Every year, we again and again plunge into the festive fuss. Bright lights, the smell of tangerines and, of course, what New Year is complete without a Christmas tree. The Christmas tree is the main attribute of the upcoming holiday. If you do not plan to put a real forest beauty, then you can celebrate with its reduced counterpart, created from improvised materials, for example, pine cones. And you will learn how to make a Christmas tree from cones in the course of the further description of MK.
I devoted this master class to creating a cone Christmas tree from cones. Such a Christmas tree can decorate the interior of any apartment or serve as original gift your loved ones.
So, for work we need:
- Pine cones;
- cardboard (or any thick paper);
- hot glue gun;
- 3 - 4 pcs. transparent rods for the glue gun;
- a can of silver acrylic paint;
- scissors;
- stapler;
- beads for decoration.
How to make a Christmas tree from cones: step by step instructions
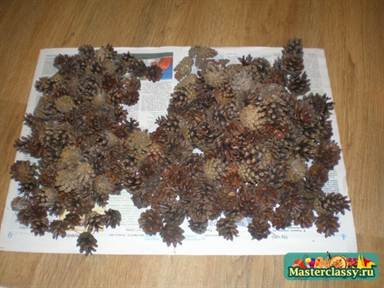
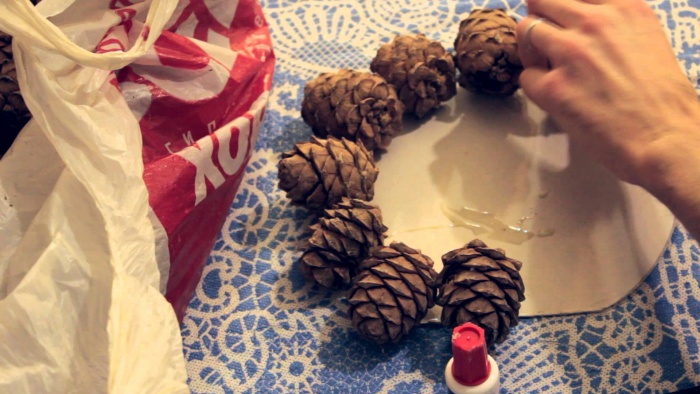
To begin with, I went for a walk in the forest with my children. We don’t have snow yet, so we quickly replenished the autumn stocks of cones, which we didn’t have enough. At home, we sorted out the cones: the broken ones were thrown away, the good ones were cleaned of debris and sorted into large and small ones. If the buds are too closed, they can be dried in the oven. Hot air will open them up. By the way, you can make a lot of all kinds of New Year's crafts from pine cones - penguins, spiders, mice, etc.
Collected cones
The next step is preparing the base of the Christmas tree. I rolled the cardboard into a cone, fixed it with glue and a stapler. At the base, cut off the excess part of the paper with scissors. I did not paint the base for the Christmas tree. But if you want everything to be perfect, you can do it.
 Cone - the basis for the Christmas tree
 Now, with the help of a glue gun, you can start building up the first row. We will start with large cones, and finish the craft with small ones. If you don't have a glue gun, you can use any super glue. But still (to speed up the process and in order to make a neat Christmas tree from cones), I would advise you to buy it (even the most inexpensive one will do). hot glue sets instantly, which significantly reduces the time of work. I applied hot glue to the bottom of the cone base. We attach a bump to it, pressing firmly. We glue the next bump next to it, trying not to leave gaps. The first row is ready.
 We start gluing cones
 Thus, moving in the direction from the bottom up, I glued the cones tier by tier. During work, I tried to pick up cones so that the next ones lay down with the smallest gaps. If there are gaps, no big deal. You can close them with scales from cones. But this work seemed to me painstaking, and I want to enjoy the process. Therefore, I left it as is, and when I painted the entire Christmas tree, they became invisible.
 We glue the cone with cones
 On the last two rows, I tried to attach the smallest cones. For the top, the most beautiful cone stretched upwards was in store. We generously drip glue on it and fasten it. To make the Christmas tree of cones more decorative, you need to decorate it with garlands and tinsel. But first, we “sprinkle” it with silver snow.
 We paint a Christmas tree from cones
 Yes, if there are threads left from the hot glue, we carefully remove them so as not to spoil the appearance of our beauty. In my opinion, such a Christmas tree is already ready to fulfill its festive function. But I've tweaked it a bit more.
I took ordinary silver spray paint and painted the entire surface of the Christmas tree.
It is necessary to paint somewhere on the street, as the paint has a very specific pungent smell. Since when spraying, even in calm weather, its vapors will fly in different directions, I advise you to wear clothes that you don’t mind getting dirty.
Spray paint in different directions. We are waiting for the complete drying of the paint. Next, using a hot gun, I glued decorative elements. I first cut the Christmas tree beads. In a word, you can use everything that is at hand. If there are beads, they are quite suitable. We glue them in a random order.
 Cut the beads into pieces
  Attaching decorations to the Christmas tree
 You can add some decorations and New Year's tinsel, put on small ones. It all depends on your taste and imagination, experiment! Here's what you should roughly get:
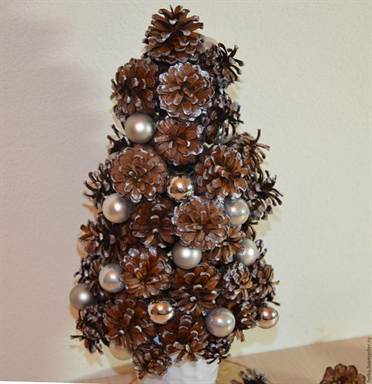
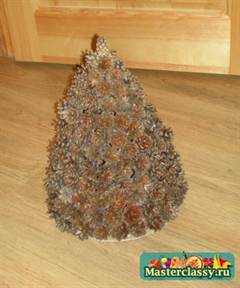
 Christmas tree made of cones
 The width of the Christmas tree is about 20 cm, and the height is just over 30 cm. Christmas tree from cones, made with our own hands, we succeeded! So what do you think? In my opinion, everything is simple and beautiful. Such an elegant beauty can be put even on the festive table.
Do you feel the holidays are coming? Share your emotions and impressions, offer your New Year decorations. In order not to miss all the most interesting - subscribe to updates via RSS or to your mailbox. Have fun and happy new year!
Approaching new year holidays- time to give and receive gifts, decorate the Christmas tree and decorate the house. Perhaps we no longer believe in the good old man Santa Claus, we do not expect gifts from him under the Christmas tree, but we definitely expect a miracle, especially in new year's eve.
A miracle is certainly good, but the realities of life dictate their own rules to us. Work, business, the end of the quarter and the year - all this leaves its mark on the availability of free time, and therefore on preparing for the holiday. If there is very little time left, and you don’t want to give loved ones a soulless purchased gift, then it’s time to think about New Year crafts made from natural materials. In this article we have collected for you best master classes from all over the Internet for making Christmas crafts from cones.
Rules for working with cones
So, before you start making Christmas decorations from cones, you should familiarize yourself with the rules for their operation, if you can call it that. There are several rules for preparing cones before using them as material for New Year's crafts in order to ready product not deformed or deteriorated after some time.
Rule 1. Working with cones is a pleasure, but you should take into account the fact that the air temperature outside is much lower than indoors, which means that the cones you brought will begin to open. Spruce trees will look like ruffled hedgehogs, and pine trees will look like fluffy Christmas trees. If your craft involves the use of closed cones, then dip the cone for 30 seconds in a container of wood glue, then remove and let it dry. Regardless of the temperature, the cone will always be "closed".
 Rule 2. If open fluffy cones are needed for crafts, and there is no time to wait, then for their speedy opening, the cones need to be boiled for half an hour, and then dried on a battery. After drying, the cone will become fluffy and will no longer change its shape. Instead of boiling, you can use the oven, placing the cones there for two hours, preliminarily setting the temperature to 250 ° C.
 Rule 3. If the shape of the cone does not quite suit you, it can be slightly corrected. For this natural material you need to soak in water, and then tie with a thread. After drying, the shape of the cone will be the same as you gave it with a thread.
 Rule 4. Buds don't have to be brown. All the same, the New Year is a holiday of miracles and an ordinary fir cone from a simple brown can turn white or even golden. In general, to bleach buds, soak them in water with bleach (1:1), then rinse and dry. The result is impressive.
So, now that you have read the rules for working with cones, it's time to start creating Christmas decorations from this natural material. What can be made from cones? Yes, anything! The main thing is to stock up festive mood and let your imagination run wild. And our master classes will help you navigate a wide variety of options.
One of the main attributes of the New Year has always been and remains the Christmas tree. It’s New Year’s because it doesn’t look like the one we saw in the forest, however, if you saw it. A Christmas tree can quite well be made with your own hands from ordinary pine cones, since pine is an unpretentious plant, and therefore grows almost everywhere in our cities. To create such a New Year's craft with your own hands, you will need: thick paper, scissors, old newspapers, glue and, of course, cones.

See more ideas Christmas trees:
Cute Christmas decorations are made from ordinary cones and pieces of felt. You will also need scissors, glue, paint and plasticine or a wooden ball. Such birds will look great on a Christmas tree or you can give them as a souvenir to your close and dear people.

Making Christmas crafts with kids is a pleasure. Firstly, the child is busy with an important matter with his parents, secondly, we are all pleased to create something new, and thirdly, such a craft may well become New Year's souvenir for grandparents, and maybe for Santa Claus himself. To make Santa's magical helpers you will need: cones, pieces of felt, scissors, glue, plasticine or a wooden ball for the head.

You can actually make a variety of forest dwellers out of cones, and it doesn’t have to be a hedgehog. From this master class you will learn how to make chanterelles from cones and felt.

It would be strange if there were no hedgehog among our master classes for making animals from cones. fluffy bump their appearance just resembles a prickly eared forest animal. You will need: cones, felt, scissors, glue.

To make squirrels from cones with your own hands, you will need: cones, felt, scissors and glue.

#7 Crafts from cones for the new year: make a ball with your own hands. Scheme
You will need a foam ball, cones, ribbon, glue.

With the onset of cold weather, it becomes more and more difficult for our smaller brothers to get their own food, so we should take care of them, especially given the cold weather in our places. A great idea for crafts from cones is a bird feeder. Take a cone, generously spread it with honey or condensed milk, and then dip it in a container with “bird treats”. Hang the feeder in the yard on a tree and watch the birds enjoy your treats with pleasure.


See more ideas:
#17 Decorating the house with shiny cones: getting ready for the New Year's party

If you are planning a serious adult party, then decorating the interior with fabulous elves and decorative owls is not worth it. It is better to use sparkles and add sparkle and chic to New Year's Eve!

Any cone is suitable for a hedgehog, both pine and spruce, but it must be fluffy. How to do this, we told at the very beginning of the article in the rules for working with cones.


Cones are a fairly versatile material, and if you have already grown out of chanterelles, squirrels and hedgehogs, then you can decorate this natural material with ordinary paint. Looks very stylish.

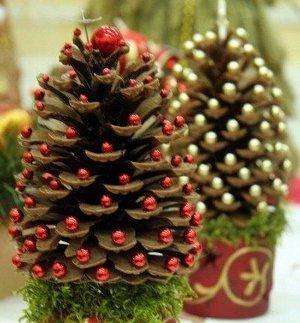
What is a tree without cones? From a seemingly ordinary pine or spruce cone, you can make an incredibly cute Christmas tree toy, which will fit into the overall decor as harmoniously as possible. You will need: a bump, glue, a bead, ribbon and thread.

The eagle owl fits perfectly into the New Year theme: it does not sleep at night, it stays with us for the winter, and of course, this particular bird was Harry Potter's pet. Small owls can decorate the interior, a Christmas tree, or give loved ones as a souvenir.

You may like:
#24 We continue to make birds from cones: DIY crafts "Owl"
Cones make excellent birds, including owls. On New Year's Eve, there must be at least one owl on the Christmas tree - there must be someone who will definitely not fall asleep and follow Santa Claus: how exactly he gets into the house and how he leaves gifts. Making a night guard is quite simple. You will need: a bump, glue, pieces of fabric, beads for the eyes.

Children, even the most fidgety ones, will gladly take up the painstaking work of creating a New Year's penguin, but on one condition: parents must take part in the process. Spend a few hours together and end up getting a sweetheart New Year's crafts— what could be better!

If you are not satisfied with the banal decoration of candles and vases with cones, then you should like this original picture. You will need: cones, a frame, ribbons, scissors and double-sided tape or glue.

Decorating the Christmas tree is one of the most important activities in preparation for the holiday. I want to decorate the forest beauty in a special way. The most special will be the Christmas tree, on which toys are made by hand, in which the soul and warmth of the creator are invested. Our step by step wizard The class will help you make an unpretentious Christmas tree toy from ordinary cones with your own hands. If there are children in the house, be sure to involve them in the creative process.

A great idea for a New Year's theme would be a craft made of cones in the form of a deer. It's quick and easy to make and looks really cute. By the way, such a craft can be hung on a Christmas tree as a hand-made toy.

A great idea for crafts for the new year from cones will be a snowman. And not just an ordinary snowman, but an athlete snowman who prefers new year holidays spend skiing. By the way, take note of this character's idea and be sure to winter holidays spend time with the whole family somewhere on the hill!


With the help of cones you can decorate New Year's table, using this natural material as a stand for cards with a seating plan for guests. Suitable not only for a party with a large number of guests, but also for a quiet cabal. The main thing, after all, is the creation of a New Year's atmosphere.


Even if you have a large Christmas tree, miniature Christmas trees made of cones will not become superfluous, because the Christmas tree is only in one room, while in others it is quite possible to create a festive atmosphere with miniature copies.

If you still decide to decorate the house with miniature Christmas trees made of cones, then here's another step-by-step master class for you.

If you like christmas balls with snow, which you can shake and arrange a real winter blizzard, then you will like this craft. The cone resembles a Christmas tree, so in a jar of snow it looks like a real forest beauty in miniature, who is waiting in the forest for a kind old man.


You may be interested in:
Another great option for a miniature Christmas tree for decoration or as a souvenir would be such a cone craft.

If you don’t have the time or desire to mess around with a fluffy wreath, the master class on which you saw above, then you can make an incredibly simple cone wreath, which will take much less time to make, but it will look very cool!


Help us become better: if you notice an error, highlight the fragment and click Ctrl+Enter.
Almost after every walk in the park, where there are coniferous trees, children bring cones home. This is great for making a variety of crafts. It can be toys, souvenirs, decor items. In this article we will talk about how a Christmas tree is made from cones. Such a product can be a good alternative to a living coniferous tree on the eve of the New Year holidays. Master classes are presented to your attention, which tell about the technology of making pine. So, we study the information, look at the photos and recharge with a portion of inspiration.
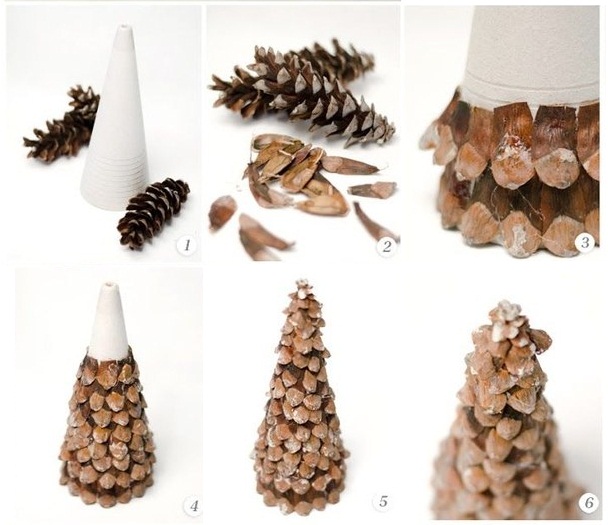
Preparatory stage
Before proceeding directly to the implementation of the "Christmas Tree of Cones" crafts, you need to arm yourself with all necessary materials and tools. Clean the pine fruits from dust and dirt, wipe them wet wipe. Sort the buds by size: from small to large. In addition, for work you will need scissors, a thermal gun, gouache paints or an aerosol, A-3 format cardboard, adhesive tape, a piece of 50x50 cm, paper (newspapers, old notebooks).

How to make a Christmas tree from cones? Studying step by step instructions
- We twist a cone from cardboard. We seal the edge with tape. We level the bottom of the workpiece so that the part is stable.
- From another sheet of cardboard we cut out a circle, the diameter of which coincides in size with the circumference of the lower part of the cone.
- We put inside the product and glue the bottom. The basis for crafts "Christmas tree of cones" is ready. We install it on plywood and proceed to fixing natural material.
- On the lower part We glue the cones in a circle with the help of a pine thermal gun. We decorate the next row with smaller cones. Closer to the top, we attach small specimens of these gifts of nature.
- Examine the tree, and if your cone tree has gaps between the fruits, fill them with chestnuts, acorns, or nuts.
- You can decorate the product with green gouache paints. An imitation of snow can be created using white paint or by gluing crushed foam onto the cones. A Christmas tree painted with a silver or golden spray will look very elegant and original. Leave the product to dry completely.

In height, such a composition is approximately 35-50 centimeters. It can be centered holiday table or on a cabinet shelf. On the eve of the New Year holidays, decorate it with toys, bows, garlands.
Small Christmas tree made of cones (craft-souvenir)
This version of the tree is made from just one pine fruit. To make a souvenir, cook rice, food coloring green, glue, a piece of plywood 10x10 cm, beads, wrapping paper.
Dilute the dye with water according to the instructions, dip the rice in the solution for a few seconds, and then dry it. Paste the plywood wrapping paper, attach a cone in the center. Lubricate all the scales on it with glue and cover them with rice. When the product dries, decorate it with bright beads. That's all, a small decorative Christmas tree is ready. Such a souvenir can be an original gift for relatives and friends.
Everyone associates the New Year with the smell of tangerines and pine needles, with miracles, and, of course, with fir cones. At first glance, the cones do not look festive at all, but one has only to turn on the fantasy, as an ordinary natural material will sparkle with completely new colors. We invite you to learn how to make a Christmas tree from fir cones with your own hands!
Making such a Christmas tree is very simple, even a child can handle this task, so making a Christmas tree from cones can be a great way to make new Year gifts or holiday decorations for home.
Preparation rules
Very often, cones falling from spruces and pines turn out to be closed and only open after a while, thereby changing the original appearance in which this cone was delivered to your home. This can overshadow the craft somewhat, so before you start making a Christmas tree from spruce or pine cones, you can familiarize yourself with some of the intricacies of preparing cones for crafts.
- If you want to leave the buds closed, after collecting them, put them in a container with wood glue for literally 20-30 seconds, this will not allow them to open.
- If you have collected closed buds and want them to open as soon as possible, there are several ways to achieve this:
- you can put them to cook for half an hour, and then dry them on the battery;
- send the cones to the oven, heated to 250 degrees, for 2-2.5 hours.
- plus the heat treatment will kill the microbes and small insects living in the buds and make them safe.
There is also a way to adjust the shape of the cone: you just need to soak it in water for 5-10 minutes, tie it with a thread and dry it on a radiator. To whiten the bumps, they need to be soaked for 5-6 hours in water with diluted bleach (1: 1), then rinsed thoroughly and dried.
Getting Started
For work we need:
- Cones. Their number depends on how large a decorative Christmas tree you want. The more cones, the larger and more magnificent the Christmas tree made of pine cones. Cones for crafts need to choose good ones, without defects;
- Glue gun;
- Paint cans. The color depends only on your imagination;
- Garland;
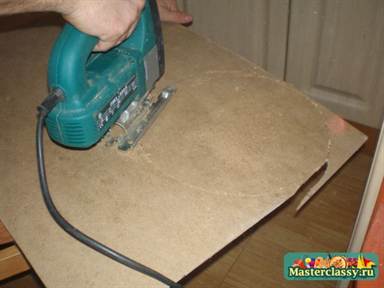
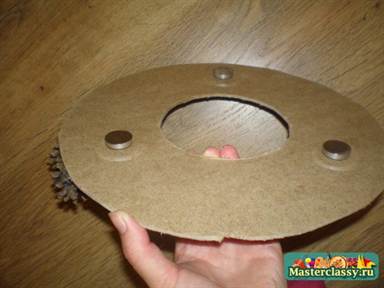
- You can make such a Christmas tree in two ways: glue the cones on a pre-prepared cardboard cone or on a fiberboard base. In our master class, manufacturing will be carried out according to the second method, with a fiberboard base (instead of fiberboard, you can take a chipboard sheet or any other dense material that is easy to cut).
Now that the buds have been processed, the first step is to sort them into large and small. This task can easily be entrusted to a child.
The size of the sheet will vary depending on how big you want your tree to be.
We have a sheet with a size of 30 × 30 cm. Draw an even circle on it with a compass and cut it out with an electric jigsaw. Only dad can handle this task, and in this way you can involve the whole family in the process of creating a fluffy beauty with your own hands!
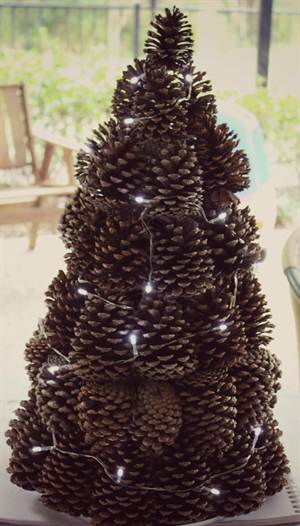
In the cut out circle, you can make another circle, smaller, as shown in the photo. This is necessary in order to later place a garland inside the future Christmas tree, thereby creating beautiful overflows and glow.
You can also make legs for the Christmas tree to make it more stable. You can use special iron legs, or you can buy plastic legs for furniture in the store. The main thing is that the base is firmly on the surface.
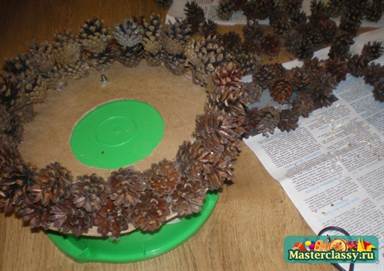
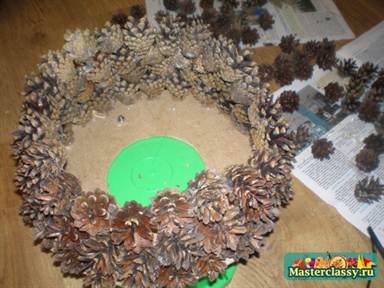
Now we proceed directly to gluing the cones. To do this, we take the largest cones and use a glue gun to glue them along the edge to our base. Glue is applied directly to the cone itself and to its base, and to the sides in order to fasten adjacent cones together. When the first circle is glued, you need to wait until the glue has completely dried and hardened, otherwise the whole structure may fall apart.
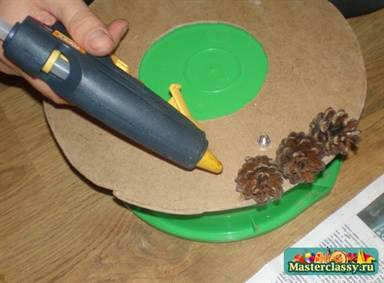

The second row is a little more difficult to make: the bumps are attached to each other, in the gaps between the bumps of the first row. No need to spare glue if you want to get a stable structure. Again, we are waiting for complete drying when we finish with the second row. And in the same way we glue the remaining rows, with each row slightly shifting the cones to the middle, forming a cone.

For the top of the Christmas tree, it is best to choose an oblong cone with a pointed tip to look more realistic.
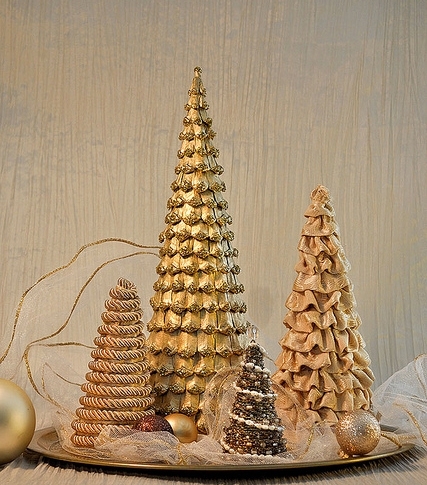
Next, we have a crucial step - painting. This is not necessary if you want to preserve the natural colors of the material. We will cover the Christmas tree silver paint from a balloon. We repeat that absolutely any color can be chosen by you.

It is best to paint with spray paints on the street, since such paints have a specific smell that is not so easy to weather, or we open all the windows in the apartment, and cover the walls and floor in the place where the painting will be done, cover with newspapers so as not to stain anything around. After painting, you need to wait for the paint to dry completely.
Content
The simplest and most accessible material that can be actively used in creativity is an ordinary cone. It can be used both as a separate decor and as part of compositions; its scales can be used in the design of candlesticks or some other decor items. In this article, we propose to practice making a Christmas tree from fir cones, it sounds funny, but it is such a craft that can enliven the interior on New Year's holidays. It is not a shame to present such a Christmas tree both as a gift and install it in an office, a country house.
You can start preparing materials right now. Collect material without flaws, preferably the same size. Before use, it is better to rinse everything with water and dry it. In the case of creating a Christmas tree, open cones are suitable for you, so you can safely dry them without fear that they will open too much.
Christmas tree from one cone
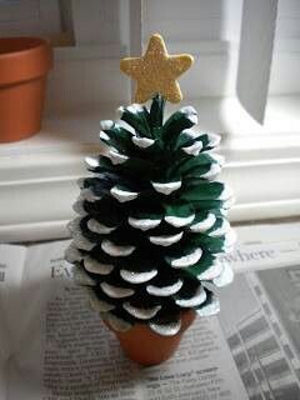
Let's start with the simplest option. Since the cone itself has a conical shape, this design itself can be considered as a small decorative Christmas tree. You will need a fully opened cone, on the scales of which you can glue small soft balls, beads, sequins, sprinkle glitter, attach rhinestones. This craft is easy to do with children, they can be entrusted with the small work of gluing parts.
Ready-made crafts can be glued to small wooden blocks, which must also be arranged first. Such Christmas trees can be placed on the table near each guest or create different New Year's compositions.
Crafts decorated with various large beads look beautiful. The tree can also be dyed green color and decorate with a star.
Christmas tree made of several cones
This option is more difficult. Will it take enough a large number of cones and other materials. Such a tree turns out to be voluminous, large, fluffy. What you need to prepare:
- cones (take more, if left, then make other decorations);
- cardboard cone;
- glue gun;
- scissors;
- spray paint (choose any color that suits you. A golden or silver Christmas tree looks beautiful).
It is worth noting that cones can be taken not only from spruce, but also from pine or larch. Can be combined different materials in one tree. First you need to sort them out and choose approximately the same size. Scissors need to remove bumps and some bad parts.
Now you need to glue the main decor onto the cone using a glue gun. Do this carefully, row by row. When all the details are glued, they can be painted with spray paint and decorated with some additional decor. Such a Christmas tree made of cones can replace the usual green beauty and please the eye for a very long time.

A do-it-yourself Christmas tree made of cones will remind you of a pleasant pastime for its creation and will become the pride of the hostess.
By the way, a similar Christmas tree can be made without using a cardboard cone. The design itself will be made directly by cones. Such a Christmas tree will turn out more magnificent and larger.
You just need to cut out a circle of cardboard of the same diameter as you would like to see the base of the Christmas tree. Cardboard can be replaced with a wooden block. On the blank circle, it is necessary to glue the parts with the base inward.

The larger the diameter of the base, the larger and taller the tree will be. But keep in mind that such a craft will require much more basic material.
Christmas tree from scales
A very delicate and elegant Christmas tree is obtained from scales. Of course, such work is more painstaking, requiring more time, effort and perseverance, but it turns out very beautifully.
For our work, collect the following materials:
- many cones of firs;
- knife, sharp scissors or pliers;
- cardboard or foam cone;
- glue gun;
- paints;
- sequins or any other decor (this is optional, because even without additional decor the Christmas tree looks very beautiful).
Your very first step is to separate the scales. Do this with pliers or sharp scissors, a sharp knife will do.
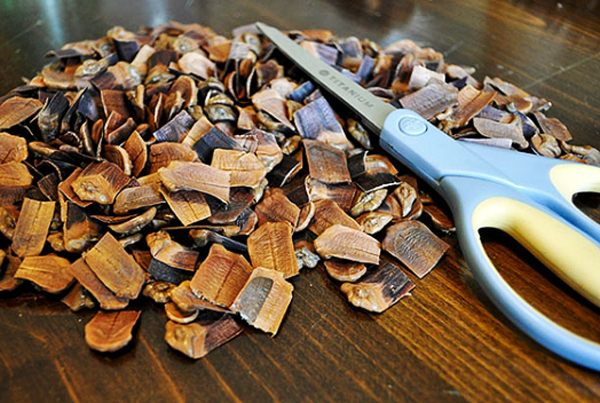
The longer the scales are, the more convenient it will be to stick them and the more magnificent the Christmas tree will turn out.
Now that the main material is ready, let's start creating a New Year's beauty. We take a cone and fasten the scales in a checkerboard pattern. The Christmas tree can be either very small or large, which can be installed on the floor.
The Christmas tree can be painted in gold or green, decorated with additional decor.

The end result might look like this:
Bonsai from cones
You roughly understood how to make a Christmas tree from cones, but how do you like the option of bonsai from cones? Such is the original move for the New Year. Guests come to you, and instead of a Christmas tree you have a small Japanese tree. For this craft you will need:
- fir cones;
- a branch from a tree;
- small pot;
- pot filler (it can be earth, and scales from cones, and small pebbles).
First you need to form a ball of cones, which will become the basis for the bonsai. This can be a small foam ball that you use a glue gun to attach the base material to. Cones can also be glued directly to each other to form a ball.