Volume letters from natural material. Do-it-yourself letters. Master Class. Fabric Basics
On the eve of the New Year holidays, and even on ordinary days, many Internet users ask how to make volumetric letter with your own hands? From three-dimensional letters, you can compose any inscription that will become a worthy decoration of the interior or a gift for friends.
What are large letters made of? The material to create an original creation can be used very different:
paper;
tree;
Styrofoam;
the cloth;
napkins;
gypsum;
bottle caps.
Let's look at a few of these options.
Do-it-yourself letters made of paper
Paper letters are made in several ways. You will need a stencil, which you will also have to make yourself. It is recommended to choose the simplest font, if you have experience in this activity, use serif fonts. Such letters will undoubtedly be more beautiful.
The stencil is applied to the cardboard on which the blanks are drawn. We cut out letters from cardboard and choose a method for their design.
Blanks can be wrapped with multi-colored yarn.
Stick on the cardboard base beads, broken glass from Christmas decorations, shells, foam balls.
Do-it-yourself volumetric letters from cardboard can be made in a different way. Cut out blanks in duplicate. From the same cardboard we cut strips of the same thickness, we will use them for the edges of the letters. We bend the edges on these strips, grease them with glue and connect them with the prepared parts for the letters.
You can decorate finished letters with fabric, colored paper, New Year's tinsel, glitter, ribbons.
Another version of volume letters made of paper - papier-mâché technique. First, the letters are glued together according to the second method. Next, the finished frame is pasted over with chopped paper strips. To do this, you can use old newspapers, scribbled school notebooks, unnecessary magazines.
Finished letters are made out in decoupage technique or in any other way you like. An interesting solution is to paint dry pasta stars with paints and paste over the letters with them. Do-it-yourself volumetric letters (diagrams and stepping) can be found on YouTube.

Do-it-yourself volumetric letters from napkins
To make beautiful three-dimensional letters from napkins, you need to purchase several packs of this product. We choose napkins without a pattern. The more magnificent the figure, the more attractive it looks, so you will need a lot of napkins.
In addition to napkins, you will need a foam or cardboard base, thick PVA glue. If you take liquid glue, the cardboard base will spread or simply deform, then the letters will turn out to be ugly.
If you choose foam, be prepared for the fact that white crumbs will appear in the room, and when working, small balls stick to hands and tools. To minimize this drawback, use a special cutting tool, where instead of a blade there is hot nichrome wire. It cuts the material very easily and welds the edges at the same time.
If there is no such tool, you can put the nozzle of the included vacuum cleaner next to the cut, then all the debris will immediately fall into the dust bag.
We fold the napkins with a rose, cut off the protruding ends with scissors.
You need to make a lot of such blanks at once so that the glue on the base does not have time to dry while we prepare new flowers from napkins.
We smear the base with thick glue and fill the entire space with paper flowers.
We are waiting for our letters to dry and make a word out of them.

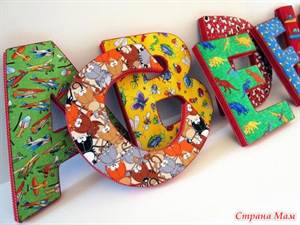
Do-it-yourself volume letters made of fabric
Such letters are considered the most popular and functional, since they contain a soft filler inside, and the letters may well play the role of sofa decorative pillows.
Making soft letters from fabric does not require special talents and does not take much time.
All you need to work:
fabric with different prints;
synthetic winterizer or other filler;
scissors;
stencil;
sewing machine.
Important. When drawing a pattern on a fabric, first we apply the stencil with the front side, and to make a part for reverse side letters, the stencil is placed on the fabric with a mirror image.
If you plan to make one or two letters, they should be large. If you want to create a whole inscription, the letters are made smaller, a small loop is sewn to their upper part, and then they are strung on a decorative cord, the ends of which are attached to the walls of the room.

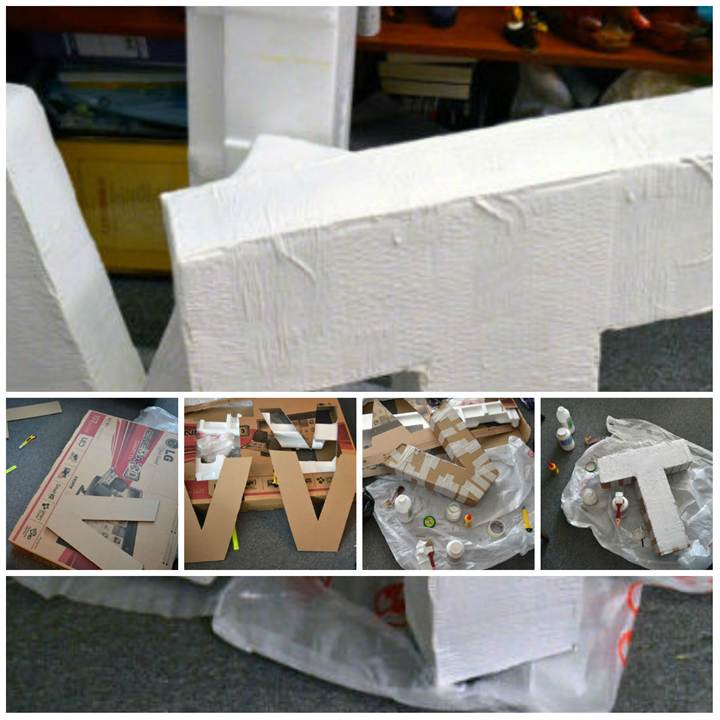
Do-it-yourself volumetric letters from polystyrene foam
To create three-dimensional foam letters, you can purchase foam plates at a hardware store or use old packaging from household appliances.
First, we prepare paper stencils, transfer them to the foam, draw around the contour and cut out the blanks with a clerical knife or jigsaw.
You can decorate the letters with acrylic paint:
matte;
mother-of-pearl;
silver;
gold.
For a greater decorative effect, glitter is added to the paint (sequins that are used for manicure). Along the contour, the letters are decorated with trimmings of tulle, lace or bright ribbons. With the help of rubber glue, small applications (butterflies, ladybugs) can be glued onto the letters.

V Lately large and small numbers made of cardboard, created especially for kids, are popular: they are used for birthdays and other themed holidays. We have collected for you best options Do-it-yourself voluminous figures from paper: diagrams and templates will help you quickly make the desired combination of a number series and use it in your idea.
What are numbers for?
As a rule, figures are made for. They look unusual and delight all the guests of the house: the grandparents of the baby are especially touched, because the number not only decorates the room, but also eloquently indicates that the baby has become older. The numbers serve great backdrop for thematic photos: the baby can pose with numerous relatives or on his own.
Numerical figures do in any event agency, however, parents will save a lot by making such crafts with their own hands. Their production is extremely easy and does not take much time: good imagination and creative skills will help you create paper numbers that will look no worse than purchased ones. About how to do it and what is needed for this in detail we will tell in the article.
Materials for manufacturing
 If there is a very small baby in the house, and you have not yet got hold of stationery, we advise you to immediately go to the needlework store. Create a note in the phone, so as not to forget the tools that you need to purchase for future crafts:
- Cardboard
The size depends on the size of the number you are going to make. For a large number for numbers planned to be used as props for a photo shoot, it is better to prefer A4 thick cardboard. if there are huge crafts in the plans, you will have to be creative and find large boxes of large household appliances. The easiest way to do this is to ask at the store: usually sellers are happy to give away unnecessary packaging from goods. - Scissors
Take comfortable scissors: when cutting cardboard, they should not rub the places of contact with the skin.
If you still don't have a clear idea in your head of what your number should look like, choose the colors that you will like the most in the store. Otherwise, select the material according to the idea.- Twine
Get a couple of skeins of twine if the planned event will be held in a rustic style. - Construction stapler
A stapler is needed when working with thick cardboard. Without it, the creation of three-dimensional figures will become almost impossible. - glue gun
Required for fastening parts - Rulers, pencils, erasers
Materials are needed for the design and marking of numbers on sheets of cardboard. - Additional materials
Purchase Additional materials if necessary. These include: textiles, beads (beads), napkins and colored paper, knitting threads, tinsel.
We make a frame of volumetric figures
 Big numbers have a big advantage: child can play with them and rearrange to any place in the apartment. At the same time, a well-made figure will last more than one year.
Follow instructions if you want to make a volumetric figure:
- Decide on the sizes. Depending on this, choose the material: regular A4 size cardboard or big box from the refrigerator.
- On a piece of cardboard draw number by hand or using a template. Templates are given below.
- Cut out the number. Use scissors or stationery knife. If you cut out only one shape, then the craft will turn out flat: you can hang it on the wall or make holiday skewers with the age of the child.
- For a three-dimensional figure, prepare two identical numbers. In addition, cut out strips of cardboard that will serve as a layer between the templates. Band width define depending on the size of the number.
- Attach two templates and inner strips with a construction stapler, paper tape or a glue gun.
- Decorate the resulting frame, depending on the idea and materials at your disposal.
Variants of volumetric figures from improvised materials
We have made extensive compilation volumetric figures created by craftswomen especially for their kids. Some options are given with a description, so you there will be no difficulties with the performance of particularly complex figures.
Gorgeous colored paper numbers are made very easy, however, they often take several days of painstaking work to create. If you want to make a neat craft, take the creation of decorative elements into your own hands. baby can render minimal help: submit sheets, choose colors or glue decor elements in the indicated place. detailed instructions for decorating letters with paper flowers is indicated in the photo tutorial.


 Numbers from buttons
Such a figure will come out in a tidy sum if you are not a craftswoman with a collection of buttons. Glue the buttons on cardboard or paper, dropping a little superglue into the middle. If thin cardboard is used and the figure does not exceed the size of an A4 sheet, the buttons can be sewn on with contrasting threads. This will give the craft special charm.

The figure with images of a baby or a family is performed in a three-dimensional and flat version. To fix photographs on paper need glue PVA or small scraps of adhesive tape.
 fluffy number
Looking at such creations it is difficult to hold back a smile: they are soft and fluffy want to touch them. Imagine how nice it is for a baby to cuddle up to a three-dimensional figure?
Making it easy: select the threads for knitting the desired colors. Next with follow instructions:
- Wind the threads around the object of the desired size. It can be a regular mug or planter.
- Carefully remove the winding, fold it in half. Bandage the core.
- Cut the threads along the edges, fluff. The soft pom-pom is ready.

 Thread craft
Another option for crafts using knitting threads. Just wind the frame as it shown on the picture. You can arrange a composition a single color or mix several contrasts. For a rustic party, use twine.

 Corrugated paper numbers
In this performance fantasies there is where to roam. A variety of colors and decoration techniques will help you create a figure to your taste and needs. Here are the simplest frills, and flowers, and the usual pasting: look carefully at the photo and get ideas from finished works young mothers.


 From napkins
Do not think that numbers made from improvised materials will look ugly, because the work of the master is afraid. Check out the photos below: all voluminous figures made ordinary women. In the process of work, they used only templates of numbers and napkins that ended up at home. Try it too: the result will exceed expectations!
Making something with kids is a wonderful activity, better than you can imagine. Very often you have to prepare decorations for a kindergarten, school or at home for some holiday. For example, if your child went to school for the first time, you can send him a congratulation in beautiful three-dimensional letters. Yes, and on any other day (Birthday, New Year etc.). And if you do not know how to make letters with your own hands, this article will come in handy for you.
Letters can be made from absolutely any material, it all depends on your imagination, in this article we will tell you the most interesting and common options.
First option

Probably the most common variant of homemade letters is cardboard letters, because this is a very affordable material. The principle of operation is very simple: you just need to cut out the letters you need according to the sketch and glue them, that's all. As you can see, there are no complexities and sophisticated methods. Ready product can be pasted over with colored or self-adhesive paper, or simply painted with paints or colored felt-tip pens.
soft letters
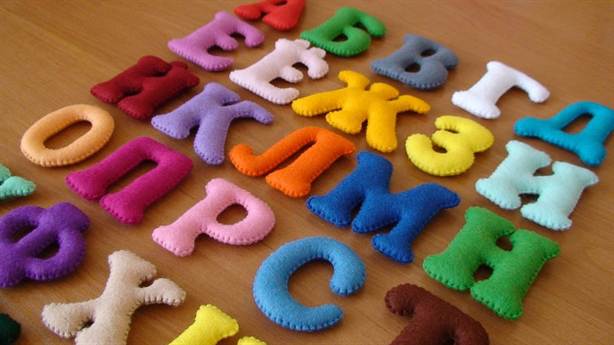
Very often they make letters from fabric, this method is already a little more complicated than cardboard, but also very straightforward.
Usually the letters are made of felt, as it holds its shape very well, is quite dense, and looks very nice.

In order to make such letters, you need to cut a letter out of the fabric, leaving a place for the seam, fill it with filler (synthetic winterizer, fluff, fabric scraps) and sew. You can do it with a machine stitch, or you can do it carefully with your hands.

For fabric letters, you can come up with wonderful beaded jewelry, somehow sheathe a contour with them, for example. Also, buttons, beads, locks can be sewn to the letter from the fabric, or decorated with some kind of embroidery. It will look very original, loved ones will definitely appreciate your work and idea.

We make paper

There is probably no more popular way to craft letters from paper. Thus, you can make just extraordinary masterpieces. Letters made of paper are convenient in that they can be painted in any color you need without much difficulty.

Letters from napkins are very beautiful. The letters are fluffy and cute, otherwise this technique is called letters (or numbers) from paper flowers. The execution technique is also quite interesting:
- First, take a single-layer napkin and cut it into four equal parts. We put these pieces on top of each other and fasten them in the middle with a stapler.
- We cut the squares into a circle.
- Now, from the edge to the center, we cut each layer into thin stripes and straighten them.

- We cut out the letter itself from cardboard and glue the resulting flowers around the entire perimeter.
This is the beauty of the result:

In a similar technique, you can make letters from corrugated paper, but then the circles will need to be cut immediately from big sheet, but this way the flowers will turn out even fluffier and more voluminous, and, therefore, more beautiful.
Unusual way

Letters from quilling are interesting, not childish and fluffy, let's try to make such an interesting craft:
- First, take a sheet of paper, which will be the base, and draw on it the outline of the future letter.
- Now we will prepare the stripes with which we will work. To do this, cut colored paper into strips no thicker than six millimeters.
- Glue a wide strip of thick paper along the contour of the letter.
- Roll small strips of colored paper into curls. You can wind them on the handle and hold a little.
- Well, now we decorate the letter as we wish.

More complicated products

Let's try to make a letter out of gypsum, it will definitely please you for more than one year, because this material is more reliable than napkins and cardboard.
- First you need to draw the letter itself on cardboard and glue it with sides, so we get a mold for creating a plaster letter.
- We dilute the gypsum mortar, and for reliability, put gauze in the bottom of the mold, so the product will be stronger, and, therefore, will last longer.
- Fill the form with the solution and wait until it hardens.
- When the gypsum has hardened, we take our craft out of the mold and grind it with sandpaper so that there are no bumps and extra bulges on it.
- It remains only to paint and decorate the finished letter.

Letters from plywood

Ludmila Dudoladova
For manufacturing, we need thick cardboard, a clerical knife, a glue gun, paper napkins(a lot, stapler, glue stick, scissors, paper cups.
So you can get started. Draw a template on cardboard letters

I cut two at the same time letters from two pieces of cardboard, if you have a good clerical knife, this will easily work out
Then I glued the two halves letters with thick paper cups

Paper cups are denser than plastic and our the letter will be more stable

Then we begin to glue the sides of our letters

To do this, we prepare a lot bulk circles of napkins


I think many people already know how to make blanks, but I repeat. We take a napkin, fold it in half, then in half again, fasten it with a stapler, cut out a circle (I used a template so that all the circles were even)
How do you decorate letters- this will tell you your fantasy. This is how we do it!

These volumetric letters- a gift by September 1 for my daughter. We will have an inscription - 3rd grade. I think my daughter and her students will be happy with such decoration of the class. Thanks to all. There is still time until September 1, maybe someone will take advantage of my idea.
Related publications:
 Dear colleagues! I would like to share a version of a pencil holder made by myself. Here it seems simple thing- a pencil holder, and such.
 I bring to your attention a master class "Flowers with your own hands". To make flowers, we need: colored napkins or corrugated.
 Dear colleagues, I want to present a master class on making a photo frame with my own hands using a non-traditional plasticine technique. I am engaged.
 Such an element of the interior as a frame is used very often. The stores have a great selection of frames, and even the most fastidious customer always has one.
 Authors: Golovkina G. A., Yakunkova A. V. MBDOU "Kindergarten No. 6", Sarov Modern children are surrounded by abundance bright toys, which.
DIY Lapbook Master Class Municipal budgetary preschool educational institution Kindergarten"Rainbow" of the workers' settlement Sosnovoborsk Master class.
 TO new year holidays there is always a desire to decorate the reception and group room somehow in a special way, not like last year and.

3D letters are a great way to decorate weddings and wedding photos.
This accessory can be made by hand.
We have collected the most interesting and original ideas how to make initials for a wedding with your own hands.
Well, to make sure that it is not difficult at all, we will also show as many as 3 step-by-step master classes.
The initials sewn from fabric look very gentle. You can choose absolutely any fabric, even inexpensive ones. The main thing is that it matches the style of the wedding in color and texture.
The lace trim adds a special touch.

If desired, you can completely make the letters lacy.

Volume letters from threads
Making three-dimensional letters for a wedding from threads is quite simple: you need a frame, which is then simply wrapped with threads.
Thus, you can create absolutely any inscriptions for the wedding with your own hands, for example, a surname.
For the frame, you can use wire.

Or a cardboard stencil.

Cardboard letters
Speaking of cardboard. It is a cheap and versatile material. Here are just a few ideas on how to create wedding letters with it.

Three-dimensional letters look even more interesting, which can be made from ordinary cardboard, and then pasted over with paper or cloth to your taste. Get a great monogram for a wedding with your own hands.

Your photographs are perfect as decorations.

Volume letters from unusual materials
Do you want something really interesting? Pay attention to non-standard materials.
For example, this figure is made from paper cupcake wrappers.

For an autumn wedding, voluminous letters made of leaves are the best fit.

Or even wood.

As you can see, there are enough options. And they are all quite simple, but they really decorate the wedding.

A master class on how to make volume letters from paper for a wedding with your own hands
Volumetric can be not only letters, but also numbers. Date, important date or table number.

So here's how it's done:
- Cut the paper into squares.
- Make rounds at the corners.
- Cut the shape in a spiral, moving from the edge to the center.
- Leave a small circle as the center.
- Add a few drops of glue to the core.
- Twist the figure in a spiral into a flower shape.
- When the spiral is twisted, press it firmly against the core to hold everything together with glue.
- Make a stencil of letters or numbers out of cardboard.
- Glue the flower onto the stencil.
- Continue until you have filled in all the gaps.

Do you want to make this beauty? Here's what you need:
- To make cubes, you will need paper blanks. 2 square parts with sides of 10 cm, 2 - 11 cm and 2 12.5 cm each.
- For each piece, measure 1cm from the edge and fold inward.
- Glue the pieces together along the fold to make a box.
- Cut out letters or numbers from decorative paper. From the same paper, cut out frames for decoration.
- Glue all the details on the cube. Ready!