Names made of cardboard letters. Master class: How to make volumetric letters from cardboard with your own hands. Photo of volumetric letters
If you are planning a holiday and you don’t know how to decorate your house, cardboard letters can be a great addition to a festive interior. For children, these accessories can be interesting toys or gifts. If you do not know how to make cardboard letters, you are very lucky, because our article will tell you in great detail how to make letters from cardboard with your own hands.
Ordinary option
This option for making a cardboard letter is perfect for beginners, because it is very simple and does not contain any complex manipulations.
- First you need to prepare a template and transfer it to cardboard. Cut out the letter with a clerical knife or scissors (but it will be more accurate with a knife).
- Now the workpiece needs to be decorated. This can be done in any way convenient for you. The letters wrapped in threads look very interesting, for this you just need to wrap the workpiece with thread over the entire surface, now you can simply hang them from the ceiling, and not just on the wall, because they will look equally beautiful on each side.

Bulk products

With the help of such letters, you can decorate your house for your birthday, and then they will remain with you for the rest of your life and will remind you of the joyful events that took place on that day. We are offering to you detailed master class to create volumetric cardboard letters.
First you need to draw a letter on an A4 sheet.
If you don't know how to draw, that's okay, you can use the diagrams, templates below, and just print them.


The selected letter must be drawn in duplicate on cardboard.

Cut off a strip of paper about two centimeters wide.
Now take a paper towel (or toilet paper) sleeve and, using the strip you cut out earlier, draw a line. There are about six such rings you need to make. If you want to make the letters look very voluminous, make the rings wider.


Cut out the rings.

Now we put our rings on one letter. It is the rings that will create volume, therefore, as mentioned above, if you want more volume, make the rings wider.

Then we glue each ring to a letter. We grease the other edge of the ring with glue and glue it to the second part of the letter.

Now you need to take plain paper and cut it into small strips. With these stripes we will glue the sides of our letter. The paper can be wrinkled a little at first, so it folds better as you need it.

Then you need to glue the whole letter with paper and as a result, our product will become quite solid and durable.

Wait for all the glue to dry and color in the letter. It is best to use acrylic paints, they are quite durable compared to others.

You can decorate the letter somehow or draw something interesting on it.


Cardboard letters can be not only a decoration for a holiday or a matinee, they can be a great decoration for your everyday interior. We invite you to watch this video tutorial, it tells how to make cardboard letters with backlighting, they look very modern and original, at first it is not clear that they are made of cardboard.
Cardboard letters can be used as a decoration on the head, for example, for a Primer's holiday at school or for home entertainment.

It is quite simple to make such an accessory, just cut out the desired letter from the cardboard and glue it onto the rim (an ordinary strip of paper, stapled into a ring). It is desirable to decorate such a letter.

You can decorate any cardboard letter with anything: threads, colored paper, self-adhesive paper, paints, buttons, in general, for which there is enough imagination.

If you want to please your soul mate, for example, on Valentine's Day, you can make a beautiful cardboard inscription "LOVE". To do this, you will not need to put in a lot of effort. We offer you reamer templates, you only need to carefully cut them out and, preferably, transfer them to cardboard so that they turn out more reliable. After that, you just have to bend and glue all the ears.
After that, decorate the letters as you like, it will turn out very beautifully if you glue the letters with beads, rhinestones or sequins, under certain lighting they will shine brightly and shine.

Related videos
Now you can easily make a letter from cardboard for any occasion. Agree, it looks very original and modern. The end result will depend only on your efforts and imagination, do not be afraid to experiment, and you will certainly achieve great success in this exciting activity. We also bring to your attention a video selection of master classes. They also include more ideas and options for products of letters from cardboard.
It is quite popular abroad to use letters in interior decoration, which can be hung on ribbons, placed on shelves, etc. Also, you can add names or any phrases from them, or you can chaotically "scatter" around the wall to decipher anagrams. V Lately such volumetric letters began to be used for photo shoots and decoration festive hall... Today we offer you to make such letters yourself from an unnecessary cardboard box.
To make three-dimensional letters, you will need:
Corrugated cardboard (you can use an old box);
- design paper;
- regular and double-sided tape;
- ruler, pencil, cutter;
- marking board;
- decorative elements (ribbon, rhinestones, buttons, etc.).
Volumetric letters from cardboard step by step:
Take a piece of cardboard and draw a simple letter on it, no roundness. Then cut out the letter in duplicate with scissors / paper knife (photo 1). The cut out letter will look like in photo 2.

Make bumpers on one letter, for which cut cardboard strips about 7 cm wide and as long as possible. Cut them into pieces so that there is enough for the entire perimeter of the letter. Fold the 2 cm allowances on both sides and glue to these allowances along a strip of double-sided tape. Then glue the resulting "sides" to the "letter" part (photo 3).
Glue a second cardboard letter to the sides and press firmly, but try not to bend the corrugated cardboard (photo 4-5). From above, you can fix it with more strips of double-sided tape (photo 6).

Start decorating the letter. Trace it on design paper and roughly figure out how to cut to cover the letters from all sides (its entire surface). The wrapper for the letter may not work the first time - it's okay, try again (photo 7-9).
If your child has a birthday, learn how to volumetric figures and letters from cardboard to decorate them with flowers from napkins, paper, threads.
How to turn cardboard into the basis of three-dimensional letters and numbers?

Volumetric figures make out the most various materials, using for this corrugated paper, thread, napkins. But the base is made of cardboard. If you want to make the number 1, then with your own hands you first need to make a blank for it.

The diagram below shows the recommended sizes for this number. You will need 2 of these parts - one for the front, the other for the back, cut them out of cardboard. Decide how thick the number will be, this width you need to cut a strip of cardboard.
It is better to make further manipulations together. Start at the top, first attaching a strip of sidewall to the face with masking tape.
Please note that where there is a bend in the number, the adhesive tape must be cut evenly so that it fits well in this place.
After you fix the strip of cardboard on the front of the number, you also need to glue it to the second side of the given number, which will be the back.
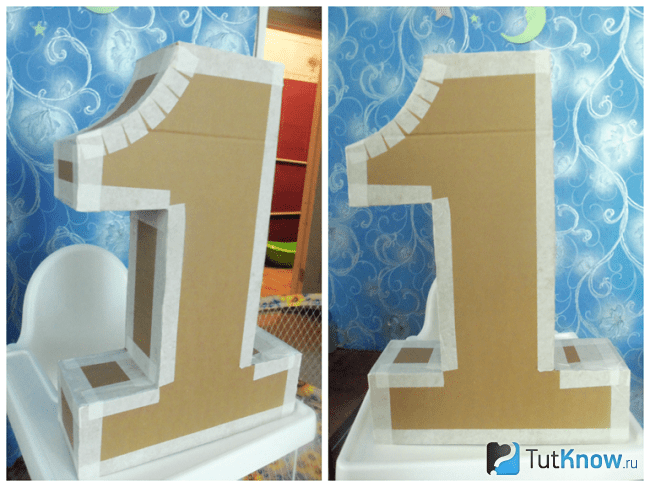
It remains to glue one edge of the strip to the second at the top, after which you can tell yourself that you could make the number 1 with your own hands.

Let's see how to craft the base for the next number. To make the number 2 out of cardboard, transfer the presented template onto it with your own hands. To do this, you can use squared paper to then draw cells on the template. bigger size, thus transfer the drawing.
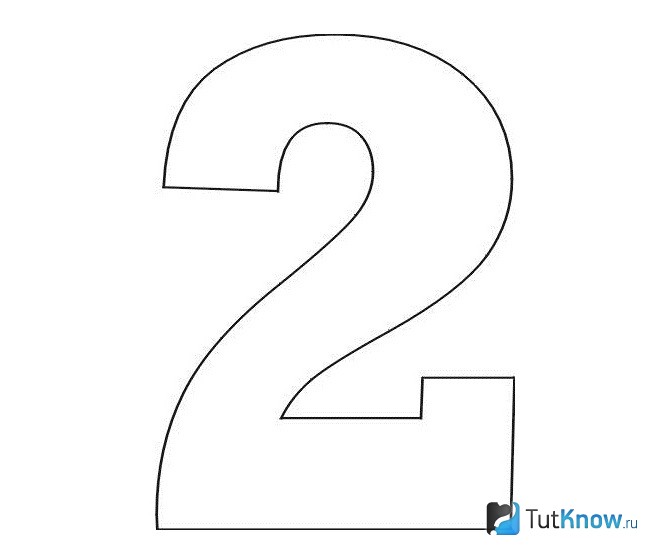
You can also draw it by hand, repeating the lines and bends of this figure. As in the first case, to work you will need:
- digit pattern;
- cardboard;
- construction tape;
- scissors.

Now attach the other half of the number.

As you can see, for this it is not necessary to glue the tape over the entire surface, you can attach it in small pieces, fixing it perpendicular to the surface.
Surely, you have already understood the technology of how to make a volumetric figure out of cardboard. By the same principle, you will make all the other numbers, if the events to be marked require it. Now check out different options decorating such numbers.
How to make a fringe to decorate letters and numbers?
To do this, you can use different kinds paper: corrugated, colored, we will take it in silence. In another way, it is also called papyrus, wrapping. When you buy shoes, it is often in this thin translucent material that they are wrapped.
To make a volumetric figure according to this principle, you will need:
- tissue paper of different colors;
- scissors;
- PVA glue.

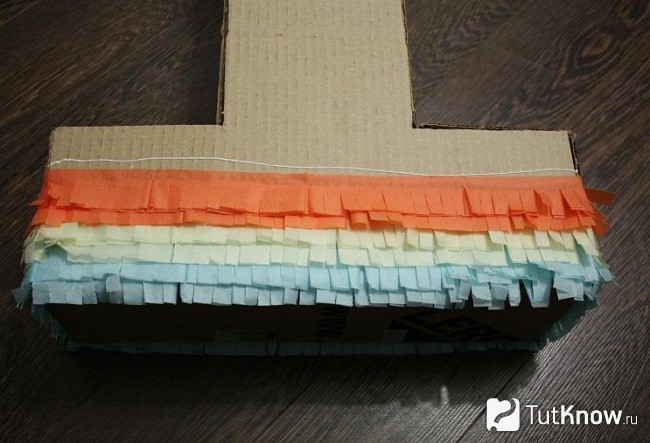
The long edges of these blanks with scissors need to be cut with a fringe. To speed up this process, fold several strips at once or fold each to make 4-5 layers.

Apply on lower part numbers from PVA cardboard, glue a strip of prepared paper here. Since it is very thin, it is better to glue two tapes at once. If you use instead colored paper or corrugated, then attach in one layer. The second goes a little higher, being located above the first.

Combine colors to make the number more effective.
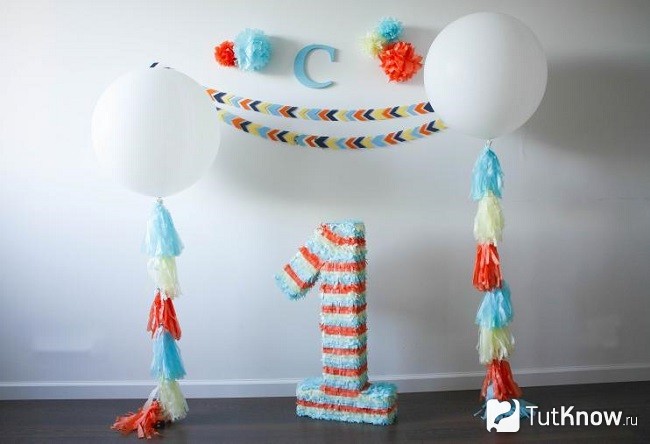
After you completely decorate it, decorate the corner of the apartment in the same colors.
Paper for bulky letters and numbers
Look at interesting design options for numbers from it.

To embody such a masterpiece, take:
- colored paper;
- scissors;
- double-sided tape or glue gun;
- compass or round object.

- Using a compass or circular template, draw on back side colored paper circle.
- Cut a small segment outside, as long as it will be, the petals of the flower will become that wide.
- Starting from here, cut this circle in a spiral, working from the edges to the center.
- When this part of the work is done, take the outer edge of the flower in your hand and begin to twist it.
- Fix the middle with a drop of glue, also attach a small circle to this solution to the back of the flower so that the structure does not unwind.
- Glue these blanks to the cardboard numbers, placing them rarely or often.
- For this, you need to cut out only one blank from cardboard, then decorate it. To do this, cut the paper into strips 5–6 cm wide, glue the edges of the number with them in order to decorate the front and back sides at the same time.
- Now we begin to twist flowers from these strips. Fold the edge of the paper about 2 cm here to create a bulky edge.
- Bend the corner, make a turn, then bend the workpiece, make a turn again, bend the flower again, and so on.

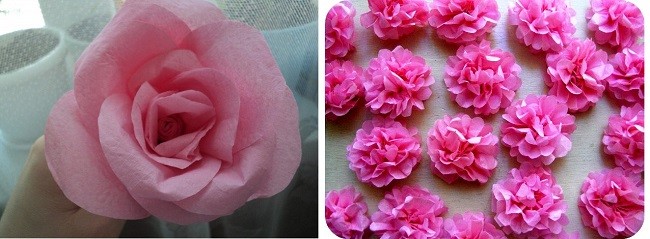
See how to make paper roses, a master class will help you with this. Such a flower can be made not only to decorate voluminous figures, it is also suitable for other occasions. But then you will need to additionally create a stem.
To make roses out of corrugated paper take:
- a sheet of cardboard;
- pencil;
- ruler;
- scissors;
- corrugated paper;
- a toothpick;
- glue stick.
Then attach this cardboard assistant on top of the folded sheets of corrugated paper, cut along the contours.

Straighten the resulting part, starting from the left edge, screw it onto a toothpick with a cut sharp end. In this case, a wire is used for this, take this idea into service when you make a flower from paper with a stem. Tie with thread at the bottom.
When making a blank from corrugated paper, twist the inner petals tightly, and the outer ones more loosely.
Having made several such blanks, decorate the cardboard numbers with flowers.

The master class will also help you to make other roses from corrugated paper.
- Cut a strip 6 cm wide from the paper. Fold it in an accordion manner.
- Use scissors to make the top edge rounded. Expand this detail. Start rolling it so that the wavy edges are on top.
- Tie a thread around the bottom of the rose.
- To make the petals look more picturesque, wind each one with a toothpick.

To do openwork flower, take:
- corrugated paper;
- scissors;
- threads.

Thus, arrange the entire edge of the strip, such tucks are similar to those you make on dumplings, holding their sides together.

Now twist this ribbon, giving it the shape of a blossoming bud. Tie with thread to secure.

Here is another option, it is very simple to implement.
If you want the corrugated paper flower to have a double color, then cut a strip of white, and the second, which will be wider, from a tape of a darker color.
Place two strips one on top of the other so that the narrow one is on top. Roll them in accordion widths. Take this prepared canvas, starting at a narrow edge, and twist it into a flower shape.

The next idea will require the following materials and accessories:
- corrugated paper;
- cardboard;
- compass;
- scissors;
- glue.
- Cut off paper strip fold across several times to immediately cut a certain number of identical petals.
- Draw a circle on the cardboard, cut it out. Step back a little from the edge of this workpiece, glue the petals, placing each subsequent one on the edge of the previous one.
- Having completed the first outer row in this way, make the second inner one, if you want, then close the middle of the flower with petals.

The last master class in this series will tell you how to make the number 1 using colored paper.
- You already know how to make a template. Now cover the cardboard with colored paper. You need to cut strips of paper, their width will be equal to the radius of the flower.
- Fold the first strip of paper, starting at the small edge, in an accordion manner. Now put some glue on this edge, attach the second small edge to it to turn the strip into a circle.
- Close its core with a small circle made of the same or another colored paper.
- You can make large and small flowers, arrange them on the number as in the photo.

It's time to switch to a different type of material, maybe you are just now thinking how to make number 2 using yarn?
Knitting threads for decorating letters and numbers
They are used to decorate volumetric figures. You can use one or more yarn colors. For such a decoration you just need:
- preparation of a figure from cardboard;
- threads;
- PVA glue;
- brush.

When you're done with yarn of the same color, glue the loose tip to the cardboard. Next, attach the end of the thread of the second ball. Decorate the volumetric figure in a different color. When the number is completely covered with yarn, you can admire the excellent results of your work.

In skillful hands, knitting threads will quickly turn into. You can make them with a fork, a semicircle made of cardboard or in another way.
Step by step photos will also help you make thread pom poms.

- As you can see, you first need to cut two identical rings out of cardboard. Put the thread inside.
- The yarn from the ball is wound around the rings, gradually filling them. Then cut along the outer circle, passing the scissors between the two cardboard blanks.
- Pull the string and the fluffy pompom is ready.
- Thus, make several different sizes using different yarns.

Decoration of volumetric letters and numbers with ribbons
This material will also help solve the question of how to make volumetric figures.

To format the number 2 in this way, take:
- red satin ribbon;
- white beads of various diameters;
- glue;
- scissors.
A glue gun will help fix the beads of different diameters. They can be sewn to fabric ribbons, but this work is more painstaking.
To implement the second variation, you need:
- braid of the same width, but different colors;
- scissors;
- glue.

If you have enough free time, you have patience, then you can make, decorate with them the entire figure or only individual fragments.

If you want, use the already known master class to make such flowers or make them according to a different principle.

As you can see, you need to periodically bend the corners of the tape, fix them with a basting seam. When it's done this way, twist it up to give it a rose look. Secure the workpiece with a thread and a needle.
The zigzag braid is the ready-made base of the flower. It is enough to collect it on a thread, pull it, shape it into a circle, fix it with a thread.

You can make more than one circular row of such turns, but several. Each subsequent one will be slightly smaller than the previous one in diameter. Sew a button in the center and you can sew or glue the flower onto the number.

It can be not only flat, but also voluminous. To do this, you will need the same wavy braid. Cut two strips from it. Match them, as it was done in the photo, sew along to connect. Now you will twist this ribbon so that it turns into a round flower. How to combine these two stripes can be seen in the next photo.

Do-it-yourself roses and other flowers from napkins
For the next master class, you will need:
- napkins;
- circle pattern;
- stapler;
- scissors.
Lay several napkins, without unfolding, one on top of the other. Place a circle on top. Cut out your napkins using this pattern.

In the center, these blanks need to be fixed with a stapler. Lift the first layer, roll it up in the form of an inner still unblown rosebud. The second row of petals will be looser. Thus, decorate the entire rose.
Here's another idea. You need to take 8 napkins or papyrus paper, roll up like an accordion. For this method, thicker multi-layer napkins are suitable. You should have a solid rectangle. Cut off the ends to make them rounded. Now start straightening the blanks folded with an accordion, making them in the form of a flower.

To make the number 1, you need to glue these roses over the entire surface. See how beautiful flowers of different sizes and colors look.

- will also allow you to create blanks for the design of numbers. To do this, you need to cut the paper into squares, put a pencil in the center of each, twirl.
- Without removing this square from the pencil, attach the blank to the cardboard base of the number, having previously greased this area with glue.
- The trims must be glued close to each other in order to create the effect of a single volumetric surface. It will also be appropriate here to combine different paper colors.

You can use plasticine instead of glue. It is necessary to lubricate the surface of the cardboard blank with it or roll it out of plasticine small ball, and wrap each end face with a half of a toothpick, insert such blanks into plasticine balls. Then, attach to the cardboard base.
If you plan to hang the number on the wall, then you can make it out of polystyrene foam. In this case, the trims are attached to a toothpick, then stuck into the foam. If a sheet of this material is not very thin, then you can make volumetric figures and put them. They are more durable than thin foam.
How to make 3D letters?
You will create them according to the same principle. To do this, you need:
- cardboard;
- pencil;
- scissors;
- paper towel tube;
- White paper;
- hot melt glue.

Decide how wide the letter will be. Cut the rings from the paper towel tube this wide.

Stick them on one half of the letter, then glue the other on top, pressing it down a little.

Cut sheets of white paper into strips, glue them over the sides of the letter, and then all of it.

You can paint such a letter acrylic paint or glue flowers from paper or napkins, or decorate them satin ribbons or thread. See how to make letters on cardboard, declaring them in cloth. You already know how to make a dense base. Glue strips of fabric on it with PVA, and lace tape on the outer corners.

From these letters you can add a word to arrange a photo session on your wedding day.

If you are celebrating the anniversary of this event, then place one or two numbers next to the letters indicating how many years of marriage you are celebrating.
You can paste over the letters with paper or wallpaper that was left over from the repair.

An original, at the same time touching decor will be the design of such a letter with family photographs.

If the birthday boy loves the forest or you want to decorate a room on this topic, then glue birch bark and moss or maple leaves onto the base.
Today, three-dimensional letters folded into words and sentences are often used in photo shoots, wedding decoration and home interior decoration. You can make such a decoration yourself, and the basis can be fabric, foam, and even ordinary paper napkins.
Below are the most interesting ideas with photographs and instructions for making handicrafts on the topic “Letters”. Choose the option that suits you and get started.

Made of cardboard
The simplest master class on how to make a letter craft is to make a volumetric composition from cardboard. This option is suitable even for small children, it does not take much time, and basic materials can be easily found in every home.

The instruction is as follows:
- Draw a letter on a sheet of cardboard, remembering to leave an allowance in the desired thickness along the straight edges, cut it out.
- Attach the blank on a new sheet and make a second copy.
- Cut the strips from the remaining material and glue the circles.
- Stick the mugs on one of the bases.
- Glue the blanks together.

Styrofoam
Having a sufficient amount of foam, you can make large and small letters with your own hands on its basis.
- Having decided on the size and shape of the future product, we start working with airy material:
- We make a piece of paper or print it from the Internet.
- We circle the stencil with a marker on a piece of styrofoam.
- Cut with a sharp knife.
- We sand all the edges with sandpaper.


From fabric
A similar principle for the manufacture of letters from fabric: it is necessary to circle the pattern with chalk on the seamy side of the material, provide for allowances for the seams, sew, remembering to leave a few centimeters unstitched.


From paper napkins
To obtain interesting craft on the topic of alphabetic letters, you can experiment with paper napkins:
- Choose a suitable color.
- Collect a napkin into a lush and tight flower: twist and pull off the tip with a thread.
- Make the required number of buds, depending on the required size.
- Glue the flowers together securely.

The main thing is to first outline the boundaries of the future craft on a sheet of paper and glue the buds, focusing on the sample. It is also important to ensure that the flowers are dense, keep their shape, for which you can use several napkins at once.

Made of wood
Those who know how to work with wood will like the volumetric letter made of wood. You can make such a decoration from a solid mass, but in the absence of special tools, you can go the other way:
- Gather up thin branches, wash and dry.
- Collect letters from them, depending on the desired thickness, varying the number of rods.
- Fix the twigs with a rope.
- Trim or break off excess edges.
- Cover with varnish.

Salted dough
For children's creativity, a craft in the form of a living letter, made with your own hands from salt dough, is more suitable. True, the final product will be small and heavy, but it provides tremendous opportunities for experimentation and motor development.


An approximate algorithm looks like this:
- Dilute the dough: stir three quarters of a glass of salt with a glass of flour, five tablespoons vegetable oil and small amount warm water.
- Blind the letter by gently leveling the surfaces.
- Allow the product to dry.

How to decorate
Volumetric letters-crafts from any materials at hand need decoration. You can decorate the base in many ways:
- Paste over with beads, beads, rhinestones, as well as bows, flowers, applique.
- Cover with cloth or gift paper.
- Wrap with satin ribbons.
- Paint or pattern.
- Supplement with a luminous garland.
- Spray with sparkles from a special spray can.

The nature of the jewelry is selected taking into account colors and the style of the event or venue, the materials available and your own skills.


The basis should also be taken into account, for example, natural materials, figures of animals and insects are more suitable for decorating wood, beads and rhinestones are more suitable for fabric blanks, paper and appliqués for cardboard, and varnish with sparkles is enough for structures with paper napkins.

To make the product beautiful, even and harmonious, it is recommended to pay attention to the following points:
- It will be useful to study the photos of handicrafts in the form of letters available on the network in order to pick up the best way and have a sample handy.
- Not knowing how to use a compass and a ruler, it is better to print the finished stencil.
- If it is planned that the letters should stand, you should take care of a wide and stable base in advance.
- Do not overuse colors: three shades in the entire composition are enough.
- Illuminated letters are installed next to the outlet.


Having figured out how to make 3D letters, you can not only help your child excel at school in a craft competition and have a good time, but also make an unusual photo zone, decorate your home interior with an interesting accessory, or prepare a personalized gift for your friend.

In any case, the above tips, instructions and ideas will help you determine the materials and the sequence of actions in order to immediately create the perfect product.

Photo of craft letters


Increasingly, you can see unusual decorative elements in the interior - letters or whole inscriptions from them. Naturally, many construction and design firms immediately took up this idea and started producing such jewelry. But those decorative accessories that are made on their own are considered more interesting, valuable and significant, and it is not so difficult to make them.
Naturally, it is impossible to make jewelry out of metal or plastic without equipment, but there are many materials that are quite affordable and easy to process. From what and how to make a volumetric letter with your own hands, so that it is unique and inimitable, which means that it favorably distinguishes your home, we will tell you below.
Textile
The most common way to make volumetric letters with your own hands is their manufacture from fabric and filler. For those who are at least a little familiar with sewing machine or even with a thread and a needle, it won't be much of a problem to make soft letters. They can be small when they are strung on a thread or fishing line for decoration and words are formed, or large when used as floor pillows. But the most popular size for such products is considered to be the average size, like ordinary cushions.

To make volumetric letters from textiles with your own hands, you need:
- choose a fabric that matches the overall style of the room,
- make a stencil of the required letters,
- transfer the stencil using cardboard to the fabric,
- cut out two blanks (note that on one side you should apply the stencil directly, and on the other - in mirror image, i.e. flipping),
- sew them in the most primitive way.
This can be done by hand or with a typewriter, depending on your sewing skills. As the letter is sewn, the free space in it is filled with scraps of fabric, foam rubber, padding polyester or cotton wool. It is worth choosing a sufficiently strong fabric and thread so as not to often repair such a letter.
You can connect the fabric with any kind of seams, leaving them outside or inside, simultaneously turning the letter inside out. You can decorate such pads in different ways: sew on buttons, lace, glue on various butterflies, pebbles or flowers. For children, you can "revive" these letters by gluing their eyes, nose, tongue, hair and marking their arms and legs with threads. Making a ready-made pillow is a complete freedom for your imagination.

Cardboard
In various ways, you can make letters out of cardboard with your own hands. This will also require a stencil with the letter of exactly the font that you would like to see on your shelf or wall. As a tip for beginners, it's best to choose a simple, classic sans-serif typeface. When this is easy to come up with, you can move on to decorative fonts or serif fonts.
After making a stencil, it is used to transfer the image onto thick thick paper, plain or corrugated cardboard. And then the manufacturing technology may differ.
The first method is somewhat simpler: to make volumetric letters from cardboard with your own hands, it is enough to wrap them with woolen or other thick threads. Then you can decorate such accessories with flowers knitted from the same threads, shells, pebbles or beads.

The second option is somewhat more complicated, but the result is not soft, but real classic letters that will adorn both classic and minimalist interiors. To do this, you also need to prepare the letter stencils and cut out two parts. If the letters have holes, cut them with a clerical knife and then cut them out with scissors. For the edge of the product, you need to cut a strip of cardboard, which should be three to four centimeters thicker than the thickness of the product. Using the pen, where the ink ran out, we push through the fold lines with which the parts will be connected. Next, you need to bend the cardboard along these lines. Then one piece is glued to the edge of the product (in order to glue it more conveniently, in the part of the letter where the lines are smooth, the fold of the edge should often be cut with scissors). After connecting the first part of the letter to the edge, the second part is glued in the same way. The entire product is put under a press for a while (a couple of hours is quite enough).
After making a letter from cardboard with your own hands, you need to decorate it. You can paste over the cardboard on top with white paper - such a letter will fit into a minimalist design. Or you can make the letter brighter: sprinkle sparkles over a layer of glue, use beads, shells, bows, gift ribbons, wrapping paper, etc. To make the letter fit a certain style of the interior or to individual pieces of furniture, you can paint it yourself.

It is in this way that the letters used in the holidays are created. At anniversaries it can be numbers, at weddings - the names of the newlyweds or individual words "Love", "Happiness", etc.
The third way, how to make any shapes, including letters or numbers, using cardboard and paper, is the papier-mâché technique. To do this, you first need to draw a word or letter in duplicate, and then fasten them together so that they are at an equal distance from each other. Some craftsmen fill this space with paper cups, gluing the top and bottom of each cup, and thereby holding the two pieces together. You can use cartons of the same length for gluing parts. On top of this, the product is pasted over with cut pieces of paper or newspapers, as is usually done using the papier-mâché technique. The finished part can be decorated with painting, applique or decoupage technique. Such unusual decorations as pasta in the form of shells or stars will look original.

Tree
Another popular material for creating letters and inscriptions is wood. DIY wooden letters can be made from blocks of wood or plywood, which is much easier. True, the letters made of plywood will turn out to be flat, but with the help of decorations, for example, natural material(cones, acorns, etc.), it is easy to give them extra volume.
To make wooden letters with your own hands, you also need a stencil. It is transferred to plywood and then cut out with a jigsaw. After the product is ready, it is worth treating it with sandpaper so that there are no irregularities and splinters. Such letters are usually painted first and then decorated with any materials. After finishing work, it is better to varnish the product so that the tree is protected from moisture.

Styrofoam
If you have enough material, you can make letters from foam with your own hands. Styrofoam can be bought in the store in sheets or you can find boxes from household appliances, where there is often quite a lot of it. The technology for making beech from it is the same as for wooden letters: first, using a stencil, the image is transferred to a sheet of foam, then the product is cut out with a jigsaw (you can use a construction knife), and then it is carefully processed with fine sandpaper so that there are no defects, and the surface is perfectly flat.
When decorating foam letters with your own hands, usually first two layers of paint are applied to all surfaces of the product, and then light decorations are used: lace, tulle trimmings, burlap, threads, etc. For decoration, letters from polystyrene, you can make small flowers with your own hands, ladybirds, butterflies or other accessories, but do not glue them on the glue-moment. It can corrode styrofoam. It is better to use rubber glue - it is safe for the product.

Wine corks
Another option, how to make a volumetric letter with your own hands, is considered to be a product made of wine corks. V modern world Nothing surprises anymore, but using so-called waste to create interesting things is a great idea. The plugs can be glued together with regular or super glue. You can change the direction of the plugs by gluing them first with edges and then directly. Such products are decorated with paints, applique, dried flowers and in any other way.

Gypsum
You can use plaster, creating interior volumetric letters with your own hands. It is better to work with plaster with gloves. To create letters from plaster, you need to prepare a mold into which the prepared solution will be poured. To do this, you need to draw the letters you want on cardboard, and then cut out long strips that are equal to the thickness of the product. These strips need to be glued to the cardboard along the contours of the letters so that a cavity is formed into which the gypsum is to be poured. It is advisable to glue the form inside with tape - this way it will be easier to get the part after it has solidified.
For the preparation of gypsum, all the recommendations on the package are strictly followed. Usually, it should be like yogurt in consistency. First, the mold is half-filled with mortar. Then a layer of burlap is laid on top for the strength of the future product. Then the product is poured to the end, i.e. to the top of the form.
Usually, gypsum hardens completely after 4-5 hours. After that, you need to use a knife to get the product out of the mold. Then the surface is sanded with emery paper, corners are cut and irregularities are removed.
Usually such letters are not decorated, but are left white. But not necessarily: they can be covered with paint, also decorated with some cute little things. To prevent such jewelry from getting dirty, they should be sprayed with acrylic spray.

You can also mention the creation of interior letters from salt dough, which you can do with your children.

Some cast the letters out of wax to create chic candles. Those who are fond of modeling are quite capable of making letters from clay. There are really many options for creating unique decor elements.

By decorating such products with an LED strip or an ordinary New Year's garland, you can create a creative lamp for the bedroom, and by placing small volumetric letters made of fabric on a large canvas, you can get gorgeous panel... Show your imagination - and you will be able to decorate your home in an unusual way!