Christmas decorations from papier-mâché (crafts for the New Year). Crafts from papier-mache - Christmas trees and not only Crafts from papier-mache Christmas decorations
See what papier-mâché dolls can be made using toilet paper. From the same material you will make a piggy bank, toys, New Year's crafts.
How to make a papier-mâché piggy bank with your own hands?
You will make such a funny tiger cub if you take:
- two sheets of white paper;
- newspapers;
- plasticine;
- a small polyurethane jar;
- PVA glue;
- scissors;
- paste;
- gouache;
- stationery knife;
- thin and thick brush;
- acrylic pistachio varnish.

Prepare the paste. To do this, take a glass of cold water, pour it into a saucepan, pour 2 tsp here. starch, stir well. Put the container on the fire, stirring often, bring the liquid to a boil, remove from the stove. When the paste has cooled down, it is ready to use.
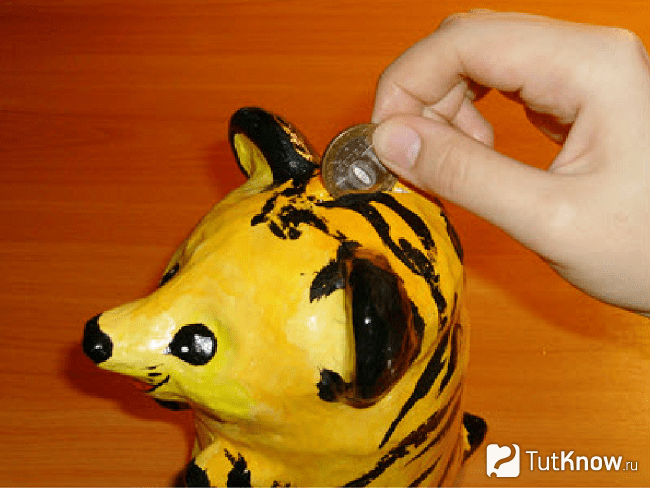
Remove the lid from the jar, turn the container over, put it on the table. Sticking around the jar with plasticine, immediately form the ears, eyes, paws, facial features of the tiger cub. Here's how to make the piggy bank go further.

Tear the newspapers into small pieces, start pasting them over the blank. Attach the first layer with water. The remaining 10 layers must be fixed by lubricating each piece of newspaper with a paste.

Leave the workpiece overnight to dry. In the morning, glue it with pieces of white paper, which must be attached with PVA glue, which will give the product strength.

Let the toy dry completely, then cut it into two halves with a clerical knife.

Remove these parts from the jar, connect them again, gluing them at the cut site with white pieces of paper smeared with PVA.

At the top, with a clerical knife, make a cut of such a size that coins of the desired denomination can be lowered into the piggy bank through this hole.

Now walk along the outer surface of the product with white gouache to prime it. When it dries, paint the product in the desired color.

Here's how to make a piggy bank out of paper and newspapers. If you want to see how to make a funny pig that is also designed to store and multiply small things, then check out the second master class.
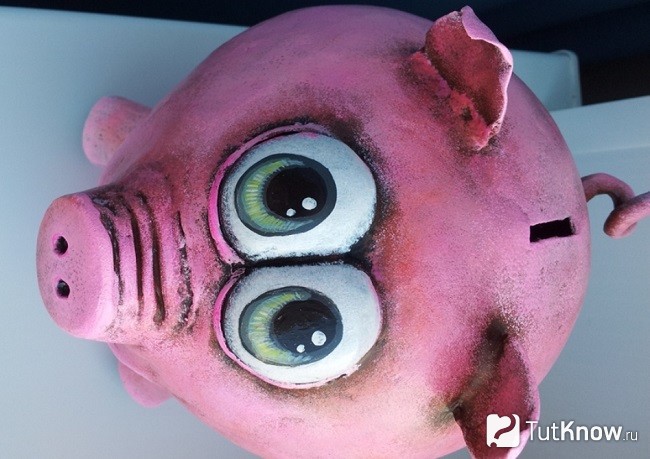
This is how touching and at the same time funny the piglet will turn out. To make it, use:
- inflatable ball;
- toilet paper;
- acrylic paints;
- building PVA;
- foil;
- newspapers;
- toothpicks;
- acrylic putty.
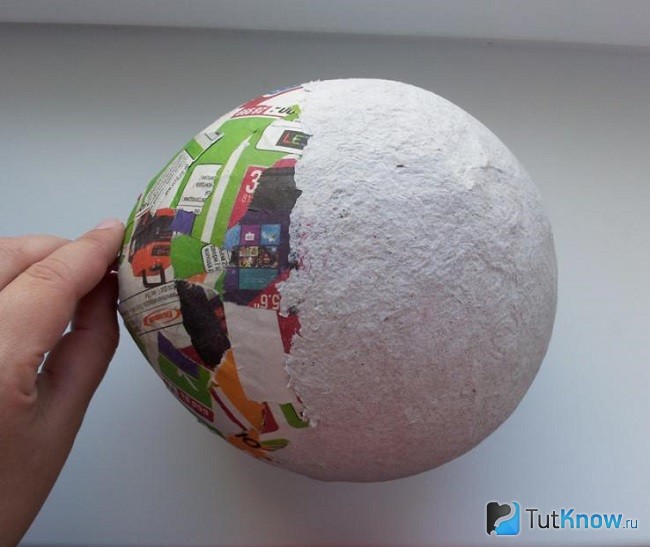
You can first moisten pieces of newspaper in water, then dip them in PVA, forming the surface of the ball, and glue torn pieces of paper here.

We make mass for papier mache, for this, rather large pieces are torn off toilet paper. Put them in a container in which you want to add PVA. After that, it remains to mix the contents well. Now, using a sponge or rubber-gloved hands, apply this mass to a ball covered with newspapers.
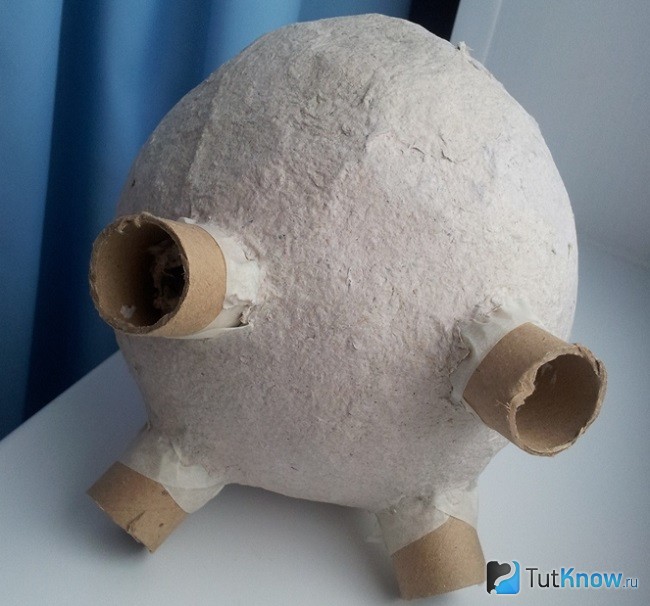
When it dries well, make a puncture with a needle. Remove the burst ball through the bottom hole. Cover the slot with two strips of masking tape that are attached crosswise. Piggy bank legs can be made from a reel left over from foil or stretch film. These cardboard tubes need to be cut with a knife into 4 parts. You can use toilet paper rolls if you like.
These blanks must be attached to the base with masking tape, and a papier-mâché mass should also be applied on top.
Make a piglet from a piece of foil, attaching it with toothpicks and tape. Paste it with toilet paper soaked in glue, form a nose.
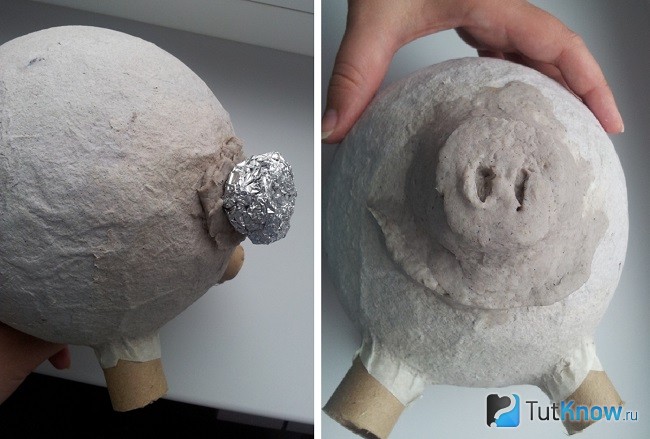
From it you will need to fashion eyes, attach them in place with glue. Ears can be made from papier-mâché or clay

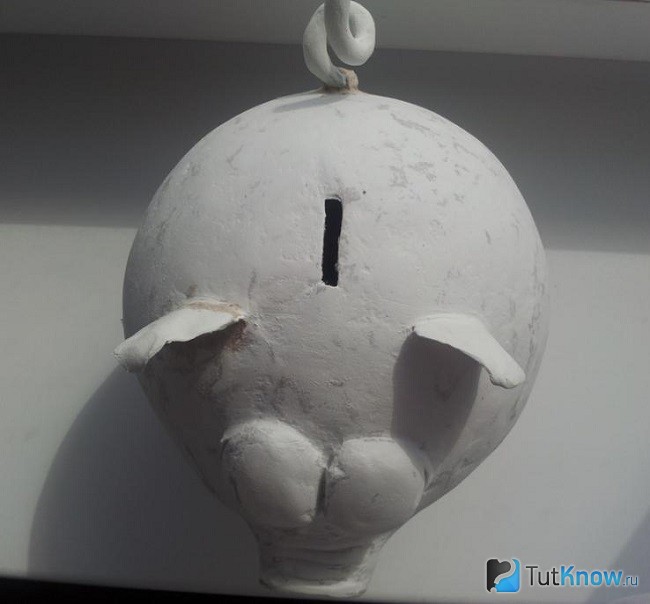
Now we need to leave the piggy bank so that the papier-mâché will dry well. Then we grind the workpiece with sandpaper, after which we apply acrylic putty on it. We are waiting for it to dry, then wipe the piggy bank with a damp cloth to level the product. We apply putty in several layers until the surface becomes even.

Use a utility knife to make a hole for the coins. We attach the tail, which must be made in advance from wire and papier-mâché.
We begin to paint the product. First we apply any dark paint, then, using a sponge, cover with red.

Next comes pink color, after it - a mixture of white and pink. The next coat of white paint, but it needs very little.
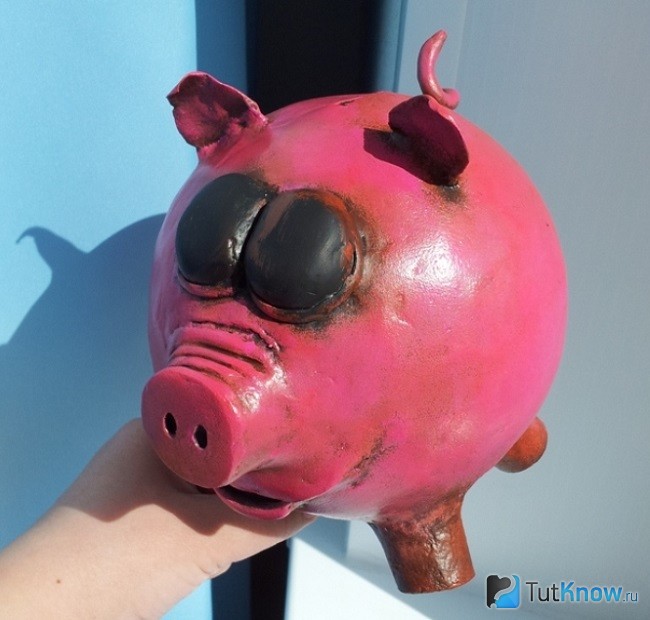
It remains to paint the eyes, after which the papier-mâché piggy bank is ready.
How to make a mass for modeling paper with your own hands?
The base is not always simply pasted over with torn newspapers; there are very interesting recipes for making mass for papier mache. Get to know one of them.
From such a mass you can mold an animal figurine, for example, a bear. Take:
- 2 rolls of the cheapest gray toilet paper;
- 3 art. l. linseed oil;
- 500 ml of universal or building PVA glue of a liquid consistency;
- 1.5 liters of water;
- gauze;
- large bowls;
- sandpaper of medium and fine fraction;
- colander;
- PVA glue.
Now you need to wring out the paper. To do this, lay gauze folded in several layers on a colander, put a little mass here, some of the water will drain. Remove the rest by lifting the edges of the gauze, squeezing out the paper. Also squeeze out the rest, but do not overdry, leave some water.
Put all this paper in a large bowl, then add construction glue to it. Stir the mass. This will be easier to do if you mix the paper and glue in small batches.
Add linseed oil, stir. It will allow the mass to become more plastic. Now you can sculpt from papier-mâché or put this mass into molds to make toy parts. You will glue with the help of PVA, which is called "Moment joiner".
When papier-mâché blanks are completely dry for several days, they will need to be sanded with medium, then fine sandpaper.

The finished product is primed and then painted.
Master class: do-it-yourself Baba Yaga's hut
It can also be made from the mass, the recipe of which you just learned or use another. This is how the house of this fairy-tale character will turn out.

But for this you need to work hard, but first prepare:
- a bottle of suitable size and shape;
- napkins;
- stack;
- PVA glue;
- ruler;
- pencil;
- mass for papier-mâché.

Starting from the bottom, the mass for papier-mâché is glued in strips. Decorate two sides at once, forming circles in the form of slices of logs.

With the help of a stack, make stripes on the door, logs, so that they convey the texture of the tree.

Make smaller details of the door.

Let the house dry for a day.
Blind from the mass for papier-mâché a window, shutters. Using a stack, decorate them with carvings. We begin to make an attic, in the photo it is pink.

Such elements need to be made above the window and above the door, then we make out the roof.

Having made a row on one side and on the other, leave to dry, only after that make one more tier.

Then work the third row and pipe.

Use the stack to make a brick pattern here, then give these elements a roundness.

There will be another row at the top of the pipe. Then we decorate the wall with fly agarics from polymer clay.

Leave the house to dry completely. After that, you need to paint it.

Baba Yaga's hut is ready.
DIY papier-mâché dolls
I can’t even believe that such wonderful works of art can be created from toilet paper.

To make such a Snow Maiden, take:
- an empty glass bottle in the shape of a trapezoid;
- copper wire;
- pliers;
- mass for papier mache from toilet paper;
- rubber glue;
- polymer clay;
- cotton wool;
- elastic bandage or well-stretched fabric;
- scissors;
- paints;
- fabric for clothes;
- satin ribbon for hair;
- rhinestones for decoration.

Cut a piece from the wire with pliers, wrap it around the neck to make papier-mâché doll handles.

Wetting the elastic bandage with rubber glue, wrap the workpiece with it.

Now grease this bandage on top with PVA glue, attach papier-mâché here, forming the chest and back of the doll.

From the same mass, make a head for her.
To use less papier-mâché, first you can wrap the top wire with foil, then cover it with this mass, forming facial features, ears.
Leave the workpiece to dry completely, then sand it, apply putty. After the one dries, it also needs to be processed with sandpaper.

To make hands, moisten cotton wool with an aqueous solution of PVA glue, apply it to the wire. Wrap the moistened glue with an elastic bandage or a strip of cloth. Make brushes from polymer clay. Paint the doll using skin color, mark the eyes, eyebrows, lips with the appropriate shades.

Sew a petticoat and dress for the doll, made of cardboard. Unraveling the satin ribbon Brown, you will get such luxurious shiny hair. It will take a lot of time to make such a papier-mâché doll, but the materials will cost a little, and what a luxurious result awaits you!

If you want to get acquainted with another sample, then watch the second master class in this section.

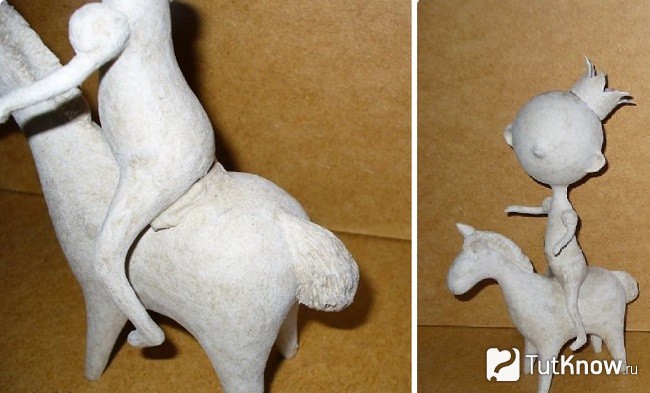
Here is such a wonderful doll on a horse you will succeed. To make this duet you will need:
- toilet paper;
- wire;
- cardboard;
- Styrofoam;
- strong thick thread;
- newspapers;
- foil;
- acrylic paints;
- foam ball.

Give the doll the desired shape by overlaying with a mass of papier-mâché.

We make a horse. Bend the wire, as in the photo, wrap it with foil.

Coat this blank with papier-mâché paste.

When it dries well, stick two pieces of wire into it to make the legs of the animal.

Cover upper part blanks with wet papier-mâché. Let the horse dry well. Now we need to add volume to both blanks, for this we also use papier mache, including to make the ears and nose of the prince. And we make the ears of the horse from cardboard, cutting out the details of the appropriate shape. Sand the blanks.

Cut off excess wire on the legs of the animal, add a mane, tail, and muscles to the prince. Cut out a strip with zigzag edges from cardboard, glue it with newspapers, fold it into a crown. Coat papier-mâché.

After finishing grouting with sandpaper, the doll will look like this.

Glue the crown using papier mache. With the same mass we connect two heroes.
For the platform, a piece of foam is used, which must be pasted over with newspapers.

Cut out the wheels from cardboard using coins as a template. Also cover them with newspapers and papier mache.

Apply the same mass on top in 4 places of the cart to attach the horse.

Sand the blanks, then paint them.
Let's create them using the same papier-mâché technique. If you want such funny hedgehogs to show off on the Christmas tree, then proceed to creative work right now.

To create them, you will also need such materials that you do not need to buy - the savings are obvious. Take:
- two toilet paper rolls;
- cones;
- mass for papier mache;
- cotton pads;
- paints;
- plasticine;
- glue Titanium;
- two wooden skewers;
- brush;
- sequins.

Disassemble the cones into scales, glue them on one side of the roll, as well as on the sides. Form the rows, starting from the bottom, placing the elements of subsequent rows in a checkerboard pattern. Use titanium glue for this.

At the beginning of the article, you read how to make papier mache mass from toilet paper. You can use other similar materials, such as paper towels. In this master class, napkins were taken for this yellow color their color doesn't matter. Form the body and nose of a hedgehog from such a mass.

Let it dry, make the front legs, attach them to the tummy, using the same mass. Here are some interesting crafts on the New Year 2017 are obtained. But for now, we need to let our hedgehogs dry well, then cover the arms and tummy beige and then brown. We paint the spines of animals in the reverse order - first we use a brown tone, then beige or white. Then the hedgehog's coat will be as if powdered with snow.

Make eyes, eyebrows, mouth, nose out of plasticine, fashion a mushroom, attach it between the handles of the animal.

If you want, you can make lower paws for an animal from plasticine or plastic, placing them at the ends of the laces, the middle of which is threaded through the upper hole. You can attach a bell so that when the hedgehog moves, it makes interesting sounds.

These are the most wonderful crafts for the New Year you will get.

Make them with your kids. If it is difficult for children to do this, then tell them interesting idea creating papier-mâché cakes, which they will gladly bring to life. Let the child make such dolls and toys as a New Year's treat.
To do this, put next to it:
- foil;
- cardboard;
- two bowls;
- not a food spoon;
- newspapers;
- paper towels or a rag to dry your hands.
Cover the table with newspapers in advance, cover it with plastic wrap. Then the child will not stain the work surface.
Let him tear or cut the newspapers into small pieces, put them in a separate container. In another, you need to pour a paste. It is prepared as follows: pour a glass of water into the pan, add 2 tsp. flour or starch, mix. Put on fire, bring to a boil with vigorous stirring. Let the paste cool, pour it into a bowl.
Have your child roll the foil into balls.

From a sheet of cardboard you need to make a box. Look at the diagram on how to cut its sidewalls, fold them, gluing them.

Everything is ready, it's time to start making crafts for the New Year with your own hands, the photo will show how to make it.

Everything you need is on the table. Let the child dip the lumps in foil in a paste, then attach pieces of paper here.

Then you need to leave the craft for a few days so that the glue dries well. If this is not done, the work may begin to mold.
When the cakes dry well, let the child give free rein to imagination. Using paints, small red pompoms, finely chopped colored pieces of paper, he will make such a festive treat for dolls.

When the paint dries, it's time to arrange these cakes to decorate the table of toys.
In the same technique, you can make other children's crafts for the New Year. With their own hands, they will build blanks from foil, which must be pasted over with pieces of newspaper. This process has just been described. To attach the toy to the Christmas tree, at this stage you need to tie a carpet ring with a cord or rope, as is done in the photo tip.

This is followed by another 2-3 layers of papier mache from newspapers, after which Christmas decorations need to colorize.

Now you can make dolls from papier-mache, New Year's toys from the same material, a piggy bank. We offer you to get acquainted with the process of making an apple. It turns out so realistic that you should immediately warn both guests and family that the fruit is not edible.
If you want to see how to make mass for papier mache, then watch the second plot.
Absolutely any form. On the eve of the upcoming New Year, we propose to make with children using the papier-mâché technique by layering the Snow Maiden and the Fire Monkey - a symbol of the upcoming 2016.
For work you will need:
Any paper (from toilet paper and newspaper to notebook and album sheets);
Paste (wallpaper glue or PVA);
Glue brush;
Paint brushes;
Modeling board or oilcloth;
Vegetable oil;
Scissors for labor;
Stationery knife;
Braid;
Varnish.
Progress
1. To perform work on this technology, a form is required. Since the Snow Maiden and the Monkey were supposed to be made in the form of painted nesting dolls, a bottle from under liquid soap. The bottle turned out to be an excellent "torso", but the head had to be molded from plasticine.

2. Cooked a paste. The proportions are visible in the photo: a tablespoon of sifted flour per glass of water.
Tip: the paste is a perishable product, so you need to store it in the refrigerator between work.
3. The finished form was smeared vegetable oil(you can use Vaseline) so that the paper does not stick to it.


Otherwise, at the end of the work, it will be very difficult to remove the papier-mâché blank from the mold.
4. Three layers of paper soaked in glue were laid on top of the mold in layers. The layers are dry. Again, several layers were applied. Dried out again. The procedure was performed several times. The more layers of paper, the harder the finished craft will be. By the way, children like to stack layers of paper - doing something comparable to picking up puzzles.
5. Cut the paper blank in half, trying not to cut through the shape, and removed it from the base.


6. We prepared a braid for which the toy will be attached to the Christmas tree. To do this, 20 - 25 cm of ribbon, cord or braid were folded in half, the ends were tied with a strong knot.
7. We connected the halves by inserting a loop of braid into the upper part of the toy blank, while the loop itself should remain outside, and the knot inside the craft.


Pasted over the toy in one layer of paper with glue.
8. We made a paper bottom for the toy. The move is a departure from the traditional papier-mâché technique, and was taken because the toy was originally planned to be made without a bottom.


9. We applied several more layers of paper with glue (the top layer is recommended to be made of clean white paper). Dried up.

Tip: if you want to achieve the most even surface, sand the dried papier-mâché blank with sandpaper, removing all creases and bumps. To obtain a smooth surface, putty can also be used, followed by grinding.
10. The papier-mâché blank was primed.
11. Put on the figure the drawing you like, painting.

With the approach new year holidays I want to add a little fabulousness and magic to my life. To diversify the preparation for the New Year and Christmas, surprise loved ones, and at the same time create a magical atmosphere in the house, you can create New Year's papier-mâché products.
The first unusual works of this technique appeared in Ancient China, and it was used in the production of protective headgear. Soon the French began to use it in their country for the manufacture of decor and even furniture, where the name "Papier-mâché" originated. Translated from French, the technique of making objects is translated as “crumpled paper”.

DIY crafts look very original, especially old ones. In addition, they are quite simple, and even children can cope with their manufacture. The papier-mâché technique is as follows: a certain form is taken as a basis, on which torn paper must be applied in layers. The paper is superimposed in such a way that each piece is found on the previous one. Each layer of the figure must be carefully smeared with glue, and the paper should be carefully smoothed so that there are no wrinkles. To create crafts, as well as strengthen its strength, you must make at least 5 layers. At the end of the work process, the product must be dried well.
Hanging figurines for the New Year, such as Christmas toys, New Year's or Carnival mask and other handmade products will amaze both children and adults.
Christmas toys and papier-mache crafts are especially original, and a New Year tree with such decorations pleases with its originality. Under green beauty you can put a molded Santa Claus, a New Year's house, a symbol of the new year and other figures on a winter theme.
Master class on working with papier-mâché (video)
Papier-mâché Christmas decorations: a fun decoration
What could be more interesting than receiving gifts? Of course, cook them! It's even nicer when souvenirs and Christmas decorations made by hand.
To make original or vintage toys for a papier-mâché Christmas tree, you will need:
- A mass of several rolls of toilet paper;
- Workflow surface;
- Paint with brushes;
- Forms;
- Sandpaper.

The main material for crafts is paper pulp, made from toilet paper, glue and glycerin. If it is available, you can start creating crafts.
The necessary mold is taken, in the role of which anything can act, and stuffed with mass. You may or may not use the form. In this case, it is necessary to squeeze the mass in the palms as much as possible for its strength. In the process of manufacturing toys, a specific shape of the intended product should be given.
An excellent option would be to create animals, cones, Christmas balls. After the modeling is over, the products need to be dried for two to three days.

To give the surface of the resulting figures smoothness, you should rub them a little with sandpaper. It is not only pleasant to touch smooth products, but also work with paints is facilitated several times in the future.
The final stage - painting the elements acrylic paints. You can invite children to coloring products - there will be no limit to delight! The resulting balls or other standard shapes can be additionally decorated with ribbons, beads and other small details. Papier-mâché Christmas decorations are finished, and the mood is already New Year's!
New Year's mask for a festive evening
A papier-mâché mask is made in a slightly different way.
To begin with, a model of the future mask is taken, covered with petroleum jelly and pasted over with pieces of paper in the following move:
- Standard papier-mâché technique;
- The first layer is covered with glue;
- Pasting with thicker paper smeared with thick glue;
- Papier-mâché technique from plain paper;
- Pasting with pieces of cotton cloth;
- Repeating the papier-mâché technique from plain paper;
- Again pasting with thicker paper;
- Pasting with white thick paper or white cloth
All layers must be done carefully, carefully smoothing out the folds and releasing the formed air bubbles so that the mask is even. Next, the product is well dried for more than three days.

After the mask has dried, proceed to its decor. You can cover the workpiece with any fabric, but it is best to give preference to stretch fabrics to avoid wrinkles. Slits for the eyes must be made with a small allowance for turning the edges inward. On the inside, the mask should also be pasted over with cotton fabric. The last stage of making crafts is the most interesting.
The finished mask is decorated based on fantasy. You can use anything: beads, feathers, sequins, braid and more. A handmade mask is highly valued at any holiday.
Cotton papier-mâché and its simplicity
How can you do without Santa Claus in the New Year? And if the character is made by hand, then the feeling of a holiday is exceeded several times.
To create a hero from cotton wool and papier-mâché, you need wire or plastic bottle, which will be used for the frame of the product, cotton wool, threads and PVA glue. You can mix flour or starch paste with your own hands, but work is simplified with glue.

To begin with, a wire is taken and twisted in the form of a human silhouette, on which dry cotton wool will be molded in layers. After applying several layers, the cotton wool on the frame must be fixed with threads. Now the main stage of work begins. On the frame of the craft, it is necessary to stick cotton layers. To do this, thinly divide the cotton wool, soak it well with glue and apply it to the figure. To make the surface smooth, you can glue the figure with thin paper. After the formation of the silhouette of Santa Claus, it is necessary to start sculpting his face and other small details. The modeling of the New Year's guest is completed!
The time for drying the figure is calculated based on its size, but not less than 3 days. The last stage is the New Year's coloring of the product with acrylic or other paints.
How to make papier-mâché crafts beautiful?

To do this, you need to know little tricks.:
- Do not dry the figures on a radiator or other heaters to avoid cracks;
- You can give the product perfect evenness and smoothness with sandpaper or additional layers of glue;
- To preserve the durability of the craft at the end of the work, it is required to coat it with varnish;
- To give strength to the product will help cotton fabric, well impregnated with an adhesive solution.
How to make a papier-mâché toy with your own hands (video)
Not everyone can do papier-mâché technique. To work with your own hands, you should have such features as patience and perseverance. And for craftswomen who cannot imagine themselves without their favorite work, and the skills of the workflow for the manufacture of original products have long been honed, crafts can bring good earnings.
Examples of New Year's papier-mache toys (photo)


Olesya Loginova

Hello, Dear friends and colleagues! I present to your attention master class on making papier Christmas decorations-mache on Christmas tree, decorated with decoupage.
We'll need:
dry pool balls;
(about 1.5x1.5cm) newsprint;
torn into small pieces (about 1.5x1.5cm) plain white paper;
PVA glue;
art acrylic primer white (you can water-based paint);
foam sponges;
patterned napkins (which you want to place on toy) ;
acrylic paints;
beautiful string or ribbon toy;
double sided tape
So let's get started. 1. To begin with, we glue our ball with a newspaper dipped in water. This is done so that later we can easily remove our ball from toys.


2. We make the next layer from white paper, but we already coat it with PVA glue.


3. All subsequent layers are coated with glue, but alternate a layer of newspaper with a layer of white paper. Glue five layers and let dry.


4. After the ball is good dried up, cut it in half.

5. We glue the two parts along the seam, using the same white scraps of paper and PVA glue. At the same time, we go through the entire ball to make a beautiful snow ball. Let's dry.

6. Using double-sided tape, we attach our ribbon. The result is this, not yet decorated, Christmas tree decoration. Next, we proceed to decorating our toy. To do this, we need to go through our ball with artistic acrylic primer or water-based paint with a sponge. Dries in 20 minutes.

7. Then out paper napkin select the element that we want to place on our toys and cut him off at the office. We put our drawing on the ball and coat it with glue on top.


8. Final stage. Add acrylic colored paint to the remaining primer or water-based emulsion to obtain a finishing layer.


And here's what we got.


Related publications:
Master class: Do-it-yourself fruits made using papier-mâché technique. Purpose: Formation of skills and abilities in the design of products in.
Hello dear guests of my page! I bring to your attention a master class on making mushrooms using the papier-mâché technique.
Purpose: to involve children through theatrical activity to the folklore genre-fairy tale. Tasks: -to form children's ideas about the heroes of a fairy tale.
Master class "Manufacturing Easter eggs from papier mache" Shirokova E. G., preschool teacher « Kindergarten No. 329, Yekaterinburg, Sverdlovsk.
The material is designed for music directors and teachers of preschool educational institutions. Purpose: making an attribute, for holding a surprise moment.
Before the day of cosmonautics, we were given a task - from each group, a model of the planet to decorate the hall for the holiday. I chose Zelma. Generally, for now.