How to make a paper airplane diagram. How to make an airplane out of paper, an airplane, a fighter or a three-dimensional model. Step-by-step photo of a flying paper airplane model
In childhood, everyone was fond of throwing a paper airplane to each other. Many adults remember such entertainment only with the advent of children, when the basic skills for collecting complex origami crafts are already lost. To please and occupy your child for a while, learn how to make a paper airplane according to a simple pattern, teach crafts to fly, what you need to fold the model.
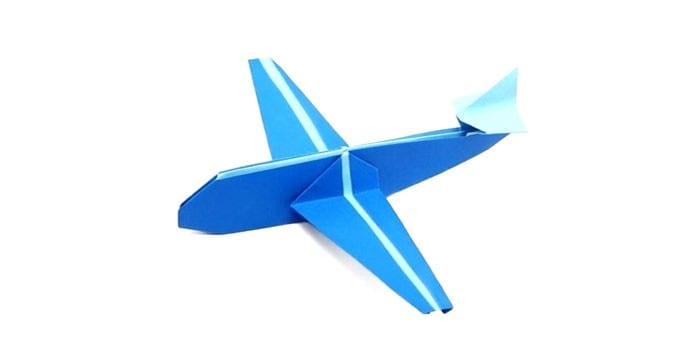
How to make paper airplanes
The art of aerogami has been around for over 50 years. During this time, craftsmen were able to come up with and skillfully bring to life hundreds of different models paper planes. Some of them fly for a short time and only along one trajectory, but there are those that are able to cover long distances. Modern designs of the boomerang or the unusual Glider appeared.
How to glue a paper plane
A thick A4 sheet, a ruler, glue, scissors and possibly felt-tip pens - this is all you need to glue a paper plane with your own hands. It will be good if you find a ready-made drawing on the Internet in advance and simply print the drawing. If the photo shows dotted line- this is the place of the fold. The arrows on the sketch indicate the turn of the paper in a certain direction, and the straight lines indicate the place of the cut.
origami planes
It will be easier for beginners to assemble a glider model from common materials: A4 sheets, thin paper, notebook sheets or newspaper clippings. The main requirement for the material is that it should resemble a square or rectangle in shape. To make an origami plane, you just need to follow clear instructions. There is one more little trick: in order for the parts to keep their shape better, aerogami professionals recommend drawing along the fold with a ruler.
How to make a paper plane - step by step instructions
In order for the assembled model to keep its shape well and not fall apart from touch, you need to take a few tips into service:
- It is optimal to use sheets of small size with a density of 100g/m².
- During operation, you must strictly follow the instructions, iron the bends well and fold the material according to the scheme.
- To launch a paper plane, it is important that all the details are symmetrical. Especially for balance, you need to pay attention to the bow and tail.
simple airplane
When teaching aerogamy to children, it is better to start with the development of simple models. The way to make a classic layout is as follows:
- Prepare a landscape sheet. Turn it towards you with the short side.
- Fold the sheet in half and mark the middle of the sheet. The crease does not need to be smoothed out.
- Unfold the paper and fold its edges so that the corners touch the marked center line.
- Grasp the top of the sheet so that the junction of the two folded corners becomes its fold.
- Fold the top left corner in the same way. Repeat the same action with the upper right corner.
- A triangle should have formed, bend it up.
- Fold the model in half. Form the wings.
Airplane
This model is almost the same as the assembly method from the previous version, the only difference is the blunt nose. To assemble an airplane airplane, follow these instructions:
- With a sheet of thick paper, do the first 4 steps from the instructions above.
- Bend the upper left and right corner so that a straight line remains in the center, 0.8-1.5 cm long.
- Secure the part with the bottom triangle.
- Turn the model inside out along the center fold.
- Straighten all parts, set the desired angle of the wing.

Paraglider
Thanks to the wide wings, this model can soar beautifully in the air. To make an airplane out of a sheet of paper, you need to follow the tips:
- Bend and unfold the rectangular sheet lengthwise as always.
- Measure about ¼ from the top and wrap towards the center.
- Bend both corners inward so that their noses do not go beyond the intended line.
- Flip the model over and fold the folded half over.
- Bend and fold the small corners in the center.
- Bend the model along the central fold, unfold the nose and form the wings.
small plane
The dimensions of this model are small, so get ready to do painstaking work. How to make a paper airplane:
- Take any sheet of paper measuring 20 * 20 cm.
- Fold in half, iron the fold.
- Fold in half again to form a square. Mark the center.
- Fold one half of the paper onto ¼ of the sheet, make a note.
- Bend the sheet inward from the ¼ mark and to the top edge, you get a triangle. Smooth the edge.
- Turn the edge outward so that a small triangle forms at the top.
- Turn the sheet over, bend the other side of the triangle inward.
- Bend the wide end towards the pocket, a few millimeters short of the edge.
- Do the same with the other side.
- Put the fingers of one hand under the fuselage, fix the nose of the aircraft with the other. Lift the paper slightly with your hands.
- Fold the corner into a pocket. Repeat the previous two steps on the other side of the sheet.
- Fold up the side of the large pocket. Do the same on the other side.
- Open the model, bend its front edge inward.
- Turn the workpiece over, push the front part, using the corners as a guide.
- Fold the plane in half, go through the folds.
- Fold one side down along a line that is parallel to the center fold.
- Do the same on the other side.
- Fold the edge of the wing up for better aerodynamics. Straighten the model with your hands.

big plane
This model can decorate a children's room. To fold the liner, prepare cardboard, glue, scissors, a matchbox and follow the instructions:
- Cut a long strip of cardboard 2 cm wide. Fold it in half.
- Fix the edges with glue in the center of the matchbox top and bottom.
- Cut two strips of cardboard 4 cm wide. Round off the edges.
- Glue to the matchbox on the sides.
- Cut out a thin strip of cardboard and fold it in half.
- Wrap the edges of the strip up, indenting from the edge by 1 cm.
- Glue the workpiece to the tail.
square plane
Many are accustomed to seeing flying machines with a pointed nose, but not all models may look like this. Try folding the paper airplane differently:
- Unfold a piece of paper with the wide side facing you. Fold in half.
- Turn the sheet over to the other side, with the narrow side facing you. Fold in half.
- Turn the sheet to the other side. Fold the edge towards the center of the fold.
- Fold in the corners on both sides.
- Flip the paper over with the folded side facing you. Fold the edge to the center.
- Fold the plane along the center perpendicular line.
- Fold over the folded edge. Open the pocket, holding the center with your fingers.
- Expand the pocket. Bend the wings to the triangle marked in the center.
volumetric aircraft
After you have mastered simple models, you need to learn to understand more complex schemes. Below is a step-by-step instruction on how to assemble a volumetric flying plane:
- Bend the sheet lengthwise, unfold.
- Fold the paper in half. From the center, fold the edges down, and then unfold half.
- Unbend the sides from the side, tuck each lapel inward.
- Bend part of the wings back.
- Bend the wings from the bottom a short distance.
- Press the fold lines with your fingers. Bend the resulting lines parallel to the folds of the wings.
beautiful plane
You can decorate a children's room with paper crafts by collecting a whole collection of different models. To make flying machines pleasing to the eye, they can be made of colored paper or cardboard, decorated with applications - numbers, inscriptions or asterisks. Three-dimensional models of passenger liners look good on a shelf in a nursery. It will take a little more time to make them.
How to make a passenger plane out of paper
To create this model, you must download and print the Concorde airliner assembly diagram in advance. Then, to fold the passenger plane, follow the instructions:
- Make folds in the center and top corners.
- Fold the side parts to the middle, then bend their edges back along the dotted line.
- Roll up the figure front part up the center line.
- Bend the corner along line 5, smooth it out, and then return the figure to its original position.
- Repeat the same on the other side.
- Tuck the edge inside the case along the dotted line, then pulling its end back and bending along line 6.
- Bend both wings up, fix the tail with tape.
How to make a cool paper plane
There are also models of devices that are able to gently plan long time or travel long distances. They are slightly different in design from their simple counterparts. If you want the airplane to fly further, choose a model with narrow wings and a long tail. Balanced airplanes with a large wingspan are capable of long flights.
How to make a paper plane that flies
If you get bored with the basics of aircraft construction, try making a cool model with good aerodynamics:
- Make a midline and fold the corners around the edges.
- Fold the product across exactly in the center, turn it over.
- Under a slight slope, fold the corners, not reaching a little to the fold.
- Wrap the resulting angle, straighten the part bent on the other side of the aircraft.
- Fold the model along the base, form wings at the same distance.
- Make small bends of the wings along the edges.

How to make a paper plane that flies far
This design provides for the formation of additional wings in the nose of the apparatus, which will ensure the flight range. To make a paper airplane, follow the instructions:
- Mark the center line, fold the edges to it at an angle of 90 degrees.
- Turn the workpiece over, bend the corners towards the center again so that a sharp edge forms in the center.
- Raise the triangle at the back, and fold the resulting square in half.
- Mark the crease with a pencil, fill the rectangle in the middle of the pocket.
- Bend the wings at a 90 degree angle.
How to make a military plane out of paper
Boys who are fond of war games, shooting games and armored vehicles will love the idea of creating a collection of military aircraft at home. There are a lot of models of such aircraft. You can fold the Fighter, Bomber, Il-2, Messerschmitt or other equipment. To make such toys look colorful and be as similar as possible to the original, it is recommended to make them from colored paper.
Fighter
Options for making such paper toys can be found on the Internet, or you can make a paper fighter according to the following scheme:
- Take a rectangular sheet. Fold in half along the widest part.
- Bend two corners towards you.
- Bend the corners again diagonally, starting the movement of the hand from the sharp nose.
- Fold the product across so that the sharp part is in the center of the opposite side.
- Turn the paper over, fold the top edges down.
- Wrap the resulting corner on yourself.
- Bend the figure in half. Form the wings and flaps of the aircraft.

bomber aircraft
This beautiful model a little more difficult to create, but the result is worth the time spent. To make it work, follow the tips:
- Fold up upper part leaf with a double triangle.
- By analogy, bend the left corner, aligning the top of the sheet with the right side.
- Make a fold of paper that will pass through the intersection point of all the resulting lines.
- Fold the side triangles along it inward.
- Mark a center line at the bottom of the sheet.
- Mark a line that is parallel to the base of the triangle.
- Flip the paper over to the other side.
- Bend the corner towards you.
- Turn the layout over again and bend the two corners up, tucking the top half in half.
- Turn the figure over, bend the corner.
- Fold the right and left edge which is inside the layout.
- Bend the corner away from you, fold the plane along the central bend.
- Bring the edges inward, fold the figure in half, and then turn it on yourself.
long-haul aircraft
This model will be able to overcome any distance. It has good aerodynamics, is well balanced and weighs little. Long-haul aircraft do this:
- Make notes of the center of the sheet, bend the upper corners.
- Fold the sheet in half, forming a roof with sharp corners.
- Fold the edges of future wings inward to further sharpen the nose.
- The layout is turned down with the front side, then the wrong side is folded vertically. without touching the bottom corners.
- The wing is bent so that it captures the entire length of the workpiece.
- Set the wings to the desired angle of inclination.
Video
Today we will tell you how to make a dream plane, of course it will be made of paper, but it will fly far and long. Folding an A4 paper airplane and having a racing competition is a great idea. Are you ready to prepare thoroughly for this event? Let's find out how to make a paper airplane that will be better than other crafts.
Step by step instructions with photo
Children love to fold paper planes. The simplest manufacturing option is known to both adults and kids.
Do you want to make a lot of beautiful and sharp-nosed planes? Easily! We will look at the most interesting options below. But now let's remember and tell the children how to make an airplane out of paper according to the old scheme.
- we take a sheet with A4 format, put it vertically and visually outline the middle line;
- to the intended line, we bend the right and left upper corners so that they are placed parallel, and their joint does not obscure each other;
- in the resulting figure, once again bend the right and left sides to the middle;
- fold the workpiece in half, the fold should turn out in the form of a "slide";
- fold the airplane wings.
We have made a plane, but it is not yet ready for flight. Arm yourself with felt-tip pens or a marker, make the desired color and finish the portholes.
Now you can send the liner in flight.
Aircraft with a flight range of 100 meters
After simple models of airplanes, your child will ask how to make a paper airplane so that the flight duration and range are longer. Let's try to construct a model with not just a long flight, but a direct and beautiful one. If everything is done correctly, then the finished aircraft will fly at a distance of up to one hundred meters. Immediately clarify that this work involves the use of elements of the origami technique.
For the manufacture you need only one rectangular sheet. Getting Started: 
- Take the prepared sheet. Any color can be used, it is not necessary to use white. You can use office paper with a blue or green tint.
- Lay the sheet horizontally and fold it in half. Open the workpiece and turn it upside down.

- Bend the top edges to the intended vertical line. As a result of folding, you should get a triangle.
- We turn the ends of the triangle outward. With their noses, they should touch the intended line. We repeat this action again.

- Expand all the parts that we have folded. Next, we bend the paper on one and the other side along the marked lines to the central strip.
- Where the lines intersect, fold the sheet forward. Carefully press the new fold line with your fingers. Once again open all the folded parts and return the sheet to its original state.
- Bend the sheet focusing on the first line, which is located at the top. We bend the resulting workpiece to a line located in the center horizontally. We put the corner so that it is located exactly on the line.
- We turn our workpiece over and bend it along a horizontal mark. We turn the workpiece over again and make it so that the resulting triangular part looks “nose” up.
- We bend the parts located at the top towards the bent line in the center. By doing this action, you will notice that the workpiece will begin to assemble on its own. You need to carefully smooth the paper, do it gently.

- Fold all parts in half. We bend the wings. When the wings are bent, make small bends, their size should be from one to one and a half centimeters.
- We open the blank and get the plane. Align the piece.

The plane is ready to fly, don't fly too far! Now you know how to make a simple A4 paper airplane. Step-by-step actions may seem long, but it will take a little time to complete the work. Once you get the hang of it, you can craft multiple planes in five minutes.
Your little fidget doesn't like to wait? Check out the instructions that will show you how to quickly make an origami paper airplane. Even if you are new to this business, the work will take five minutes of free time.
 Airplane in 5 minutes
 Craft of this type, suitable even as a souvenir. Please a colleague or dad by folding an airplane out of a banknote according to this scheme.
As for the quality of the craft, such an aircraft flies further than the previous scheme, parents, get ready to search for the aircraft after launch!
The most important thing in this plane is to achieve two identical (mirror sides). If your sides are even, then the flight will definitely be perfect.
So let's get started:
- take a rectangular sheet (any color can be), fold it in half;
- open the workpiece, and, as in the previous version, we bring the upper corners to the center line;
- bend the upper nose to the bottom of the triangle, fold the side parts of the top;
- we bend the side parts to the center line, you should get an isosceles triangle;
- fold it in half and measure 10 centimeters from the spout;
- at the point where ten centimeters were measured, we make a fold, carefully iron all the lines;
- we divide the nose into two parts and “turn” each side inside out;
- In the end, we straighten the triangle in different directions at the plane, we got wings, their ends need to be bent up.
It turned out to be a great plane. Please note that no special skills are required to make such a craft, this elementary plane is ready with a few deft actions. We will consider complex structures below.
A plane that can fly far
Ready for more advanced models? In fact, today there huge selection paper planes. If we talk about the leading paper crafts, then this is the Falcon, Albatross, Owl or Hawk. We propose to learn how to make a powerful paper plane, which bears the proud name "Thunderstorm".
As with other manufacturing options, you need A4 paper. Let's do it step by step:
- We bend the paper so that the sides are symmetrical. Carefully smooth out the line that turned out and return the workpiece to its original position.
- Make a triangle at the top in the same way as it was done in the examples above. Each top edge should touch the horizontal line.
- Bend the sheet again, you should get a triangle with a sharp top. We connect the sheet at the fold.
- We unfold the workpiece. Turn the sheet over and bend it on the other side. Bend the sides from the sides to the center point. Fold the triangle again.
- Flip the piece over and fold it over again. The finished structure, which should already resemble an airplane, is bent in half. Bend out the top of the wings. They can be bent to resemble the wings of a real airplane.
That's all, you learned how to make your own paper plane. Why is it worth doing this craft? You will be pleasantly surprised because the flight of this simple flying aircraft is up to 1000 meters, and if it is launched on the street, the distance can become even greater.
You will say that a paper glider is a craft that will take a lot of time and knowledge is needed? No, we will answer. It will take a maximum of five minutes to build it, while it takes effort to fold and bend. We do crafts and go to Fresh air!

And, as usual, we prepare A4 paper for work, but add scissors or a stationery knife, as well as plasticine to it. Make sure you don't use these tools. Small child. When making such crafts with the participation of a baby, it is better to take special scissors, the sharp edges of which are protected.
Let's start making:

The glider is ready! Time of testing. To test how well the glider flies, position the structure vertically down and release. A correctly made model will fly up. If you notice that the glider is leaning to one side, don't be discouraged. Our model can be adjusted by lowering and raising adjusters.
gift plane
Let's continue building aircraft. The next model will require some more materials and time, but you get an attractive toy. And if you try and decorate ready product, you can get a wonderful gift that will delight grandfather or dad
Let's prepare the materials:
- 2 sheets of thick paper (it is better to use cardboard of any color);
- stationery glue stick;
- simple pencil;
- matchbox packaging.
We carry out the work in stages:


The craft is ready. Of course, such a design will not fly, but as a toy or a gift it will fit perfectly.
Folding a simple paper plane is a matter of 5 minutes. Models of complex design require more experience and a sufficient amount of free time. In the presence of assembly schemes, the process is greatly accelerated and facilitated.
What paper and materials will be required
It only takes paper to fold a paper plane. The most common, clerical, A4 format is suitable. For large models that are planned to be launched on the street, you can take an A3 sheet. Larger size it is not advisable to take, since the launch and planning of such an aircraft is problematic.
Paper weight varies by aircraft. For light, floating models, classic printer paper or newsprint is suitable. Rigid, gliding aircraft are characterized by paper with a density higher than 100 g/m 2 .
Due to the hardness of the material, it is possible to achieve the required flight characteristics.
In addition to paper, in rare cases, scissors or glue are additionally used to better fix the model. Beginners can use a long ruler, it helps to avoid curves and asymmetrical bends. If desired, the finished model can be painted different colors or stick with stickers.
Classic paper plane model
The model of the aircraft in the classic version is formed in 6 steps:

The model is universal and suitable for launching by both children and adults. This is due to the average characteristics of the flight - sufficient for moral satisfaction.
jet fighter aircraft
It takes more time to make a fighter.
This is due to the large amount of action in the folding process, but the work itself is quite simple:

A jet fighter is capable of flying fast and far if properly launched. It is necessary to throw the plane strongly and at a slight angle of up to 50 degrees to the ground.
military paper plane
Such a fighter flies smoothly and smoothly. To complete it, you need a landscape sheet and a few free minutes. 
Performance:
- Bend the sheet in half lengthwise to determine the central axis.
- Bend the upper corners close to the axial fold.
- Flip the sheet over and fold the corners back to the center line. It turns out a narrow and long "nose" of the aircraft.
- Straighten the folded top layer of paper from the back to get a diamond, consisting of 2 halves. Fold it in half. Thus, a triangle is obtained from a rhombus with the base at the top.
- Fold the workpiece in half with the folded layers facing out. Bend the wings at a distance of 2-3 cm from the axial fold.
The plane folds up quickly enough, the scheme is clear even to a child. It is better to take paper that is not very dense, since the nose of the model is already weighted. In flight, a military aircraft is characterized by smooth and long gliding with a smooth descent.
Paper airplane with a propeller
To make an airplane with a propeller, you will need an A4 sheet and a 10x10 cm paper square (for the propeller). The square is cut diagonally, not reaching the center 1 cm from each corner. Fasten with a needle in the center every second corner obtained. The resulting propeller in the final is attached to the nose of the aircraft.
The paper plane is folded as follows:

The plane will appeal to children, as it is not similar to other models.
When starting, special skill is needed, otherwise it will not fly. For reliability, the propeller can be glued with superglue after fixing, it is important not to get on the screw itself, otherwise it will stop rotating.
How to make an unusual plane
Any model that does not look like a classic aircraft looks extraordinary and attractive. 
This original aircraft resembles a passenger airliner, the assembly scheme is as follows:
- It is necessary to make a square from the landscape sheet, cutting off the excess width.
- Press two diagonal folds on the sheet. Fold in half to make a triangle.
- Fold the sharp corners to the center to make a rectangle, then fold in half along the fold. You should end up with a right triangle with a folded base at the bottom and 3 independent corners at the top.
- The two extreme free corners are the wings. They must be bent at a distance of 3 cm from the base of the aircraft.
- A tail is formed from the central corner. To do this, you need to make a fold 3 cm wide, which is clamped between the base of the wings. For better fixation, the base is glued with PVA.
- The tip of the nose is cut from the bottom up at an angle of 30-40 degrees.
How to make a boomerang plane
The boomerang plane is made from a landscape sheet of paper. 
The scheme consists of the following steps:
- Fold the sheet in half across.
- Fold one half in half again, leave folded.
- Bend the workpiece in half lengthwise (with the folded section inward). Press well, open the workpiece.
- Bend the resulting corners to the center line on both sides.
- The resulting "nose" is folded inward along the fold line located on the reverse side.
- Fold the workpiece in half inward, strongly squeeze. Reopen.
- Form wings. Bend small corners parallel to the fold at the edges of the wings.
- Fold in half with small wings folded inward.
- Bend large wings at a distance of 2-3 cm parallel to the entire aircraft.
A model for the lazy, because with the right design, no matter how you launch it, it will fly back. Kids will love this paper toy. It should be borne in mind that paper for a boomerang aircraft needs to be thin, light - then various turns and maneuvers are possible during the flight.
Origami paper airplane
An airplane made of paper, the scheme of which involves multiple folds and additions, is also called origami. More specifically, airships.
One of the representatives of this type of creativity is the following aircraft:
- The album sheet is folded in half lengthwise to determine the central axis.
- The upper corners are folded close to the center centerline on both sides.
- The resulting acute angle is bent across inward. In this case, it is necessary to retreat 2.5-3 cm further from the previously bent corners.
- The workpiece is turned over. The top edge is tucked in half a centimeter.
- The workpiece is turned over again, and the upper corners are bent to the central fold.
- If everything is done correctly, there should be a small triangle at the bottom, which must be bent up for additional fixation.
- The almost finished plane folds in half with the folds outward. All folds and folds are well pressed through. It's better to do it with a line.
- Wings are shaped in a special way. When they are postponed, the middle of the rear plane of the wing and the angle of the lower, rear base of the aircraft should coincide.
- To improve the flying qualities, the wings can be bent again by half a centimeter along the edge.
Attention! Such a model is capable of flying for decent distances, provided that it is properly folded.
 The bends on the wings must be strictly at right angles, the aircraft itself must be symmetrical and proportional.
How to make a fast paper plane
A paper fast plane is similar in appearance to a fighter, but has wider wings and, accordingly, its layout is different.
It builds up in stages as follows:

This model flies faster than others due to its design: a narrow and long nose without weighting and wide, maneuverable wings. Such characteristics will allow the aircraft to stay in the air longer.
What does it take to fly a plane far?
Paper planes are conditionally divided into long-flying and far-flying. Models that fly long distances are narrow and dense. Their main feature is the length and center of gravity, which is located closer to the nose of the product. 
The scheme of a paper plane should be proportional, with a correctly calibrated center. When folding narrow and long models, it is important that the wings are as symmetrical as possible. It is necessary to determine in advance the places of the folds and make them even and clear.
Video: paper plane, diagram
How to make a paper plane that flies far, see the video clip:
Making an origami plane:
tinkering paper crafts loved by adults and children. This hobby does not require large material costs and brings a lot of positive emotions. If you do not know how to captivate a child, show him how to make a paper airplane.
it simple toy will make the baby smile, because he will be able to launch it on his own and watch the flight. Air aviation will become your child's favorite pastime.
Plane "Arrow"
This is the easiest way to make a flying machine.


A white sheet of paper turned into a sharp-nosed Arrow plane. He received this name for his high speed. Now it's time to launch the Arrow and find out how far it can fly.
Invite your child to color the paper model with bright felt-tip pens. Come up with a name for the plane together, write it on the wing. The kid will be delighted.

"Fighter" from paper
If you have mastered simplest way aircraft addition, you can proceed to more complex models. It's time to learn how to make a paper airplane, which received the big name "Fighter". To make a paper aircraft carrier, you will need scissors.
The aircraft manufacturing algorithm resembles the first option, but there are significant differences that need to be taken into account.


This model looks different from the classic paper airplane. She looks more realistic. "Fighter" can also be painted with paints or markers. Admit it, you had no idea that making a paper plane is so fun and exciting. The main thing here is to show imagination.
Invite the kids and friends to have a paper model launch competition. So you find out which of the planes flies faster. Don't forget to tag your aircraft with a unique emblem or your name.

How to fold the Glider
There is another type of paper airplanes. These are the so-called "gliders", which are able to fly without a motor. The manufacturing process of the airframe is not at all like folding the Arrow and the Fighter:

As you can see, making a paper airplane is not difficult at all. Here is a real glider that is able to fly long distances, moving smoothly through the air thanks to wind currents
Paper aviation attracts the attention of children and adults, captivating with the beauty and grace of models. Surprisingly, a simple sheet of paper can be turned into an aircraft that can move through the air.

Make your first paper plane, show your child the magic of origami. This kind of creativity can become your kid's favorite hobby.
Video instruction
Green paper airplane
Everyone is familiar with a paper airplane, who didn't make it as a child? Children loved to play with boats, planes and toads made of paper. Origami does not require any special costs, it develops motor skills, imagination and manual dexterity. This is the safest hobby for toddlers. You can launch paper toys at home and even in the yard without fear of unpleasant consequences. And you can make several such toys at once. Especially the kids like to launch airplanes from a window on a high floor, and then watch them tack and fly.
Mastery Secrets
Consider a few various ways how to make a paper airplane with kids. It is important to know that the range of your paper structure will be affected by several factors:

It is pleasant and convenient to work with paper, it is easy to deform and takes almost any shape. Self-folding origami can be beneficial and fun:

standard model
It is better to start with the simplest, this is the basic model of an airplane familiar to everyone from childhood. We only need an A4 sheet (you can use a notebook or newspaper sheet if desired), a margin of patience and skill. To understand how to create a paper airplane, you need to start with the basics. Teach your kids to start with simple layouts, and then gradually move on to more complex ones. Let's get started:

We make a trucker
Such a layout has the ability to fly like a boomerang.

jet fighter
The boys will love to make military combat aircraft that look like real ones. Can be used colored paper, and also depict model numbers on it with felt-tip pens or pencils.
The red layout perfectly maneuvers and gains high speed due to the weight in the nose, while the tail is lightened. In this case, even the wind will not be an obstacle to the aircraft.
But the green layout is designed for long-distance flights. This model is capable of a slow and smooth decline, soft landing.
These are real F15 and F16 fighters. They are capable of complex maneuvers, go through a dead loop, various peaks and turns. Only an experienced and fearless pilot is able to cope with such devices.

Aircraft Design Tips:
- It all depends on your imagination. You can use colored pencils, pens, felt-tip pens, markers and paints. Paint already finished designs.
- Make crafts from colored paper, choose bright colors so that the plane immediately stands out from the crowd.
- If you want to have competitions on whose model can fly faster or longer, make your planes from the same color. This will make it easier to distinguish your layout from your opponent's layout. To understand the process of creating a paper airplane, carefully follow the instructions in the pictures and videos.
propeller device
We need a sheet of A4 paper, sharp scissors or stationery knife, a needle with a bead and a simple pencil. Consider the whole process step by step:
- We bend the paper sheet in such a way that we get two diagonals, as shown in the photo.

- We turn the sheet face down, bending so that we get a central line in the middle of the diagonal ones. Then we bend the paper on both sides, as shown in the picture.

- Flip the left edge over to the right and fold it up. Then unfold it back and do the same with the right edge.

- Again, you need to bend the left edge, bending the corner for the layout.

- Expand the right side, bend to the middle line.

- We make another fold and wrap the top corner inward.


- Bend the right corner to the midline and unbend back. Rotate the left side reverse side, the edge from below must be inserted into the hole on the right.


- We bend the layout and make wings, as shown in the photo.


- To make a propeller, we need a sheet of about 8 * 8 centimeters, drawn along two diagonals. On each line we make notches at a distance of 5 mm from the center point.

- To understand how to make a paper airplane that flies far and is easy to do, you need to learn how to make a propeller correctly. We cut the sheet along the lines exactly to the serifs. We fasten the structure, as shown in the photo, fixing it in the middle with a needle. The needle should pass through exactly into the center line at the intersection of the diagonals.

- We fix the propeller on the tail of our aircraft, you can fix it with glue or tape. The model is ready!

Origami making tips:

fast plane
By strictly following the instructions, you can make a product that can fly quickly and well. Let's start:

There are secrets, knowing which, you can make your product fly longer than usual. Here are a few of them:

Super Model Fighter
Why is this a super product? It is believed that it can fly up to 100 meters. However, it is known from official sources that the maximum flight range of such paper product was 69 meters. This model has good aerodynamics and looks spectacular. To create a handsome fighter, we need a flat A4 sheet, colored paper is also suitable. Following our step by step instructions from the photos, you will get a real fast plane! Work carefully and carefully, especially when shaping the wings and tail section.
 Stage 1
 Stage 2
 Stage 3
 Stage 4
 Stage 5
 stage 6
 Stage 7
How to make a paper airplane, shown in the video.
A few more secrets from experts in the aircraft industry:

Paraglider
The paraglider has very large and wide wings, which allows it to make beautiful and high flights. Let's start making a paper paraglider:

original maize
Your child will definitely like this model, especially if you have a boy. This craft resembles a real corncob in shape. You need to purchase red colored paper, green double-sided cardboard, empty boxes from matches, sharp scissors, pencil, glue.

Let's start creating:

original models
Paper crafts are available even to children, but they require perseverance, patience and concentration. Here are some interesting models that are sure to captivate your child in this useful activity:

Origami classes are undoubtedly very useful, so do not be afraid to waste time. So you can develop manual dexterity, perseverance and concentration. At the same time, the sections of the brain responsible for spatial thinking and fantasy also participate.
Take our schemes, photo instructions and video tutorials as a basis and don't be afraid to experiment. Now you know how to make a paper airplane and you will be able to please your children with fresh and original ideas.