Crafts from maple leaves with their own hands. Craft: a bouquet of maple leaves. But for making roses with your own hands you need
Autumn is not only cloudy days and endless rains, it also brings us a rich harvest and paints monotonously green crowns with its motley palette. It is from this beauty that skillful needlewomen, and even simple children, make crafts from leaves with their own hands, for exhibitions and for gifts.
"Crafts on the theme" Autumn "do it yourself"
Every year, many schoolchildren and their parents are tormented by the same question: “What to create for an exhibition on the theme of autumn?” The master class proposed below will tell you in detail about how to quickly make a spectacular application of bright colors. autumn leaves. For this you will need:
- Thick cardboard;
- PVA glue;
- Lots of colorful leaves;
- Black chokeberry berry;
- Scissors.
Manufacturing process:
- Having collected this wonderful variety of leaves, they must first be properly dried in books or newspapers;
- When the material is ready, we glue the outlines of the future rooster onto the cardboard base;
- After the first layer dries, we begin to add “feathers” to it;
- With the help of scissors we form an eye and a brow;
- We make a pupil from a berry;
- It is advisable to delimit the wings, tail and body with different leaves, focusing on one part of the body;
- When the proud bird is ready, we put it under the press, wait a couple of hours and proudly carry it to the school craft exhibition.
Funny pictures of leaves
In the application technique, you can make a lot of interesting work from autumn leaves. This step-by-step instruction will tell you how to make a cute centipede. To implement it, you will need some dry yellow and green leaves, cardboard, scissors and glue.
- On a cardboard basis, we reproduce our drawing, which we will paste over;
- Now we arm ourselves with scissors and cut and glue them according to the resulting contour;
- Upon completion, add sharpness and draw a face with a felt-tip pen;
- In this way, you can fantasize any image that you like.
Video gallery of beautiful do-it-yourself leaf crafts
For the long-awaited autumn ball you need to have time to make not only beautiful outfits and prepare a concert, but also take care of the appropriate decoration of the main hall. To make such original garlands we need:
- Leaves from various trees and the more diverse they are, the more interesting decoration succeed;
- Paper PVA;
- Paints and brush;
- Preferably a yellow plastic lid from mayonnaise;
- Scissors;
- Table white napkins;
- Knitting;
- The paper is self-adhesive.
Manufacturing process:
- Draw on colored paper autumn leaves and cut them out;
- We tear off the protective film;
- Glue on a sheet of thread in the form of veins;
- We put a napkin on top and cut off the excess edges;
- We decorate them, adding a little glue, leave them to dry;
- We take our mayonnaise lid and cut it in a spiral;
- We hang leaves on the resulting garland. Our wonderful DIY craft is ready.
Continuing the theme of the autumn ball, let's focus on interesting craft from wedge leaves, which will decorate the head of the young ruler of the upcoming celebration. For children, it is interesting because it is done very easily, but it looks very impressive. To create such a miracle you will need:
- Beautiful maple leaves of the same size, about 7 pieces;
- Thermo gun with glue;
- Small berry clusters;
- Scissors.
Manufacturing process:
- We cut off the rough tips of all the leaves;
- We take two maple petals and bend them at the base;
- We insert one into the other and fix;
- Thus, we carry out the consolidation;
- When the crown is ready, we proceed to the decor;
- With the help of liquid glue we decorate the product;
- It will not be difficult to make such a tiara during a walk for your little princess or prince. Our craft is ready!
To create such a small and beautiful masterpiece, you will need, in addition to patience and accuracy, a glue gun and a lot of beautiful aspen leaves. They are ideal for rose petals, as they exactly repeat their shape and color. It is better if they are collected dry. Otherwise, when dried, they are deformed and lose their crimson color.
Manufacturing process:
- We start making a rose by twisting the first leaf into a tube;
- We take the second one and wrap it in the first one, but we already glue the edges with liquid glue;
- Thus, we systematically form a rose, the more leaves, the more freely they stick together;
- It took about 50 pieces to create such a craft. aspen leaves.
You can bring natural charm to your everyday routine with the help of bright crafts made from autumn leaves in the form of a wall wreath. For its manufacture you will need:
- Many leaves of the same tree and different sizes;
- Thick cardboard;
- Glue gun.
Manufacturing process:
- Having collected dry leaves, you need to sort them by size;
- From cardboard we cut out the base for our wreath;
- Now, row by row, we glue them, first the largest, then the smaller, and so on;
- Follow the direction, it is important that their angle of inclination is the same, and each row remains at the same level, only in this way you will get a truly beautiful product.
To capture the short-term beauty of bright leaves, you can use salt dough, which is long time keep the autumn mood in its original beauty. For this craft you will need:
- Water (200 ml), salt (200 g) and flour (500 g) for the dough. Instead, you can take hardening clay for modeling;
- Leaves with thick veins;
- rolling pin;
- Paints and varnish.
Manufacturing process:
- More accurate and subtle work is obtained from modeling clay. For those who decide to make a 100% homemade craft, you first need to make salt dough.
- To do this, mix all the ingredients and knead the mass well;
- When it is ready, we make small cakes;
- We print leaves on them with a rolling pin and bake. If you have purchased clay, this is not necessary;
- The resulting blanks are decorated and varnished.
Such a wonderful tree will be an excellent craft for the exhibition. The more different leaves you collect, the more unusual the work will turn out. Nuts, acorns and, of course, the beautiful mountain ash are suitable for decoration. For the base, it is better to take maple leaves.
An ordinary straight stick is suitable as a trunk. You will also need a small flowerpot, glue gun, newspaper and thread;
Manufacturing process:
- We collect the collected leaves in small bunches. They will immediately need to include berries and acorns, we fix them with threads;
- If necessary, decorate your pot and fix a stick in it;
- Roll up a small ball from the newspaper, wrap it with thread and put it on the “trunk”;
- Now carefully and systematically glue small bouquets so that you get a beautiful crown;
- When the craft is ready, spray it with varnish, from this it will sparkle with new colors.
The delicate beauty of these homemade flowers captivates and makes you fall in love at first sight. It is even hard to believe that they were made from ordinary rough ears of corn. To make them we need:
- Corn leaves;
- Wire;
- Threads;
- Floral tape and tape;
- Artificial leaves from plastic flowers.
Manufacturing process:
- We cut the leaves into identical rectangles;
- We take the wire, bend it in half and twist it so that a loop remains at the end;
- We bend the corn rectangle in half and wind it on the wire;
- On top of it we fix the second sheet and tie it with a thread several times;
- Thus, we form the whole bud;
- We hide the sloppy ends of the rose petals and the wire under the floral tape, which we fix with adhesive tape at the end;
- We put on artificial leaves and our wonderful craft is ready.
Finally
It is not necessary to use natural materials for crafts, only exhibitions in kindergartens and schools. The process of assembling, preparing and directly manufacturing them will bring a lot of interesting impressions and useful experience to you and your child.
, natural leather and other improvised materials for making crafts, from which we learned to make beautiful artificial flowers.Autumn has long come into its own and painted the world around us with bright multi-colored colors. Autumn gave us wonderful natural materials for making unique DIY crafts - fallen from trees
autumn leaves different sizes and with bizarre shapes, as well as numerous flowers and inflorescences that we will use to make beautiful flowers, cute lamps , graceful bouquets with artificial roses, original compositions of vegetables and fruits for interior decoration.And children will be happy to help their parents create amazing crafts from improvised, absolutely waste natural material . Such joint leisure is very useful for the development of imagination, fine motor skills of hands, sensory abilities small children and elementary school students.
From autumn natural materials you can do not only simple crafts, children's educational toys, applications and herbaria. Interior designers have long adopted the unique beauty and indescribable sophistication of autumn gifts. The walls of the rooms can decorate with exquisite panels and paintings with compositions in the form of flowers from autumn fallen leaves (maple, oak, chestnut), folded with their own hands in a special way. In order to use the fallen leaves of trees and dry flowers for making crafts , bouquets and compositions with your own hands, it is important to properly prepare these natural materials before work. You probably already know that autumn leaves can be laid between the sheets of albums (books, magazines, newspapers) and a load can be placed on top. This harvesting method is suitable for forming a herbarium, children's appliqué or collage.from dried leaves.
But for making voluminous crafts and bouquets of flowers from autumn leaves fallen from trees, this method is not suitable. Before you start twisting such flowers from fallen leaves from trees (for example, roses from red maple leaves), it is important to process them correctly in order to crafts retained their original appearance long time. We will tell you about this in detail later in this article. In addition to tips and useful ideas for creating bouquets and compositions from natural materials, you will find here video lessons , as well as master classes, with the help of which you can quickly make simple compositions with your own hands (children's crafts from leaves, applications, figures, collages), as well as complex bouquets and objects for interior decoration in the form of bouquets with flowers from autumn leaves topiary ) or compositions of dried flowers (see photo).
You will learn how to properly process and preserve maple leaves and autumn flowers so that they are made from them. beautiful crafts did not turn into brittle, shapeless and twisted objects. And you can make any of these natural autumn gifts of a wide variety of colors and with surprisingly different bizarre shapes. artificial flowers - big roses , small cornflowers, graceful chrysanthemums, cute daisies, chic water lilies . The color of these homemade flowers can be very different (not only yellow or red) - after all, dried autumn leaves can be painted with an acrylic primer with the addition of a color scheme of the desired color (and then coated with a colorless varnish). With the help of helium pens, you can apply different patterns and geometric shapes on the surface. artificial flowers autumn theme.
Ideas for creativity:
- Application.
Great idea for spending time with a child! Have you already collected a lot of beautiful fallen leaves and autumn flowers in the yard, dried them, made a colorful herbarium? Let's not stop there! Spread on the table big leaf thick paper or cardboard, lay out our "harvest" on it and put together an original composition, combining colors and different forms of natural materials . You can glue the details of the autumn composition on the base with PVA glue (but it is better to use photo glue or gum arabic);
- Collage.
You can fold together with your child a multi-layered bright collage under the frame. The bottom layer is large dark and brown leaves, then greenish, the upper layers are small bright contrasting leaves of red and yellow flowers. We add dry autumn flowers to the collage, adding different shapes from them and we get a beautiful three-dimensional composition.
And you can add letters or words (as well as figures) to the collage - press a sheet of cardboard with cut out letters tightly to the glued composition and carefully cut it out according to the letter pattern with a clerical knife (of course, with the hands of the parents, not the child);
- Educational game for the child.
Great idea that your little one will love. preschool age! Glue a half of a fallen leaf onto a paper sheet (pre-cut the sheet vertically). The task of the child is to draw the missing half of the sheet with a pencil (felt-tip pen). Advise your child to choose suitable color pencil and carefully look at the shape of the half in order to accurately reproduce the mirror part of the composition. Most difficult option- a maple leaf, leave it for later and help the kid draw a little;
- Painted autumn leaves.
You can decorate both flat and voluminous crafts made of leaves with painting. For this work, use helium pens and felt-tip pens (with silver, gold, white and other colors). Bouquets with decorated artificial flowers will be fine and other interior objects;
- Bouquet of autumn leaves and dried flowers.
You will find information below on how to fold flowers from maple leaves with your own hands and collect a bouquet from them. If you decorate such a bouquet with dried flowers and put it in a small wide vase, you will get an excellent compositional center for your room; 
- Tree or topiary from autumn materials.
Another great option for interior decoration. From fallen branches, you can fold a small tree and decorate it with homemade flowers made from leaves. Or make your own topiary (see photo), attaching a lot of such flowers to a floristic ball (option: on a foam ball); 
Tree (photo):

- 3D picture from the gifts of autumn.
As a base, you can use a large photo frame or a wooden picture frame. background can be made from cardboard painted in the right color . We make interesting compositions from maple leaves, dry flowers, fallen pine needles and other natural materials with our own hands, attaching them to the base with a wire.
Helpful Hints:
How to prepare autumn leaves for making crafts and applications at home.
- for voluminous crafts in the form of flowers and bouquets.
We will not be able to fold voluminous crafts from dried leaves, as they are too brittle. Therefore, we will specially process the collected leaves. We divide the solution - 200 ml. glycerin per 400 ml. pure water. In a tight plastic bag, carefully put the leaves that have fallen from the trees and level them, then fill them with the prepared solution. The package with the contents must be hermetically sealed (with a heated knife) or sealed with adhesive tape. Leave this bag in a dark closet for 3-4 days, and then spread the leaves on a paper towel to dry. From these flexible leaves that retain their original appearance for a long time, you can add a variety of flowers (below - MK: how to make them with your own hands maple leaves beautiful roses);
- for flat autumn compositions (applications, collages).
Leaves and flowers collected in autumn are best dried in massive magazines and reference books. The collected natural materials must be thoroughly pressed with a weighty load placed on top of the reference book.
How to dry autumn flowers for crafts and compositions:
- iron drying.
Autumn leaves and many small flowers can be dried with an iron. To do this, lay out natural materials on thick cardboard. , cover with a thin paper sheet on top and iron with a not very hot iron until all moisture has evaporated;
- natural drying.
Great for drying fall flowers. Tighten the rope in a dry room with good air circulation. We put the collected flowers in bunches and hang them on a rope with inflorescences down;
- drying in the oven.
a wonderful way to dry large single flowers (roses, tulips, peonies) for making arrangements. The temperature in the oven should not be very high - about 50-60 ° C. Carefully monitor the process so that the flowers do not turn brown during drying and do not lose their shape;
- bulk drying of flowers.
According to many seasoned florists, this method of drying autumn flowers preserves their natural shape and color. The cut flower is placed in calcined dry sand for 4 weeks. As a container, you can use a box with a fine mesh at the bottom and a retractable bottom. Flowers with terry and voluminous inflorescences (lilies, dahlias, roses) are placed in the sand with stems down, and with flat inflorescences-baskets (buttercups, daisies, asters, forget-me-nots) - with stems up.
What tools and materials can be useful for making autumn crafts:
- Scissors.
Small scissors with blunt ends for a child and sharp long ones for an adult;
Stationery knife and stacks.
Via stationery knife It is convenient to cut multi-layered parts of crafts. Plastic stacks are great tools for child, with the help which he can cut individual leaves for application;
- Shilo.
For convenience, choose a tool with a wide wooden handle (length - 5-6 cm) and a not very thick piercing part;
- Long tweezers and tweezers.
It is convenient to move small parts of handicrafts with tweezers. Tweezers with a flattened twisted front can be borrowed from a manicure set. It is very convenient to twist individual parts of the product and wire with such tweezers;
- Thin wire.
It is often used to form the frame of crafts and toys made from natural materials. For fastening individual parts, it is desirable to use a flexible and durable copper wire diameter 0.35 mm;
- Foil and foil paper.
For decorating autumn crafts, for applications and collages;
- Sewing needle and thread.
To connect the individual parts of handicrafts, to form bouquets of leaves and dried flowers;
- Paper.
The more different types paper (different in color, density, thickness), the better. For the manufacture of crafts, applications, bouquets, panels and wall compositions from natural materials, you can use corrugated, wallpaper, velvet, parchment, landscape, wrapping, copy and other types of paper;
- Plasticine and plastic (polymer clay).
For fastening, as well as for sculpting individual parts that complement products from leaves, dry flowers. Working with plasticine polymer clay your child can do;
- Glue.
A variety of brands of glue can be useful in the work. Often use PVA, BF, "Mars". The safest options for a child to use are PVA and glue stick.
For gluing individual parts of the craft, brushes with a hard bristle will come in handy;
- Paints and brushes.
To create applications and collages - watercolor and gouache paints. For coloring voluminous crafts from autumn leaves and dried flowers - acrylic paints. It is most convenient to draw with squirrel soft brushes.
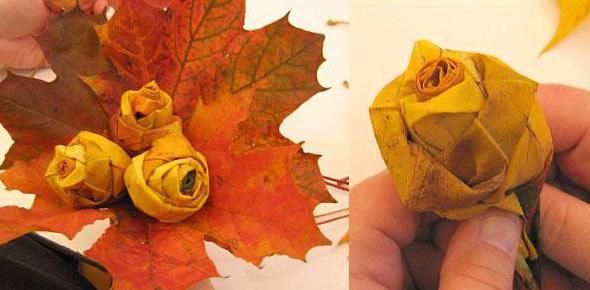
2. HOW TO MAKE A BEAUTIFUL ROSE FROM FALLEN AUTUMN LEAVES WITH YOUR HANDS
Such artificial flower DIY is very easy! For work, prepare autumn maple leaves, strong threads, golden paints and sunflower oil. You can treat the leaves with a solution of glycerin (see the recipe above) for the durability of the assembled craft.
For the manufacture of a single flower, it is best to choose plain maple leaves. The rosettes from the leaves will turn out to be quite large. 5-7 such crafts are enough to fold beautiful bouquet. As leaves for this bouquet with artificial homemade flowers, you can use all the same maple leaves. Make roses red and yellow.
So, let's get to work:
- take a maple leaf and bend it in half (front side outward);
We bend the very tip and twist the leaf into a roll;
We take the second maple leaf of the same color, put the already twisted bud at its base (see photo);
We form a maple rose petal by bending the leaf and wrapping it tightly around the bud;
We wrap the third maple leaf in the same way. The more such rose petals there are, the more voluminous and bigger the rose will turn out. Move a little down each subsequent row so that the flower looks like it has blossomed;
A little above the petioles of the leaves we fix the craft with a thread;
Similarly, we will make 5-7 more of the same roses (yellow, red, greenish);
Lubricate maple roses with sunflower oil so that the bouquet retains its original appearance for a long time. Now you can cover the crafts with golden paint;
It remains to lower a few maple leaves into a small vase, and then form a beautiful bouquet of artificial roses.
3. MASTER CLASSES. LEARNING TO MAKE CRAFTS IN THE FORM OF FLOWERS FROM AUTUMN LEAVES AND A COMPOSITION FROM DRIED FLOWERS
Master class number 1:
STAGES OF STEP-BY-STEP PRODUCTION OF GORGEOUS VOLUME ROSES FROM RED MAPLE LEAVES FALLEN FROM TREES (PHOTO) .
Master class number 2:
HOW TO MAKE A FLOWER FROM AUTUMN LEAVES. ANOTHER OPTION OF FOLDING A BIG ROSE FROM MAPLE LEAVES WITH YOUR HANDS. STEP-BY-STEP PHOTO MK.
Master class number 3:
MAKE CRAFTS FROM LEAVES
Here comes the long-awaited autumn time. Time for dreams and new achievements. It is now that nature, more than ever, pleases us with its beauty, a riot of colors, refreshing, but still warm breeze rustling leaves underfoot. And so I want to keep the feeling of complete harmony and warmth as long as possible, not only in my memories, but also at home! Autumn foliage will come in handy, and do-it-yourself flowers made from tree leaves will be a wonderful interior decoration or an unusual gift close person.
This work will not require you to spend a lot of both materials and time, but will not yield in its originality and beauty to other handicrafts made from improvised materials.
Flowers from tree leaves: master class
Most effectively and naturally look in compositions and simple bouquets made from rose leaves. The process is quite fun and very simple, so that the whole family, including the kids, can take part in it.
Having started making such crafts, you will understand that the stage of collecting leaves is much longer and more tiring than the creative process itself. The following trees are best suited, the foliage of which is preferable to use for making an autumn rose: maple, ash and Try to choose bright leaves in colorful shades (yellow, red, maroon, green). If possible, use leaves from trees rather than picked from the ground. They will not only be cleaner and less damaged, but, more importantly, still quite elastic due to the remaining moisture, it will be much easier to work with them, and the composition using them will turn out to be more realistic. Collect leaves of different sizes. The splendor of the rose will depend on the number of leaf petals used.
So, the main material is already in your hands, are you full of desire and enthusiasm? Then let's quickly consider how to make flowers from tree leaves with your own hands.
Necessary tools
To make this craft you will need:
- leaves;
- scissors;
- thread or thin rope;
- sunflower oil or hairspray;
- iron.
Use flowers from tree leaves different color or alternate different colored leaves in one rose - it all depends on your taste.
To create not just a bouquet, but a separate composition, you can use other natural materials (mountain ash, cones, spruce branches, chestnuts, acorns, etc.).
Step by Step
Take a leaf first reverse side towards you so that its front side is directed to the palms, and fold in half.

So let's get started. Making flowers from tree leaves step by step:
1. Roll the resulting half of the leaf into a tight tube - this will be the core of our future flower.
2. Take the second sheet. It must be placed face down.
3. Bend this sheet outward so that its top protrudes 1-2 mm above the previous one. Wrap the base with the resulting half.

4. Repeat this manipulation a few more times. Depending on how many leaves you make, the size of the rose will depend.
5. Each subsequent row of leaves must be shifted slightly lower. So the finished rose will be more fluffy, voluminous and beautiful.
6. Fasten the base of the resulting flower tightly with a thread.

7. From above, slightly soak the flowers from the leaves of the trees with sunflower oil. This will give finished product shine and will help to keep it longer.
8. Instead of oil, you can use hairspray. Sprinkling the flowers lightly, you will also give them shine, and this manipulation will also save them from brittleness.
9. If desired, you can make separate strokes of golden paint or sparkles over the roses.

10. In conclusion, it remains to arrange the resulting autumn flowers in a bouquet and decorate them with the most colorful and neat leaves. First, be sure to iron these leaves through a cloth or a double sheet of paper.
Flowers from the leaves of trees, made with their own hands, are ready. They will surely please you and your loved ones. In addition, such a bouquet can be a wonderful gift that has preserved the love and warmth of your hands.
Flowers from tree leaves: photo
The completed composition might look like this.
Although there are no identical flowers in nature, yours will be completely unique and unique.
chrysanthemum flower
In addition to roses, you can also make, for example, a chrysanthemum flower. This will, of course, require more time and leaves to complete, but still worth a try.
Need to screw enough a large number of straws (about 50 pieces for one lush flower). If you combine them in one bunch, you get a chrysanthemum.
Blank features
Tubes can be formed by winding them on long skewers, pencils, knitting needles or other oblong devices. The size and density of the finished petals will depend on the diameter of the rod used. Give them the necessary shape according to your desire and artistic taste.
The resulting flowers from the leaves of the trees must be securely fixed with glue and thread. You can first coat each leaf with glue and roll it into a tube, or, conversely, glue the finished workpiece and fix it with a thread for the drying period, not forgetting to remove it at the end of the cooking process.
After all the blanks are ready and the tubes are wound in sufficient quantities, proceed directly to the formation of a flower.
It is best to beat the resulting blank and give it the look of a real plant by fixing the flower on a long skewer or thick wire. At the base (for the sepals), it is recommended to use small green leaves or make them yourself from corrugated or colored paper. Be sure to wrap the stem itself with the same green corrugated paper or a special teip tape.
As you can see, just a little effort, and the finished chrysanthemum flower from an unusual natural material is already ready. Now they can be supplemented with any or, having made a few more of these flowers, create a separate lush bouquet of chrysanthemums. Put such a bouquet in a vase, decorate it and enjoy the beauty of this wonderful autumn flower for a long time yet.
Conclusion
For any creative process, the most important thing is desire and inspiration. And even at first glance, such a simple process of creating flowers will be a godsend for you and will certainly please you with its result. Create, please yourself and others, and the presented master class on how to make flowers from tree leaves, we hope, helped you with this.
Any process of creation carries only positive emotions. Having created such beauty on your own, and even from natural materials, you will feel a surge of creative energy and new ideas. In addition, this kind of activity can be done by the whole family, from collecting leaves during a walk in the park to creating flowers and decorating them. Try it!
It is very sad to watch how autumn comes after a sunny summer: the leaves on the trees turn yellow, it almost always rains, it gets cold outside, you have to get warm clothes out of the closets.
Despite this, the autumn time can also become beautiful and full of colors during the onset of sunny days. Cheerful children run around the city parks, play, collect colorful bouquets from fallen leaves.

At home, I begin to collect a variety of crafts for school and kindergarten sometimes just for myself. There are a huge number of exciting ideas, and our article will be about them.

Crafts from leaves for kindergarten
The child loves to take part in the creation various crafts. Show him what can be made from the colorful leaves that fill all the streets of your yard, and he will be extremely happy to take part in this.
Creating crafts is not only entertainment, thanks to such activities, children can get wonderful exciting lessons on getting to know the world around them, develop thinking and Creative skills. The presented options for working in kindergarten will help you with this.

What you need for crafts from autumn leaves:
- Directly the leaves themselves, of different colors, sizes and types;
- Stationery (Glue, pencil, scissors, paper, white and colored cardboard);
- Threads;
- Wish.

Possible options for crafts from leaves
Application of autumn leaves
It is considered the simplest type of leaf crafts. You and your child can easily make an application in the form of animals or birds.
With the help of dry leaves, PVA glue and paper, you can count to create. In order to make the work more vivid, use leaves of various colors.
Crafts from leaves and cardboard
Making crafts from cardboard and leaves is not difficult. You just need to cut the base out of cardboard and glue dry leaves to it.
Herbarium
One of the most fascinating and common types of crafts for children is an amateur herbarium. You can collect many types of natural material, according to which your baby will be interested in exploring the variety of plants growing in your area. Use as many types of plants as possible to create a beautiful herbarium.
Garland of autumn leaves
Dry the leaves, then dip each of them in yellow paint to give the leaves more bright color. Then we hang the leaves to dry in the form of an elegant garland.
Take maple leaves different sizes and flowers, then cover them clear varnish. After the leaves dry well, you need to hang them on strings, decorate with beads or beads and hang them up. The resulting pendant will be a great decoration both on the street and in the house.

Bouquet of flowers from autumn leaves
Flowers created from maple leaves look very impressive.
Vase of leaves
You can use any leaves you like. For one vase, you can use several types of leaves, different in color and shape, or you can make them from the same ones.

Instructions on how to make crafts from leaves Application First you need to prepare everything necessary materials, and shoot the table with oilcloth.

To create an overhead application, you should draw the picture itself on the cardboard, then put the leaves on the drawing, you do not need to cut the leaves, they are used entirely. Everything that is not enough can be finished with paints or made from other materials.

Silhouette application, created from cut leaves. The leaves are cut to embody with the help of them, the conceived pattern.

The hardest way is to create modular application. It is made from leaves of the same size. In this way, fish scales or bird feathers are made.

To obtain a symmetrical application, it is necessary to select paired leaves that are identical in all respects.
Note!


Tape - with its help create many details in one picture.
Herbarium
It is better to collect leaves for a herbarium in dry weather, as wet leaves require additional processing. Each detail of the herbarium must be straightened with a cold iron, before that, carefully remove all creases of the sheet.

If the street is constantly damp and there is no time to wait for dry weather, then they should be allowed to dry on their own. After the leaves have dried, they are ironed with a warm iron, placing them between two sheets of paper. It is not necessary to press the iron on the leaves, just press a little so as not to flatten them.
The prepared elements are placed on a sheet of paper, which will serve as a background and at the same time a frame. Fix the leaves with thread or glue.
Bouquet of flowers/rose
In order to be accurate and beautiful flowers leaves should be even and clean. Place the paper directly in front of you, fold it in half. Then you need to twist half the leaf into a tube, but do not twist it very tightly, the flower should be voluminous.

It turned out the core of the flower, we make the petals from the rest of the leaves. Insert the core into the second maple leaf. In turn, wraps the edges of the sheet so that petals are obtained. The sheet can be fixed with a thread so that it does not fall apart later.

Note!

To make the flower voluminous, at least six or seven maple leaves should be twisted in this way, each of which is fixed with a thread. To create a bouquet, you need several of these flowers.
Vase
To make this craft you will need:
- PVA glue;
- Leaves of different colors;
- Normal balloon ik.

It is necessary to inflate the balloon to the desired size of the vase. Take glue diluted half and half with water. Lubricate one half of the ball with glue solution.

Each sheet must be properly glued and smeared on top with another layer of mortar so that the upper layers of the sheets hold just as well. When you have glued the top layer, then it should also be smeared with glue.

After that, remove the ball for a few days until completely solidified. When our fake is completely dry, it will be necessary to burst the balloon. A vase of leaves is usable. Making such a work is not difficult, but very interesting, so it is good to do it with children.
Photo crafts from leaves

Note!


Autumn is a truly magical time. And not only for romantics, but also for those who like to work with their hands. This season provides us with a lot of natural materials that, with a little imagination and patience, can be turned into beautiful crafts, appliqués or home decorations. When walking through a park strewn with fallen leaves, you will have the opportunity to spend time not only pleasantly, but also usefully: having collected a bunch of beautiful leaves, you can either just put them in a vase or try to turn them into something unusual.
In addition, in schools and kindergartens they often give the task of making crafts from leaves - and this is a great reason to take a walk with your child on fresh air collecting the gifts of autumn.
We have collected for you 25 craft ideas from fallen leaves, cones, acorns and nuts that will give you many unforgettable moments spent with your children.
1. First, let's try to make a butterfly from autumn leaves. This simple option is suitable even for the smallest. The only thing is that you first need to dry and straighten the leaves by placing them between the pages of books or under any other press for a day.

3. Such an unusual snail can be made from leaves of different colors and shapes. 

5. Using a paper or cardboard puncher on fallen leaves, you can get a truly magical result!

7. Candles will help create a special homely atmosphere in autumn. With the help of a glass jar, leaves and ribbon for decoration, you can fill your home with comfort and warmth. 

9. In autumn, chestnuts fall under your feet. Let your child show their imagination by drawing funny faces of people or animals on them - you can be sure that the child will not be torn away from this activity! 

11. By making such a cute hedgehog, you will ensure good mood for yourself and your baby for the whole day.


13. A variety of colors and shapes of fallen leaves opens up scope for imagination. Collect a whole zoo with your child - for him it will turn out to be an absolutely fabulous experience! 

15. This idea is suitable not only for children, but also for decorating a gift for an adult or as a decorative element.

17. Use fallen leaves to create your own autumn scenery. To do this, it will be enough to apply paint on one side of the sheet, and then press it to the paper. Feel like a master of painting without making any effort! 

19. Don't be afraid to experiment with materials. For example, to create such a tree, you will have to take scissors and cut the leaves into small fragments. Paint the tree trunk in watercolor, let it dry, and then glue the cut leaves onto its branches. 

21. A little glue, plasticine, fantasy and magic - and ordinary acorns turn into a miniature set for tea drinking or fairy-tale characters!