Homemade postcards from March 8 how to do. Postcard made of paper with templates for International Women's Day
International Women's Day is one of the brightest holidays: on this day we strive to please our beloved women with attention and care, arrange surprises and give gifts. And it's hard to find a more touching gift than a postcard made loving hands child. On the eve of March 8, we have collected all kinds of postcard options that a child can handle on his own or with the participation of adults.
Children are little creators. Even for a two-year-old toddler, creating a postcard will be extremely exciting and useful activity... At the age from 2 to 4 years old, it is safer and easier for children to work with paints, therefore, in kindergarten on March 8, pictures are usually drawn.
It is not easy for kids to cope with a brush and colored pencils, but creativity gives free rein to imagination: you can draw with cotton swabs, crumpled paper and just by hand.
For example, to create a postcard with peonies, you only need two sheets of paper, a saucer, water and paint. Pour some water into the container and add the desired paint. On a dense sheet, draw stems and leaves with a finger or a brush. Then we crumple the second sheet, dip it in a saucer and leave traces on the paper, forming a flower. And now, a bouquet of peonies is ready.

Or you can make a bouquet of bright handprints.

Very beautiful drawings are obtained if you draw using the poke method. cotton swabs... Sticks can be collected in bunches by tying them stationery or scotch tape, dipped in paints and leave traces that look like small inflorescences. In this way, you can depict mimosa, wildflowers, cherry or lilac twigs.
Applications for March 8 in kindergarten, a step-by-step postcard application.
V senior group kindergarten, the child can perform an application card. In work, you can use colored paper, plasticine, scraps of fabric, buttons, ribbons, straw, cereals, eggshell, cotton wool and many others.


The application "Vase with volumetric flowers" turns out to be very beautiful. According to the description and templates provided below, you can create a unique postcard of your choice.

We need: colored cardboard for the background, colored paper, glue, scissors, beads, satin ribbon or other decorations.
We make five templates from solid cardboard different sizes... You can choose ready-made vase and flower patterns at the end of this MK or draw them yourself. Next, select a sheet of colored paper, outline the blanks and cut them out. For one flower, we should get five different blanks.

Now we need to gently bend the petals to the center.

Then we open the petals, forming cups.

We collect the flower: we smear the blanks with glue and put the smaller cup into the larger one. In this case, the petals should be placed asymmetrically in relation to each other, so that the flower looks more realistic.

We collect the remaining flowers. Then we cut out a vase from paper of a different color and begin to build the composition. Better to take your time and first place all the elements on a background sheet of cardboard without glue. After we determine the location of each flower, you can glue, starting with a vase. If desired, the vase can be decorated with a satin ribbon or colored paper mosaic, and beads of the same tone can be glued into the flower cups. And now we have a cute applique postcard.

You can use templates with a different number of petals and a different vase shape.


Postcards for March 8 in elementary school, do-it-yourself step-by-step drawing, master class.
The most common option among children's postcards is still the drawing postcard. And this is true: they do not require special materials to create, they are simpler in design and, in their own way, adorable.

To create such a postcard, we need: paper, watercolors, a brush, scissors. Better to use thick watercolor paper or whatman paper.

Fold the sheet in half and start drawing blades of grass with light lines. Draw flowers closer to the edge, in our case, these are cornflowers, but you can choose other field plants, for example, poppies.

Inside, we also draw the grass, and then cut off the edge from the front side with a smooth line, repeating the outlines of the flowers. And so, we have got an unusual and very delicate postcard.
Beautiful do-it-yourself card for March 8:
With the advent of the internet, finding sources of inspiration has become easier. We have collected many great ideas for creating a postcard for March 8 for mom, grandmother, teacher or sister.
In the scrapbooking technique.


In the quilling technique.


Postcards 3D.


With the use of buttons, beads, ribbons and many others.


for mom, 10 options
You can express your love for your mother with a card with flowers in the shape of a heart ...


Or draw her favorite flowers.

Mother's favorite flowers can also be depicted on an applique postcard.


Original postcards, handbags.


Despite the fact that it seems complicated, such a card is very easy to make. Can be used special paper or just choose a background for scrapbooking on the Internet and print it. In order for the bag to be stable and solid, it is better to stick the printed background onto thin cardboard. We print or draw a template, cut out a blank on it, bend, glue and proceed to the most interesting thing - decoration. To do this, you can use ribbons, lace, beads, buttons, rhinestones, fabric flowers, sequins and many others.
Bag template and background for scrapbooking.


for grandma, 10 options
When our grandmothers were children themselves, postcards for March 8 were mainly drawn or made from improvised means. Today, there is a huge selection of various materials for needlework and painting. For example, we can surprise grandmother with these postcards.


Postcards in vintage style look very cute and original, but they are more difficult to perform, so it's better to carry them out with your mother.

If there is little time left to create a gift, you can make a bright origami card. For example, here's a bouquet of tulips: simple and elegant.

Origami tulip patterns.


March 8 is also a holiday of spring, which is why you can often see spring primroses or mimosa sprigs on postcards. Present your grandmother with a mimosa napkin applique or delight her with flowers blooming on the windowsill.


for the teacher,10 variants
Teachers receive postcards for March 8 each year from their students, so it's a little more difficult to impress them. But if you let your imagination run wild and get down to business, this is what you can get.

Application with a bouquet of flowers in mixed media.

If you master the quilling technique, you can make such unusual postcards with your own hands.


You can make several of these flower meadows and decorate the nursery.

Volume postcard for March 8, master class
A voluminous postcard for March 8 is a cute gift that you can easily make with your own hands. We invite you to make a nice volumetric postcard "Blooming tree".

We will need: a thick sheet of colored double-sided A4 paper, colored paper, a pencil, glue, scissors.

We print out the pattern of the tree and petals. We choose the colors of the paper for the crown, it is desirable that we get 3-4 shades that are in harmony with each other. We start drawing petals: bend a sheet of colored paper and apply a template dotted line to the place of the fold, circle and cut out. Thus, we need to prepare a large number of blanks (7-8 petals per flower + petals for decoration). From the sheet Brown cut out the trunk of the tree. We fold the base sheet in half, glue the tree trunk in the center of the sheet and begin to form the crown, while without glue.

After a harmonious composition is formed in front of us, we begin to glue the petals behind lower part... The card is ready, in addition, you can darken the cores of flowers with pencils to match, outline the bark on the tree with a black pen, write wishes on the inside of the petals, or add other touches to your taste.

A handmade postcard is the warmth of your hands, care and attention, embodied on paper. Do not worry if something comes out a little crooked, the main thing in such a gift is your time and efforts. Approach the creation process with imagination, imagine how they will be delighted with your gift, and do not be afraid to create: remember that there is a wonderful world and necessary, sincere words in your head.
Video: drawing for mom
Video: postcard to mom
Video: postcard to the teacher
Hello readers and guests of the blog. Finally, the last month of winter, February, has entered into its legal rights, which means that the next portion of our favorite holidays awaits us ahead: Maslenitsa, Valentine's Day, February 23 and March 8.
So, many of us have prepared for our soul mates, and the female audience has already bought gifts for their beloved men. But our guys are just starting to think about the issue of presents for lovely ladies.
Of course, it's very simple for men, bought a gorgeous bouquet of flowers and a cake, and the gift is ready. But it is not so easy for our children to please and surprise mothers, grandmothers and sisters. I don’t know about you, but I believe that a child from childhood should understand what to do about and without pleasing his loved ones, and even with the help of an adult. After all, the main attention, not the price of a surprise.
So, traditional handmade gifts for the female half are flowers, for example, or different crafts, postcards. I dedicate this collection to the latest type of creativity. After all, such a congratulation is easy, fast and very effective. I hope it will be useful to both teachers, educators, mothers, and older children.
When making such souvenirs, there are usually improvised means that are in every home. And most often it comes to the rescue plain paper and cardboard. And then it's a matter of imagination and taste.
I have prepared for you great options, and now I will share them with you. Write what you liked the most.
- Floral mood.
We will need: colored paper, colored cardboard, glue, scissors, a stapler, double-sided tape.

Manufacturing process:
1. Cut 9 circles of different sizes and colors from colored paper. Cut strips of green paper so wide that when folded like an accordion, you get stalks.

2. Stick on the cut out circles as shown in the photo.

3. Fold the stems in an accordion manner and use tape to secure each flower to its own stem. And with the help of a stapler, fix the flowers in one bouquet.

4. Take colored cardboard and fold it in half. Make a pocket out of colored paper and glue it on the front side. Insert the bouquet, and write a wish inside.

5. That's what beauty it turns out!

Isn't that a very simple idea for congratulations?
Also on this day, fashionistas can give presents with cut-out dresses, it looks cute and graceful. And it is performed in the usual technique - applications.

Here is an option with raised flowers in vases: cut out and glued on colored cardboard.

Or such a composition with printed wishes inside.

And this delicate vase can be used as a craft.

Floral version in a mug. Spring and tasteful.

Do not forget about the symbolism of the holiday. The number 8 is especially popular if you decorate it with voluminous buds.


How do you like this folding work? Again, everything is simple - cut out the base, glue a bouquet on it, tie it with a ribbon.

Here is a quilling job. In the middle, you can make any inscription or paste a photo.

A variant of a voluminous congratulation. Tulips are made using origami technique.

Look at what a gentle idea of a hand hug that directly touches the heart.


In addition to blooming flowers, you can try to surprise with something else. For example, give air balloons made from cardboard and thread.

Or such lovely birds - the personification of a mother with a baby.

Of course, all ideas do not end there, but only begin. So we read further, everything will be much more interesting!
How to make a congratulation for mom using scrapbooking technique
The most important person whom you want to congratulate on March 8 is your beloved mom. Therefore, we will devote this item to her. Let's see what can be made so original and beautiful for her. By the way, these ideas can be implemented not only on March 8, but also on your birthday, or on Mother's Day.
- Delicate gift for mommy.
We will need: checkered fabric, a small piece of pink polka-dot paper, a small piece of designer cardboard, a paper flower, half-beads, curly scissors, a satin ribbon Pink colour, lace, red cardboard.

Manufacturing process:
1. Make a base out of red cardboard by folding the sheet in half. And from the white, cut out the frame using curly scissors.

2. Cut a strip out of plaid and a small rectangle out of pink paper. Take the middle of the frame and make a tag out of it.

3. Glue the checkered strip to the bottom of the cardboard.

4. Tint the tag with pink pencils or paints, make a hole and sign.

5. Glue the lace on the double-sided tape.

6. Take a rectangle of paper with polka dots and glue in the upper left corner, and glue the frame on top.

7. It remains to decorate the product by gluing beads, a flower and a satin bow.

Here are a few more photo options in this technique. If you do not have suitable paper, you can buy it at the office. Such paper is called for scrapbooking.


Volumetric paper cards for children in kindergarten
I show in detail how such a miracle thing can be done using the same cardboard and colored paper.

We need: yellow double-sided cardboard or thick paper, scissors, glue, colored paper.
Manufacturing process:
1. Take a green piece of paper and fold it in half. Then make cuts along the fold line: large at the edges, and small in the center.

2. Now open the sheet and push out the steps.

3. Cut flowers out of colored paper. Fold the yellow cardboard in half, and make the base oval and stick it onto the cardboard. Glue the finished flowers on the protruding parts.

But ordinary buds, made with an accordion in a circle, also looks cool.

I'm afraid of nowhere without origami technique, so let's learn to fold.

Well, here volume is created due to cut out buds, which are partially glued.

Simple work of halves of a circle, but how elegant it looks.

Such lovely flower meadows, do not forget to glue a wish on the back.

A simple basket, plus the work of a curly stapler and voila, the masterpiece is ready!

Twisted roses, and it is better to use napkins.

But I was also inspired by works with the use of decorated pasta, such creativity will definitely appeal to little children.


Video plot on how to make a gift from napkins
Products made from ordinary napkins are very bright and beautiful. I have prepared an excellent video for you, see if you can try yourself in this work.
A great time to accompany dad with children, and mom will be pleased!
Beautiful cards for March 8 for children from 3-10 years old
We continue to do needlework with you and choose what we will do with the children in 2019. The selection is useful for teachers, because probably in labor lessons you make something like that, but here once, ready-made ideas and you don't need to invent anything.
- Mimosa.
We will need: a sheet of glossy thick paper, a green felt-tip pen, a household viscose napkin yellow color, pencil, glue stick, scissors, bright ribbon, green paper.
Manufacturing process:
1. Take a white A4 sheet and fold it in half. Round the corners by drawing rounds. Cut the corners with scissors.


2. Use a green felt-tip pen to draw twigs approximately in the center.

3. Cut out the fringed leaves from green paper.

4. Stick them on the branches, but only in the middle, and fluff the cuts.

5. From a napkin, first cut a strip, and from it circles. Glue the flowers onto the twigs.


6. Decorate the bottom of the base with a ribbon, write or paste a wish inside.

Also pay attention to felt and bead products.

Check out what colorful flower pots you can create. I think that mothers and grandmothers will definitely like it.

And here are the flowers, decorated with buttons. Like the idea?

Here's another piece with buttons and again a cute orange elephant.

You can also use corrugated paper to decorate bouquets.


And if your guys are older and know how to paint well with watercolors, then here are a couple of ideas in this particular technique.


This is for preschoolers - kids love to decorate their palms! And if you make a flower out of them, it will be a real miracle for them.

How to make a folding card with your own hands
Almost most of the gifts are made on folded sheets, so you get such a folding congratulation. Let's see what else you can create.
- "Since March 8".

We need: white paper, colored paper, felt-tip pens, curly scissors, glue.
Manufacturing process:
1. Take a sheet of white paper, fold it in half. On the front side, with felt-tip pens, draw any spring picture.

2. From a sheet of colored paper, make an insert inward in a smaller size, cutting along the edges with curly scissors.

3. Now cut out the flowers.

4. And then a vase.

5. Followed by a number and letters. Stick the insert on the prepared white base, then the basket, flowers and the inscription. Do not grease the middle with glue so that you get volume when you open the product.

Also look at what beauty you can create from flower hearts !!

Folding butterfly. A real spring gift. Look for a template for making it just below.

And the koalas from cotton pads in a beautiful package? Well, just like the real ones! Do you like it?

Postcard-book, each page has its own congratulations. Very impressive, though you will have to work longer.

The already known scheme of imparting volume due to protrusions. This option can be done for a sister or girlfriend.

If you have not yet decided on the choice of the product, then read on.
Master class on making 3 d postcards
And I suggest that you do this kind of work with tulips, because they are always given. I just adore these flowers!
We need: colored paper, colored cardboard, scissors.
Manufacturing process:
1. Fold a few tulips out of colored paper, according to the diagram below.

2. From a strip of green paper, make stems, folding several times. Connect the stem to the bud with glue.
3. Bend a piece of cardboard and open it, make cuts at the bottom. Flex and unfold again, and then pull the paper out of the cuts. Insert a bouquet into this vase.

It is very cool to give cards with hearts on Women's Day, as we show how we love our loved ones and dear people. Take a look at these works:


But on the front side, you can glue any flower or make an inscription.
And of course, how are we without 3d bouquets !!


I also liked the idea with pink flamingo: we make the body out of a cannon, and paint the rest with watercolors.

Original congratulations with blossoming flowers for the teacher
In addition to our mothers, grandmothers and sisters, we are in this spring holiday Congratulations to teachers and educators. Therefore, I prepared different creative ideas for them separately.
- Wish tree postcard.

We need: colored paper, scissors, pencil, glue.
Manufacturing process:
1. Print the template for the craft and decide in what color the composition will be made.

2. Take a piece of paper that will be the base. Fold it in half, round the corners. Redraw the tree pattern. Cut a large number of petals into different sizes.

3. A full flower will need at least 8 parts. When you cut them out, lay them out on the base to find out how many flowers still need to be made.

4. Stick all the details and don't forget to sign!

It is very cool to make a product for the whole class in the form of palms with poems, both simple and original.

How do you like this lovely little book? Blooming flowers are at the head of everything.

Or a cute version with roses, and we make the leaves using the quilling technique.

Such a miracle is perfect for a music worker, don't you think so ?!

Or here is such a magical version of a folding congratulation, just lovely!

I think that any work you create will really please your favorite teachers.
Stencils for March 8 for elementary school and not only
In the end, I have prepared simple templates for cutting for you. So don't lose, but rather save.
- The "butterfly" that was promised to you above.

- Eights and flowers.


- For those who are good at cutting.

- With animals + coloring.


How many colors came out in this article! Well, it's my fault that we girls love them very much. So dear teachers who will make gifts in the form of postcards with our children, do not think that we are tired of bouquets). And I, too, will go with my daughter and make presents for March 8 for grandmothers. See you.
Choosing a postcard theme
It would seem, what to choose? The eighth day of March in our country is a women's holiday, which means you need something pleasant for women. And here is a place for thought, because the theme for the postcard can be:- flowers (bouquets and individual flowers);
- plant motifs (leaves, twigs, blades of grass and other flora);
- beautiful abstraction (spots, splashes, curls and doodles);
- family motives (stylized image of the whole family, mother-child relationship);
- motherhood (happy mother in different life or comic situations);
- femininity (any images associated with femininity - personal care, outfits);
- culinary theme (charming pastries can cheer up many women);
- animals.

Choosing a technique of work
To understand how to do it, you first need to figure out what techniques are available to you, what you can work with. It can be:- painting and graphics;
- application;
- scrapbooking;
- origami;
- decoupage;
- embroidery.
Different themes and different techniques
Several examples of postcards, different on the topic, which are made in different techniques with a brief description of the work.
Graphics and flowers
The simplest combination, it is very easy to make such a postcard. Draw flowers using any technique you like - watercolors, alcohol markers or even gel pens, fold the sheet in half and decorate the drawing a little by adding small details - for example, glitter gel pens.Or, cut out several circles of different diameters from multi-colored paper, and then cut each circle in a spiral and twist them into buds, you get cute little flowers that you can decorate a postcard with.

Another option for a postcard:

You will also need to sign the postcard - you can try to portray beautiful inscription do it yourself, using the technique of fake calligraphy, or you can simply print the inscription you like from the Internet.

options for phrases for printing from the site:


Plant motifs and quilling
Quilling is an ideal technique if you want you to get voluminous and original beautiful postcards by March 8,. To work, you will need a sketch or a master class, a blank of thick paper for a postcard (for example, colored cardboard) and strips of colored paper for quilling.It is necessary to lay out a drawing from stripes according to a sketch, gluing it in such a way that it keeps its shape well. Or use a master class and follow its recommendations. These postcards turn out to be very effective and beautiful.

If you want you to get a voluminous beautiful postcard for March 8, made by hand, then it makes sense to make all the elements in the quilling technique separately, and then assemble them on the blank - so you can work out the composition and come up with your own style.
Abstraction in any technique
This is a pretty easy way to make beautiful cards in just a few minutes, especially if you have minimal paint skills and understand how to mix colors on a sheet so that you get beautiful streaks, and not dirt on the sheet.
You can try the technique of marbling or sumingagashi - dripping on the water special paints, and streaks are "removed" on the paper by dipping. This technique allows you to simulate marble - I think you will have beautiful abstract greeting cards.
You can try using a monotype - for this, on any smooth and non-absorbent surface, you need to apply a few drops of liquid watercolor, attach a sheet of paper and remove - you get a beautiful print that can be used as a background for a postcard.

Marbling, like monotype, is very easy way make a beautiful background, and a background made with your own hands can be decorated with a ready-made inscription (for example, printed from the Internet).
More options for phrases for printing from the site:


Scrapbooking and femininity
Working in the scrapbooking technique is interesting and quite simple, but you will need to visit a creative store to buy materials for work - cuttings, chipboards, beautiful scotch tapes, interesting texturing pastes and all kinds of glitters.Choose an image for your postcard - for example, dress and lace. This is not a very complicated image that even a child can embody. So, you need to choose a background for the card, cut it out and glue it to the base.

Then make the central element - the dress. Top part just cut out of paper, the lower one is better to fan out to give a little volume. Glue a piece of lace and some kind of small symbol on the background - it can be the number eight, a flower, a bird or a butterfly, and then set the center element, and your card is ready.


See the steps for creating cards with dresses in the video:
Origami and animals


It is very easy to learn how to fold origami, and a three-dimensional postcard decorated with origami looks interesting. Try folding a cute fox, cat, or bird.
To make a postcard, you will need origami paper (you can replace it with ordinary colored double-sided paper), a base for the postcard and decor of your choice. If you want the card to be elegant, then you can use sparkles, foil ornament and stars.
And if you like minimalism, then a solid background and a bright paper animal are an excellent choice!


Culinary theme in different techniques
If you want to make a culinary-style postcard, then you can take different motives - a jar of jam, a beautiful cupcake, or just a cup of coffee. Such a greeting card will be cozy and charming.For manufacturing, you will need materials for scrapbooking, but you can get by with improvised means - trimming beautiful paper, unusual laces and labels, multi-colored tape and voluminous flowers. Gather finished goods- a pleasure, especially if the topic is close to you.


A few more ideas + Video bonus


Now you know how you can make an unusual beautiful postcard for any holiday and on March 8th. If your child wants to make a postcard for mom on March 8 with his own hands, then it is better to turn on a video lesson for him - one that was recorded by the child, so it will be clearer and more interesting for the baby, and the postcard for mom will turn out to be just great!
In spring, one of the brightest and most beloved holidays is celebrated on March 8. On this day, it is customary to congratulate your loved ones and beloved women. It is customary to give postcards. As one of the options, it can be a photo postcard. Photo postcard for March 8 will delight mothers, grandmothers, girlfriends, beloved girls.
Mimosas, tulips, snowdrops are spring flowers, suitable for holiday pictures, they can be bought in a regular store.

Types of photo postcards
- Only with a picture. You need to write the text of your wishes yourself.
- With poems already printed.
- The picture says to whom it is addressed: grandmother, mother, friend, sister.

As an alternative to the purchased one, you can make a postcard with your own hands. Will especially delight mom.


- Quilling.
- Origami.
- Application.
- Use of ribbons.

Application
One of the easiest paper handling techniques. A base is selected from cardboard, details are cut out from colored paper: flowers, the big eight. With the help of glue, the elements are glued to the base. You can write the text of congratulations.

Quilling
Beautiful postcards for March 8 can be made using the quilling technique. The blanks are purchased from a stationery store, but you can cut colored sheets of paper into thin, long pieces.

Part of quilling is paper rolling. Corrugated paper is used, cut into strips, glued to the base. A quick way to create a surprise. Easy to make a variety of flowers, lettering.

Origami
In the origami technique, you can make beautiful greeting cards from March 8th. In this technique, it is easy to do voluminous tulips, snowdrops. Snowdrops are suitable for a postcard, they are glued to the background, as a result, the picture is voluminous.

Ribbons
Ribbons are arranged together with paper. They can wrap an eight cut out of cardboard, then glue it. It will look much prettier.

How to make an origami card for March 8
It is the lightest and quick way to create masterpieces, suitable for both adults and the smallest children.
For such a technique, you will need a minimum number of components: glue, colored paper, scissors, cardboard. It is better to use a glue stick, it glues the paper well, it takes a minimum amount of time to dry, it will not spoil appearance postcards.


Flowers in a vase
To decorate the postcard, you can use decorative elements: beads, sequins, sequins. Fold the cardboard in half, cut out a detail that resembles a vase, the shape can be any. You can pre-cut the template from paper and circle it on cardboard. One of the parts of the cardboard vase is two centimeters longer.

Glue the details of the vase together, only along the edge to make a pocket. Decorate the vase with an ornament. Cut a rectangle out of cardboard, the width of which is equal to the width of the neck, and the length is three centimeters more than the height of the vase. Insert into pocket.

Cut out the leaves from green paper. Glue to the protruding part of the rectangle. For more volume, add a few long leaves. Glue flowers on top, use different shades.

In the middle of each flower, you can glue a bead, button or sequin, decorate with sparkles. Write congratulations on March 8 on the vase.

Lilac from paper lumps
Made from napkin or corrugated paper... Cut into small squares and download into lumps. For lilac, use purple, red shades, the background is light. The lumps are glued to form flowers. Decorate with leaves and inscriptions.

Eight
Take a sheet of colored cardboard and fold it in half. Cut out a double eight, leave rectangles at the bottom, bending them in the middle, the number will stand. Glue the parts of the base. You can decorate with mimosa flowers from multi-colored napkins. Cut each into four parts, download into lumps.

Glue a twig of thuja to the bottom of the postcard. Decorate with mimosa flowers from prepared lumps. You can complement the composition with figures of butterflies, on back side write congratulations to mom.

Postcard with plasticine
You will need cardboard and plasticine. Choose a suitable background that differs from the tone of the flowers.

Swing thin sticks out of green plasticine, depict grass and leaves on cardboard from them. Swing the petal sticks in the same way. Twist with a spiral for each petal separately, you can combine shades. Fast and easy way.

Using your imagination and improvised means, you can make various works to please your mother on this bright holiday.

DIY photo of postcards for March 8


Summary: DIY postcards. Do-it-yourself card for mom. Do-it-yourself card for grandmother. Postcards for March 8. DIY postcard for March 8. DIY gift for mom. DIY gift for mom on March 8. DIY gift for grandmother. DIY crafts for March 8. Crafts for March 8 in kindergarten. DIY paper crafts by March 8.
Do-it-yourself card for March 8 is a wonderful gift for any girl or woman. It's a real pleasure for children to make DIY cards for grandmothers and mothers, even with the participation of adults. The participation of adults in the preparation of the surprise is important in order to show the child an example of how to do it. Welcome any imagination in the design of the postcard. Your ideas and creative examples will help the little one navigate and add something of their own.
1. Do-it-yourself card for mom
The child will definitely like the idea of encircling his own palm, cutting out the resulting silhouette and making a postcard for mom from it.

Separately cut and glue a bouquet of spring flowers from colored paper. Glue your palm to the front of your March 8 card. Just leave your fingers not glued! Put flowers in them, bend them and only then glue them. Do-it-yourself card for mom is ready!


From the silhouette of a child's palm, you can make another original postcard for March 8 with your own hands.
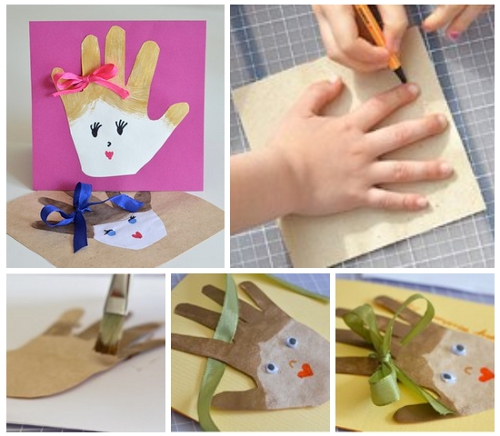
Here is another version of a postcard for March 8, decorated with volumetric applique from paper. A very kind, beautiful and gentle postcard. You can view the instructions and download the postcard template on the website Krokotak.com

Volumetric postcard "Vase of flowers". It is very simple to make it. Flowers are made of colored circles of different diameters. The vase is made of a rectangular piece of paper glued to a postcard. For detailed instructions on how to make such a gift to your mother or grandmother with your own hands, see.

A spectacular postcard for mom is easy and quick to make using an ordinary hole punch. To make this postcard for March 8 with your own hands, you will need blue paper and yellow flowers... Link >>>>

Here is another interesting option for how you can make a voluminous postcard for mom with your own hands. Flowers are made of corrugated paper, etc. chenille wire... The card itself is two-layered. For more information on how to make such a voluminous postcard as a gift for March 8, see.


3. Do-it-yourself card for grandmother
A child can make this voluminous postcard together with his mother and present it to his grandmother or aunt. Detailed instructions for making a voluminous postcard by March 8 with your own hands, see the link >>>>

A postcard for March 8 with your own hands can be decorated with an original applique in the form of spring flowers, made of circles folded in half. See link >>>>

Here is an example of another do-it-yourself volumetric postcard, decorated with an applique in the form of flowers made from circles of different sizes. Both the petals and the leaves of the flowers on the card are made of two circles each: one larger, the other smaller.


A beautiful volumetric applique flower is also obtained from hearts folded in half. For detailed instructions on how to make this postcard on March 8, see.


Applique flowers
Here we want to give a link to the book "Flowers. Simple application (for children from 2 years old)" by the publishing house "Karapuz". In it you will find many interesting and simple ideas how to make an applique flowers to decorate a postcard for March 8. The book does not have to be bought, all illustrations from the book are posted on the website of the Labyrinth online store.

Continuing the theme of paper flowers for beloved mothers and grandmothers, we will share with you interesting master class from the site maaam.ru Do-it-yourself card for March 8, decorated voluminous flower from paper. How to make it, see.

This homemade card for March 8 is decorated with a volumetric applique made of colored paper. To make one tulip flower, you need to cut out two identical tulips according to the template, bend them in half, and then glue them together with the sides. To add volume to the leaves of flowers, fold each leaf in half and glue only one half of the leaf to the card.

The paper flower can be wrapped in a paper lace napkin. You will get a very delicate spring bouquet. Link >>>>

A creative solution is to make a card for March 8 in the shape of a cup, inside which you put a bunch of paper flowers. Please note that the front side of the postcard is decorated with vytanka flowers. Vytynanka is type of creativity, which is based on cutting paper patterns. For cutting, use ordinary office paper or sheets of Whatman paper. You can cut stationery knife or with a special breadboard knife. Also, nail scissors are often used to cut out patterns.


An original flower applique can be made from colored pencil shavings.

Paper cupcake cups or paper coffee filters can also be used to make flowers to decorate March 8 cards. In the center of the mold, the child can stick his photo.

A rose print leaves a celery root on the paper when painted over. Try to make a do-it-yourself card with your child using this unconventional technology drawing.


Surely, you are familiar with the paper weaving technique. Using this technique, you can create beautiful paper napkin rugs. See link

By weaving such a paper rug, you can then cut out a basket for mom or grandmother from it. Be sure to decorate the finished basket with flowers. Link >>>>

The card pictured below is decorated with flower petals made from corrugated paper. How to make such an original volumetric postcard for March 8 with your own hands, see the link >>>>


Flowers can not only be cut out of paper, but also drawn with paints, pencils or felt-tip pens. Here interesting way decorate a postcard for mom on March 8 >>>> First, very easily outline a plot spot with a simple pencil. Then use watercolors on wet paper to paint colorful spots. When the paint is dry (you can dry the paper with a hair dryer), use a black thin marker (felt-tip pen) or a gel pen to paint streaks on the leaves, flowers, decorate and sign a postcard for mom. Another related link.

You will find a master class on making a postcard for March 8 with your own hands with a voluminous napkin applique on the Country of Masters website.

Quite interesting postcards are obtained if you use elements folded using the origami technique in them. These are elegant postcards that you can make with your own hands for a woman using an origami dress. Such dresses can become both a decorative element of a postcard and an independent decoration, for example, a tag for a gift.


Master class on making origami dresses see the link >>>>

And here is a simpler version of a postcard for March 8, decorated with a paper dress. Here the dress was made from a book page. The bodice of the dress was cut and glued separately. We made a separate skirt by folding thin strips of paper like an accordion.

And another example of a do-it-yourself card for March 8, decorated with a paper dress. For this dress, a skirt is cut out and folded separately from paper, and a bodice is separately. Take advantage of ready-made template dresses. See link.


Finally, the simplest version of a voluminous postcard for March 8, decorated with a tutu skirt. The skirt is made of a strip of paper folded like an accordion.

From plasticine flagella (sausages), a child can make an original application as a gift to his mother or grandmother for the holiday.

The basket with flowers in the photo below is also molded from plasticine sausages. It turned out a beautiful and original postcard for mom on March 8th.

Here's an example of another interesting postcard on March 8, made of plasticine using the applique technique.

Handbag- an indispensable attribute of every woman, so it would be appropriate to depict her on a postcard. For example, you can make an applique in the form of a handbag made of colored paper, decorated with rhinestones and sequins. Link >>>>


And also required attribute a true lady - a lady's hat. Complement your gift for your beloved mother with a small original postcard in the form of a hat. How to make this card for mom on March 8, see. It stands well on the table. Inside is a congratulation. Outside - any design you want. You can come up with a wide variety of decorations for the hat: flowers from napkins, flowers using origami technique, quilling technique, as well as buttons, lace, ribbons, sequins.

If your mother and grandmother are big tea lovers, then for them you can make a postcard for March 8 with your own hands in the form of a cup with a tea bag.
Here's the easiest option.
Make a cup and saucer applique out of colored paper. At the same time, not completely glue the cup to the base of the postcard so that you can put a tea bag inside.

And here are two more interesting options for making a postcard for March 8 with your own hands, but they are also more complex.
To make a voluminous postcard as in the photo below, download the postcard template from the link. Print it out and let your child color. After that, you need to make cuts on both parts of the card with scissors and insert one part into the other. For detailed instructions on making this craft for March 8, see the link >>>>

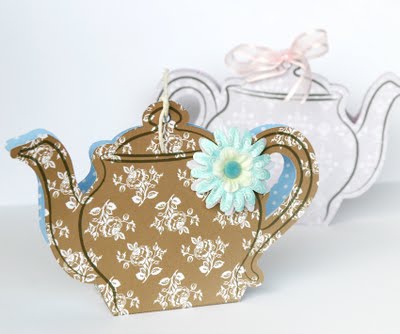
And this postcard is in the form of a teapot. Inside you can put delicious tea bags and congratulations on March 8th. Template for making a postcard with your own hands on the link. To make this paper craft for March 8, you will also need a beautiful ribbon.

If you want to emphasize the role of a mother or grandmother as a hostess in the house, if your mother or grandmother loves and knows how to cook deliciously, then make a do-it-yourself card for them on March 8, decorated with a paper applique in the form of a kitchen apron.


On the same site there is a section with do-it-yourself voluminous postcards for March 8. Postcard in the form of a bouquet of flowers, or a cup of coffee or a basket of flowers. all this and more can be found on the Creative Park website.


10. How to make a postcard. Postcard templates
Volumetric postcards-toys from the site www.nika-po.livejournal.com deserve special attention. These postcards will occupy the attention of the recipient for a long time, he will roll the ball through the labyrinth or follow the sprinkling beads. The main element of all these volumetric postcards with a window - a plastic lid for food packaging (for example, for sour cream). Detailed master class on how to make a postcard with your own hands, see. Here is another link to the book of the author of the site, the book is called "Entertaining postcards".
