Small Christmas tree with original hands. From what can you make a Christmas tree with your own hands? Christmas tree made of cones
Helpful Hints
The Christmas tree is a symbol of the New Year, so many people want to make a Christmas tree with their own hands and give it to loved ones or decorate the house and / or their Christmas tree.
There are many options for how you can make a Christmas tree with your own hands.
In this article we will consider the most interesting options for small Christmas trees from various materials that you can make at home.
Christmas tree from an old book

1. Prepare an old, unnecessary book (the thicker the better), carefully remove the cover.
2. On the first page, draw the outline of the Christmas tree and cut along the contours (see image).

3. Using the Christmas tree template, trace the shape of the tree on all sheets and cut it out. You can cut multiple pages at once.
4. Paint the edges of the pages.

5. Cut out two stars of the same size from colored paper or wrappers, glue them together and at the same time with the top of the Christmas tree.

Christmas tree craft made of thread and buttons

You will need:
Styrofoam cone (can be made from cardboard and wrapped with foil)
thick thread
Buttons different shapes, sizes and colors
Hot glue
Pompoms (optional)
Scissors.
1. Glue the end of the thread to the bottom of the cone. Start wrapping the thread around the cone, adding glue from time to time to secure it.


2. Glue the pom-pom to the crown and the buttons to the Christmas tree.

Christmas tree made of cones (pictures)

You will need:
Acrylic paint or gouache and brush
sequins
PVA glue
Hot glue or plasticine, stars and small pots (if needed)

1. Wash, dry and color the bump.

2. Decorate the bump with glitter. You can add some glue and sprinkle with fine salt to imitate snow.
3. You can buy small pots and use hot glue to glue the bump to them. Instead of pots, you can use colored cardboard. If there is no hot glue, you can use plasticine.
4. You can make paper stars for the crown. Stars are also available for purchase.
How to make a Christmas tree from funnels and fabric

You will need:
Wide ribbons in any fabric
3 funnels
Hot glue
colored cardboard
Small styrofoam balls (3-5 pieces) to stick to the tip of the funnel
Little Christmas decorations.
1. In order to evenly put one funnel on top of another, and they do not stagger, you must first glue a foam ball to the spout of one funnel with hot glue, and glue the next funnel to it.

2. For the base, you can use a toilet paper or paper towel roll. It must be cut, painted or wrapped with colored paper or tape, and glued to colored cardboard. You can also use other items of similar size.

Christmas tree made of colorful ribbons (master class)

You will need:
foam cone
Multiple Tapes different colors(width about 1cm)
Scissors
pins
Any decoration for the crown (asterisk, pompom)
PVA glue.

1. Cut out a circle from felt to glue it to the bottom of the cone, thereby ensuring its stability.

2. Start cutting into pieces of 10 cm long ribbons.

3. Fold each piece of ribbon in half and thread a pin through it. Make several of these.

4. Starting at the base of the cone, attach the ribbon pieces with pins to the cone (see image). Make one row first, then with a small overlay the second (to cover the pin) and so on.
The last row can be glued to avoid using pins.

5. Glue the crown. It can be a bow, an asterisk, a pompom or something else.
DIY Christmas trees made of felt

You will need:
Felt of any color
Crepe paper
Thread and needle
Hot glue.
1. First, cut out a few squares of felt. You should choose 3 colors and cut out several squares of different sizes for each color.

2. Fold all the squares into one pile, alternating colors, and thread a needle and thread through them.
To become the owner of a Christmas tree, you don't have to buy it- just take a look at helpful tips and find out how you can beautiful Christmas tree do it yourself.
Today you can find many Christmas trees in stores and on the street.
You can put in the house a natural Christmas tree or sprigs from a Christmas tree for smell, but you can decorate a house, or a gift for a loved one, knowing a few interesting tricks.
Learn how to make a Christmas tree paper, food, fabric and even pasta.
Make this craft quite easy, and your house will be decorated with a unique decor, and friends and acquaintances will be happy to receive a Christmas tree made by you as a present.
Christmas tree made of paper with your own hands. Christmas tree made from scraps of magazine pages.
You will need:
Unnecessary magazine or book with bright pictures
Cardboard or thick paper
Glue gun or PVA glue
Shaped hole punch, optional
Pencil or pen
1. Make a cone out of a thick sheet of paper and fix it with glue.


2. Prepare pages from a magazine with bright pictures and cut out many circles of the same diameter from them. If there is a shaped hole punch (the shape of a flower or a large circle) it will be easier.
3. Wrap the cut circles around the pencil so that they curl a little.


4. Starting from the bottom of the cone, start gluing the bent circles.
Make neat rows. The circles should be tightly glued to each other so that the cardboard is not visible.
5. From one circle, make a small cone, and glue it to the top of the cardboard cone.
The tree is ready!
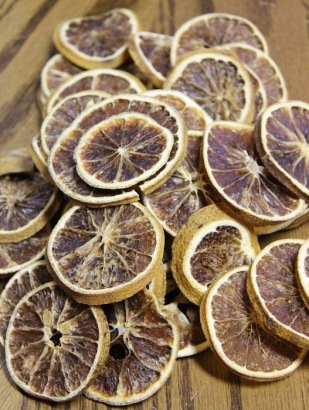
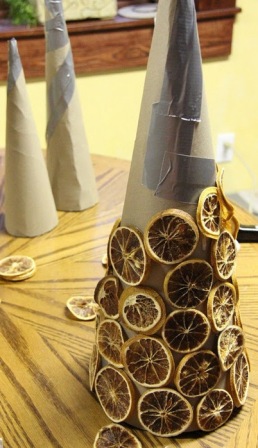
DIY Christmas tree made from cones and dried citrus fruits


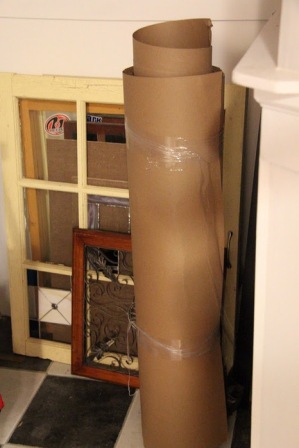


Christmas tree with your own hands (master class). Trees from wrapping paper.


You will need:
Large thick sheet of paper
Wrapping
double tape
Scissors
Decorations
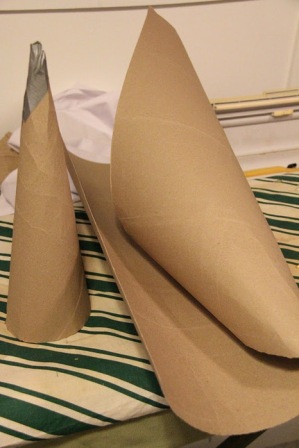
1. Make a cone out of a sheet of thick paper.
* If your wrapping paper is quite thick, you can bypass step 1 and make a cone out of wrapping paper.

1.1 Fold the paper diagonally, holding one end to keep it sharp.

1.2 Secure the folded paper with tape. You do not need to do everything too carefully, since you will cover the cone with wrapping paper.

1.3 Cut off the excess at the bottom of the cone to make a flat base.

2. Prepare a colorful wrapping paper and cover the cone with it. To do this, lay the paper face down on a flat surface.

2.1 Using tape, attach the end of the colored paper to the top of the cone.
2.2 Start slowly twisting the cone, wrapping it in wrapping paper. You need to wrap the cone tightly.

2.3 Measure the paper and cut before wrapping the cone all the way around. Glue double tape to the edges and connect to the other end. At the base, you need to cut off the excess so that the paper is even.


3. It remains only to decorate the Christmas tree as desired. You can do paper stars, use glitter, stickers, glue beads and / or buttons, wrap with ribbon, etc.

Similar trees:


Christmas tree made of fabric with your own hands. How to make a Christmas tree out of felt.


You will need:
Glue or double tape
Scissors
* Try using felt in two colors to make the Christmas tree even more beautiful. In this example, yellow and orange felt was used.
1. Make a cone out of cardboard. Secure the ends with glue or double tape.
2. Prepare the felt and cut out circles of different diameters from it, from small to large (see picture). You can use pre-prepared circle templates made of cardboard.

3. Glue Christmas tinsel to the bottom of the cone.
4. Now you need to make a criss-cross cut in the center of each circle cut out of felt. Do not cut too much so that the felt robe does not fall. Make an incision exactly such that you can tightly put the circle on the cone.
5. Start gradually putting the circles on the cone. If you use two colors, then put on the circles in sequence, first one color, then another. Also worth noting. That you need to put on the next circle not only on the cone, but also over the tips of the cuts of the previous circle.


6. We decorate the top of the Christmas tree. To do this, simply add tinsel, to which you will need to add a pre-prepared small cone of felt. Fix the tinsel and crown with glue.
* If you wish, you can hide a sweet gift inside the cone.


Original Christmas trees with their own hands. Glowing tree.
You will need:
Floral florist net (preferably several shades of green)
Scissors
Cardboard for the cone
PVA glue
Cellophane
pins
Garland
floral wire
Decorations on request

1. Make a cone out of cardboard.
2. Wrap the cone in cellophane.
3. Take any container and make a solution of PVA glue in it and a small amount water
3. Prepare your floral grid. Cut it into small pieces and lower each into a container with a solution.
4. Start gluing the pieces onto the cellophane-covered cone. Glue different shades of mesh in different directions. The joints should be anointed with another layer of glue for a more durable fastening.
5. Secure the entire structure with pins and wait for the glue to dry.
6. You have the first layer of the Christmas tree. Now in the same style you need to make a second layer. After finishing gluing the second layer, leave the structure to dry.
7. Now remove the Christmas tree from the cone - the glue should quickly lag behind the cellophane.
8. Place a garland inside the Christmas tree, which you need to secure with floral wire.
9. It remains to decorate the Christmas tree according to your taste.
DIY Christmas trees (photo). Christmas tree made of pasta with your own hands.

You will need:
Plastic or foam cone (or you can make your own out of cardboard)
PVA glue
Pasta various forms and sizes
spray paint, acrylic paint or gouache
Tassel.
1. Prepare the cone and paint it in the desired color. Wait for the paint to dry.
* If you are using spray paint, you can skip this step.
2. Prepare pasta. Start applying glue to each piece and stick the pieces to the cone. Create a Christmas tree design the way your imagination tells you.
After applying the glue, press the piece a little and hold it so that it adheres well to the cone. It's okay if glue is visible from under the pasta.
Continue until you have covered the weight of the cone with the pasta. Wait for the glue to dry.

3. Start painting on the pasta. In this example, acrylic paint was used. Try to carefully paint all the details so that there are no empty spots.
* It is desirable to paint in two layers.
* If painted with white paint, the Christmas tree will look like a porcelain product.
Useful advice: if you want to remove the craft, then put it first in a plastic bag, so you can immediately find the part that could come off the cone.
We make a Christmas tree with our own hands. Bright paper tree.

You will need:
Colored cardboard or design paper
Thick cardboard
Glue moment or glue gun (with hot glue)
1. Cut out a square base for the Christmas tree from thick cardboard.
2. Insert the skewer into the cardboard and fix with glue.
3. Now you need to cut out circles of different diameters from designer paper or colored cardboard. You need to make 3 circles of the same size.
For example, if you want to make circles in 10 different sizes, then you will need to cut out 30 circles (3 for each size).


* If you don't want to cut out a lot of circles, just shorten the skewer and you end up with a cute mini Christmas tree.
4. Make a small hole in the center of each circle.
5. Before you start putting the circles on the skewer, grease the hole in the middle with glue.
6. Start putting the circles on the skewer, leaving some space between them.
7. Cut out stars from paper and glue them to the top of the Christmas tree. You can use another detail for the crown and not necessarily paper.
Crafts. Fir-trees from a thread with their own hands.


You will need:
thick yarn
Pile yarn
Cone (made of cardboard or foam)
pins
Decorations to taste.
1. Do paper cone or buy a Styrofoam cone in specialized stores.
2. Take both strands and secure their ends with pins at the base of the cone.


3. Start winding the threads around the base of the cone, pinning about every 2 inches.
4. Now start moving towards the top of the cone, gently wrapping the future Christmas tree with both threads. At this stage, you do not need to attach the thread to the cone.
5. When you get to the crown, secure the threads again with pins, wrapping the threads several times around the crown.
6. Both yarns now need to be pulled down, also wrapping the cone with a second layer.

7. Cut the threads at the base of the cone and fasten them.
You can leave the tree as it is, or you can also decorate it.

In this example, artificial berries were used for decoration, but you can use multi-colored beads, buttons, buttons, etc.


Try also to make a decoration for the top of the Christmas tree. The crown can be decorated the way you like.
You can leave the tree as it is, or you can also decorate it.
You can make just a paper hat or a star, or you can make something more complicated. If you chose the latter option, then the instructions for you follow.
You will need:
flower wire
Wire cutters (for wire)
sequins
PVA glue
Fine wire (calibrated wire)

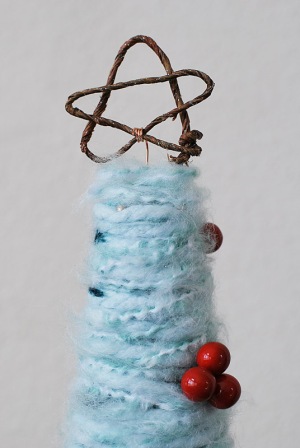
1. Bend the wire into a star shape (see pictures) and cut off the excess.
2. Cover the star with glue and sprinkle glitter on it.
3. Attach a thin wire to the star, as shown in the picture:
4. Attach a star to your Christmas tree.
DIY creative Christmas tree

If you want something original, or you just don't have enough space for a large Christmas tree at home, you can try to make such a simple design.
It is worth noting that such a tree is suitable for any room. It can be done both at home with children and at work.
This Christmas tree can rise by 1.5-2 meters and takes up almost no space in the house. In addition, it is a good background for New Year's photography.
You will need:
Foam base or matte cardboard
Scissors
corrugated paper
masking tape
adhesive tape
PVA glue
Stationery knife
marker, optional

1. Lay out the styrofoam or cardboard on a flat surface to get a large rectangle (see picture).
2. Use adhesive tape to connect all parts.
* In this example, we used adhesive tape black for better visibility, but it's better to use white tape.
3. Mark the size of your future Christmas tree with masking tape.
4. Using stationery knife, carefully cut out the shape of the future tree.
5. cook corrugated paper, fold it in half and cut the fringe. You should have plenty of fringed paper to cover the entire Christmas tree.
6. Start gently gluing the crepe paper to the styrofoam, starting at the base of the tree. The fringe should hang a little below the base to cover the foam (or cardboard) and also cover a little upper part tree trunk, which we will make later.

7. Move to the top, covering the entire tree with a bright green fur coat made of crepe paper.
8. FROM reverse side Christmas tree, add a hook so that the tree can be hung. Instead of a hook, you can use double tape to cover the perimeter of the Christmas tree.
9. To make the barrel, you need to cut a small rectangle out of foam or cardboard.
9.1 Cover the rectangle with brown paper in the same way as the Christmas tree, i.e. cutting the fringe paper strips and gluing them.
Soon the New Year 2018 will knock on all doors, and the houses will be filled with the smell of tangerines, vanilla and chocolate cookies, and pine needles. However, they won’t feel the unique aroma emanating from the green beauty somewhere: the owners of these dwellings, after watching videos and photos on the topic “how to make a Christmas tree with their own hands”, decide to save nature - not to buy cut down trees. Instead, they will make a Christmas tree at home from such improvised means as ribbons, balls, cones, paper, cardboard, cotton pads, tinsel. Even decorations for such a beautiful craft they can be homemade - children will make them in labor classes at school and kindergarten. What else and how can you create a unique Christmas tree? Simple master classes with step-by-step explanations will tell you about this.
How to make a Christmas tree with your own hands at home to school or kindergarten

Surely, you will want to help your child in making his best Christmas crafts. To do this, first find and mark for yourself the most unusual ideas to create a fluffy Christmas tree. Study carefully the master classes and photos that tell you how to make a Christmas tree with your own hands at home to school or Kindergarten. Bookmark the pages you have marked or print detailed explanations on how to create the craft on the printer.
Examples of Christmas tree crafts with photos and videos

If you have long been nurturing the idea of making a homemade Christmas tree instead of buying another felled tree for the New Year, read how you can make a Christmas tree yourself at home - bring it to school, kindergarten or decorate your house with a green beauty. Pay attention to our selection of photos and videos - the materials will tell you what and how to make crafts from.


How to make a Christmas tree out of paper with your own hands in a kindergarten - DIY crafts master class at home
Children preschool age they are still not too deftly able to handle scissors and carefully connect the details of handicrafts. As a rule, a teacher or parents help children of this age to make something original. Having learned from us everything about how you can make a wonderful Christmas tree out of paper with your own hands and take it to the kindergarten, having studied the master classes of crafts for creating a mini-Christmas tree at home , moms and dads will be able to explain to the children what needs to be done in order for the craft to come out neat and beautiful.

Examples of homemade Christmas trees made of paper and cardboard

For creating paper crafts requires care and patience. Learn how to make a Christmas tree out of paper with your own hands in a kindergarten - a crafts master class at home with photos will tell you all the steps step by step.


Paper Christmas tree toy for the Christmas tree - Master class with explanations on the photo

To create this mini Christmas tree, New Year's toys, you will need to carefully study the photo explanations of the master class.
- Fold the green square of paper in half twice and unfold it - you will see the fold lines.

- Start folding the figure, focusing on the fold lines.

- Consistently follow all the steps shown in the photo.


- Cut off the bottom part of the workpiece.

- Make symmetrical cuts on both sides of the workpiece - you will have a Christmas tree!

How to make a Christmas tree with your own hands at home to school for a competition - Master class with instructions
On the eve of the upcoming New Year, schoolchildren often make crafts for the holiday. Everything at a certain time finished goods exhibited for demonstration to other students so that they can objectively name the best of the works. Of course, every child wants his craft to be recognized as the most original and beautiful. To do this, learn how to make a Christmas tree with your own hands at home to school for the competition - a master class with instructions will explain everything step by step.

Do-it-yourself felted wool Christmas tree - Master class with explanations

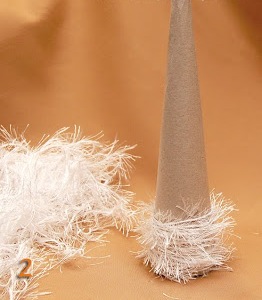
If you want to learn how to make felted crafts, read how you can make a Christmas tree from wool with your own hands at home and send it to school for a competition: a master class with instructions with a photo is attached.
- Having bought green wool for felting, wind a tight cone out of it.

- It is necessary to separate the wool from the skein by tearing it off, not cutting it off.

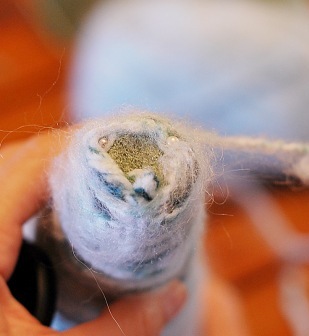
- Putting the cone on a wet sponge, start felting it. A pen with a needle attached to it can help.

- Constantly rotating the workpiece, moisten the future Christmas tree in warm soapy water and wring it out a little (be careful - otherwise the craft will lose its shape!)

- Put the craft on a wet bag and, rotating it, roll on - this way the Christmas tree will be stable.

- In the same way, make balls for the Christmas tree.


- Carefully sew the balls onto the Christmas tree.

- If desired, the Christmas tree can be decorated with a garland. Wrap diagonally around the craft, securing the “garland” of beads or beads with a few stitches.

- To decorate the Christmas tree, you can use bells, beads, jewelry, etc.

How to make a Christmas tree from cotton pads with your own hands at home: crafts master class
At good master, with a rich imagination, in the house there will always be the most unusual, creative crafts made from unexpected, unusual materials. Such a craftsman can gladly teach you how to cotton pads, purchased at a regular supermarket, make a Christmas tree with your own hands at home: a crafts master class and photos are attached.


Master class crafts "Herringbone" made from cotton pads

Learn how to make a Christmas tree from cotton pads with your own hands at home: a crafts master class will teach you how to make it step by step. The snow-white beauty will decorate any New Year's interior.
So, prepare first:
- Cotton pads;
- stapler;
- silicone adhesive;
- Cardboard;
- Scissors;
- beads;
- Green paint.
- Prepare each cotton pad as shown in the photo: fold it twice in half and secure with a stapler.

- For a Christmas tree 45 cm high, you will need more than three hundred prepared cotton pads.

- From a thick sheet of cardboard, glue the cone, cutting off everything superfluous at the bottom. Start gluing the prepared disks to the cone.

- Move from below, gradually attaching cotton pads in a circle.

- cotton tree on New Year 2018 is ready and waiting for her outfit.

- Glue beads to the center of some of the folded disks, and cover part of the “paws” with green paint.

How to make a Christmas tree from threads with your own hands at home: a master class in stages
As you already understood, crafts can be made from almost any materials and improvised means. The main thing here is not what the thing is made of, but the creative approach of the craftsman. Learn how to make a Christmas tree from threads with your own hands at home: a step-by-step master class, with the help of photos and explanations, will help you master this technique.

Craft "Christmas tree" from threads - Master class with photo

Read carefully how you can make an openwork Christmas tree with your own hands from simple threads - this is easy to do at home. Detailed master class will explain to you step by step how to work with materials, so that in the end you get a light, patterned Christmas tree.
- Prepare everything first necessary materials(see photo).

- Make a cone out of paper by making cuts at the bottom. Through these cuts, you will wrap the Christmas tree with threads like a cobweb.

- Having diluted the PVA glue in a bowl to the state of liquid kefir, moisten the threads in it and wrap them around the workpiece. Threads can be of different colors.

- After finishing the winding, wait for the craft to dry. Gently pull out the cone from the inside - you will see a dense openwork Christmas tree. If you place a garland inside it, the tree will shine with New Year's lights.

- If there is no garland, decorate the craft as you wish.

How to make a Christmas tree with your own hands from tinsel: photo and video instructions
It is customary to decorate houses with tinsel, carnival costumes and ready christmas trees. And is it possible to make them something? About, how to make a Christmas tree with your own hands from tinsel, they will tell you the photo and video instructions of the master classes posted on this page. You will only have to repeat the actions of the craftsmen.
Big green Christmas tree made of tinsel - photo with explanations

If you decide not to buy a cut Christmas tree for the New Year 2018, find out how you can make a fluffy Christmas tree with your own hands from tinsel: in the photo and video instructions you will find all the explanations regarding this creative work.

How to make a Christmas tree with your own hands from improvised means - Master class with photo
Surely, every housewife has countless ribbons, beads, ropes, pebbles, scraps of material, broken jewelry and a lot of such nonsense in wardrobes and chests of drawers. Throwing all this away can be very pitiful, so read how to make a Christmas tree with your own hands from improvised means - a master class with a photo of the finished craft will give you the best tips.


Christmas tree from ribbons for the New Year 2018 - Master class with instructions

If you already know approximately how different things can be made from improvised means beautiful Christmas trees with your own hands, pay attention to this master class with step by step photos for making a green Christmas tree satin ribbons.
For work you will need:
- Satin ribbons in three shades of green;
- Green cardboard;
- Glue,
- Scissors,
- Simple pencil;
- Thread,
- Burner;
- Glass,
- ruler made of metal;
- Compass,
- Silver and red beads.

- Using a burner and a metal ruler, prepare pieces of satin ribbon 10 cm long. Protecting the table, cover it with glass.

- You should end up with several tens of ten-centimeter pieces of ribbons of different colors.

- Make loops from the ribbons, again using the burner and a metal ruler.

- You should have three groups of loops of different shades of green.

- From green cardboard, make a cone blank by drawing it as seen in the photo.

- Using a compass, make more arcs, already smaller in diameter.

- Starting from the bottom, glue loops of ribbon in rows in a circle.

- At the top of the cone, the loops must be attached as tightly as possible to each other.

- Alternate loops of different shades of green.

- Start gluing beads to the ribbons.

- As a result, you should get such a green beauty.

What you can make a Christmas tree with your own hands: Christmas crafts from cones
Going for a walk in the forest, collect the cleanest, neatest cones and other natural materials there - you will need them to prepare for the New Year holidays. What you found will be what you can make a Christmas tree with your own hands: a New Year's craft made of cones will surprise your guests with the originality of its appearance.


Topiary tree made of cones: a master class with photos and instructions

When you find out what else you can make a Christmas tree from with your own hands, you will definitely want to make this New Year's topiary craft from cones.
- Before work, prepare all the materials and tools shown in the photo.

- Using heavy scissors, cut off their “leaves” from all the cones collected in the forest.

- Buy a ready-made cone or roll it out of thick cardboard. Starting from the bottom, move in a circle, attaching “petals” of cones to the base of the future spruce.

- The future Christmas tree itself will soon begin to resemble a huge cone.

- Having reached the top of the cone, form a neat top of the spruce.

- Now begin to cover the almost finished Christmas tree with glue and sprinkle with sparkles.

- If desired, cover the craft with gold paint.

- Such an unusual Christmas tree-topiary will perfectly fit into your New Year's interior.

What to make a Christmas tree for crafts for the New Year 2018 and how to decorate it

Photo and video examples of Christmas tree crafts for the New Year

From what home masters do not try to make a Christmas tree for crafts for the New Year 2018, how diligently they decorate it! Newspapers, magazines, packs of souvenir money, plastic bottles and cups, peas, pasta, socks, notebooks, tinsel, Balloons And much more. The photo shows how creatively the creators of the most creative Christmas trees approached the work.


How to make a Christmas tree with your own hands from plastic bottles - a master class with photos and videos
Sometimes we don’t even realize how much unique craft material we have at home! If you and your children often buy bottled water, kvass and lemonade, learn how to make a Christmas tree with your own hands from plastic bottles - a master class with photos and videos will help you with this.
Homemade Christmas tree from plastic bottles - Master class with photo

Having learned how to make an unusual light Christmas tree with your own hands from plastic lemonade bottles and having studied this master class with photos and videos, you can easily replace the best replacement for a tree cut down in the forest. Of course, before starting work, it is worth preparing everything you need in advance, namely:
- A large number of plastic bottles;
- Frame for spruce (from PVC pipe or wooden slats);
- wire;
- Three cans of green, and one can of silver paint;
- Stationery knife;
- Scissors;
- Drill or thin drill;
- electrical tape;
- Spruce stand.
- Assemble the frame for the tree. Attach plastic corners to a piece of PVC pipe. They will serve as the basis for the side paws of spruce. On top of the "legs" (they do not touch the floor!) And in the middle of the pipe, make holes by passing the wire through them. Secure it with pliers. Fasten the cut-off top from the plastic bottle between the "legs" - this way the construction will be stronger. Reinforce everything with duct tape.

- Cut off the bottom of the bottles.

- Cut the rest of the bottle into "noodles".


- Manually bend the strips away from the neck.

- Bend the strips up, cut off the necks of the bottles and paint the blanks with green and silver paints. You can do without paints, initially using multi-colored bottles.

- Start assembling the Christmas tree by stringing the blanks upside down onto the base. Screw the covers onto the lower legs. Drill holes in them and, with the help of a wire stretched through the hole, fix the structure.


- Secure the top of the spruce with wire.

- Place the tree in the stand. Decorate it with silver paint and tinsel.


After learning how to make a Christmas tree with your own hands at home, you can help your child win a craft contest at school or kindergarten. Use paper, ribbons, cotton pads, cones, tinsel, threads, plastic bottles and other improvised means to create a Christmas tree for the New Year 2018.

Once again, handicraft craftsmen surprise me: what people don’t make Christmas trees from! Some copies are so original that you can't help imbued with respect for the creative author. Many crafts are nice to me, there are also those that make me smile, and some are astonishing: how could you think of depicting a Christmas tree from this? Well, enough of the introductions, we still have to watch and watch) For us, the main thing is to look for a suitable idea, at least a little consonant with our tastes, and then, you see, your own imagination will connect, make adjustments) And we will get a completely different craft - the author's ) So, let's see what people make Christmas trees from?
Let's start with a tinsel Christmas tree: the material is inexpensive, the work is simple, it takes a little time, and the result is excellent!

To help everyone who wants to make such a Christmas tree - for manufacturing.
Christmas decorations
Another simple and affordable way to perform is from Christmas toys, they are sure to be found in every home. It will not be difficult to depict the New Year's symbol on a wall (or window, door). A little longer will have to tinker with the volumetric image.
But the spatial composition looks interesting. And if, instead of threads, you hang the balls on a thin, colorless fishing line, the illusion of floating in the air will be complete.
As a child, we drew Christmas trees in albums, and now we can do art on the walls of our own house - who will forbid us?

If you decorate a painted fir tree with real toys or a garland, it turns out very interesting!
Fairy lights
And you can not draw anything: attach the garland to the wall, giving it the shape of a Christmas tree. A wonderful express option for giving the room a New Year's look.
Don't like the tree on the wall? Then "put" it in the center of the room or in the corner)

By the way, an additional plus - then you don’t have to waste time removing toys and cleaning fallen needles)
Perhaps, most of the options for home-made Christmas trees are paper: the material is inexpensive, it’s easy to work with, the result can be very good!

It goes not only colored paper, but also napkins, newspapers, pages from books, cardboard packaging.

You can ignore the paper drawing at all: a charming Christmas tree can be in pastel shades, and in a bright version, and even plain.

Call for help any paperwork techniques that you are familiar with: quilling, origami, modular origami etc.

And do not try to copy the craft from the photo exactly, let you get your own creation. The main thing is that the process should be joyful, bring pleasure.
Christmas trees from books and magazines
It will take 20-30 minutes, no more, to make a desktop Christmas tree from an old magazine (well, what can I do, my reverent attitude towards books does not even allow me to assume that crafts can be made from them). Even faster, you can cope with the task if you simply stack the books in a pile, giving it the appropriate shape.
The option in the middle photo quite accurately copies the shape of the Christmas tree, but, in my opinion, is extremely unstable.
I really like Christmas trees made of buttons - simple, but so cute! Anyone can cope with the work, the main thing is the presence of a sufficient number of buttons for crafts. Once I really was about to make such a Christmas tree, but there were very few suitable buttons in stock. I went to the store, chose the right ones, calculated the right amount. Then she knocked out the overall result - how much a set of buttons for the Christmas tree would cost me, and changed her mind about making it.

But I consider the idea worthwhile, anyway, someday I will make such a cute Christmas tree.
If you like to work with beads, these cute miniature Christmas tree ideas will surely come in handy on the eve of the holiday.

All of them are good, but two beauties left a particularly strong impression (photo on the left). I sincerely admire the skill of the author!
A hodgepodge of all sorts of trinkets that any woman must have (earrings, hairpins, buckles, brooches, bracelets, beautiful handbag accessories, and so on that have become unnecessary). This is where you can find a worthy use of the accumulated wealth over the years!

The Christmas tree of the clock looks symbolic: as if it reminds us of the transience of time, of the uniqueness of every moment. As if he advises not to waste precious minutes on empty grievances and quarrels, but to live them with benefit: enjoy every day, tell your loved ones about your love, hurry to do good...
Do you want a ribbon Christmas tree? Easily! All that is required for work is the tape itself, a glue gun, a stand and a base that plays the role of a barrel. First, prepare pieces of tape: for the bottom row - the longest, for the second (bottom) - a little shorter, and so on. Fix the base (wire, kebab skewer) on the stand. Roll up pieces of tape, apply glue to the edges and attach to the base.

The glue gun can be replaced with simple bobbin threads. Perhaps this will go even faster than with glue: you can attach not one folded blank to the stem, but 2-3 at once.
Christmas trees from sesal, jute, tulle
Christmas trees made of mesh (sesal, jute) look very impressive. There is no way to buy this material in our village, otherwise I would definitely try to make such a craft.
But everything is ahead of me: local florists carefully wrap even tiny bouquets in huge panels of such nets) A couple more holidays, and I will have plenty of material for crafts)
Crafts from tulle look airy and weightless.

It also holds its shape well, does not crumble on sections, in general, working with tulle is easy and pleasant)
I can’t imagine where you can now find threads on spools of wood? We don't have any for sale! I have a couple of wooden rarities (still Soviet times) so that the children at least know what a wooden coil is. If you have such a rarity in abundance, it will not be difficult to build a Christmas tree)

I like the option in the center the most, and you?
It seems to me that almost no one throws away corks from wine bottles) If you managed to save up enough - Christmas tree options are for you!

Even a small one looks good, and even a large one - and even more so!
Great option New Year's decor, crafts made from natural fibers (threads, twine) look especially stylish: cotton, linen, jute, hemp. The base is made of cardboard (triangle, cone). Generously lubricate it with PVA glue and wrap it with threads.

The Christmas tree is ready! And everyone decorates it to their own taste: beads, cones, flowers, dried fruits - whatever is at hand.
Luxurious New Year's beauties are obtained from lace - in my opinion, they do not even need additional decoration.

Variations on a lace theme: with a base of paper and fabric, with fragments cut out of lace.

In the photo, crafts in pastel colors, but you can make them in any color that fits into your interior.
Christmas trees made of fabric
Have you saved beautiful scraps of fabric that you can’t find a use for? Take a closer look at these pretty Christmas trees - maybe you should make one of them?
The option is even simpler - Christmas trees made of felt. It is very easy to work with this fabric: it does not slip, the edges do not crumble (they do not require additional processing), it keeps its shape well.

Buttons, simple embroidery, a few beads - and from a modest craft before our eyes it turns into a stylish one.
In my opinion - quite fresh ideas.

I liked the fur craft very much. It is a pity that there is no suitable material, otherwise I would gladly make one.
Christmas trees from separate fragments
There is no limit to the fantasy of craftswomen) Balls of thin stripes fabrics, balls of thread, flowers from ribbons - in skillful hands, everything will fit for making a Christmas tree!
And it can also be made from hand-made blanks: bows, snowflakes, pompoms, and so on.
Christmas trees from cones
Even a child can make Christmas trees from cones: paint in green color, decorate with beads, put an asterisk on top, attach a stand. Everything! Wonderful craft from natural material ready.
Don't like the color option? Then put them aside: look how charming a Christmas tree looks from ordinary cones, without any additional decoration. The crafts in the photo on the right seem to be covered with frost: it is easy to depict it using artificial snow (spray). There is no coveted canister? It doesn't matter: take PVA glue and a brush, lubricate each bump and sprinkle it with improvised material (flour, starch, sugar, salt, soda, grated foam plastic is also possible))) It will turn out just as good!

And if you add a little vanillin to the artificial frost, the Christmas trees will be fragrant with fresh pastries - a small nuance to create a festive atmosphere.
Nature is an inexhaustible storehouse of ideas and material for creativity! See what you can adapt for New Year's crafts!

From brushwood, you can make both a small tree and quite impressive sizes - life-size. 
If the sight of bare branches makes you sad, just decorate them with Christmas decorations. 
I liked these vintage plywood trees - they have an inexplicable charm. And I would very much like to thank the author of the Christmas tree-shelf for a great idea: both beautiful and practical, and a festive mood has been created) 
And here are stunningly beautiful Christmas trees made of wood! I would not refuse any of them if I could buy. To make your own skill is not enough, there is nothing to try. 
Here you can see the hand of a true master.
Christmas trees from seafood
If you (like me) like to wander along the seaside early in the morning, collecting shells that you like, pieces of glass turned by waves - there is more than enough material for such a craft.
Truth, sea stars I didn’t come across, but shells and glass pieces are enough for a Christmas tree three meters high.
You won’t surprise anyone with Christmas trees made of fruits, but nevertheless I included them in the selection, the execution ideas seemed very successful to me.

For crafts, you can take any fruit, up to dried mushrooms and capsicum, but, as I think, they should be required.
Every child's dream

Can we work as wizards? After all, children need so little for happiness ... By the way, a Christmas tree can be made not only from sweets.
Christmas trees from coffee beans
Ideas Christmas trees for gourmet drink lovers. If you want with lace - please, in a stylish snow-white design - no problem!
The attractive shapes of today's pasta, as well as their variety, have not escaped the attention of tinkerers. They quickly found application, including for the manufacture of Christmas trees.

The craft in the photo on the left for some reason reminded me of the missing treasures of the Incas)
A lot of time and effort was spent on the construction of bottle trees.

It's interesting to watch, but for some reason I don't want to repeat it)
You know, it’s very interesting to consider all kinds of ideas, of course, but trying to collect them in one article is unrealistic) Somewhere in the middle of the collection, I realized that I needed to somehow group the ideas more tightly, otherwise the review would drag on indefinitely)
Christmas trees from what you want
I couldn’t come up with a more accurate name for this group of crafts) Well, really, how can you combine all this diversity under one concept?
A little bit of fantasy, a minimum of decor, and the role of a Christmas tree will be successfully performed by glass jars, flower pots and plastic cups from under the yogurt.

If suddenly you have accumulated a lot of wooden rulers and brushes, and you have no idea how to attach them to the case - here are great ideas!

And another practical option) Appearance varies depending on the intensity of decoration. And if you equip the stepladders with improvised shelves, they can be placed on them even for a very large family.

And, if absolutely nothing more suitable was at hand, make Christmas trees from what you have a lot of)

Well, have you picked up a suitable idea, do you want to repeat something from what you saw? Not? Then continue)
A separate section is devoted to metal crafts. I didn't think there would be so many ideas!

And, I repeat, I took only a part, trying to cover as many options as possible. A Christmas tree made of mesh touched, and made of barbed wire inspired sadness and unpleasant associations.

I noted the Christmas tree made of bicycle rims for myself as interesting and uncomplicated in execution, but I looked at the installation of clothes hangers for a long time, but to no avail: I did not manage to understand how this structure was created.

ABOUT! Here are interesting crafts - from horseshoes. If (as the old saying goes) folk omen) even one such metal product can give a person happiness, can you imagine what will happen to the owner of a whole Christmas tree set? Yes, he simply must be completely happy all his life) However, only found horseshoes have magical properties ... So postpone the raid on the nearest stable) Better look for a place where scattered horses constantly lose horseshoes, then everything will be according to the rules)

Here are some more ideas new year symbol from metal. How do you like works of art from ordinary saws? I was impressed, and how!

And two more pretty beauties.

A fragile Christmas tree made of light bulbs and a miniature tech tree.

But cozy and practical crafts: after the holiday, pillows can be used for their intended purpose)

Of course, you can not ignore the New Year's money tree)

And do not say that you have absolutely nowhere to put the Christmas tree, or that you are bored with its usual appearance. If desired, everything is solved!

Here our review has come to an end. I hope at least one of the proposed ideas seemed to you standing forces and time to create it.
If you still prefer an ordinary live Christmas tree, you don’t have to put up a whole tree: you can make a charming mini-spruce from several branches and floristic foam (sponge). Just do not forget to moisten the foam, then the branches will remain fresh for a long time (rich needle color and aroma).

Or just put a few spruce branches into your favorite vase - it's up to you to decide what and how your Christmas tree will be made of!
Go to the competition page - there are also many interesting crafts Christmas trees (and not only)! Very convenient: if you find your option - detailed description manufacturing attached)
It is a pity, but surely many of interesting ideas were not included in my selection for a simple reason - I did not see them. Join, supplement the selection with your ideas in the comments, there is still time before the holiday, let there be as many options for crafts as possible! And one more thing: many are embarrassed (I judge by myself) to show their own works, considering them too simple (ugly, not worth attention, and so on). This is mistake! Do not deprive us of the joy and pleasure of admiring your work. Who knows - maybe needlewomen have been looking for your idea for a long time and unsuccessfully, so help them find it!
In the pre-New Year's fuss, sometimes it’s not up to the Christmas tree: crowds in shops and specialized Christmas markets discourage any desire to acquire a fluffy beauty. However, in order for a real Christmas tree to appear in the house, it is not necessary to buy it. From this article you will learn how to make a Christmas tree with your own hands from improvised materials.
We have collected more than 20 master classes for you with step-by-step photo instructions, so creating a holiday atmosphere in your home is not difficult, even if there is absolutely nothing left. These lessons will also be useful for mothers, because it is a pleasure to work wonders with your kids!
By the way, if you already have a real Christmas tree (artificial or natural), a DIY Christmas tree will be a great themed gift for family and friends! In general, stock up New Year's mood and go on creating!
Let's start with the very simple option- Christmas tree made of paper. To make it, you will need colored paper, scissors, glue, toothpicks and a hole punch.
#2 Christmas tree made of wrapping paper
To make such a Christmas tree, you will need: cardboard or thick paper, wrapping paper of several colors, scissors, glue or double-sided tape.
#3 Origami Christmas tree
To make a Christmas tree you will need: paper, scissors and patience :)

See more paper Christmas trees:

Christmas tree, of course, the main attribute of the most important winter holiday. It will not be possible to do without the forest beauty, the atmosphere is not the same, and where does the good grandfather put the gifts? It so happened that a Christmas tree is decorated in the house for the New Year holidays: someone puts a live one, someone prefers an artificial one, and someone paper. A paper Christmas tree can not only replace a Christmas tree […]
To create you will need: felt, scissors, needle, thread, glue.

You will need: felt, buttons and beads for decoration, a needle, thread, cotton wool, scissors.

Look for more Christmas trees made of felt in the article:

With the approach of the New Year, we all begin to feel the atmosphere of the holiday: the streets of the city are lit with festive lights, large decorated Christmas trees appear on the squares, and shops sell Christmas decorations, lanterns, tinsel. It remains only to add a little holiday to the house by decorating the interior with New Year's crafts. One of the main symbols of the New Year is the Christmas tree, and in this article we will tell you how to […]
#6 Christmas tree from a plastic bottle
You will need thick paper plastic bottle preferably green, scissors, tape.

#7 Christmas tree from table napkins
You will need: table napkins, a bead, sewing machine or a needle and thread.
You will need: a plastic bottle or glass, pasta, glue, paint.

Necessary more ideas from pasta?

Approaching new year holidays, which means it's time to think about creating a festive atmosphere. For decor, it is not at all necessary to use store-bought accessories. It's time to unleash your creativity and make original crafts with your own hands. If you are one of those people who are engaged in creativity about once a year, then New Year crafts from […]
You will need: thick paper, cones, glue.

We have more ideas for crafts from cones:

The New Year holidays are approaching - the time to give and receive gifts, decorate the Christmas tree and decorate the house. Perhaps we no longer believe in the good old man Santa Claus, we do not expect gifts from him under the Christmas tree, but we definitely expect a miracle, especially in new year's eve. A miracle is certainly good, but the realities of life dictate their own rules to us. Work, […]
You will need: thick paper, coarse thread, glue, beads.

#11 Wire Christmas tree
You will need: thick paper, wire.

#12 Christmas tree from dough
You will need: salty dough(cold porcelain or polymer clay), scissors. From the mass for modeling we form a cone, and then with the help of scissors we “pinch off” the paws. For greater realism, the paws can be bent up a little. Next, we send the Christmas tree to dry. After complete drying, the craft can be further decorated, for example, with paints, sparkles, beads, rhinestones, etc.

You will need: thick paper, colored paper, glue, a lot of patience.

#14 Christmas tree made from cardboard cylinders from toilet paper
You will need: toilet paper rolls, crepe paper, scissors, glue, thread.

Any bushings left? Make more original Christmas crafts!

The New Year holidays are approaching, there is less and less time left, and more and more worries and troubles in preparing for the holiday! It is especially difficult for mothers in these pre-holiday days. Little fidgets are looking forward to the holiday, so mothers have to come up with interesting games and activities every day. If fantasy doesn’t work anymore, our cool master classes on making New Year crafts from […]
#15 Christmas tree made of threads
You will need: paper, thick threads, scissors, glue, beads.

#16 Christmas tree from an old magazine
You will need: a magazine, glue, beads or glitter to decorate.

You will need: cotton wool, a dry twig, threads, ribbons, beads and sequins for decoration.


#19 Wine cork Christmas tree
You will need: corks, glue, tape, paint.

#20 Delicious strawberry Christmas tree
You will need: thick paper, strawberries, chocolate.

#21 Wrapping paper Christmas tree
You will need: wrapping paper, glue, whatman paper, decorations.

#22 Christmas tree from balls

#23 Christmas tree from dry branches
You will need: dry branches, rope, lanterns and other decorations.

#24 Cotton pad Christmas tree
If you want to make a Christmas tree from improvised materials, then it's time to pay attention to cotton pads. You will need thick paper for the cone, cotton pads, glue and beads for decoration. By the way, you can decorate the Christmas tree with any materials to your taste: sparkles, sequins, watercolors. Or you can just leave it white. As you like or as time permits.

New Year's holidays are ahead and it's time to start decorating. You can make decorations for the New Year from the most different materials, such as paper, beads, cones, and even from old CDs. But in this article we will talk about New Year crafts from satin ribbons. Crafts can be simple or made using a special Japanese technique - kanzashi. Herringbone Let's start our crafts […]
#26 Christmas tree from a napkin: decorating the New Year's table
Do Christmas tree can be from table cloth napkins. And the Christmas tree, and the decor New Year's table. Try it and you won't be able to stop!

Help us become better: if you notice an error, highlight the fragment and click Ctrl+Enter.