Do-it-yourself New Year's gifts for the year of the dog. Crafts for the New Year from salt dough
Sew and stuff the body, then sew the head, paws and tail to it. Sew the ears to the head. Embroider the nose, mouth and claws on the paws with black thread.
Glue ready-made plastic eyes (you can get them at a sewing accessories store) or black beads. To make the craft look more decorative, tie a ribbon around the neck.
DIY dog toy
A very cute animal can be made from felt, this material is ideal for beginner needlewomen, because it does not crumble during operation.
Cut out two dog bodies from the felt, also cut out a couple of ears (they should be different color), speck and nose. Also prepare a felt strip 0.8 by 12 cm, it will come in handy for the collar.
Sew a speck and nose onto the front of the body, first mark the mouth and eyes with a pencil, and then embroider them.
Fold the parts of the body, and then fix with pins, sew along the edge, not forgetting to leave a small hole. Through it, cotton wool should be stuffed inside, then the hole should be sewn up.
Sew the ears from the back half of the body, lay the collar (do not tighten it), fix it behind and sew on the button.
DIY Christmas tree toy - year of the dog
From felt you can also sew a wonderful do-it-yourself Christmas toy dog- be sure to decorate the Christmas tree with it for the coming New Year 2018. To make it, first draw a pattern: head, ears, nose and a spot around the eye. Attach the pattern to the felt so that it does not move - secure with pins and cut out the muzzle. Then cut out all the rest of the details. Christmas decor will be even more attractive if you use a fabric of different colors. And if you work a little longer and make it double-sided, then it will be impossible to simply take your eyes off such decoration.
Now all that's left is to assemble do-it-yourself dog toy on the Christmas tree. Glue the nose and speck (you can use fabric glue for this). Embroider eyes, mouth and mustache, however, buttons can be sewn instead of eyes. The final step will be the placement of the ears and ribbons for hanging, followed by covering with the top layer of felt.
Year of the dog - DIY toy
A cute spotted dog is sewn from fleece - the result is an unusually cute soft craft.

First, make a toy pattern - draw a body, tail, ear and head on paper, then cut it out. Transfer the pattern of the torso to the white fleece, cut out two pieces, not forgetting the seam allowances. Also use white fleece for two elements of the head, four for the ear, two for the tail. Don't forget to add seam allowances when cutting.
Lay the parts of the body on top of each other with the right sides and sew, leaving no holes. Make two tucks on the details of the head and sew them, a hole should already be left here. Fold the ear pieces in pairs (face to face) and sew without sewing up the holes in the upper parts. Do the same with the tail, but do not leave a hole.
Make a small incision on the body and turn the part inside out, stuff the synthetic winterizer inside and sew the incision. Do the same with the head and tail, twist and straighten the ears.

Sew ears to the head, tail to the body. Cut out the spot different sizes from black fleece and sew them to the body and tail. Also cut out a black fleece circle with a diameter of 3 cm - this will act as a spout. Sew this circle with black thread around the edge, tightening it slightly. Lay a little synthetic winterizer inside and tighten the thread. Sew a spout and spots to the head, and then sew it to the body itself. Lower your ears down and grab a couple of stitches, glue your eyes. Tie a satin ribbon around your neck.
It will also be extremely cute.
Christmas toy do-it-yourself dog
Children also want to take part in the manufacture of the symbol of the New Year 2018. For them the best option there will be modeling from plasticine, because everyone knows very well how this plastic mass has a positive effect on the development of various skills.
In order to fashion a cute mongrel, you should take plasticine Brown. Also in the work you can not do without a stack.
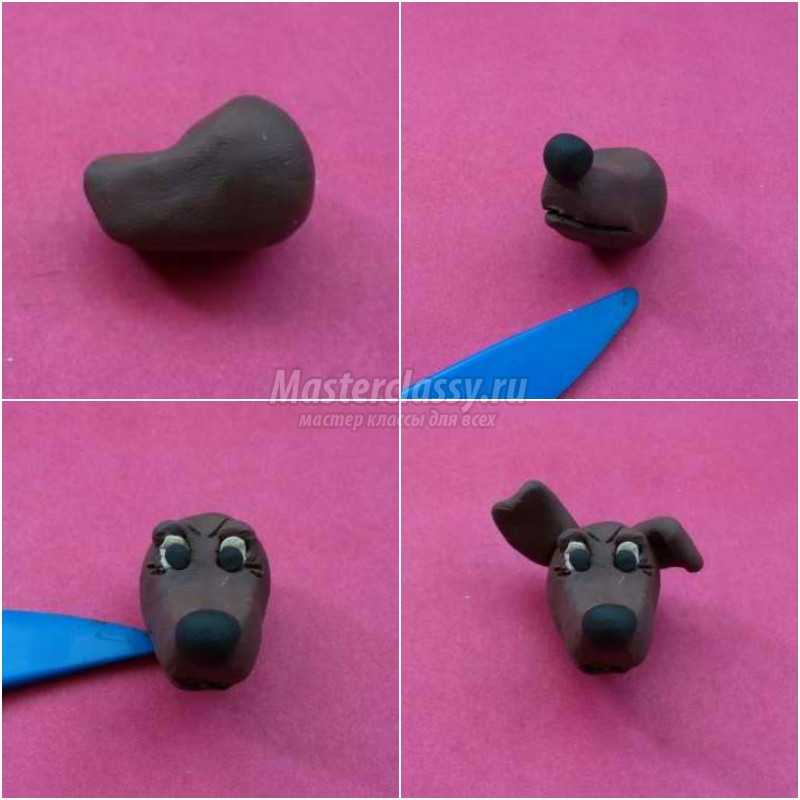
A small part should be cut off from the plasticine bar, knead it well and transform it into a ball. Pull out the ball from one side - this will be the bow. A black ball-nose should be stuck to it, with the help of a stack, cut the mouth. Make round eye recesses using the same tool, insert black and white balls into them.
Blind ears from brown plasticine and fasten them to your head, if you want, you can take white or beige color. Transform the rest of the brown plasticine into the mongrel's body - first roll up an oval roller, then sharpen the neck and highlight the chest in a semicircle.
To sculpt the hind legs, prepare rollers and balls. Squeeze the balls to form flat drops, attach to the bottom of the dog's body, then attach the paws.
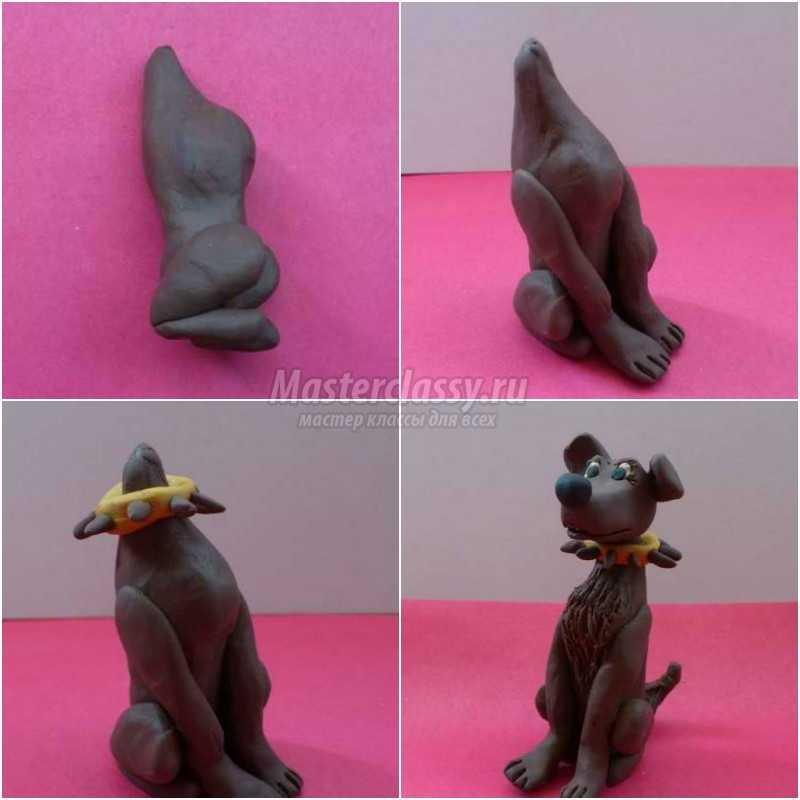
To make the front paws, plasticine should be pulled out with thin tubes, bent at the ends. Matches can be laid at the base of the limbs. Attach the front paws to the body, cut the pads with a stack.
If you want, then you can "hang" a collar around the neck, this is best done when the head is not yet attached. Attach a ponytail at the back, if you wish, you can make it "fluffy" with a stack.
Attach the head by piercing the neck with a match. Then walk over the entire surface of the chest with a stack - it should also become fluffy.
As you can see, both an adult and a child can easily make a charming dog craft, we recommend that you start creating right now so that you get great toys by the New Year.
You need to prepare for the New Year in advance, especially if you have many friends, which means that you need to make a lot of gifts. 2018 will be held under the sign of the Earth (yellow or brown) Dog.
This article will collect all the photos and master classes sent to the contest "" .
Also see what ideas and workshops on making symbol of 2018 already on our website. Master classes are collected in a separate section "".
Dogs - modeling
"Little Dogs" Simova Yulia Valerievna
Dogs made of felt and foamiran for decoration New Year's table, have a hole at the bottom, can be put on a spoon or skewer. If you stick a magnet, you can on the refrigerator.
Cold porcelain dog.

"Symbol of the New Year" Kalycheva Victoria.
The dog is made entirely of plastic. Decorated with thermal rhinestones, sequins. The eyes are decorated with artificial cilia.

"We celebrate the New Year together with the Barboskins))))". Lavrentieva Polina Igorevna
Plasticine, colored paper, cotton wool, paints, artificial snow, glue, toothpicks, transparent paper, New Year's tinsel, plastic base.


"Dog with a gift." Vorotyntseva Natalya Vasilievna
The work is made of plasticine. We select the colors of the desired color and get to work. We roll out the balls, try to make them the same size. Then lay out along the contour of the picture, tightly to each other.
And now the picture is ready!

***
Snoopy, Rex, terrier, pug and poodle -


Paper dogs
"Charlick". Korabelnikova Alena Alexandrovna.
Modular origami.


"Vytynanka is a symbol of the year." Trotsky Anna.
The work is made of paper. We want to present to your attention the symbol of 2018. These are perfect for New Year's Eve.

"Symbol of the Year" Solovieva Ludmila.
The work is made of paper using the vytynanka technique, painted in gold color and decorated with rhinestones.

"Dog". Gritsenko Oleksandra.
The work is made of paper cardboard and disk. Encircled with a marker.

"Christmas dog" Maryukhno Uliana.
The work is done in the technique of iris folding from paper. All parts of the picture are glued to the base.

The second work is made in the origami technique - the symbol of 2018. The work material is paper.

Doggies from paper tubes. Tatyana.

Champagne coasters with the image of dogs - a symbol of 2018.


Pug out of the box
You can make a small souvenir in the form of a dog out of the box. Moreover, the dog will be of a certain breed - a pug puppy. You need to use two shades of material to show a unique color. Pugs are very cute, soft and even funny. They are wrinkled and plump, like hamsters. Sometimes a live dog is indistinguishable from a plush miniature. Master class by Elena Nikolaeva.

To work on creating a paper dog, prepare:
- paper box;
- orange crepe paper;
- measuring tool;
- brown paper or cardboard;
- scissors;
- glue stick;
- set of pens.

Paper pug puppy step by step
1. You can take any box for work: from under the products, cosmetics, household goods. Its shape should be narrow and oblong. Soft corrugated paper necessary for pasting colored cardboard. The body of the figurine will be orange, with some details a darker brown.
2. Try on the box to the canvas and cut out such a canvas, which is enough for a complete pasting of the original part. Wrap orange paper around the box, glue the end of the canvas, smooth it out.

3. Cut out the details for the puppy muzzle. From the brown part, make a border for the eyes, glue smaller white parts on top. Make a triangular nose.

4. Draw pupils on the eyes, longitudinal wrinkles on the brown nose, and also add a tongue. Additionally, cut out narrow triangular ears from brown paper. Bend them, glue the narrow ends to the opposite side.

5. Stick the received parts on the orange box so that the little pug looks at us and smiles at us. Place the eyes and nose in the center, ears at the top.
6. Also make four paws - simple oval parts from the same brown paper. Draw the fingers with a pen.

7. Glue the ends of the paws to the craft: the upper paws are in the center, the lower paws are on the bottom. Assembly completed.

interesting paper craft ready for kids. This is a copy of a person's friend, which will save the house from negativity. It is very fun to do it together, and therefore you can practice such entertainment on weekends when you want to keep your child busy with something. In practice, you can transfer similar knowledge to a traditional toilet paper roll, then you get a similar, but rounded (cylindrical) figure.

Dog toys - sewing
“Symbol of 2018 “Doggy in a gift sock”. Tsybulkina Alena Alekseevna
Work from felt. For work you will need:
- Felt (brown, light brown, black, pink, red and white);
- threads (under the color of felt);
- filler;
- needle;
- scissors.


"Puppy Dobryash". Anoprikova Anastasia.
The puppy is made of colored felt, added satin ribbon and a metal bell. A synthetic winterizer was used as a filler.

“The symbol of the New Year 2018 “Dogs”. Cherednichenko Nadezhda, 14 years old.
Made from colored felt with filler.

"Most best gift". Khleskin Konstantin together with the teacher Spevak Tanziley Faskhaevna.
The craft is new year gift, consisting of candy, crackers and doggy. The cracker and candy are made of cardboard and paper. The dog is a soft toy made of fabric.


Dogs of Galina Egorova:


"Patchwork Dog". Zhukova Tatyana Nikolaevna
The dog is sewn from circles, the muzzle is made of fleece. The body and legs are tightly gathered on a strong thread.


Christmas costumes

For New Year's costume you will need - yarn "grass" and wool blend yarn of different colors. Hook number 2. A piece of spotted fabric, tinsel, black felt, a needle and thread for sewing on details. Sintepon for the muzzle, white blouse, spotted socks and slippers, bow.
From the white "grass" we knit a hat. On the one hand, when knitting, we leave holes for the eyes, sew on the ears and round cheeks.
We cut out the eyebrows from felt, knit the tongue and muzzle from two halves. Glue on the nose.
We sew all the details + mustache, and we get such a hat:

For the vest, cut out the back and shelves. We sew the details and sheathe with tinsel.
We knit a jumpsuit with straps and with voluminous shorts st. with a crochet, alternating different yarns.

We knit armlets. Sew on a tinsel tail. We attach the bow to the hat, put on socks and slippers.

Varvara helped to demonstrate the costume. Breed - "Marble Royal Dog".

Dogs from foamiran
Dogs Druzhok and Ladushka (with a surprise) -.


Knitted dogs
Competition entries by Oksana Alexandrova:
The twin brothers are Antoshka's puppies. Crocheted:


Rock climber: 

"Dog amgurumi". Zaikina Olga.
The toy is crocheted.

"Dog amgurumi dachshund." Zaikina Olga.
Crocheted with "alize" yarn.

Amgurumi dogs:


Rocky is the Symbol of 2018. Nicholas Lisa.
The basis is papier-mache made of paper, shaggy threads are wound on top, ears are crocheted, eyes and nose are glued on top.

"Dog Jack" Molokanova Valeria.
Knitting.

"Julia. Julie and Rachel. Dog Barbos. Bug." Molokanova Valeria.


"Miron". Sorokina Ludmila Viktorovna
A toy dog named Myron. Crocheted No. 2, from multi-colored threads.


The symbol of the year is the dog. Koksheneva Lyubov Evgenievna
I crocheted the dog from the remnants of yarn, filled it with filler, a small finish. It made a great birthday present for my granddaughter. She really liked it. The dog was tied up in two evenings. She has already participated in the New Year's competition in the kindergarten and received a diploma.


Pillow-toy "Friend". Nikonova Vera.
Crochet.


Dog in a New Year's cap -


Dogs made of wool
"Dog Knop". Popova Polina, 7 years old.


"Felted dog". Parkhomchik Dasha.
Dog in the technique of dry felting.


Dogs from improvised materials
"New Year's Poodle". Mironova Olga Sergeevna
This poodle was made with my daughter on new year's competition at school. For him, I took polystyrene 1 × 1 m, 10 cm thick, twisted such panicles from plastic bags, and then with the help of sewing pins (needles) attached them to the workpiece. Paws, part of the nose and torso were sealed with cotton wool, the nose was made of felt.


"The New Year is in a hurry." Kallaeva Love.
A cheerful dog made of stones, cardboard, sea stones, cones, an eye, a shell (tail), packaging material are also used.

"Dog Lucky". Volodichev Ilya.
Application. The Christmas tree is made of colored paper, the dog is made of millet and barley groats.

"Symbol of the Year 2018". Christmas Nike.
The craft is made of waste material: cork, ribbon, braid, flower, button eyes.

"Yellow Earth Dog". Kurtz Ekaterina.
For the toy you need:
Light bulb, gouache, white woolen threads for a hat, cardboard ears.


Yellow pom-pom dog. Valentina Glukhova.
For its manufacture you will need: newspaper, glue, yarn suitable color, scissors, fork, felt and time for creativity.
Stage 1: for the base of our future dog, we take wallpaper glue and newspaper, tear the newspaper into small pieces and soak it in glue. From these wet pieces we sculpt the silhouette of a dog, in this case I have a head. We let her dry.
Stage 2: This is the manufacture of pompoms on a fork. We put a small piece of thread between the teeth in the middle, then we wind 20 turns on the teeth, cut the main thread and tie a knot in the middle. Remove from a fork and cut along the edges with scissors and straighten the pompom. The number of pom poms depends on the size of your base.
Stage 3: We cut out eyes, ears and tongue from felt.
Stage 4: Assembly. Our blank has dried up, we begin to decorate it, first we glue the eyes, tongue and ears onto the Moment Crystal glue. Then we begin to glue the pompoms from the muzzle and then the entire base. Here our dog is ready.


"Symbol of the Year" Modina Victoria.
The work is made with stationery glue and thread.
As a child, when the New Year was always expected with great anticipation, we prepared for it in advance and carefully, creating a variety of crafts from plasticine, cones, and colored paper. It was a special pleasure. But even now, creating something on your own to decorate an apartment for the holiday, you can breathe in that very spirit of celebration and feel how the atmosphere is filled with expectation. New Year's miracle. In the article, we will describe in stages how to independently make New Year's crafts for 2018.
How to make a symbol of the New Year
V Lately there was a tradition for the New Year to put on the table the symbol of the coming year according to the Chinese calendar. In 2018 it will be a dog. Of course, it is easy to buy a soft toy or some kind of souvenir in the form of a dog; on the eve of the New Year, they are sold literally on every corner. But if you have time, make a new year symbol yourself. Believe me, it's completely easy. Fortunately, there are many master classes that will help you understand all the intricacies. And materials can be used in a variety of ways.
For example, a dog can easily be sewn from a sock. The toe of the sock is cut off - ears are sewn from it, and the resulting hole is sewn up. The ears are sewn to the heel of the sock. The elastic will also need to be cut and the edges sewn together. From the side of the gum there will be a muzzle. Cut the second sock across, cutting out four parts for the legs. Stuff them with filler and sew along the sides. Sew to the bottom of the body. From the remaining scraps, sew a thin tail and sew it from the side of the toe. If you take stockings, you can manage to make a dog from one golf, and sew its twin from another and give it to relatives or friends. See illustrations for the work in the video.
Video: sock dog
A dog from a sock is sewn not only in this way. There are several variations that differ in the way of cutting. One of the master classes shows how to sew a puppy from terry socks. Unlike the first option, the head is cut out from another sock, and the hind legs are integral with the body. It turns out a funny Corgi puppy. This breed of dog is cute. appearance with short legs.
Video: terry sock puppy
Step by step master class
Below you can see two step by step tutorials on how to make dog toys. The first of them is devoted to the creation of a dog from a towel. In this case, the needle and thread are not used at all, instead prepare:
- towel;
- scissors;
- thick paper;
- black felt-tip pen or marker;
- thin rubber bands to match the color of the towel;
- a small piece of tape (for example, 5 cm wide) of the same color as the towel or a contrasting one.
This New Year's Eve, this is the most wonderful way to give a towel as a gift. It can be of any size, respectively, and the dog will be larger in one case and smaller in the other.
 |
Lay the towel out on a flat surface, such as a table. |
 |
Twist two rollers towards the middle. To prevent the first roller from spinning when you roll the second one, press it down with something. |
 |
Fold the towel in half. |
 |
Put on one or more elastic bands so that they hold well. We have formed the paws of the future dog. |
 |
Now we form a muzzle. |
 |
Again, fasten with rubber bands. |
 |
Fold the piece of ribbon in half and tie the end into a knot. Insert the folded ribbon into the hole as shown in the photo so that the knot is hidden inside. |
 |
Now make the eyes. They are cut out of paper. Fold the sheet in half and, starting from the fold line, draw two semi-ovals. Cut without unfolding the sheet. Draw the eyes with a marker. Take an elastic band and put the cut out parts on it so that the elastic band is at the fold. |
 |
Put the elastic on the towel under the ears. |
 |
Cut out the dog's nose from the same paper and insert the sharp edge between the rollers. |
 |
These are such cute puppies. |
Another master class is dedicated to creating a real soft toy. For stitching parts, it is better to use a sewing machine, but you can also sew them by hand.
Prepare:
- fleece or any other material - you need a piece of fabric from which the dog itself will be sewn, a small piece of black for the nose and a little for the collar;
- scissors;
- threads in the color of the material and black,
- a needle, if you pre-baste the details;
- pencil, pen or marker;
- synthetic winterizer for stuffing.
 |
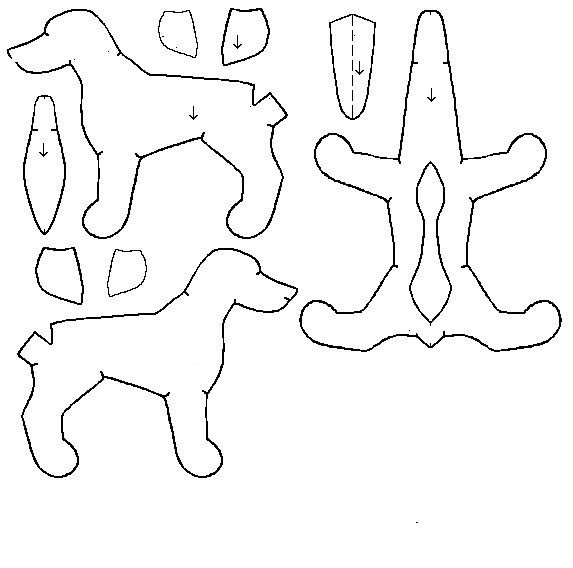
Draw the torso, head, ear and forehead on paper as shown in the photo. |
 |
Cut out the pieces according to the patterns, not forgetting the seam allowances. For the head you need two parts. |
 |
For the forehead - one detail. |
 |
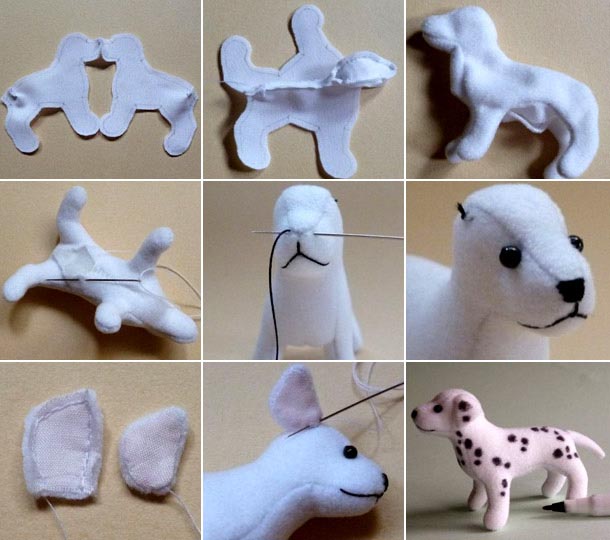
Sew the forehead piece between the head pieces, starting from the nose. |
 |
Turn your head out. |
 |
Cut out two pieces of the body. |
 |
Then cut out two pieces for the inside of the paws and belly. In the pattern above, you can see that an arc is drawn across the torso. The lower part is just the pattern of this part. |
 |
Place each body part with the leg part right sides together and sew. |
 |
Then sew a seam on the stomach, then upper part body, tail, leave a hole on the side of the head for stuffing with filler. |
 |
That's how it happened. |
 |
Turn the stitched body inside out. |
 |
Stuff with synthetic winterizer. |
 |
Stuff the head with filler and sew to the body. |
 |
Cut out four pieces for the ears. In our case, they are made of fabric of different colors. |
 |
Sew two pieces together. |
 |
Turn right side out. |
 |
Sew the ears to the head. |
 |
Sew a nose out of black fabric. |
 |
Black thread line down from the nose. |
 |
Sew on two beads for eyes. |
 |
Decorate the paws by stitching them with threads. |
 |
Sew the collar: cut out a strip of fabric, fold it in half, sew along. |
 |
Try the collar on the dog and sew the two ends right on the toy. |
A toy dachshund is sewn in a similar way, the pattern of which is presented below.

From felt
Wonderful little dogs are made from felt. There is much less work with it than with ordinary material, which means that they can be sewn quickly. The felt does not crumble, it is convenient to cut out of it, and hand seam gives the toys a special charm. The crafts themselves can be both flat and voluminous. For stuffing, the same synthetic winterizer is usually used, but something else can be used, for example, fabric scraps. Below are a few patterns of dogs made of felt with an image of what should be the result. Having carefully examined the schemes, it is not difficult to figure out how to sew crafts.


If you are unfamiliar with the buttonhole stitch technique, which is used to sew felt pieces by hand, see how to do it correctly.
Video: buttonhole seam
If you are going to staple on sewing machine, use the advice of experienced craftswomen.
Video: stitching a felt toy on a sewing machine
Another interesting option for making the symbol of the New Year is a magnet. Whole next year it will show off on your refrigerator, reminding you of how you prepared for this year's meeting. If you have a dog, you can use his photo and make a picture of your pet out of felt.
 |
Prepare felt of different colors corresponding to the color of the dog you will be sewing, three beads for the eyes and nose, threads, glue, a piece of cardboard, a magnet. |
 |
In addition, you will need scissors, a pen, a pencil, a bar of sharpened soap, a blade, and a needle. |
 |
Make two printouts. One for the base, the other for cutting out parts of a different color. |
 |
With soap, circle the base template on dark felt twice. |
 |
With a gel pen, circle other details on a light material. |
 |
Here are the details. |
 |
Glue small parts to the base. |
 |
Sew on a bead instead of a nose. |
 |
Make indentations under the eyes with a blade and sew beads for the eyes onto small pieces of felt. |
 |
This will look more natural. |
 |
Make eyebrows from light felt, put on glue. |
 |
Now, using the template, cut out the cardboard lining. It should be slightly smaller than the front part so that the cardboard does not peek out from the sides. |
 |
Glue cardboard to the back of the second part of the base. |
 |
Glue the front side on top. |
 |
Glue a magnet on the back. |
 |
The magnet dog is very similar to the real one, due to the fact that a real photograph was used for the pattern. |
Thus, you can independently make a dog that will play the role of a symbol of the coming year.
Crafts in kindergarten
Before the New Year, it's time to involve children in creativity. Children who go to kindergarten, on the eve of the holidays they give the task to make some kind of New Year crafts at home. Depending on the age of the child, the complexity of the implementation will also vary.
From paper
A dog's muzzle using the origami technique can be folded by a child of 3-4 years old. It is made from a square sheet of paper. It needs to be folded according to the scheme, and then draw eyes and a nose.

More difficult option when the whole dog is folded. Offer this activity to an older child. You may need adult guidance.

Original products from colored paper
A beautiful New Year's wreath is obtained from colored paper and a disposable cardboard plate, and a child can make it.

If you are not sure that the child can cut the bottom of the plate, help him. As you can see in the diagram, strips of colored paper are attached to the ring made from the plate. You can make them from colored paper in a variety of colors. The edges of the strips, after you have wrapped them around a cardboard ring, are glued together. When the glue dries, triangles are cut around the edges to give the wreath a more decorative look. You can decorate a wreath with a candle made from a strip of white paper folded like an accordion, ribbon bows, colored balls, foil, snowflakes - let your imagination tell you.

The funny biting dog toy is quite difficult to make, but it can also be folded under the guidance of an adult. But she can play.
Video: biter dog
A cute Christmas tree toy in the form of a snowman is obtained from round paper elements.
 |
To make a toy, prepare two blanks in the form of a snowman, colored paper, several round parts (a compass is useful for making them), a felt-tip pen, a thread with two beads at the ends for weighting. |
 |
Fold paper circles in half and glue the sides together. |
 |
Lay the thread between the two parts of the snowman - glue them. On the lower part glue the glued round elements. |
 |
Cut out a hat and nose from colored paper - glue it, draw eyes and a mouth. crochet air loops you can knit a scarf for a snowman. |
It is very easy to make Santa Claus from a toilet paper tube, colored paper and cotton wool. Draw a face on top of the tube with paints. Fold a piece of colored paper in half, roll it into a bag, cut off the excess and glue the parts along the seam and among themselves. Glue a strip of cotton wool along the edges of the cap, and a cotton pom-pom on the tip. Wrap the tube with a strip of red colored paper, glue it.

It remains to make a beard and a trim of the “caftan” out of cotton.

And if you cut out two parts from thick green paper or cardboard, and then cut one from the top to the middle, and the other from the bottom, and insert one into the other, you get a miniature paper Christmas tree that you can decorate as you wish.
Video: paper tree
Very pretty and simple Christmas decorations can be made from strips of colored paper, and it can be a variety of shapes: a snowman, a heart, a Christmas tree, an angel and others. See for yourself.


We use cardboard
The use of cardboard gives no less opportunities. It is quite possible for a child to independently make a postcard out of cardboard, inside of which there will be a dog. It is necessary to take several multi-colored sheets. Fold one of them in half - it will be the base. And from the other according to the template, cut out the details.

You can see the template and manufacturing scheme below. dotted lines the places of bending and gluing are indicated.

If you make several figures out of cardboard, you get a winter city, where bears and deer roam among the trees, and the inhabitants ride on a sleigh pulled by dogs. For the manufacture of such a composition, corrugated cardboard is used.

Templates can be printed in actual size or enlarged.


From salt dough
It is useful for kids to sculpt from salt dough. Firstly, they really like this activity, and secondly, it develops well fine motor skills, thirdly, the dough is much safer than ordinary plasticine. Finally, both simple and complex compositions are made from salt dough, which, after drying in the oven, become hard, and they can be used as Christmas tree decorations, for example.
To prepare the dough, use flour - 2 tbsp, salt - 1 tbsp, water - 1 tbsp, sunflower oil - 2 tsp. It is best to use fine salt so that its grains are not noticeable in ready dough, and take ice water - the dough will turn out to be more plastic.
Video: salt dough recipe
We offer to mold a dog from the dough.
 |
Roll up a thick sausage for the body and attach four small balls for the paws. |
 |
Roll up a short thick head. Attach it to the body. We mark the eyes with a pencil. |
 |
To make the ears, flatten two balls of dough. Attach the ears to the head. |
 |
Roll up a small sausage for the tail and a ball for the nose. Attach them. |
 |
Mark the mustache with the tip of a pencil, and the mouth with a teaspoon. Bake the dog in the oven, and then paint it. |
In addition to the dog, make a snowman out of the dough.

You must have seen how interesting Christmas decorations they are made from dough, and you may not have guessed that it was used to make them. If not, please take a look.


After preparing the dough according to the recipe, roll it out and invite the child to cut out the figures on their own.

It is important to make a hole in the decoration in advance before drying. It can be cut with a cap from a felt-tip pen or simply by inserting a toothpick.

Dry products in the open air or place in the oven to speed up the process. Drying in the oven takes place at a temperature of about 70 degrees. In terms of duration, it takes an average of an hour.
color like ready product, and add dyes to the dough. Note that the first option is more suitable for a child, since making from colored dough is difficult in terms of working with color.
From plasticine
According to the modeling technique, plasticine is similar to salty dough. It is also easy to make a dog out of it. Roll the torso, four legs, neck and two balls for the head out of plasticine. Connect according to the scheme. Make a nose and eyes from small pieces of plasticine.

Follow the instructions to make such a funny dog.

A variety of crafts are molded from plasticine. Why not make a Christmas tree.
From beads
Working with beads is quite difficult, it cannot be done by very young children, because, firstly, babies cannot yet sufficiently control their fingers and it is difficult for them to grab a bead, and secondly, there is a danger that the child will inhale the beads. In addition, the material involves working with a needle, and this also requires caution. In general, we would recommend starting to make beadwork at the age of five or six, when the child is already quite reasonable, and under the supervision of adults.
Without using a beaded needle, such a Christmas tree is assembled. For its manufacture, a special wire for crafts is used, it is very thin, and beads are strung on it with ease.

Above, we have already given an example of making a felt dog magnet. And now we suggest that you familiarize yourself with a master class on creating a magnet in the form of a boot with appliqué elements from beads. Prepare:
- paper;
- material of red and milky colors - felt is ideal;
- cardboard;
- glue;
- beads of red and milk colors;
- pencil or pen;
- scissors;
- thread or fishing line;
- narrow tape;
- magnet;
- bead.
 |
On a piece of paper, draw a boot and an edge. |
 |
Cut out the template. |
 |
Transfer the details of the boot and the edge to the felt and cardboard. Cut out one piece of the boot from cardboard, one piece of the edge from milk-colored felt, and two pieces of the boot from red felt. Leaves are not required. |
 |
Glue cardboard to one of the parts. |
 |
Apply glue to the cardboard and attach another piece on top. |
 |
Thus, the edge will then be glued. |
 |
String beads on a fishing line or thread. The length should correspond to the perimeter of the boot. |
 |
Glue the beads on the fishing line around the perimeter of the boot. |
 |
Fasten the trim on top. |
 |
Apply glue to the surface of the milk felt. |
 |
Pour milky-colored beads on top, press with your finger. |
 |
Apply glue to the surface of the red felt. |
 |
Now you need to fill the surface with red beads. It's best to do this work in something that has ribs so the beads don't roll around on the table. |
 |
Here's what happened in the end. |
 |
Now decorate the boot with a golden ribbon. |
 |
Glue a ribbon bow, and a large bead on top. |
 |
WITH reverse side put a magnet on the glue. |
 |
Attach the boot to the refrigerator. |
From cotton pads
Manufacturers cotton pads, most likely, they hardly thought that their products would be successful as a material for crafts. Nevertheless, it is from cotton pads that, according to numerous instructions, all kinds of new Year decoration and applications. For example, such as this snowman on an ice cream stick.
To make one of these crafts you will need:
- six cotton pads;
- three mugs of cardboard of different sizes;
- some plasticine for buttons;
- colored paper for the nose and hats;
- fluffy wire;
- stick for ice cream;
- if desired, plastic eyes are used, but plasticine can also be dispensed with.
Blanks are cut from cotton pads. Let two disks remain natural size, and the other four must be reduced. Moreover, to make the blanks the same, cut them by folding them in pairs. Then proceed according to the diagram.

Even from cotton pads, such wonderful Frosts are obtained.

If you cut the discs in half, the halves will resemble drifts of snow.
Video: winter city
They even make a Christmas tree from cotton pads. For the base, you need to roll a cone out of cardboard. The edges of the disks on one side are decorated with sparkles, then they are glued onto the cone with an overlap, like scales.

Christmas tree decorations
A particularly large scope for creativity opens up if you decide to make Christmas tree decorations yourself. From what materials they are not made. It is impossible to consider all the options, so we will turn your attention to decorations made of felt and wine corks.
From felt
Decorations are made in two ways: in full and almost flat. Here, for example, such a snowman is made from two circles of felt. Filler is placed inside, the edges are sewn with a running stitch and pulled together, then the parts are sewn together. From beads make a nose, buttons, eyes. And from felt of a contrasting color - a scarf and a hat.

A more traditional option is decorations of this kind, stitched along the edge with a looped seam. See above for how to do it. A tape is sewn between the parts.

Patterns of felt Christmas toys


More detailed instructions search in video format.
Video: felt snowman
Video: felt deer
From wine corks
You won’t immediately think that you can make beautiful Christmas tree decorations from such waste material as wine corks. And there are plenty of examples of that. Corks, by the way, are used not only for this, they are also used to assemble panels, rugs and other useful items in the household.
For crafts, sometimes whole corks are used, and sometimes they are cut into rounds. If you glue several pieces together in the form of a pyramid and tie them with a rope, thread or ribbon, you will get Christmas tree pendants.

And if you put the round in the center and glue the round parts around, there will be a snowflake.

Pendants, by the way, are decorated with sparkles, foil, ribbons, paint patterns.


Even a Christmas deer is collected from corks.

We offer for review a master class on making various figurines from a wine cork and an acorn cap.
 |
You will need several wine corks, as well as acorn caps, paints, brushes, a knife, sandpaper, an awl, thread, glue. |
 |
Take a knife and cut off the edges of the cork a little on one side. |
 |
Sand the cut edge with sandpaper. |
 |
Paint the cork with acrylic paints White color. Leave the paint to dry. |
 |
Draw a face with a thin synthetic brush. |
 |
Then draw in blue the contour of the beard and the back of the head and paint over with blue. You can circle with a deeper blue. |
 |
Make two holes in the hat with an awl. |
 |
Pass the thread through the holes and tie a knot from the inside. |
 |
Glue on the hat. |
 |
You can make any drawings. |
You could find a lot of ideas in this article New Year's crafts from felt, paper, cardboard and other materials that you can make yourself or with children. We hope that long winter evenings you will have something to do. See more crafts in the gallery.
Photos of New Year's crafts


A universal selection of gift ideas for every occasion and occasion. Surprise your friends and loved ones! ;)
Good day, Dear friends! 2018 New Year is coming soon. This means that it's time to get ready for the upcoming event with might and main, for example, prepare homemade gifts. Do-it-yourself dog - what could be better as a souvenir for an upcoming event?
Now many have already begun to prepare for the holiday, which I strongly advise you to do as well. In this article you will find many representatives of the canine world of various breeds and from a variety of materials.
This post is so detailed that I would be very surprised if you do not find what you are looking for. This year will be special for me, since I was born exactly two Eastern calendar cycles ago, also in the year of the dog. So I'll try not to lose face and collect as much as possible more ideas. There will be warm and soft toys, pillows, crafts, even elements of home comfort.
Do-it-yourself dog: a symbol of the New Year 2018 with photos and master classes
To make a dog yourself with your own hands, you will not need any special skills or hard-to-find materials. Almost everything is clear from the master classes, and sometimes even from the photos themselves. The main thing is to be patient and do something really sensible.
By the way, a dog can be presented not only for the New Year. After all, this creature is the personification of loyalty and devotion, so by presenting it, you seem to want to strengthen the connection with the person to whom you decided to make such a surprise.
dog costume
To create a dog costume, it is not necessary to sew a full-fledged outfit for going out. It is enough for him to acquire, for example, cool mask this furry creature. It can be printed on a color printer or used as a template for cutting out felt.

If you want to make the image complete, then I advise you to take a closer look at the following simple ideas for the holiday. From what and how can you make a cute costume for the New Year for a child and not only?
Look at the girl: she is wearing a fluffy tutu skirt, which is complemented by an openwork top, striped tights and a headband with textile ears. Two cute ponytails will help complete the look. A small nose is drawn on the nose.
It is easy to make a tutu skirt yourself, for this you will need a large number of translucent fabric, which will need to be folded in several layers and gathered at the top with an elastic band.

For a boy, you can adapt a fluffy pajama suit (for example, a Japanese kigurumi) or sew it like her own. For such an outfit, only approximate body parameters (the height of the child and the waist circumference) are useful, so even a not very experienced seamstress can handle the creation.

Want to make things easier? Make a cap with ears, the process of creating which is described below. Take fur, fleece or velor for her. Velsoft will also work if you can handle it (it stretches quite a lot).

Other options for hats can be seen in the following pictures. For example, such a hat can be a good alternative to the previous option. She needs fleece with a long pile.
In the future, a similar hat can be worn on the street as the main headgear. At the same time, for such a hat it will be enough to choose a T-shirt and pants (skirt) in the color of the dog. The image will be almost complete.

Another headdress is sewn according to the same patterns, but the muzzle here is completely different, as well as the ears. Fleece here can be taken with a much shorter pile.

How about a flirty dog hat? Choose some cartoon character and make a catchy addition to your look.
Progress:
- Cut out a base circle from thick cardboard.
- Cut out a circle from the fabric, one and a half to two times larger than the base in diameter, pull it together with a “forward needle” seam laid along the edge. Put a solid base inside.
- By a similar principle, make the top of the cylinder.
- Side: cut a long strip of thick cardboard and cover it with fabric so that the edges do not stick out. Connect at the back with a hidden seam.
- Sew or glue the top of the hat to the side to side part tightly attached to the top and formed a cylinder. Attach the design to the bottom base and decorate the hat.
You can attach this to your hair with hairpins or a headband.

You can also sew the ears on the rim, for this you will need the rim itself and ear patterns. The first option is more complicated, it implies that the inner part will be somewhat smaller than the outer one. To create it is best to use fur or fleece.
 But the ears are simpler.
To look believable, take regular gloves in the color you want and some felt. Cut out the details of future paws from felt and attach them with a thin layer of glue or thread. You can make such gloves in just 10-20 minutes!

Crafts from improvised materials and not only
We got the costume, but what about crafts with the Earthy Yellow Dog? We will make them ourselves different ways. Paper postcards and souvenirs, even matchboxes - all this will be used and will please with its unusual appearance.
Paper fantasies: postcards and origami
From cardboard and paper, you can make postcards and original origami. How do you like this cartoon dog? It can be printed and circled to create your own original postcard. Congratulations can be written both on the card itself, and attached to the inside of the text part as a separate layer.

The second option with a simpler form looks no less original. And if you try, then such a dog can also be made with a surprise: if you pull the tongue, the ears will open.


Try to transfer this doggy to felt. So it will last much longer than the paper version and it can be used even after the New Year.

The next dog can be used as a bookmark for books, which will certainly come in handy on the farm. Make it from a regular square of paper.
From such paper dogs, you can create a Christmas tree garland that will remind you of the symbol of the year.

But as follows, you can fold napkins on holiday table. This form is quite stable, but at the same time does not take much time to assemble. Fans of Scotch Terriers will especially appreciate it.

The latest in this series is a very cute and inventive dog: it is made from a matchbox, and a heartfelt message is left inside. A series of such boxes will make all your relatives and friends happier. If you cover the boxes with a special varnish for paper, then even snow and rain will not be terrible for such a gift (although you should not wash it anyway).

wooden doggies
Warm material, which is the best suited for meeting the upcoming New Year. Make a plywood key holder or some kind of hanger for dog things. Woodworking skills, dog carving templates and acrylic paints with a specialized wood varnish will come in handy.

As children, many of us made plywood toys. This hobby can be turned into something more by making a full-fledged home sculpture.

And here is a completely childish way to prepare for the holiday: a dog with movable legs, which can be made from cardboard or plywood.

Christmas toys
In fact, you can hang almost anything on a Christmas tree. For example, I decorate a green tree with small soft toys Purchased and made by myself. Try to sew the dogs you see below. They can literally be reduced from the photo and get ready-made patterns.

A great way to surprise friends and family will be hand-painted Christmas tree balls. To do this, buy plain round balls and acrylic paints.

We use polymer clay and plasticine
Many children really like to create figures from plasticine, dough or polymer clay(by the way, according to the presented MK, you can do both). But this develops fine motor skills and in many ways has a very positive effect on the child's psyche. Therefore, when preparing for the New Year, we will take into account this important factor and blind some cute dogs.
The production of such figures is generally the same, but has some differences. If you are good at modeling techniques, then you can immediately proceed to something like the dog below.

If you still consider yourself a beginner, then start with simpler forms that can be repeated right behind the photo, as in the picture below. Very cute pit bull turned out)

Pug is also not inferior to his brother. Thanks to its simplest form, even very young children can do it.

With the next three step by step master classes you will create several dogs of completely different breeds. All of them can be done with children.
A souvenir can either be close to real-life dogs or have the appearance of a cartoon character (in the second case, it may turn out to be even more interesting).


How to sew a dog out of fabric: cute patterns
Stitched dogs will be popular not only on the eve of new year holidays, but also in the future.
Stuffed Toys
A fabric dog can be sewn in a variety of ways. How do you like the dog below? It is more like a hyena, but due to the similarity with the desired character, it looks very attractive.

You will definitely like the avant-garde pattern characters that you can see below. They have very big heads and small bodies, thanks to which these dogs look childishly clumsy and naive. The effect is achieved with a very wide insert in the head and rather modest side parts.

The classic dog in the next variant is made from faux fur and stands on 4 legs, unlike most of the previously mentioned dogs. On New Year's Eve, she can sew a Christmas red cap and a scarf.

In our selection there is a place even for author's dolls-toys with author's patterns. Just look at this adorable basset! The author (Alisa Shangina) even came up with a description for it: "The world is beautiful, like a basset." The nose of the dog is felted from dry wool, but it can also be cut out separately, highlighting the corresponding part on the pattern of the muzzle.

If you do not like the soul in Dalmatians, then you will definitely like the next idea for a New Year's surprise. Patterns of a fairly high level, but the result is simply gorgeous. Stock up on white fleece, white and black thread and beads for the eyes. Don't forget the black marker.
To sew such a dog better with hands, since you just have to be a virtuoso of a sewing machine in order to grind the details of such a dog well.
A tilde dog can be made according to the following patterns. For her, take a thin cotton fabric. The character will suit a dress, trousers - whatever you want.

A square-headed dog can be made even without ready-made patterns(create them yourself), if you look closely at its structure.

If you have a few pieces of leather in stock, then create a small dog out of them.
Let's go socks
Socks are good because there is a huge selection of colors even in small stores (unlike the same fabrics). So feel free to go to the store for a new pair of socks and create adorable babies.
Both variants New Year's dogs sewn according to the same principle, but the result is completely different. The first dog is very bright and cheerful, while the second is restrained and concise, it can be presented even to a serious man.


What can be done from nylon tights! A pair of pugs for inspiration from Lyudmila Tkachenko. They are made by the method of tightening and further coloring.


We create from felt
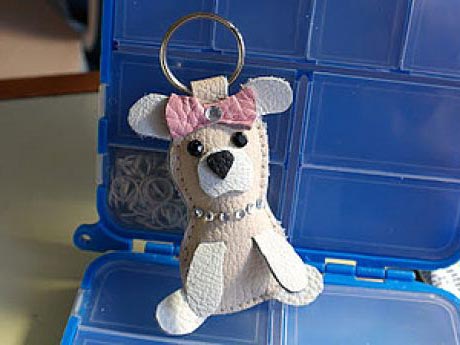
Pugs are incredibly charming representatives of the canine kingdom. To make such a doggie, you will need several colors of thick felt and thread in the color of the fabric. Then this symbol of the year can be turned not only into a keychain, but also into a brooch, a magnet, or simply left as a soft souvenir. Please note: clothes are sewn over an already finished body.


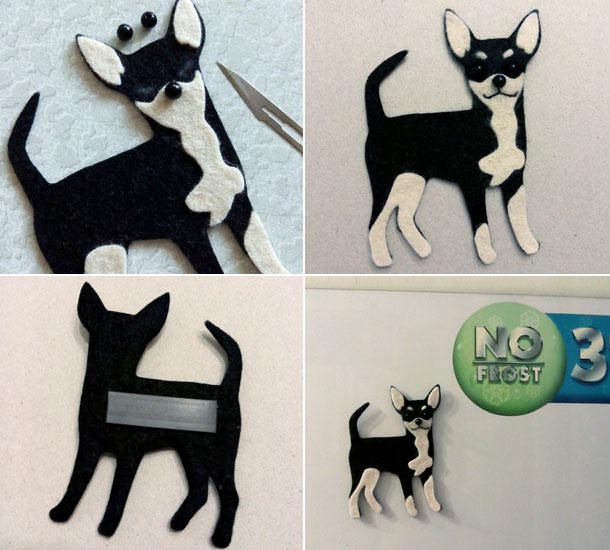
The Scottish Terrier breed inspires designers and creators to create the most various crafts with him. Below it is proposed to make a puppy and an adult version of this wonderful dog.

Continuing the series of flat felt toys, it is impossible to pass by this dog. It is sewn a little more complicated than the previous options.

Well, how to get past this charming boule? Try to make it too.

Chihuahua fridge magnet can also be made from felt. Threads are not needed here - just stock up on transparent glue and scissors.
Pillows with dogs
Decorative pillows can not only lie on sofas. This dachshund, for example, props up the door and protects from drafts. You can sew it according to the indicated patterns, increasing the animal to the desired size and stretching it in the center. The body can also be made up of many patches.


Two dachshund girlfriends are good for daytime relaxation, and at the same time as a hug toy for a child.

Do you want more ideas? On the next selection, there are more than enough of them! It is easy and quick to sew them, but each one can be presented for the New Year and not only. Use them in the car or at home.


Other gifts with the symbol of the year
If you want to surprise your loved ones not only with original toys and key chains, then you can make a set of potholders for them. Decorate them as your fantasy tells.

When creating a souvenir, you can also take into account your favorite breed, to which the gifted one gravitates.

Dogs made of wool
They can be felted from dry wool, and fasteners for a brooch or magnet can be glued or sewn on the back.

Threads and pom-poms
Filament pompoms make very believable dogs. To create pompoms, you will need special devices or two circles of very thick cardboard, on which threads will be wound. After winding in several layers, cut the threads along the outer edge and thread the other thread through the rings, tightening it properly to make a knot.

The most important thing is to learn how to make high-quality pompoms. And from them, with the help of various variations of sizes and additional elements, you can get a variety of figures.

Experiments with coffee beans
Funny doggies can also be made from scattered coffee beans. To do this, you only need to outline the contours of the dog and cover the entire surface inside with glue. So you can take the child and make a beautiful festive panel.

 bottle dogs
Often, schools and kindergartens require crafts from recycled materials. Bottles are perfect here. In addition to the base plastic bottles you can make wool and other decorative elements. You can put colorful glass balls or something similar inside the bottle to make it look more festive.

Rolling up the towel
A universal gift that is in no way inferior to the store version. Thin mohair towels are suitable for it, but thicker options with wider edges can be used. One towel is indispensable: for a believable image, ears made of pieces of felt, a nose, eyes and a ribbon will come in handy.

And a few more ways to festively roll up a towel. Not only in the form of a dog, but also in the form of other representatives of the fauna surrounding us.
I saved the juiciest for last) Just take a look at this amazing lamp in the shape of a dog, which you can create yourself. This masterpiece will be a worthy gift for your family.
Knitted dogs with knitting needles and crochet: video mk
Since knitting is not such a fast and simple thing, I decided to make a selection of video tutorials on this topic.
First of all, I suggest you knit baby booties (this is done with knitting needles). If you or your family members have Small child then it would make a great gift.
But the next three dogs are knitted with the help of many of your favorite crochet hooks. It turns out completely different and unlike each other dogs, each of which claims to be the author's toy (which costs a lot of money in stores). Thanks to the detailed MK, you will learn how to make exactly the same dogs.
The first of them is made of fluffy yarn, which makes the dogs very soft. The rest are made from ordinary threads, but also have their own charm.
The next two dogs are knitted according to the principle of amigurumi, a type of knitting that is very popular now. Thanks to him, you can create very cute creatures.
Finally, I suggest you make such a square dog. Here presented detailed description the creation process along with patterns at the end of the document.
That's all for today. Happy New Year to you, friends! Create creative dogs with your own hands and visit more often. I will be glad to see you here and in other articles of my blog. See you soon!
Sincerely, Anastasia Skoreva
Quite imperceptibly, but firmly, the Eastern New Year with its attributes entered our lives, and today our topic is crafts for the New year of the dog 2018. It would seem that summer has not yet ended, but autumn is already hinting at its arrival. And the best thing to do on rainy days autumn days and in the evenings there will be a leisurely and thoughtful preparation of New Year's crafts. But just before the holidays, when there is enough to do, you will not rush headlong in search of gifts for relatives and friends, because they have been prepared for a long time, taking into account the character and tastes of the person to whom they are intended. And how much pleasure you will get at first when making them, especially if the symbol itself is dear to your heart, or even a member of the family, and then upon delivery.
Crafts for the New Year of the Dog: a master class
Let's start with this, we will please the pet, which is a symbol of the approaching year of the Dog. Not everyone is good at sewing or knitting, so consider the simplest thing that even a novice seamstress can do: as crafts for the new year of the dog we will sew a soft cozy place for a small dog to rest. It will be great for a close friend and her pet. All we need is a thick fabric (cotton and polyester blend is best), holofiber or similar filler, threads and a sewing machine. You will need a measure of the length of the dog, stretched out to its full height, as in the picture. You can add a few centimeters to it for freedom.Choose a transverse measure to your taste: you can make the bed square, or you can make the width ¾ or 2/3 of the length. Accordingly, the size of the strip for cutting out vertical walls: 2 lengths + 2 widths. Don't forget the seam allowances. We choose the height of the side so that the lying animal is half covered by it or to the height of the body, but do not make the side too high. We make a notch in the middle of the front part so that it is more convenient for the animal to climb inside.

We cut out a long side (and if the length is not enough, you can sew several pieces) and sew from the inside along the length, like a sleeve, leaving the ends not sewn up. After that, gradually turn it on the face, noting the length of the piece. It is more convenient for filling not to turn out the entire side at once. We fill the first piece with filler, pin the very beginning with pins so that the holofiber does not fall out, and lay a transverse line along the border of the piece, then successively fill the second and all subsequent pieces, each time laying a transverse line along the border of the piece.
For the last seam, we fill the edges inward on each side by a centimeter or a little more. Allowance for stitching must be provided for when cutting. Then we fold the edges with a turn facing each other and lay a line, stepping back a couple of millimeters from the edge. The board is ready. We hem the bottom of a dense fabric by hand, as in the picture, bending the edges of the material. It makes sense to first prick with tailor's pins so that the fabric does not move.

It remains to sew a pillowcase for the pillow and fill it with filler. To do this, we cut out a rectangle that is double the size of the pillow, fold it in half and lay a line, leaving a small piece not sewn up so that the pillowcase can be turned inside out. We sew it by hand with a hidden seam on an already filled pillow. If necessary, holofiber will allow you to wash the product in washing machine, especially if it has a laundry drying function. But even without this, the product will dry quite quickly if you take a dense, but thin blended fabric for the cover. Hope the production crafts for the New Year of the dog step by step the foregoing will be easy for you. After such a gift, the Dog will definitely be favorable to you.

Crafts for the New 2018 year of the dog
Small dogs, especially smooth-haired breeds, in our climate need clothes for the winter. On specialized forums, you can find patterns and tips on sewing or knitting, but here we will consider the simplest option sewing such clothes from a disused jumper. Not bad if it is woolen and a little matted. All you need is a measure of the length of the product and the circumference of the pet's body, as well as the distance between the front paws.If the jersey is a little felt, you can cut it without fear that it will begin to unravel. Cut off the sleeve, as shown in the photo, mark the location of the holes for the paws, if necessary, shorten the product to the desired measure, and the clothes for autumn are ready for your pet. Use a buttonhole stitch by hand or machine to zigzag the edges of the paw holes so they won't stretch too much. Bend the bottom of the product and hem it. If you wish, you can also decorate it to your taste.

Interesting crafts for the New Year of the dog
Not everyone has pets, but getting a picture as a gift new year symbol anyone will be pleased. And not only children will be happy with the toy. Cute coffee dogs, the so-called primitives, will be appropriate not only at home, but also at the workplace in the office. A smiling muzzle with a pleasant aroma will help relieve stress and fatigue. Let's do these original crafts for the new year of the dog. We will need:- thick cotton fabric (100% cotton - it is important that there is no smell of synthetics and the color lays down evenly), you can take unbleached or bleached calico;
- sewing machine, threads, tailor's pins;
- filler (holofiber or sintepukh);
- instant or natural coffee for coloring toys;
- flavors to your taste: cinnamon, vanilla, cardamom, nutmeg, etc.);
- acrylic paints, felt-tip pens, decorating pencils;
- PVA glue;
- pattern.

Let's start with a pattern. The choice here is very large, you can use the proposed patterns or draw your own if you have artistic abilities. As an option: find something else on the Internet. The size of the dog is up to you. To do this, the pattern can be changed using a scale, attach tracing paper or thin paper to the screen and redraw. But it seems to me that it would be more appropriate small toy, because she can easily find a place. The simpler the pattern, the easier it will be for you to cope with sewing and filling out crafts.
Now let's start making crafts for the New Year of the dog, master class will help you with this. We cut out the paper pattern and transfer it to the fabric. We will need two identical parts, so just fold a piece of fabric in half. Since the contour is with curved lines, it is better to use scissors with a serrated edge for cutting. If you don’t have these, make the teeth yourself when cutting, a little short of the contour. We chop off the details and stitch them, leaving an unsewn piece so that you can turn the toy out.
We fill the dog with filler using a pencil, knitting needle or other improvised means so that the stuffing is dense and without voids. We sew the hole manually with a hidden seam, and you can start coloring. Don't forget to make a loop at the top of the toy. Any strong thread is suitable for a temporary one, and we make a permanent one more elegant and neat.

First you need to cover the toy with a solution of coffee. Both soluble and natural are suitable, the main thing is to make it strong enough so that the color comes out saturated. Too strong is also not very good, because a dark toy is more difficult to paint. Let's also take into account that we have a Yellow Dog year, so the average beige is best. For example, about 2 teaspoons per quarter cup of water + a bag of vanilla, ½ teaspoon of cinnamon, cardamom, or other suitable flavoring. Aromas are introduced during cooking. Strain the solution so that grains do not get in, and cool, then add 1-3 teaspoons of glue. Its amount depends on what concentration it is. You will need less thicker construction glue, and a little more liquid clerical glue.
You can apply the solution with a brush or swab, the main thing is that there is no non-painting, but the filler does not get wet. Now we hang the craft by the loop to dry. The toy can be dried in the oven by hanging it on the wire rack with a sushi stick or just a spoon. To do this, pull the loop from the bottom up through the grate and pass a stick or spoon through it. The temperature should be the same as when drying apples, not too high, and the door ajar. After all, inside the synthetic filler. You can also use a hair dryer, and if nothing is in a hurry - just let it dry in limbo at room temperature.

The most important step is coloring. If you are not confident in your abilities, practice on a paper image. We need to draw a muzzle with eyes, mouth and nose. Everything else - as your imagination tells you. It is appropriate to write a wish on the toy. We first draw the outline with a pencil. Then we circle it with a gel pen or a waterproof marker, and then fill the contour with undiluted acrylic paints. We let the toy dry well, and our work is finished. So that the gift does not get dusty, preserves the aroma and warmth of your soul, we will put it in a plastic bag and put it in a box in anticipation of the holiday.

Original crafts for the New Year of the dog
For a small child, a toy made of felt or fabric would be more appropriate. Fleece or faux fur is also suitable, but you will need to choose a model for the material, since the sewing principles for fabric and felt differ. The dog can be either small, which can be hung as a keychain to a satchel or purse, or large - for example, a sofa cushion. Let's see what interesting crafts for the new year of the dog can be made by hand.To sew a voluminous toy, you will need a sewing machine, as well as some sewing skills. The pattern can be scaled up to the size you need and transferred to paper from the monitor. Next, cut out each piece, pin the pattern onto the fabric, taking into account the seam allowances, and then cut out all the pieces. It remains to sew them sequentially, leaving a hole for the filler in an inconspicuous place. After filling the toy, sew up the hole with a blind stitch.
If the child does not have allergies, flavorings can be added to the filler. If you don't have faux fur or fleece, no problem. Any dense material will do, even if it is patterned. A dog in a flower, checkered or striped looks cute and funny.

For an adult, such a small dog can serve as a pincushion or keychain. Only if you are sewing a keychain, when connecting the parts, insert a loop of fabric into the seam on the back so that a metal ring and chain can be attached to the keychain. A simple pattern of two parts can be used to make a brooch.
Filler in this case, you need quite a bit, just to give a light volume, and it is better to take a fluffy synthetic winterizer or synthetic winterizer, and not holofiber. On one side we sew on a fastener, which can be purchased at a store with needlework supplies. Such a brooch can decorate the clothes of an adult or a child, as well as attach it to a bag.
And especially for you, we have prepared so that you have no doubts about how to choose the right present for friends and family.

If you are into scrapbooking, you can make beautiful crafts for the new year of the dog, using the silhouettes of various breeds given here. Even if the base is similar, the silhouette will make the craft individual. The same silhouettes, having increased them to right size, can be used for applique on fabric, if, for example, you want to make sofa cushions. You can attach the silhouette to the pillowcase using double-sided adhesive fabric or diluted egg white and iron.
After that, overcast the appliqué by hand or on a sewing machine with a zigzag stitch. Yes, and there are a lot of options for needlewomen, depending on what you are fond of. The dog can be made by felting, knitting amigurumi, embroidering or making origami out of paper. Even cylinders from toilet paper and papier-mâché can be used. And if you have the makings of a sculptor - plastic or clay will help you.

And now about the production crafts for the new 2018 year of the dog from felt. The edges of felt parts do not crumble, unlike those made of fabric, but still, if the felt is thin and soft enough, the body of the craft can be sewn with seams inward and turned inside out, just like we did with fabric products.
If your felt is dense enough, and even a decent thickness, we sew the details on the front side. You can lay a regular line, slightly stepping back from the edge, you can sew with a zigzag seam, or you can manually, with a buttonhole seam. At the same time, the seam is not hidden, and can even be emphasized with a contrasting thread. can be varied and original.


